
Form Validation in React
We need to finish creating the validation check to make sure the username is not empty when the mouse cursor moves away from the field. We will need to do a few things to achieve this functionality:
We will need to build a rendering function that displays the list of form errors. We will need to hook the validateUsernameOnBlur() function to validate the username and update the state where appropriate.
The first task is simple enough that we should be able to build it without really needing to update much else, so we will start there.
Exercise 2.05: Creating a Validation for Input Fields
We are still working with the same form that we have been working with this entire chapter. We will continue to iterate on this form now by adding a little more validation for the username field. The list of errors that we have is a relatively simple thing to display; all we need to do is iterate over the list of errors, and then for each of those, we need to just display a simple quick string. React has a little gotcha that we will run into when building out lists of elements dynamically: each individual item requires a separate entry for the key of the item. This allows React to quickly identify each item uniquely and update the DOM representing that item when it changes:
- Write a
displayErrors()function that, given a list of errors from our state, maps over each. You will need to set the key property and determine some way to uniquely identify each element as a value for the key property:displayErrors() { return ( <div className="errors"> {this.state.errors.map((err, i) => <p key={`err-${i}`}>{err}</p>)} </div> ); }We start off with a simple-enough function signature; there are no arguments that we are passing along. Instead, we just have a simple map call where we are passing each error and the index of the iteration. This allows us to set a unique key for each item, which we then render with a simple
<p>tag. - Add the
displayErrors()call to our mainrenderfunction:render() { return ( <div className="App"> Create Account {this.displayErrors()} <hr /> {this.displayForm()} </div> ) } - Recreate
src/App.cssand add a single bit of CSS to it:.errors { color: red; } - Change our
src/App.jsfile to import this CSS file near the top:import "./App.css";
Since we don't want to write multiple validations every single time for each field that needs to be validated to ensure that it's not blank, we will start off by refactoring our code to move the not-empty check into a new function.
- Create a new function to validate whether the field is blank or not:
validateNotEmpty(fieldName, value) {
  if (value.length <= 0) {
    return `${fieldName} must be filled out.`;
  }
 }
We will want to include not just the value that we need to validate, but also the field name to be able to generate the appropriate error message. We check the value supplied to make sure it's not blank, and then if it is, we will return a string back with the appropriate error message.
- Modify our
validateUsernameOnBlur()function call from Exercise 2.04, Using Alternative Class Declarations to Avoid Binds to a new helper function to perform the validation:validateUsernameOnBlur(event) { const username = event.target.value; const errors = this.state.errors; errors.push(this.validateNotEmpty("Username", username)); this.setState({ username, errors }); }The bulk of the function stays the same, but now writing a
validatePasswordOnBlurfunction becomes significantly easier for us. - Copy our
validateUsernameOnBlurfrom the previous step and change username where appropriate to password:validatePasswordOnBlur(event) { const password = event.target.value; const errors = this.state.errors; errors.push(this.validateNotEmpty("Password", password)); this.setState({ password, errors }); } - We will add the constructor again in this step. Use the
bindstatement in the constructor:constructor(props) { super(props); this.state = { username: '', password: '', passwordConfirmation: '', email: '', errors: [] }; this.validateUsernameOnBlur = this.validateUsernameOnBlur.bind(this); this.validatePasswordOnBlur = this.validatePasswordOnBlur.bind(this); } - Change our
renderfunction as well to modify the password field to use this new validation function:displayForm() { return ( <div> Username: <input type="text" onBlur={this.validateUsernameOnBlur} /><br /> Password: <input type="text" onBlur={this.validatePasswordOnBlur} /><br /> Password Confirmation: <input type="text" /><br /> Email: <input type="text" /><br /> <br /> <button onClick={this.submitForm}>Submit</button> </div> ); } - Write our
validateEmailOnBlur()function. The code invalidateEmailOnBlur()is simple enough and follows the same format we have been using:validateEmailOnBlur(event) { const email = event.target.value; const errors = this.state.errors; errors.push(this.validateEmailFormat("Email", email)); this.setState({ email, errors }); } - Split the field's value on a
@character and verify that both sides have at least one character in them:validateEmailFormat(fieldName, value) { let [lhs, rhs] = value.split('@'); lhs = lhs || ''; rhs = rhs || ''; if (lhs.length <= 0 || rhs.length <= 0) { return `${fieldName} must be in a standard email format.`; } } - Modify the email text field in the
displayForm()function:Email: <input type="text" onBlur={this.validateEmailOnBlur} /><br /> - Add validations for our password confirmation to ensure it matches the password by writing a
validatePasswordConfirmationOnBlur()function, adding it torender, and adding the binds for the last two validation functions we wrote. First, let's write thevalidatePasswordConfirmationOnBlur()function:validatePasswordConfirmationOnBlur(event) { const passwordConfirmation = event.target.value; const errors = this.state.errors; if (passwordConfirmation !== this.state.password) { errors.push("Password must match password confirmation."); } this.setState({ passwordConfirmation, errors }); } - Add the call to our new function for
displayForm()to our password confirmation field:Password Confirmation: <input type="text" onBlur={this.validatePasswordConfirmationOnBlur} /><br /> - Finally, make sure all these functions are appropriately bound in our constructor (we have added two of these already, but we will include all four for the sake of completeness):
this.validateUsernameOnBlur = this.validateUsernameOnBlur.bind(this);
this.validatePasswordOnBlur = this.validatePasswordOnBlur.bind(this);
this.validatePasswordConfirmationOnBlur =      this.validatePasswordConfirmationOnBlur.bind(this);
this.validateEmailOnBlur = this.validateEmailOnBlur.bind(this);
Now, when you run through the form and break all the rules we have established here, you should see all of the error messages show up at the top of the form:

Figure 2.13: Form component with the error messages
The great news is that any other event handlers you may want to write along the way are going to hinge on the same rules that you have just learned about here. It is important to become comfortable with writing event listeners and with knowing how and when to bind functions to avoid weird issues as you write more complicated code.
Now that we have explored how to build React event handlers and to dynamically modify what we are rendering; we need to put it into practice the concepts we have learned so far.
Activity 2.01: Create a Blog Post Using React Event Handlers
In this activity, we are going to build out an application that keeps track of the number of characters entered into a text area. This will require us to hook into a new event that we have not used yet and change the text and element rendered to the page to display the total length of the field. Specifically, we are going to make a text area that, unless the user has entered at least 100 characters, will not allow you to submit the form and post the text.
Here, we will build a new React application with Create React App and then build a text area, adding the length of the field next to it:
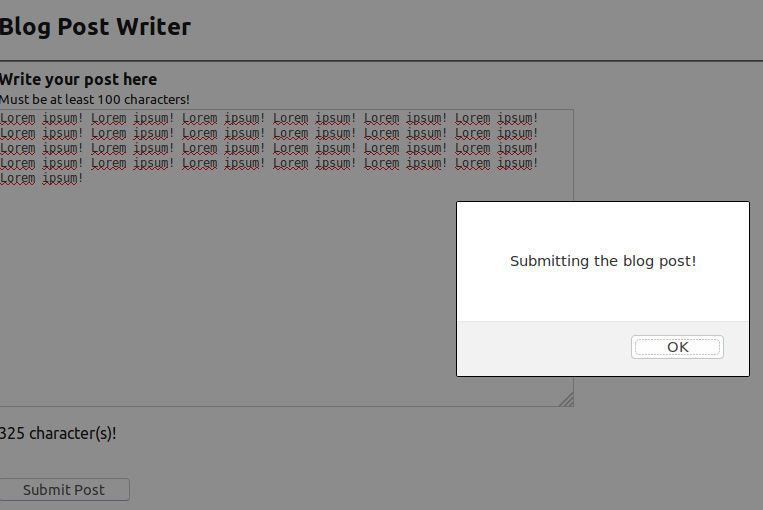
Figure 2.14: Blog Post
The following steps will help to complete the activity:
- Create your project, called
fieldlength, via the Create React App CLI. - Delete all the unnecessary files for our project.
- Build the
AppReact component as a class component but leave it blank. - Give the component an initial state with a single element in the state; this will store the input from the
textarea. - Add a
textareato the component. - Add a function that will act as the event handler. This function will need to accept an event as an argument and should update the state of the component by setting the input from the
textarea. Add this to thetextarea. - The event handler you need to use here is up to you; if you need a hint, look for one that can react to changes to your form or input to the form.
- Add a function that will return
Ncharacters, wrapped inside JSX, whereNis the length of the input in thetextarea. - Add the function above to the display of your component.
- Add a
submitbutton to make the app look like a blog post editor. - Include some instructions for the user that the post must be
100characters. - Write a validation function to monitor the length of the field.
Hint: Try to use a callback with
setStatefor the best results. - Create an alert box to visually notify the user before submitting a blog post.
- Verify that as you type text into the
textarea; the display is now updated.Note
The solution for this activity can be found on page 609.