

So far, we are aware of PowerShell formatting the output of the commands that we execute, but we haven't spent any time on the particular ways that the output is formatted. That changes in this chapter. Now, we will learn all about the PowerShell formatting system and how we can take advantage of it. The topics covered in this chapter include the following:
- When does formatting occur?
- The rules of automatic formatting
- The cmdlets that control formatting
- The dangers of formatting
- The best practices of formatting
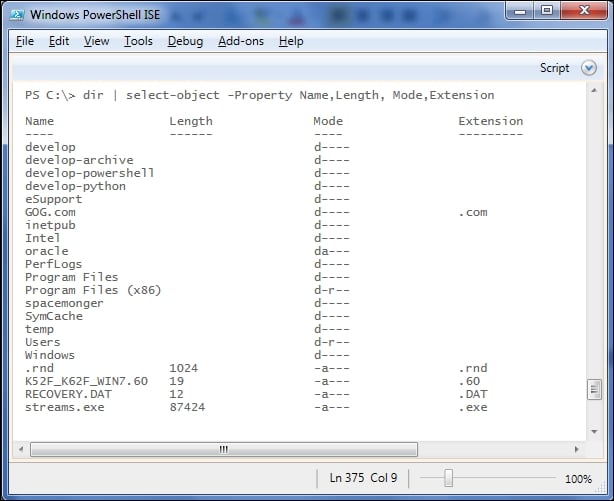
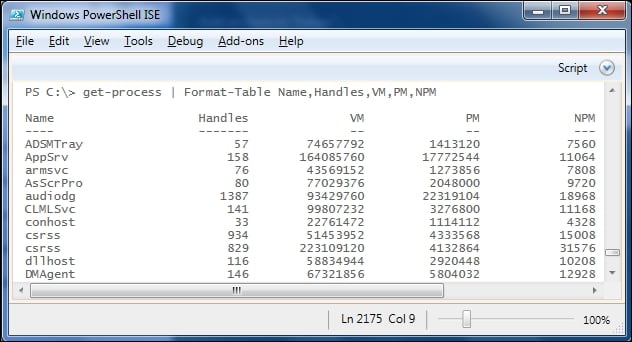
The first thing to understand about PowerShell formatting is that the host you are in always formats the output. Remember that the host is the application (for example, the PowerShell console or the ISE) that is running the PowerShell engine and executing the commands that you enter. Since we know that cmdlets always output objects, the presence of some kind of formatting system is clear when we look at the output of a cmdlet such as dir (or Get-ChildItem):
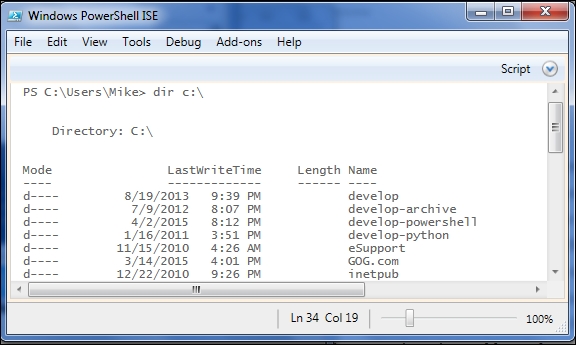
Somehow, certain properties are displayed and others are hidden. In this output, we can even see that the objects are grouped by a particular property (PSParentPath) by the display of Directory: C:\ at the top.
When the host executes a pipeline (and any line of code is a pipeline), it appends the Out-Default cmdlet to the end of the pipeline. The Out-Default cmdlet's job is to send the objects to the default formatter. The default formatter follows a set of rules to convert the output objects into special formatting objects. The host knows how to output the formatting objects, so you can see the formatted data. The trick to formatting in PowerShell is to know the rules.
PowerShell formatting is somewhat complex and can be confusing at first. In fact, there are only a few basic rules:
In $PSHOME, there are files whose names end with format.ps1xml. These files are XML files that specify the default formatting specifications for many of the types of objects that you will work with in PowerShell. These files are loaded by the host when the PowerShell session starts. If you write your own format files, you can load them using the Update-FormatData cmdlet. The details of writing your own format files are beyond the scope of Module 1, but a quick read through the FileSystem.Format.ps1xml file will make some things clear:
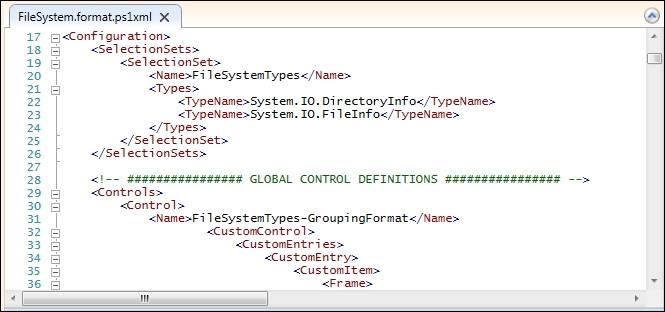
In this file, first, we can see that the formatting is selected by the objects of the System.IO.DirectoryInfo and System.IO.FileInfo types. Second, the first view specified is grouped by PSParentPath and we can see the properties listed (Mode, LastWriteTime, Length, and Name) in the table format. These two observations match what we see, when we execute the Get-ChildItem cmdlet against a file system path.
Knowing that the type of objects are matched against the formatting specified in the files is part of the equation. The next thing to know is that PowerShell relies on the first object in the pipeline to determine what formatting to apply. If subsequent objects don't "fit" in that format, PowerShell will revert to a list display, listing the property names and values separated by a colon. To illustrate this, we can join two different pipelines together using a semicolon. This will cause the output of both pipelines to be treated as if they were from the same pipeline. The first part of the pipeline is outputting the first item in the root of C: and the second is outputting the first process:
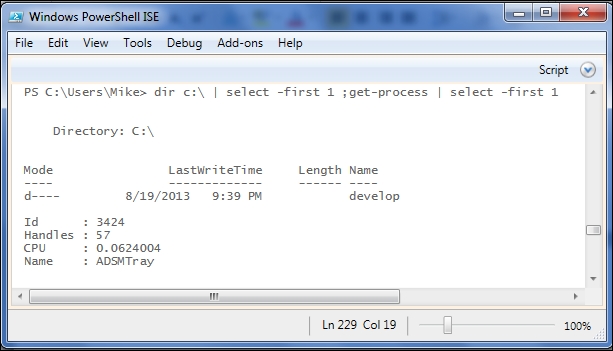
The pipeline we executed outputted a single DirectoryInfo object as well as a process object. PowerShell selected the default, tabular view for the DirectoryInfo object, but the Process object doesn't fit in this format. Thus, the Process object was formatted in a generic way, listing the properties one per line.
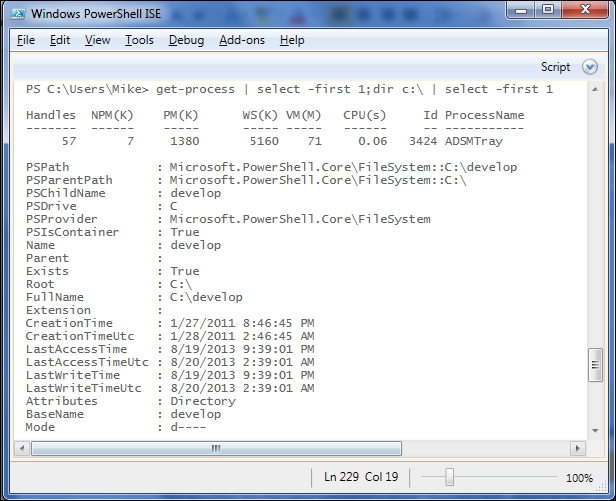
If we reverse the pipeline, we'll see that the Process object gets its specified format and the DirectoryInfo object is generically treated:
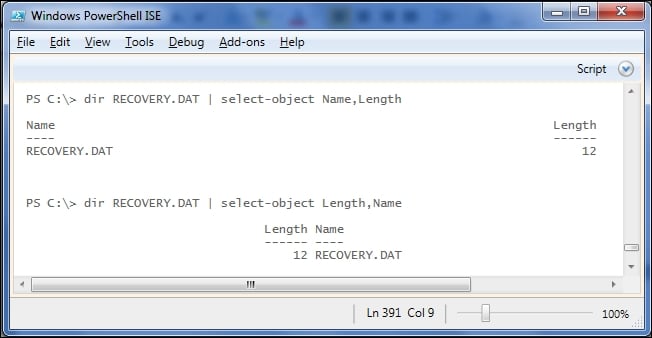
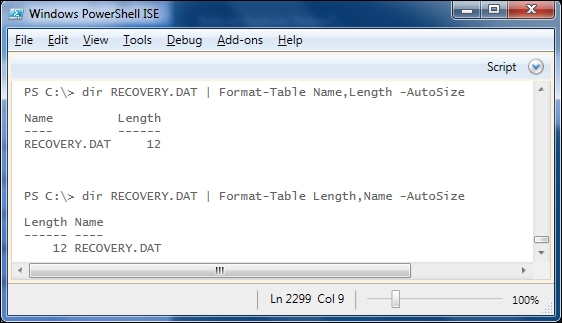
Another thing that can be confusing is that if we use Select-Object to limit the properties output, the resulting object is no longer of the original type. For example, we execute the following:
Dir | Select-Object –Property Name,Length
Here, we would no longer be outputting the System.IO.FileInfo and System.IO.DirectoryInfo objects, but the Selected.System.IO.FileInfo and Selected.System.IO.DirectoryInfo objects. These new objects would not be selected by the same format files, because the type is different.
If the objects being formatted don't match a format file, one of the rules of formatting says that small objects with four or less properties are formatted as a table. We can verify this using Select-Object as mentioned in the last section to create new objects that don't match the existing format file:
As expected, not only do we avoid the grouped format that we saw before for Dir output, but we also got the data in a table since there were only four properties.
Sometimes, we find that the table format that is generated doesn't look very nice. The engine divides the line evenly into the number of columns that are required. It also formats each column according to the type of data in the properties of the first object, left-aligning strings and right-aligning numbers. Look at the output of the two commands in the following screenshot, and you will see that the spacing of both of the tables is looking somewhat ridiculous. We'll see later in the chapter what we can do to improve this situation, but for now, we just need to be aware that sometimes default formatting is less than perfect:
Another issue with formatting in a table is that sometimes the properties don't fit very well in the columns. When this happens, PowerShell will truncate the value and end the display with an ellipsis (...):

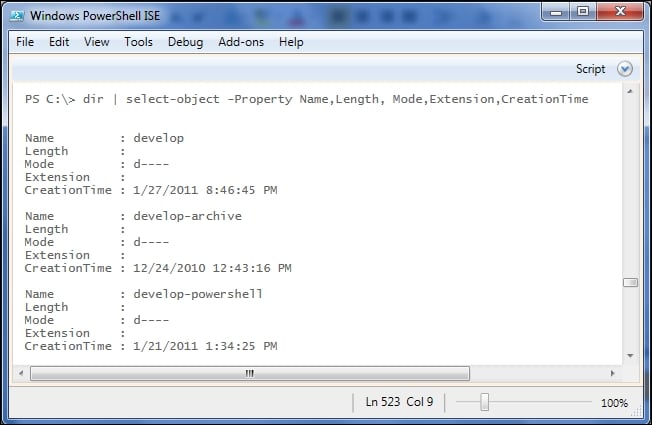
Objects that are larger than four properties are placed into what PowerShell calls a list format, placing each property of each object in a separate line, and separating the property name from the property value with a colon. We saw this format earlier when an object did not fit in the format selected by the first object in the pipeline.
Continuing the examples using Dir, we can see this format in action. Adding a fifth property to the Select-Object cmdlet causes the output to be formatted as a list:
List formats can seem cleaner than tabular formats because there is less room for issues with column widths and left and right justification. On the other hand, the output is spread over a lot more lines and is harder to scan visually.
Tip
Since default formats can cause properties to be omitted from the output, it is often convenient to use Select-Object to create new "Selected" objects that skip these formats. To see all the properties, you can use a wildcard (such as *) to match everything.
Try this, for example: Dir | Select-Object –Property *
Formatting files
In $PSHOME, there are files whose names end with format.ps1xml. These files are XML files that specify the default formatting specifications for many of the types of objects that you will work with in PowerShell. These files are loaded by the host when the PowerShell session starts. If you write your own format files, you can load them using the Update-FormatData cmdlet. The details of writing your own format files are beyond the scope of Module 1, but a quick read through the FileSystem.Format.ps1xml file will make some things clear:
In this file, first, we can see that the formatting is selected by the objects of the System.IO.DirectoryInfo and System.IO.FileInfo types. Second, the first view specified is grouped by PSParentPath and we can see the properties listed (Mode, LastWriteTime, Length, and Name) in the table format. These two observations match what we see, when we execute the Get-ChildItem cmdlet against a file system path.
Knowing that the type of objects are matched against the formatting specified in the files is part of the equation. The next thing to know is that PowerShell relies on the first object in the pipeline to determine what formatting to apply. If subsequent objects don't "fit" in that format, PowerShell will revert to a list display, listing the property names and values separated by a colon. To illustrate this, we can join two different pipelines together using a semicolon. This will cause the output of both pipelines to be treated as if they were from the same pipeline. The first part of the pipeline is outputting the first item in the root of C: and the second is outputting the first process:
The pipeline we executed outputted a single DirectoryInfo object as well as a process object. PowerShell selected the default, tabular view for the DirectoryInfo object, but the Process object doesn't fit in this format. Thus, the Process object was formatted in a generic way, listing the properties one per line.
If we reverse the pipeline, we'll see that the Process object gets its specified format and the DirectoryInfo object is generically treated:
Another thing that can be confusing is that if we use Select-Object to limit the properties output, the resulting object is no longer of the original type. For example, we execute the following:
Dir | Select-Object –Property Name,Length
Here, we would no longer be outputting the System.IO.FileInfo and System.IO.DirectoryInfo objects, but the Selected.System.IO.FileInfo and Selected.System.IO.DirectoryInfo objects. These new objects would not be selected by the same format files, because the type is different.
If the objects being formatted don't match a format file, one of the rules of formatting says that small objects with four or less properties are formatted as a table. We can verify this using Select-Object as mentioned in the last section to create new objects that don't match the existing format file:
As expected, not only do we avoid the grouped format that we saw before for Dir output, but we also got the data in a table since there were only four properties.
Sometimes, we find that the table format that is generated doesn't look very nice. The engine divides the line evenly into the number of columns that are required. It also formats each column according to the type of data in the properties of the first object, left-aligning strings and right-aligning numbers. Look at the output of the two commands in the following screenshot, and you will see that the spacing of both of the tables is looking somewhat ridiculous. We'll see later in the chapter what we can do to improve this situation, but for now, we just need to be aware that sometimes default formatting is less than perfect:
Another issue with formatting in a table is that sometimes the properties don't fit very well in the columns. When this happens, PowerShell will truncate the value and end the display with an ellipsis (...):
Objects that are larger than four properties are placed into what PowerShell calls a list format, placing each property of each object in a separate line, and separating the property name from the property value with a colon. We saw this format earlier when an object did not fit in the format selected by the first object in the pipeline.
Continuing the examples using Dir, we can see this format in action. Adding a fifth property to the Select-Object cmdlet causes the output to be formatted as a list:
List formats can seem cleaner than tabular formats because there is less room for issues with column widths and left and right justification. On the other hand, the output is spread over a lot more lines and is harder to scan visually.
Tip
Since default formats can cause properties to be omitted from the output, it is often convenient to use Select-Object to create new "Selected" objects that skip these formats. To see all the properties, you can use a wildcard (such as *) to match everything.
Try this, for example: Dir | Select-Object –Property *
Formatting decisions are based on the first object
Knowing that the type of objects are matched against the formatting specified in the files is part of the equation. The next thing to know is that PowerShell relies on the first object in the pipeline to determine what formatting to apply. If subsequent objects don't "fit" in that format, PowerShell will revert to a list display, listing the property names and values separated by a colon. To illustrate this, we can join two different pipelines together using a semicolon. This will cause the output of both pipelines to be treated as if they were from the same pipeline. The first part of the pipeline is outputting the first item in the root of C: and the second is outputting the first process:
The pipeline we executed outputted a single DirectoryInfo object as well as a process object. PowerShell selected the default, tabular view for the DirectoryInfo object, but the Process object doesn't fit in this format. Thus, the Process object was formatted in a generic way, listing the properties one per line.
If we reverse the pipeline, we'll see that the Process object gets its specified format and the DirectoryInfo object is generically treated:
Another thing that can be confusing is that if we use Select-Object to limit the properties output, the resulting object is no longer of the original type. For example, we execute the following:
Dir | Select-Object –Property Name,Length
Here, we would no longer be outputting the System.IO.FileInfo and System.IO.DirectoryInfo objects, but the Selected.System.IO.FileInfo and Selected.System.IO.DirectoryInfo objects. These new objects would not be selected by the same format files, because the type is different.
If the objects being formatted don't match a format file, one of the rules of formatting says that small objects with four or less properties are formatted as a table. We can verify this using Select-Object as mentioned in the last section to create new objects that don't match the existing format file:
As expected, not only do we avoid the grouped format that we saw before for Dir output, but we also got the data in a table since there were only four properties.
Sometimes, we find that the table format that is generated doesn't look very nice. The engine divides the line evenly into the number of columns that are required. It also formats each column according to the type of data in the properties of the first object, left-aligning strings and right-aligning numbers. Look at the output of the two commands in the following screenshot, and you will see that the spacing of both of the tables is looking somewhat ridiculous. We'll see later in the chapter what we can do to improve this situation, but for now, we just need to be aware that sometimes default formatting is less than perfect:
Another issue with formatting in a table is that sometimes the properties don't fit very well in the columns. When this happens, PowerShell will truncate the value and end the display with an ellipsis (...):
Objects that are larger than four properties are placed into what PowerShell calls a list format, placing each property of each object in a separate line, and separating the property name from the property value with a colon. We saw this format earlier when an object did not fit in the format selected by the first object in the pipeline.
Continuing the examples using Dir, we can see this format in action. Adding a fifth property to the Select-Object cmdlet causes the output to be formatted as a list:
List formats can seem cleaner than tabular formats because there is less room for issues with column widths and left and right justification. On the other hand, the output is spread over a lot more lines and is harder to scan visually.
Tip
Since default formats can cause properties to be omitted from the output, it is often convenient to use Select-Object to create new "Selected" objects that skip these formats. To see all the properties, you can use a wildcard (such as *) to match everything.
Try this, for example: Dir | Select-Object –Property *
Small objects go in a table
If the objects being formatted don't match a format file, one of the rules of formatting says that small objects with four or less properties are formatted as a table. We can verify this using Select-Object as mentioned in the last section to create new objects that don't match the existing format file:
As expected, not only do we avoid the grouped format that we saw before for Dir output, but we also got the data in a table since there were only four properties.
Sometimes, we find that the table format that is generated doesn't look very nice. The engine divides the line evenly into the number of columns that are required. It also formats each column according to the type of data in the properties of the first object, left-aligning strings and right-aligning numbers. Look at the output of the two commands in the following screenshot, and you will see that the spacing of both of the tables is looking somewhat ridiculous. We'll see later in the chapter what we can do to improve this situation, but for now, we just need to be aware that sometimes default formatting is less than perfect:
Another issue with formatting in a table is that sometimes the properties don't fit very well in the columns. When this happens, PowerShell will truncate the value and end the display with an ellipsis (...):
Objects that are larger than four properties are placed into what PowerShell calls a list format, placing each property of each object in a separate line, and separating the property name from the property value with a colon. We saw this format earlier when an object did not fit in the format selected by the first object in the pipeline.
Continuing the examples using Dir, we can see this format in action. Adding a fifth property to the Select-Object cmdlet causes the output to be formatted as a list:
List formats can seem cleaner than tabular formats because there is less room for issues with column widths and left and right justification. On the other hand, the output is spread over a lot more lines and is harder to scan visually.
Tip
Since default formats can cause properties to be omitted from the output, it is often convenient to use Select-Object to create new "Selected" objects that skip these formats. To see all the properties, you can use a wildcard (such as *) to match everything.
Try this, for example: Dir | Select-Object –Property *
Large objects go in a list
Objects that are larger than four properties are placed into what PowerShell calls a list format, placing each property of each object in a separate line, and separating the property name from the property value with a colon. We saw this format earlier when an object did not fit in the format selected by the first object in the pipeline.
Continuing the examples using Dir, we can see this format in action. Adding a fifth property to the Select-Object cmdlet causes the output to be formatted as a list:
List formats can seem cleaner than tabular formats because there is less room for issues with column widths and left and right justification. On the other hand, the output is spread over a lot more lines and is harder to scan visually.
Tip
Since default formats can cause properties to be omitted from the output, it is often convenient to use Select-Object to create new "Selected" objects that skip these formats. To see all the properties, you can use a wildcard (such as *) to match everything.
Try this, for example: Dir | Select-Object –Property *
The rules in the previous section covered all the output where we haven't specifically told PowerShell how to format. What is nice here is that the default formats for many of the types that are commonly encountered in PowerShell do a good job of displaying the most often used properties, and the rules to format other objects are also, generally, very appropriate. But in some circumstances, we want to have more control over the output, and it's no surprise that PowerShell provides cmdlets for this purpose.
The two most commonly used formatting cmdlets are Format-Table and Format-List. As their names suggest, they force the formatting system to use either a table or a list format for the objects, irrespective of the number of properties or the type-related formatting files that might be present. Each of the cmdlets has a –Property parameter that takes a list of properties to be included. A couple of quick examples should make the basic usage clear.
First, we can use Format-List with the long property value example we saw earlier, which led to an unusable table, to see how this would look like as a list:
Clearly, the output makes a lot more sense as a list.
Also, we can use Format-Table to output a series of objects that would, normally, have been formatted as a list because they have more than four properties. Since we know the properties in this case are numeric, formatting as a table is reasonable:
In this case, we still have some open spaces, so we can utilize the –AutoSize switch parameter to improve the output format even more. AutoSize tells the formatting system to look at all the values in all the columns before deciding on the column sizes (instead of dividing the line evenly):

If the number of objects is not very high, using AutoSize can make the tables much nicer to look at. The –AutoSize switch will also help the awkward looking tables, which we saw with two columns, either at the margins or crowded at the center of the page:
Format-Table and Format-List
The two most commonly used formatting cmdlets are Format-Table and Format-List. As their names suggest, they force the formatting system to use either a table or a list format for the objects, irrespective of the number of properties or the type-related formatting files that might be present. Each of the cmdlets has a –Property parameter that takes a list of properties to be included. A couple of quick examples should make the basic usage clear.
First, we can use Format-List with the long property value example we saw earlier, which led to an unusable table, to see how this would look like as a list:
Clearly, the output makes a lot more sense as a list.
Also, we can use Format-Table to output a series of objects that would, normally, have been formatted as a list because they have more than four properties. Since we know the properties in this case are numeric, formatting as a table is reasonable:
In this case, we still have some open spaces, so we can utilize the –AutoSize switch parameter to improve the output format even more. AutoSize tells the formatting system to look at all the values in all the columns before deciding on the column sizes (instead of dividing the line evenly):
If the number of objects is not very high, using AutoSize can make the tables much nicer to look at. The –AutoSize switch will also help the awkward looking tables, which we saw with two columns, either at the margins or crowded at the center of the page:
The automatic formatting of objects makes the PowerShell experience much more comfortable. Seeing familiar looking output and commonly used properties is a great aid to productivity. However, formatting comes with a price. Simply put, formatted objects are not able to be used like the original objects were. For instance, once objects are formatted, there is no way to sort or filter them based on properties. Formatting can be compared with taking pictures of the objects. The picture looks similar to the objects, but are not the actual objects. The only thing that can be done with the formatted objects is to output them somewhere. As mentioned earlier, the Out-Default cmdlet sends them to the console. Additionally, the Out-File, Out-Printer, and Out-String cmdlets send the output (obviously) to a file, printer, and string.
Attempting to use the formatted objects in the same way that we've grown accustomed to using objects, fails miserably, as seen from the following screenshot:
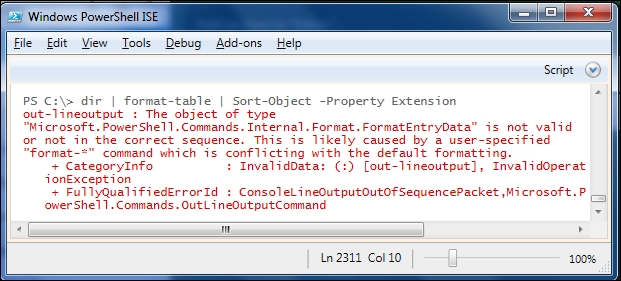
Since formatting objects leads to objects that can no longer be manipulated, it is a best practice to avoid formatting anything that you want to be able to manipulate. This seems obvious, but it is easy to get wrong. We will talk about this best practice at length in the chapters covering Scripts and Functions.
In this chapter, we have walked through the PowerShell formatting system. We saw that PowerShell hosts use Out-Default to cause formatting to happen to all the output. We looked at the rules to format objects, when no explicit formatting instructions are included, as well as the cmdlets to tell PowerShell exactly how we want objects to be formatted. Finally, we discovered that formatting is something of a destructive operation, in which the original objects are no longer available after the formatting has occurred.
In the next chapter, we will take our first steps towards packaging sequences of commands for reuse in scripts.