
Now that we have learned some useful commands, it would be nice to be able to record a sequence of commands, so that we can execute them all at once. In this chapter, we will learn how to accomplish this with scripts. We will also cover the following topics:
- Execution policies
- Adding parameters to scripts
- Control structures
- Profiles
Saving commands in a file for reuse is a pretty simple idea. In PowerShell, the simplest kind of these files is called a script and it uses the .ps1 extension, no matter what version of PowerShell you're using. For example, if you wanted to create a new folder, under c:\temp, with the current date as the name and then change to that folder, you could put these commands in a file:

Note that I'm using the top portion of the ISE to edit the file contents and I have saved the file as dateFolder.ps1 in the c:\temp folder. To run the script, you can simply type the name of the file at prompt as follows (in the bottom portion of the ISE):
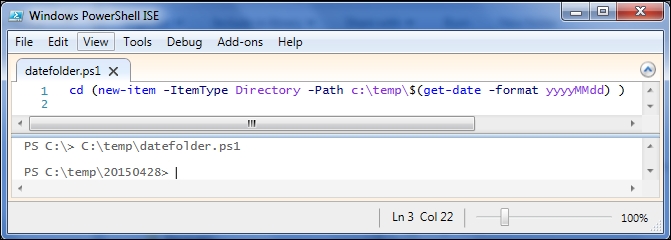
If you have the file loaded in the ISE, you can also use the Run button on the toolbar to run the current file.
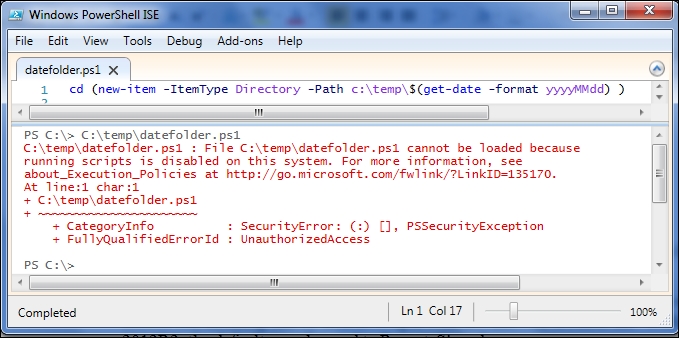
It's possible that when you try to run this script, you will receive an error complaining about the execution policy, instead of seeing the current path being set to a new folder. To understand why this would have happened, we need to discuss the concept of execution policies.
Execution policy is a safety feature in PowerShell that enables the system to control which scripts are able to be run. I say safety instead of security because execution policy is trivial to circumvent. Execution policy are more like the safety of a gun, which prevents accidental discharge of the weapon. An execution policy is an attempt to prevent users from accidentally executing scripts.
Possible execution policy values include the following:
- Restricted
- AllSigned
- RemoteSigned
- Unrestricted
The Restricted setting means that the scripts cannot be run at all. AllSigned means that all scripts must be digitally signed to run. Unrestricted says that any script will run. RemoteSigned is a middle-ground setting that says that any local scripts will run, but scripts from remote sources (like the Internet or untrusted UNC paths) need to be digitally signed.
Prior to Windows Server 2012R2, the default execution policy for all systems was Restricted, meaning that by default scripts were not allowed to run at all. With Server 2012R2, the default was changed to RemoteSigned.
Attempting to run a script when the execution policy does not permit it, results in an error such as the following:
To see what your current execution policy is set to, use the Get-ExecutionPolicy cmdlet. To set the execution policy, you would use the Set-ExecutionPolicy cmdlet.
The following figure shows the results of running the script after the execution policy has been set to an appropriate level:
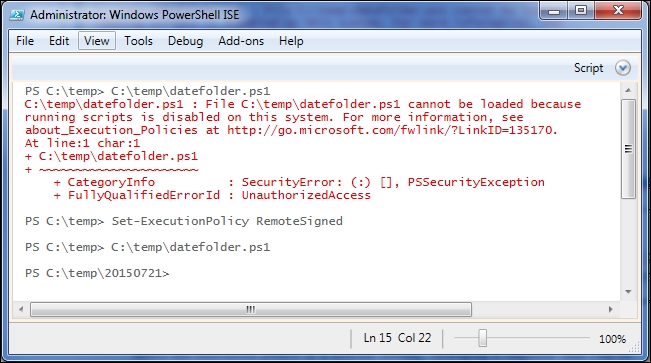
In my experience, the RemoteSigned setting is most practical. However, in a secure environment such as a production data center, I can easily see that using an AllSigned policy could make sense.
The PowerShell community often distinguishes between two different kinds of scripts. Some scripts, called controller scripts, call other cmdlets, scripts, and functions to complete a process. Controller scripts sometimes do more than one thing, but they are not meant for reuse, except perhaps as a step in a larger controller script. You might expect to find a controller script scheduled to run in the task scheduler. Tool scripts, on the other hand, are more focused, perform a single action, and are intended specifically to be reused. A tool script would never run on its own, let alone be scheduled. There aren't any technical differences between the two kinds of scripts, but there are things that would be considered best practices for one type that wouldn't be appropriate for the other. I find the distinction between the tools and controllers useful. When you write a script, think about whether it is a standalone process (controller), or it is something that you will use as a component in solving problems (tool).
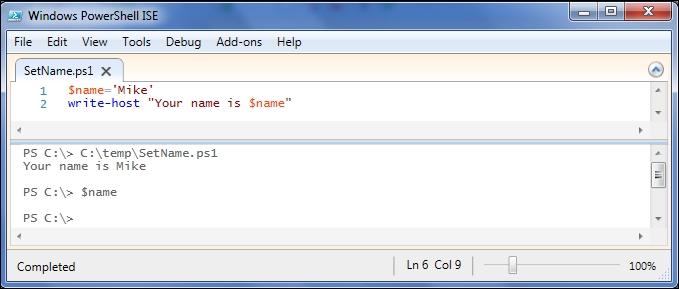
When you run a script, the PowerShell engine creates what is called a scope for the execution. If your script creates or modifies variables or functions (which we will discuss in later chapters), these changes will be created in the script's scope and will be removed at the end of the execution of the script. In the next chapter on PowerShell functions, we will see an important consequence of this, but for now we should just know that the things that are done in the script don't leave the script. As an example, here is a script that sets a variable to my name and outputs the variable to verify that it was correctly set. After executing the script, checking the variable shows that it is no longer set:
If we need the things in the script to remain after its execution, PowerShell provides the ability to dot-source the file rather than just executing it. Dot-sourcing means to execute something, but to do it in the current scope and not create a child scope for it. The effect of dot-sourcing a script is the same as executing the commands in the script at the command-line—that is, all the effects of the script remain. To dot-source something, you use a period (a dot) and then a space, and then the name of the script.
If we dot-source the script from the previous example (instead of simply executing it), we can see that the $name variable retains the value that was set in the script:

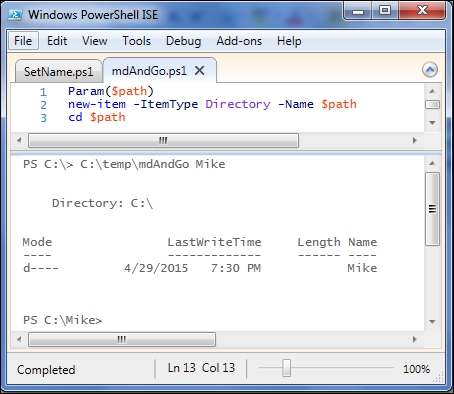
Executing a series of commands can be useful, but often you will want to execute the scripts and also provide some input—specific details about the execution of the script. One way to do this is to use parameters. Parameters are a way for you to provide the values that you want to be used in a script at execution time. For example, you might find that when you create a new directory, you immediately want to change to that directory. We started the chapter with a similar script that created a folder named with the current date, but because the script determined the folder name, we didn't need to provide any input. For this script, we don't know when we write the script what the name of the folder should be, but we will when we run it.
Parameters for scripts are specified in a Param() statement at the beginning of the script. The names of the parameters are variables and start with a dollar sign ($). You aren't limited to a single parameter, either. You can include multiple parameters, separating them with commas. We will spend a lot more time talking about parameters when we talk about functions, but the following screenshot should illustrate how to use parameters in scripts:
PowerShell would not be very useful if scripts were limited to running one command after another without any logic. As expected from a modern language, PowerShell includes a full complement of control structures to allow you to vary the execution in just about any way you'd like. We will briefly introduce the most common control structures.
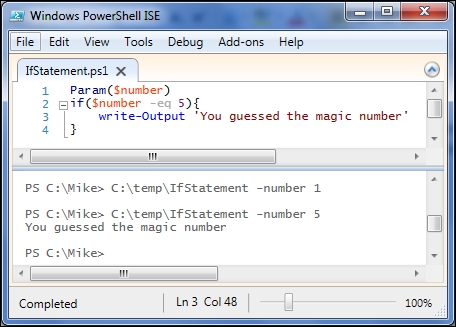
The most simple logic statement is the If statement. The If statement allows you to have some code executed, if and only if a particular condition is met. In its simplest form, the If statement includes a condition in parentheses and a scriptblock to be executed when the condition is true:
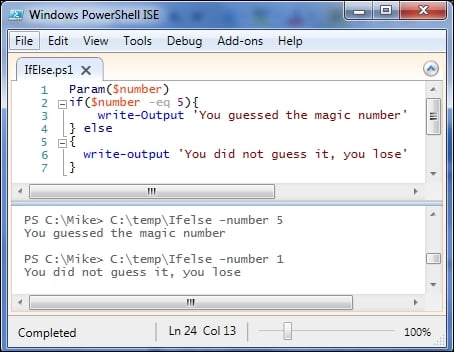
If there is another condition that should be executed if the first condition is false, you can include an Else clause:
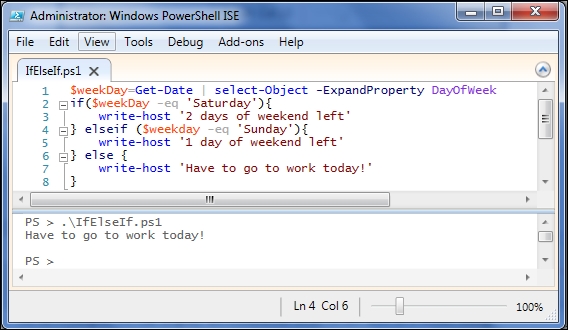
If you have multiple conditions to test, there is an ElseIf clause as well. Here's an example of its use:
The most common way to loop in PowerShell is the ForEach statement. ForEach causes a scriptblock to be executed for each item in a collection. The ForEach statement lets you name the placeholder that is used to refer to the individual items in the collection. The syntax for the ForEach statement looks as follows:
ForEach ($placeholder in $collection){
#Code goes here
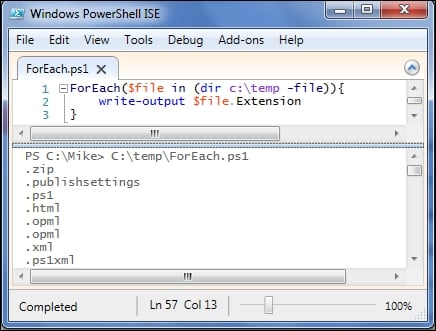
}As an example, we can display the extensions of all of the files in a folder using ForEach:
If you remember from Chapter 4, Life on the Assembly Line there is also a ForEach-Object cmdlet that works in a pipeline and executes a scriptblock for each item in the pipeline. To make things even more confusing, ForEach-Object has an alias called ForEach. It's easy to get confused between the ForEach statement and the ForEach-Object cmdlet, but remember that the ForEach statement does not work in a pipeline and lets you name the placeholder, so if it's in a pipeline, it has to be the ForEach-Object cmdlet.
There are other statements that can be used to structure scripts, but If and ForEach are by far the most common. If you need to use others, they are well documented in PowerShell's awesome help content.
For quick reference, some of the other statements include the following:
Conditional logic (IF)
The most simple logic statement is the If statement. The If statement allows you to have some code executed, if and only if a particular condition is met. In its simplest form, the If statement includes a condition in parentheses and a scriptblock to be executed when the condition is true:
If there is another condition that should be executed if the first condition is false, you can include an Else clause:
If you have multiple conditions to test, there is an ElseIf clause as well. Here's an example of its use:
The most common way to loop in PowerShell is the ForEach statement. ForEach causes a scriptblock to be executed for each item in a collection. The ForEach statement lets you name the placeholder that is used to refer to the individual items in the collection. The syntax for the ForEach statement looks as follows:
ForEach ($placeholder in $collection){
  #Code goes here
}
As an example, we can display the extensions of all of the files in a folder using ForEach:
If you remember from Chapter 4, Life on the Assembly Line there is also a ForEach-Object cmdlet that works in a pipeline and executes a scriptblock for each item in the pipeline. To make things even more confusing, ForEach-Object has an alias called ForEach. It's easy to get confused between the ForEach statement and the ForEach-Object cmdlet, but remember that the ForEach statement does not work in a pipeline and lets you name the placeholder, so if it's in a pipeline, it has to be the ForEach-Object cmdlet.
There are other statements that can be used to structure scripts, but If and ForEach are by far the most common. If you need to use others, they are well documented in PowerShell's awesome help content.
For quick reference, some of the other statements include the following:
Looping logic
The most common way to loop in PowerShell is the ForEach statement. ForEach causes a scriptblock to be executed for each item in a collection. The ForEach statement lets you name the placeholder that is used to refer to the individual items in the collection. The syntax for the ForEach statement looks as follows:
ForEach ($placeholder in $collection){
  #Code goes here
}
As an example, we can display the extensions of all of the files in a folder using ForEach:
If you remember from Chapter 4, Life on the Assembly Line there is also a ForEach-Object cmdlet that works in a pipeline and executes a scriptblock for each item in the pipeline. To make things even more confusing, ForEach-Object has an alias called ForEach. It's easy to get confused between the ForEach statement and the ForEach-Object cmdlet, but remember that the ForEach statement does not work in a pipeline and lets you name the placeholder, so if it's in a pipeline, it has to be the ForEach-Object cmdlet.
There are other statements that can be used to structure scripts, but If and ForEach are by far the most common. If you need to use others, they are well documented in PowerShell's awesome help content.
For quick reference, some of the other statements include the following:
More logic
There are other statements that can be used to structure scripts, but If and ForEach are by far the most common. If you need to use others, they are well documented in PowerShell's awesome help content.
For quick reference, some of the other statements include the following:
Profiles are special scripts that PowerShell hosts run automatically when they start a new session. Each host looks in four different locations for profile scripts, running any of them that it finds. To find where these locations are, for the host you're in, look at the $profile automatic variable:
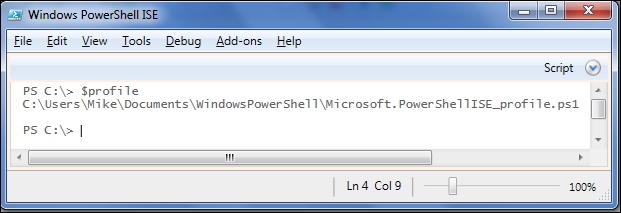
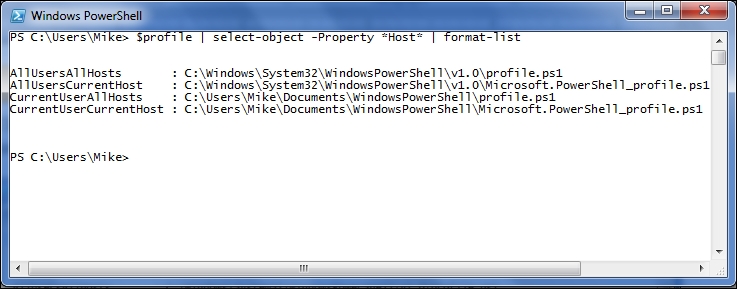
The first thing you'll notice is that there's only one path listed. To see all of them, you have to look at the extra properties that have been spliced onto $profile:
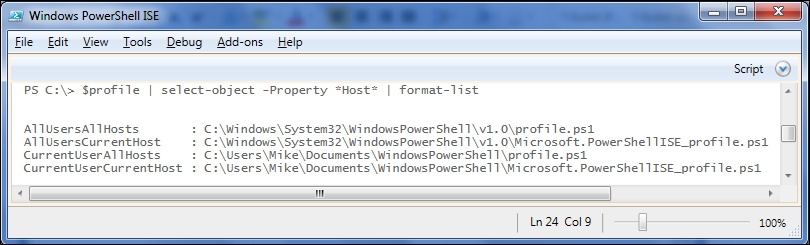
The names of these properties should give you a good idea when each of them is used. The AllHosts profiles are used by all the hosts. The AllUsers profiles are used by all the users. The CurrentHost profiles are used by the host you're in (console or ISE). The CurrentUser profiles are specific to the user running this PowerShell session. It might be helpful to see the output of the same command from the PowerShell console instead of the ISE. The AllHosts profiles are the same, but the CurrentHost profiles are different, specific to that host.
You can put any code you want in your profile. At this point in Module 1, we don't have a lot of things that would be useful, but we could at least change the directory to a more useful location than $PSHome. Since profiles are scripts, they are subject to the execution policy limitations. This means if your execution policy is still set to Restricted, the host won't be able to run your profile script, even if it is in the right place. Similarly, if your execution policy is AllSigned, you would need to digitally sign your profile scripts.
Scripts offer a useful way to combine commands and reuse them later. In this chapter, we saw how to create and execute scripts. We learned about using parameters to make scripts more flexible and how to incorporate logic into a script using a few control structures.
In the next chapter, we will look at another way to package code for reuse: namely, functions.
Get-Help about_scriptsGet-Help about_execution_policiesGet-Help Set-ExecutionPolicyGet-Help about_scopesGet-Help about_parametersGet-Help about_profilesGet-Help about_ifGet-Help about_foreachGet-Help about_switchGet-Help about_doGet-Help about_whileGet-Help about_switchGet-Help about_forGet-Help about_breakGet-Help about_continue