

The development environment is accessed from within the Windows AX client, which is also referred to as the MorphX IDE. It opens a new application window, tailored specifically for development. This environment is still the AX client, and forms can be opened and code executed as if it were opened from the main client window.
The quickest way is through keyboard shortcuts:
Ctrl + D: This opens the IDE, with the Application Object Tree (AOT) open.
Ctrl + Shift + P: This opens the development environment, with the Projects window open.
Ctrl + Shift + W: This performs an action equivalent to Ctrl + D.
The development environment is structured into the following main components:
Title bar: This tells us which server the client is connected to.
Main menu: This is a classic MDI menu that runs across the top of the window. There are customization options for some parts of its structure.
Content area: This contains the AOT, Projects window, and code editing windows.
Properties: This shows the properties of the selected element. It floats when opened for the first time, but is usually docked to the right.
Compiler output: This appears when an object is compiled. It is docked at the bottom by default, but can be made to float. It can occupy some of the valuable content area.
Status bar: This is configurable through your user options. The most important information shown here is about the company, layer, and current model.
The typical centerpiece of the IDE is the AOT. This contains the entire application code of AX. The following screenshot shows a tree view, which is organized by object type:

The button ribbon at the top of the window is context sensitive to the selected node, and in sequence, they are as follows:
 Open: This will open the selected object, such as a form. It is actually an execute action. So, for a table, it will open the table browser, and for a class, it will try to execute if it contains a static
 Mainmethod. Properties: This will open the property sheet. This action can also be done by pressing Alt + Enter.
 Save all: This will save all unsaved elements. This action can also be done by pressing Ctrl + Shift + S.
 Import: This will open the XPO import dialog, allowing code to be imported into the system.
 Compile: This will compile the selected object or node. If a node is selected, this button compiles all objects within that node. This action can also be done by hitting the F7 key.
Note
If we click on the compile icon while the AOT node is selected, the entire system is recompiled. This can take over an hour to complete.
To navigate around the AOT, you can use the mouse, but the most efficient method is to use the keyboard. The AOT behaves intuitively, that is, the right arrow key will expand a node and the left arrow key will collapse. Partially typing an object name will move to that object. For example, to navigate to the table named CustTable from the AOT node, perform the following steps:
Press the right or down arrow key. This will move to the first node, called
Data Dictionary, under the AOT.Press the right arrow key again to expand this node.
Press the right arrow key again to move down to the first node,
Tables.Expand the
Tablesnode with the right arrow key, and then press the down arrow key to move to the first table, as shown in the following screenshot: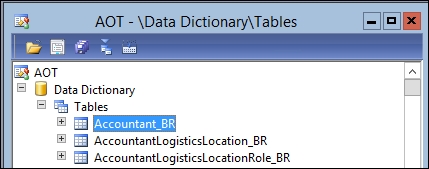
Start typing
CustTable; AX will move the cursor down as you type, displaying the text typed in the status bar at the bottom of the application's window.
This may seem quite simple, but it is very important that we are fast at navigating around the environment so that it is second nature.
We can now look at the property sheet for CustTable. We could use the button on the AOT window, but this takes time. Instead, use the Alt + Enter keyboard shortcut.
Note
Using keyboard shortcuts is much faster than using the mouse, so this should always be the preference. You might be slower at first, but it pays off later.
The following links contain useful shortcuts. You don't need to learn them all, but it is useful to use the keyboard shortcuts for the commands we frequently perform:
Shortcut Keys: Code Editor [AX 2012]: http://msdn.microsoft.com/en-us/library/aa865357.aspx
Shortcut Keys: AOT [AX 2012]: http://msdn.microsoft.com/en-us/library/aa623612.aspx
The property sheet will show the properties relevant to the current object type, in the case where the properties are pertinent to a table.
Note
Although these may seem safe to adjust, any change made to any property sheet is still a modification and will move the object into your layer and model, even if you change the property back.
We access most of the tasks we perform on an object through the right-click context menu (or the Windows context menu key). This menu is context aware, and we will go through this when we perform the task.
The following screenshot is of the context menu for CustTable, accessed by right-clicking on the CustTable node:
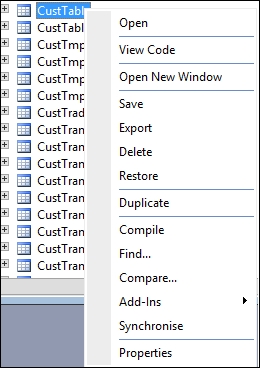
Here are some generic options on this menu:
Open: This is not always available, and should be thought of as an execute command. Its behavior depends on the selected object type:
Tables and Views: This opens a table browser, a grid view form showing all visible fields and the possibility to edit (beware!).
Table maps: This opens a table browser for fields in the map, but will show no data. This is of limited value.
Forms: This opens the form as if it were opened from the AX client. It is useful for testing forms as we modify them.
Classes: This will execute the class if it has the
Mainstatic method. Many have assumed that it would open the code editor.Queries: This will open the Query tool with the query loaded. It is of limited use.
Menu items: This will open the object referenced as if it were opened from the Windows client.
Jobs: This will execute the job; beware here, as many assume that this opens the code editor!
View code: This opens the code editor with all methods visible.
Open New Window: This is a very useful feature. It will open a new AOT window starting from the currently selected node. This is great for the drag-and-drop functionality.
Save: This will save the changes made to the currently selected object.
Export: This exports the objects from the currently selected node to an XPO file—a file that contains the object definition—so that it can be imported to a different system.
Delete: This deletes the element at the select level from the current layer. So, if you change
CustTable, you can delete your changes and revert to the next layer below. This is discussed in more detail in the next section.Restore: This will revert the selected objects to what is stored in the model store database, losing unsaved changes. Also, this is useful for loading the changes made by another developer working in the same system, or to refresh a form's data source if we add fields to the table it references.
Duplicate: This will create a duplicate of the object. If the object is a table, it does not copy the data. If the copied object contains static methods, they are not refactored to the new object name.
Compile: This will compile the current object, or in the case of a node, the objects within that node.
Find…: This will open the Find tool, allowing you to search for an element or the source code text.
Compare…: This opens the Compare tool (discussed in detail later), which allows you to compare the object across layers.
Add-Ins: This a submenu of options that will be discussed when required.
Properties: This opens the property sheet.
When you make a change to an object in the AOT, AX highlights this with a vertical red bar, as shown in the following screenshot:

Objects can be saved automatically, based on a timeout in your user options. This automatic save does not occur while editing the code in the code editor, which is good.
You can save all unsaved changes with the Ctrl + Shift + S option. This works everywhere in the IDE except the code editor. This is because the code editor is actually the code editor from Visual Studio, where this particular hotkey makes whitespace characters visible.
When the work is saved, AX writes the changes to the model store database. If the element (for example, a class method) is new, AX will create a unique element ID for it. If two developers open the same method, the first person to save the method "wins"; the other developer will be told that the method is newer on the server. Using the Restore option from the right-click menu will retrieve the version from the server.
A project is a subset of objects taken from the AOT. This could be thought of as a painter's palette. Any changes made to an object in a project are not sandboxed into that project. The change is also made to the same object in the AOT; the project merely contains references to the AOT object.
There are two types of project: private and shared. Private projects are collections only visible to the user who created them, and are generally of little use. Some projects automatically created by AX are an exception to this, as the elements (tables, methods, and so on) can contain a status indicating whether the object is complete or not.
Therefore, all projects we create will be shared. To create a shared project, we follow these steps:
Open the Projects window (Ctrl + Shift + P).
Right-click on the Shared node and choose Project, which is under New.
This will create a new project named Project1 (if not, it means we have not given a previously created project a proper name).
We should rename this with a suitable name. This is done by double-clicking on the object (as you do to rename a file in Windows explorer) or choosing Rename from the right-click context menu. The double-click method is faster.
To open the project, simply double-click on it. AX will display a window with a single node. Elements can now be dragged from the AOT as required.
The next step is to create the project structure. The best structure to use is the same structure as that of the AOT, as this makes items easier to find. This is done by the following steps:
Right-click on the root node and choose Group, which is under New.
Rename this node to be the same as the AOT node we are creating, for example,
Data Dictionary.Open the properties of this node and change
ProjectGroupTypetoDataDictionary(from the drop-down list), as shown in the following screenshot. You would then continue this process for the nodes in the AOT.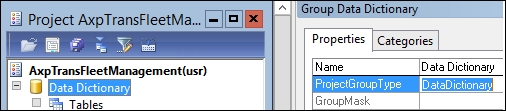
As you change ProjectGroupType, you will see that the icon in the project node changes to the icon in the equivalent AOT node.