The main page of a repository is the place where people spend most of their time when visiting a project. In this section, you will learn how to create a repository and then we will explore the vast features of GitHub that bring Git's command line to your browser.
Assuming you have already signed up in GitHub through https://github.com/join, we will see how to create a new repository that will host your code and explore the main repository's page.
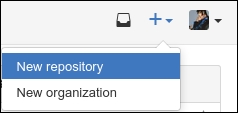
Navigate to the top-right, click on the little cross beside your username, and choose New repository, as shown in the following screenshot:
Fill in a name under Repository name, which will ultimately form the URL under which your repository will be. This is the minimal action you need to perform in order to create a repository.
Note
All the repositories on GitHub have the following URL scheme: https://github.com/<username>/<repository_name>
You can also provide a description so that people can tell with a glance what this is all about. Next option is whether your repository will be public or private. Generally, you go with public, unless you do not want your files to be seen by everybody. The private repos come with a price, though.
The very next thing GitHub provides is the ability to create the repository with a README file. Readme files usually include comprehensive information about the project you are hosting under your repository, such as installation guides, build and usage instructions, as well as guidelines on how one can contribute. You can always add a README file later, so leave this option unchecked for the time being.
Another nice feature is the ability to choose and include a
gitignore file upon creation. You can choose from a collection of the useful .gitignore templates taken from https://github.com/github/gitignore.
Ultimately, the code that you will host on GitHub will be able to be forked and reused by third parties. If you are freshly starting a new repository, you can choose a license to include upon creation. Again, this is optional and you can always manually add a license file later.
Let's hit the Create repository button and finish the repository creation. Here's what it looks like so far:
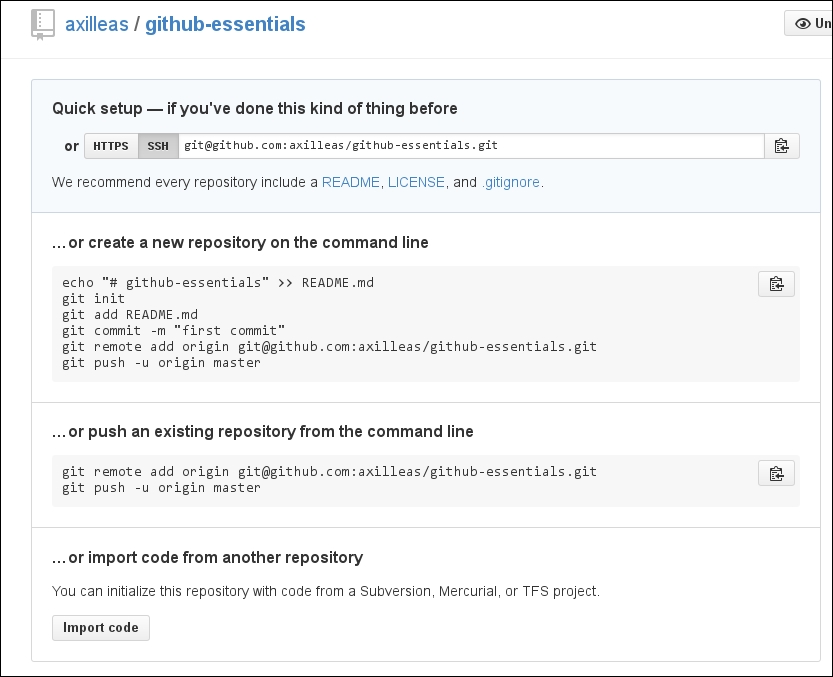
You can see that GitHub provides useful information on what to do next. If you already have an existing Git repository locally on your computer, you can push its code to GitHub or start fresh by following the instructions.
Note
Since we will be working from the command line later, it is highly recommended to generate an SSH key to use with your GitHub account. Follow the guide at https://help.github.com/articles/generating-ssh-keys/. Also, make sure to properly configure your Git username and e-mail settings. For more information, see https://help.github.com/articles/setting-your-username-in-git/ and https://help.github.com/articles/setting-your-email-in-git/.
Congratulations on creating your first repository!
The next goal is to explore the repository's main page. This is the page you see when you navigate to https://github.com/<username>/<repository>, where you see the following:
<username>: This is the username you registered with (found at the top-right corner)
<repository>: This is the Repository name you filled in the previous steps.
GitHub has a nice web UI that many common git commands can be presented to.
Let's first create a README file and push it to GitHub in order to explore the commits page:
Create the directory that will hold your code and
cdinto it:mkdir -p ~/github-essentials cd $_
Then, follow GitHub's instructions on a new project creation:
echo "# github-essentials" >> README.md
git init
git add README.md
git commit -m "first commit"
git remote add origin [email protected]:<username>/<repository>.git
git push -u origin master
Note that I use the Git protocol ([email protected]) that uses SSH underneath so I don't have to type my username and password each time. See the previous note on how to achieve this.
Note
The directory name (in our example github-essentials) could be totally different from the repository name you entered upon creation. It is the remote URL you set with git remote add that must match with the repository URL GitHub provides.
Every time you add more commits, their total number will also appear on the project's main page. In the preceding steps, we did our first commit, so the count is set to one and hence the 1 commit option is shown in the following screenshot:
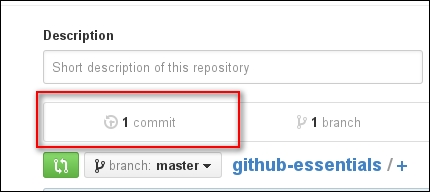
Click on the highlighted link as shown in the preceding screenshot to enter the commits page.
From here, you can browse the list of commits (so far we got only one) and visualize the output of git log. Let's compare those two commits:
Type git log in your local repository; the output should be similar to this:
commit 351b33bd7380a2434aaaea91eb8cb0ddc3b56852
Author: Achilleas Pipinellis <[email protected]>
Date:   Tue Apr 7 03:26:52 2015 +0300

    First commit.
Now, head over the commits page on GitHub. Here, you can see the same information depicted in a nice interface:

We can see the commit message, the time it was committed, and the SHA of the commit. Note that the SHA is stripped down to the first 7 characters out of 40. Clicking either on the SHA or on the commit message will show the changes introduced by that specific commit. Let's do that and compare what GitHub shows against the git show <commit> command:
commit 351b33bd7380a2434aaaea91eb8cb0ddc3b56852
Author: Achilleas Pipinellis <[email protected]>
Date:   Tue Apr 7 03:26:52 2015 +0300

    First commit.

diff --git a/README.md b/README.md
new file mode 100644
index 0000000..91bf601
--- /dev/null
+++ b/README.md
@@ -0,0 +1 @@
+# github-essentials
The result of the preceding code is shown in the following screenshot:
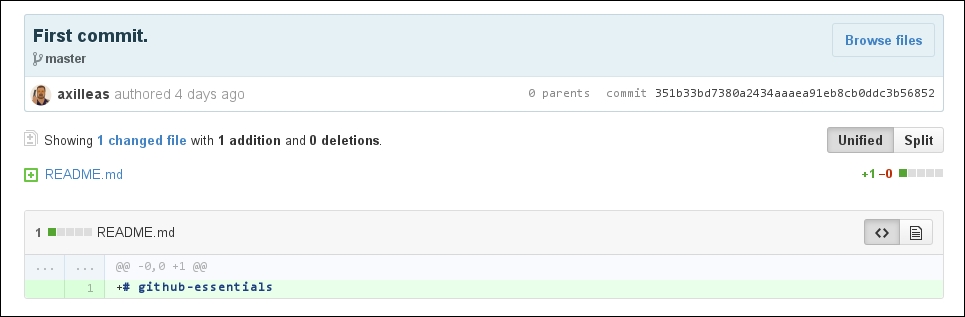
The commit message is shown in big bold letters since it conveys an important message. Right under it, there are the branches where the commit is included (currently it is only master).
You can see the commit SHA, the author name, and the date right under the blue area. GitHub also tells you how many files changed during the last commit and how many additions/deletions were made during that commit.
Lastly, we see the added changes in green. If, instead, you remove something, it will be shown in a pinkish color as we will see later on.
Let's create a branch named add_description and checkout into it:
git checkout -b add_description
Next, edit README.md, add some text, make a new commit, and push it to GitHub:
echo "\n## Description\n\nGitHub for dummies" >> README.md
git add README.md
git commit -m "Add second level header to README file"
git push origin add_description
Now let's create a second branch named new_feature, out of the master branch and just push it to GitHub:
git checkout master
git branch new_feature
git push origin new_feature
Now is the time to switch to GitHub and see how all this information is presented.
In the main repository page, you can now see that there are 3 branches:

Click on the branches link to get more information:
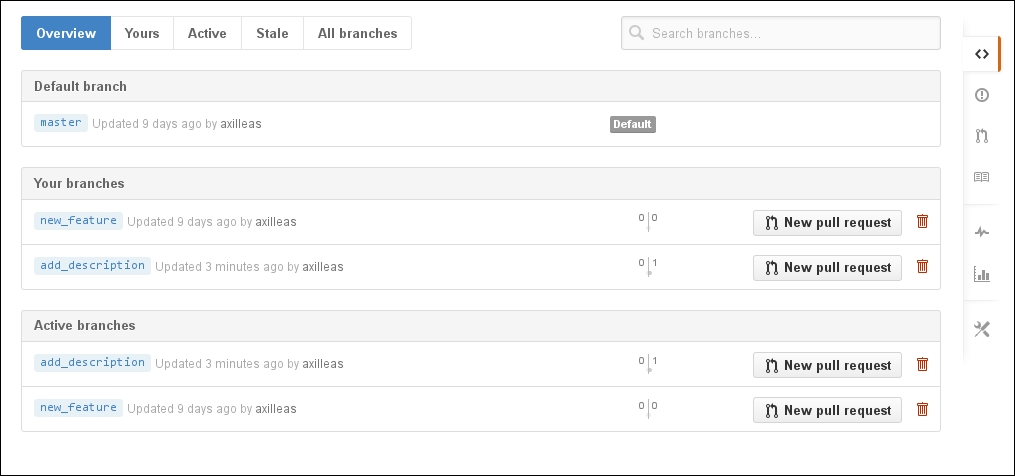
The Overview page is, as the title suggests, an overview of the other tabs you see next to it. It tells us what the default branch is, what branches you have pushed from your account (same as the Yours tab), and the most active branches in the last three months sorted by date (same as the Active tab). The Stale tab represents the branches that haven't been updated more than three months.
Note
You can change the default branch that appears in your project's homepage in the project's settings. This is covered in detail in Chapter 6, Exploring the User and Repository Settings.
You may notice that although we pushed the new_feature branch after we pushed add_description, its update time appears to be before add_description. This is only natural, since new_feature has the same commit date as our master branch that is dated before the add_description branch.
Now, if you look closely at a tab where the branches are shown, you can see written in small font the number of commits any branch is behind or ahead of the default branch, in our case master.
From the branches page, you can delete all the branches, except for the one you have set as default. Let's try and delete the new_feature branch. Click on the red trash icon and watch what happens.
GitHub gives you a chance to restore a recently deleted branch. Note that if you refresh the page or browse in another area of the page where you deleted the branch, the Restore button will disappear:
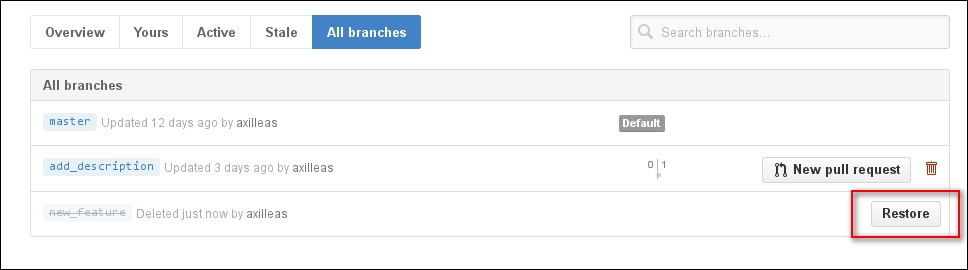
The New pull request button will be explored in a different chapter.
These three buttons appear when viewing a single file of a repository. For example, let's visit the README.md file:
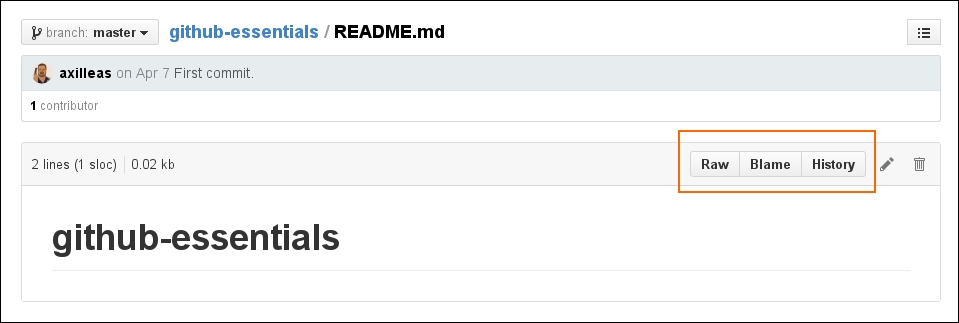
The Raw button, like the name suggests, opens the file in a raw form, meaning that any HTML formatting disappears. This is particularly useful when you want to download a single file. You will notice that many guides on the internet use this raw file format when they tell you to download something using command line tools such as Wget or Curl. If you ever tried to download a file from GitHub and all you got was an HTML file, remember the usage of raw.
The Blame button makes use of Git's blame function. Basically, for each line of a file, Git informs you about who modified that line and when that line was modified. If you want to know more, visit https://git-scm.com/docs/git-blame.
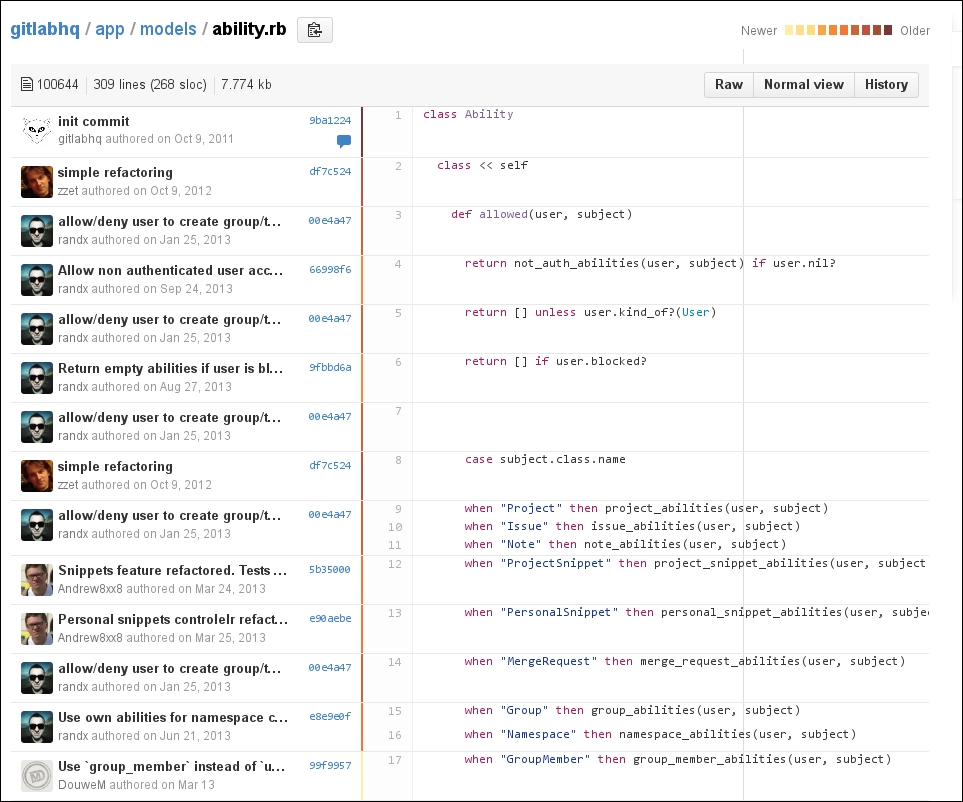
In order to properly see how that works, I will not use our previously created README.md file, since there is not much information to see how GitHub uses this function of Git. Instead, I will use a file from another repository with more commits. Take, for example, https://github.com/gitlabhq/gitlabhq/blame/master/app/models/ability.rb, as shown in the following screenshot:
Tip
Downloading the example code
You can download the example code files for all Packt books you have purchased from your account at http://www.packtpub.com. If you purchased this book elsewhere, you can visit http://www.packtpub.com/support and register to have the files e-mailed directly to you.
As compared to invoking git blame in the terminal, you can feel the superiority of GitHub's feature. Every line of code is annotated so you can see who, when, and what commit changed the particular line of the file. There is also this little nice feature of hotness. Older commits get a brown line whereas newer ones have a yellow color.
Finally, the History button is nothing more than Git's log function for a particular file.
You've probably spotted the three buttons sitting at the top-right of your repository page. These appear for every public repository, not only for your own.
The Watch button manages the level of subscription in a repository. GitHub notifies you with an e-mail whenever an action takes place in a repository you follow and, at the same time, lists them in the notifications area (https://github.com/notifications) where you can later mark them as read, as shown in the following screenshot:
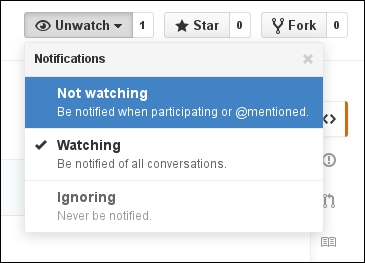
There are three levels of subscription, going from never notified to Big Brother. You can choose to never be notified if a conversation begins, such as a new issue creation, comments left in a line of code, or if someone mentions you. This is the lower level of notification you can get. The next level is to be notified only if you explicitly take part in a conversation or if someone mentions you. Finally, the third option is to always get notified, whether or not you start a conversation or you get mentioned. This is the default behavior when you create a new repository.
Note
You can mention someone by prefixing their username with the at sign(@). This is the special way in which GitHub can understand that you need someone's attention. Start typing the username and GitHub is smart enough to autocomplete it.
The Star button is a way to show your appreciation to a repository and its creator. It depicts the popularity of a project. Whenever you star a repository, it gets added to the list of your starred ones. You can see all your starred repositories at https://github.com/stars.
Note
A list with the most starred projects on GitHub can be found at https://github.com/search?utf8=%E2%9C%93&q=stars%3A%3E1&type=Repositories.
You can see the people who have starred a repository by clicking the number next to the Star/Unstar button. For the repo I just created, you can see that I am the only stargazer:

The Fork button and its purpose is what made GitHub excel in the first place. As we will see later in this book, its main use is when one wants to contribute to a project. When you fork a repository, it gets copied in your own namespace and that way you have full ownership in that copy; thus, you are able to modify anything you want. Go ahead and try it. Go to https://github.com/axilleas/github-essentials and press the Fork button. After a short while (depending on the size of the repository), you will be redirected to your own copy of this repo that you fully own.
Previously, we learned how to add a description to our project. This was optional when creating a new repository, so if you opted out from creating it, let's see how to add it now.
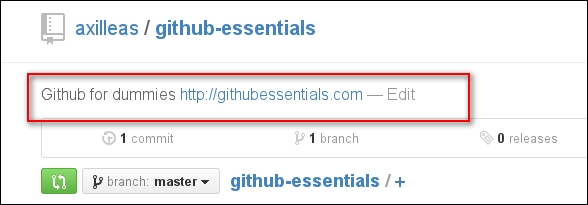
Head over the main repository page and you will be presented with two blank forms. In the Description field, put a descriptive note of your project; in Website, put the website URL that your project might have. This could also be your GitHub repository's URL. Here's what it looks like:
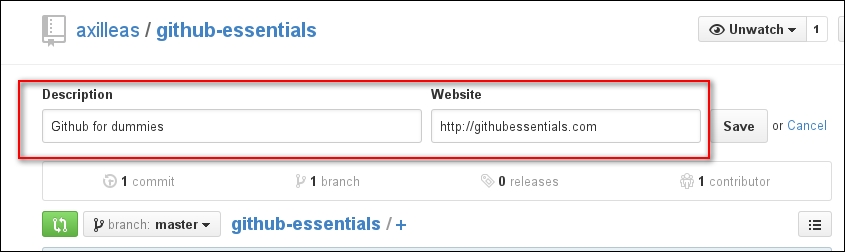
After you hit Save, you will immediately see the changes: