Book Image

Learning TypeScript 2.x - Second Edition

By : Remo H. Jansen
Book Image

Learning TypeScript 2.x - Second Edition

By: Remo H. Jansen

Overview of this book

TypeScript is an open source and cross-platform statically typed superset of JavaScript that compiles to plain JavaScript and runs in any browser or host. This book is a step-by-step guide that will take you through the use and benefits of TypeScript with the help of practical examples. You will start off by understanding the basics as well as the new features of TypeScript 2.x. Then, you will learn how to work with functions and asynchronous programming APIs. You will continue by learning how to resolve runtime issues and how to implement TypeScript applications using the Object-oriented programming (OOP) and functional programming (FP) paradigms. Later, you will automate your development workflow with the help of tools such as Webpack. Towards the end of this book, you will delve into some real-world scenarios by implementing some full-stack TypeScript applications with Node.js, React and Angular as well as how to optimize and test them. Finally, you will be introduced to the internal APIs of the TypeScript compiler, and you will learn how to create custom code analysis tools.
Table of Contents (17 chapters)

TypeScript language features

Now that you have learned about the purpose of TypeScript, it's time to get our hands dirty and start writing some code.

Before you can start learning how to use some of the basic TypeScript building blocks, you will need to set up your development environment. The easiest and fastest way to start writing some TypeScript code is to use the online editor, available on the official TypeScript website at https://www.typescriptlang.org/play/index.html:

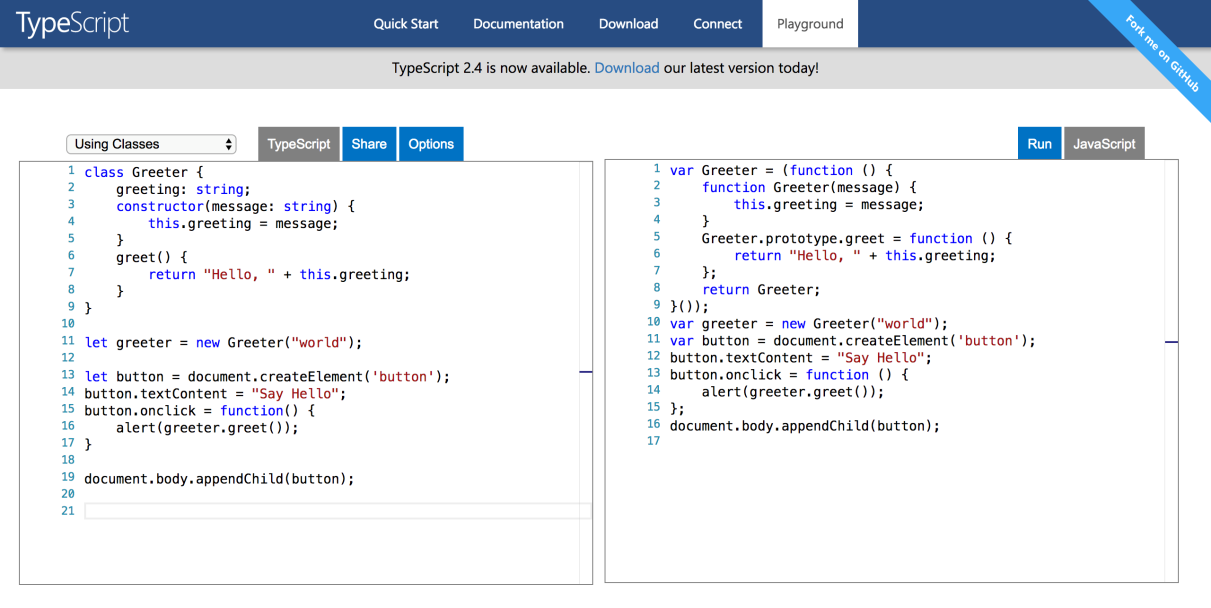
The preceding screenshot shows the appearance of the TypeScript playground. If you visit the playground, you will be able to use the text editor on the left-hand side of the screen to write TypeScript code. The code will then be automatically compiled into JavaScript. The output code will be inserted in the text editor located on the right-hand side of the screen. If your TypeScript code is invalid, the JavaScript code on the right-hand side will not be updated.

Alternatively, if you prefer to be able to work offline, you can download and install the TypeScript compiler. If you work with a Visual Studio version older than Visual Studio 2015, you will need to download the official TypeScript extension from https://marketplace.visualstudio.com/. If you are working with a version of Visual Studio released after the 2015 version (or Visual Studio Code), you will not need to install the extension, as these versions includes TypeScript support by default.

There are TypeScript plugins available for many popular editors such as Sublime (https://github.com/Microsoft/TypeScript-Sublime-Plugin) or Atom (https://atom.io/packages/atom-typescript).

You can also use TypeScript from the command-line interface by downloading it as an npm module. Don't worry if you are not familiar with npm. For now, you only need to know that it stands for node package manager and is the default Node.js package manager. Node.js is an open source, cross-platform JavaScript runtime environment for executing JavaScript code server-side. To be able to use npm, you will need to install Node.js in your development environment. You will be able to find the Node.js installation files on the official website at https://nodejs.org/.

Once you have installed Node.js in your development environment, you will be able to run the following command in a console or Terminal:

npm install -g typescript
Unix-based operating systems may require the use of the sudo command when installing global (-g) npm packages. The sudo command will prompt the user credentials and install the package using administrative privileges:

sudo npm install -g typescript

Create a new file named test.ts, and add the following code to it:

let myNumberVariable: number = 1; 
console.log(myNumberVariable); 

Save the file into a directory of your choice and open a command-line interface. Navigate to the directory in which you saved the file and execute the following command:

tsc test.ts

If everything goes well, you will find a file named test.js in the same directory in which the test.ts file is located. Now you know how to compile your TypeScript code into JavaScript code.

You can execute the output JavaScript code using Node.js:

node test.js

Now that we know how to compile and execute TypeScript source code, we can start learning about some of the TypeScript features.

You will be able to learn more about editors, compiler options, and other TypeScript tools in Chapter 9, Automating Your Development Workflow.

Types

As we have already learned, TypeScript is a typed superset of JavaScript. TypeScript added a static type system and optional static type annotations to JavaScript to transform it into a strongly-typed programming language.

TypeScript's type analysis occurs entirely at compile time and adds no runtime overhead to program execution.

Type inference and optional static type annotations

The TypeScript language service is great at automatically detecting the type of a variable. However, there are certain cases where it is not able to automatically detect a type.

When the type inference system is not able to identify the type of a variable, it uses a type known as the any type. The any type is a value that represents all the existing types, and as a result, it is too flexible and unable to detect most errors, which is not a problem because TypeScript allows us to explicitly declare the type of a variable using what is known as optional static type annotations.

The optional static type annotations are used as constraints on program entities such as functions, variables, and properties so that compilers and development tools can offer better verification and assistance (such as IntelliSense) during software development.

Strong typing allows programmers to express their intentions in their code, both to themselves and to others in the development team.

For a variable, a type notation comes preceded by a colon after the name of a variable:

let counter; // unknown (any) type 
let counter = 0; // number (inferred) 
let counter: number; // number 
let counter: number = 0; // number 
We have used the let keyword instead of the var keyword. The let keyword is a newer JavaScript construct that TypeScript makes available. We'll discuss the details later, but some common problems in JavaScript can be solved by using let, so, you should use let instead of var whenever possible.

As you can see, we declare the type of a variable after its name; this style of type notation is based on type theory and helps to reinforce the idea of types being optional.

When no type annotations are available, TypeScript will try to guess the type of the variable by examining the assigned values. For example, in the second line, in the preceding code snippet, we can see that the variable counter has been identified as a numeric variable, because its value is a numeric value. There is a process known as type inference that can automatically detect and assign a type to a variable. The any type is used as the type of a variable when the type inference system is not able to detect its type.

Please note that the companion source code might be slightly different from the code presented during the chapters. The companion source code uses namespaces to isolate each demo from all the other demos and sometimes appends numbers to the name of the variables to prevent naming conflicts. For example, the preceding code is included in the companion source code as follows:

namespace type_inference_demo { 
    let counter1; // unknown (any) type 
    let counter2 = 0; // number (inferred) 
    let counter3: number; // number 
    let counter4: number = 0; // number 
} 
You will be able to learn more about the TypeScript type system in Chapter 2, Working with Types.

Variables, basic types, and operators

The basic types are boolean, number, string, array, tuple, Object, object, null, undefined, {}, void, and enumerations. Let's learn about each of these basic types:

Data type

Description

Boolean

Whereas the string and number data types can have a virtually unlimited number of different values, the boolean data type can only have two. They are the literals: true and false. A boolean value is a truth value; it specifies whether the condition is true or not:

let isDone:   boolean = false;   

Number

As in JavaScript, all numbers in TypeScript are floating-point values. These floating-point numbers get the type number:

let height:   number = 6;   

String

We use the string data type to represent text in TypeScript. You include string literals in your scripts by enclosing them in single or double quotation marks. Double quotation marks can be contained in strings surrounded by single quotation marks and single quotation marks can be contained in strings surrounded by double quotation marks:

let name: string   = "bob";   
name = 'Smith';   

Array

We use the array data type to represent a collection of values. The array type can be written using two different syntax styles. We can use the type of the elements in the array followed by brackets [] to annotate a collection of that element type:

let list: number[]   = [1, 2, 3];   

The second syntax style uses a generic array type named Array<T>:

let list: Array<number>   = [1, 2, 3];   

Tuple

Tuple types can be used to represent an array with a fixed number of elements with different types where the type is known. For example, we can represent a value as a pair of a string and a number:

let x: [string,   number];   
x = ["hello",   10]; // OK   
x = ["world",   20]; // OK   
x = [10, "hello"];   // Error   
x = [20, "world"];   // Error   

Enum

We use enumerations to add more meaning to a set of values. Enumerations can be numeric or text-based. By default, numeric enumerations assign the value 0 to the first member in the enumeration and increase it by one for each of the members in the enumeration:

enum Color {Red,   Green, Blue};   
let c: Color =   Color.Green;   

Any

All types in TypeScript are subtypes of a single top type called the any type. The any keyword references this type. The any type eliminates most of the TypeScript type checks and represents all the possible types:

let notSure: any   = 4; // OK   
notSure = "maybe   a string instead"; // OK   
notSure =   false; // OK   

The any type can be useful while migrating existing JavaScript code to TypeScript, or when we know some details about a type but we don't know all its details. For example, when we know that a type is an array, but we don't know the type of the elements in such an array:

let list: any[] =   [1, true, "free"];   
list[1] = 100;   

object (lowercase)

The object type represents any non-primitive type. The following types are considered to be primitive types in JavaScript: boolean, number, string, symbol, null, and undefined.

Object (uppercase)

In JavaScript, all objects are derived from the Object class. Object (uppercase) describes functionality that is common to all JavaScript objects. That includes the toString() and the hasOwnProperty() methods, for example.

Empty object type {}

This describes an object that has no members of its own. TypeScript issues a compile-time error when you try to access arbitrary properties of such an object:

const obj =   {};    
obj.prop = "value";   // Error   

Null and undefined

In TypeScript, both undefined and null are types. By default, null and undefined are subtypes of all other types. That means you can assign null and undefined to something like a number.

However, when using the --strictNullChecks flag, null and undefined are only assignable to void and their respective types.

Never

The never type is used in the following two places:

  • As the return type of functions that never return
  • As the type of variables under type guards that are never true
   
function   impossibleTypeGuard(value: any) {   
    if (   
        typeof   value === "string" &&   
        typeof   value === "number"   
    ) {   
        value; //   Type never   
    }    
}   

Void

In some ways the opposite of any is void, the absence of having any type at all. You will see this as the return type of functions that do not return a value:

function   warnUser(): void {   
    console.log("This   is my warning message");   
}   

In TypeScript and JavaScript, undefined is a property in the global scope that is assigned as a value to variables that have been declared but have not yet been initialized. The value null is a literal (not a property of the global object) and it can be assigned to a variable as a representation of no value:

let testVar; // variable is declared but not initialized 
consoe.log(testVar); // shows undefined  
console.log(typeof testVar); // shows undefined 
 
let testVar = null; // variable is declared, and null is assigned as its value 
cosole.log(testVar); // shows null  
console.log(typeof testVar); // shows object 

Variable scope (var, let, and const)

When we declare a variable in TypeScript, we can use the var, let, or const keywords:

var myNumber: number = 1; 
let isValid: boolean = true; 
const apiKey: string = "0E5CE8BD-6341-4CC2-904D-C4A94ACD276E"; 

Variables declared with var are scoped to the nearest function block (or global, if outside a function block).

Variables declared with let are scoped to the nearest enclosing block (or global, if outside any block), which can be smaller than a function block.

The const keyword creates a constant that can be global or local to the block in which it is declared. This means that constants are block-scoped.

You will learn more about scopes in Chapter 6, Understanding the Runtime.

Arithmetic operators

TypeScript supports the following arithmetic operators. We must assume that variable A holds 10 and variable B holds 20 to understand the following examples:

Operator

Description

Example

-

Subtracts the second operand from the first.

A - B will give -10

+

Adds two operands.

A + B will give 30

*

Multiplies both the operands.

A * B will give 200

**

Multiplies the first operand by itself a number of times which is indicated by the second operand.

A ** B will give 1e+20

%

This is the modulus operator and remainder after an integer division.

B % A will give 0

/

Divides the numerator by the denominator.

B / A will give 2

--

Decreases an integer value by one.

A-- will give 9

++

Increases an integer value by one.

A++ will give 11

Comparison operators

TypeScript supports the following comparison operators. To understand the examples, you must assume that variable A holds 10 as value and variable B holds 20 as value:

Operator

Description

Example

==

Checks whether the values of two operands are equal or not. This operator uses type coercion. If yes, then the condition becomes true.

(A == B) is false. A == "10" is true.

===

Checks whether the value and type of two operands are equal or not. This operator doesn't use type coercion. If yes, then the condition becomes true.

A === B is false. A === "10" is false.

!=

Checks whether the value of two operands are equal or not. If the values are not equal, then the condition becomes true. This operator uses type coercion.

(A != B) is true. A != "10" is false.

!==

Checks whether the value of two operands are equal or not. If the values are not equal, then the condition becomes true. This operator doesn't use type coercion.

A !== B is true. A !== "10" is true.

>

Checks whether the value of the left operand is greater than the value of the right operand. If yes, then the condition becomes true.

(A > B) is false.

<

Checks whether the value of the left operand is less than the value of the right operand. If yes, then the condition becomes true.

(A < B) is true.

>=

Checks whether the value of the left operand is greater than or equal to the value of the right operand. If yes, then the condition becomes true.

(A >= B) is false.

<=

Checks whether the value of the left operand is less than or equal to the value of the right operand. If yes, then the condition becomes true.

(A <= B) is true.

Logical operators

TypeScript supports the following logical operators. To understand the examples, you must assume that variable A holds 10 and variable B holds 20:

Operator

Description

Example

&&

Known as the logical AND operator. If both the operands are nonzero, then the condition becomes true.

(A && B) is true.

||

Known as the logical OR operator. If any of the two operands are nonzero, then the condition becomes true.

(A || B) is true.

!

Known as the logical NOT operator. It is used to reverse the logical state of its operand. If a condition is true, then the logical NOT operator will make it false.

!(A && B) is false.

Bitwise operators

TypeScript supports the following bitwise operators. To understand the examples, you must assume that variable A holds 2 as value and variable B holds 3 as value:

Operator

Description

Example

&

Known as the bitwise AND operator, it performs a boolean AND operation on each bit of its integer arguments.

(A & B) is 2

|

Known as the bitwise OR operator, it performs a boolean OR operation on each bit of its integer arguments.

(A | B) is 3.

^

Known as the bitwise XOR operator, it performs a boolean exclusive OR operation on each bit of its integer arguments. Exclusive OR means that either operand one is true or operand two is true, but not both.

(A ^ B) is 1.

~

Known as the bitwise NOT operator, it is a unary operator and operates by reversing all bits in the operand.

(~B) is -4

<<

Known as the bitwise shift-left operator. It moves all bits in its first operand to the left by the number of places specified in the second operand. New bits are filled with zeros. Shifting a value left by one position is equivalent to multiplying by two, shifting two positions is equivalent to multiplying by four, and so on.

(A << 1) is 4

>>

Known as the bitwise shift-right with sign operator. It moves all bits in its first operand to the right by the number of places specified in the second operand.

(A >> 1) is 1

>>>

Known as the bitwise shift-right with zero operators. This operator is just like the >> operator, except that the bits shifted from the left are always zero.

(A >>> 1) is 1

One of the main reasons to use bitwise operators in languages such as C++, Java, or C# is that they're extremely fast. However, bitwise operators are often considered not that efficient in TypeScript and JavaScript. The bitwise operators are less efficient in JavaScript, because it is necessary to cast from floating-point representation (how JavaScript stores all of its numbers) to a 32-bit integer to perform the bit manipulation and back.

Assignment operators

TypeScript supports the following assignment operators:

Operator

Description

Example

=

Assigns the values from the right-side operands to the left-side operand.

C = A + B will assign the value of A + B into C

+=

Adds the right operand to the left operand and assigns the result to the left operand.

C += A is equivalent to C = C + A

-=

Substracts the right operand from the left operand and assigns the result to the left operand.

C -= A is equivalent to C = C - A

*=

Multiplies the right operand by the left operand and assigns the result to the left operand.

C *= A is equivalent to C = C * A

/=

Divides the left operand by the right operand and assigns the result to the left operand.

C /= A is equivalent to C = C / A

%=

Calculates the modulus using two operands and assigns the result to the left operand.

C %= A is equivalent to C = C % A

Spread operator

The spread operator can be used to initialize arrays and objects from another array or object:

let originalArr1 = [ 1, 2, 3]; 
let originalArr2 = [ 4, 5, 6]; 
let copyArr = [...originalArr1]; 
let mergedArr = [...originalArr1, ...originalArr2]; 
let newObjArr = [...originalArr1, 7, 8]; 

The preceding code snippet showcases the usage of the spread operator with arrays, while the following code snippet showcases its usage with object literals:

let originalObj1 = {a: 1, b: 2, c: 3}; 
let originalObj2 = {d: 4, e: 5, f: 6}; 
let copyObj = {...originalObj1}; 
let mergedObj = {...originalObj1, ...originalObj2}; 
let newObjObj = {... originalObj1, g: 7, h: 8}; 

The spread operator can also be used to expand to an expression into multiple arguments (in function calls), but we will skip that use case for now.

We will learn more about the spread operator in Chapter 3, Working with Functions and Chapter 4, Object-Oriented Programming with TypeScript.

Flow control statements

This section describes the decision-making statements, the looping statements, and the branching statements supported by the TypeScript programming language.

The single-selection structure (if)

The following code snippet declares a variable of type boolean and name isValid. Then, an if statement will check whether the value of isValid is equal to true. If the statement turns out to be true, the Is valid! message will be displayed on the screen:

let isValid: boolean = true; 
 
if (isValid) { 
  console.log("is valid!"); 
} 

The double-selection structure (if...else)

The following code snippet declares a variable of type boolean and name isValid. Then, an if statement will check whether the value of isValid is equal to true. If the statement turns out to be true, the message Is valid! will be displayed on the screen. On the other hand, if the statement turns out to be false, the message Is NOT valid! will be displayed on the screen:

let isValid: boolean = true; 
 
if (isValid) { 
  console.log("Is valid!"); 
} else { 
  console.log("Is NOT valid!"); 
} 

The inline ternary operator (?)

The inline ternary operator is just an alternative way of declaring a double-selection structure:

let isValid: boolean = true; 
let message = isValid ? "Is valid!" : "Is NOT valid!"; 
console.log(message); 

The preceding code snippet declares a variable of type boolean and name isValid. Then, it checks whether the variable or expression on the left-hand side of the operator ? is equal to true.

If the statement turns out to be true, the expression on the left-hand side of the character will be executed and the message Is valid! will be assigned to the message variable.

On the other hand, if the statement turns out to be false, the expression on the right-hand side of the operator will be executed and the message, Is NOT valid! will be assigned to the message variable.

Finally, the value of the message variable is displayed on the screen.

The multiple-selection structure (switch)

The switch statement evaluates an expression, matches the expression's value to a case clause, and executes statements associated with that case. Switch statements and enumerations are often used together to improve the readability of the code.

In the following example, we declare a function that takes an enumeration named AlertLevel.

You will learn more about enumerations in Chapter 2, Working with Types.

Inside the function, we will generate an array of strings to store email addresses and execute a switch structure. Each of the options of the enumeration is a case in the switch structure:

enum AlertLevel{ 
info, warning, error } function getAlertSubscribers(level: AlertLevel){ let emails = new Array<string>(); switch(level){ case AlertLevel.info: emails.push("[email protected]"); break; case AlertLevel.warning: emails.push("[email protected]"); emails.push("[email protected]"); break; case AlertLevel.error: emails.push("[email protected]"); emails.push("[email protected]"); emails.push("[email protected]"); break; default: throw new Error("Invalid argument!"); } return emails; } getAlertSubscribers(AlertLevel.info); // ["[email protected]"] getAlertSubscribers(AlertLevel.warning); //
["[email protected]", "[email protected]"]

The value of the level variable is tested against all the cases in the switch. If the variable matches one of the cases, the statement associated with that case is executed. Once the case statement has been executed, the variable is tested against the next case.

Once the execution of the statement associated with a matching case is finalized, the next case will be evaluated. If the break keyword is present, the program will not continue the execution of the following case statement.

If no matching case clause is found, the program looks for the optional default clause, and if found, it transfers control to that clause and executes the associated statements.

If no default clause is found, the program continues execution at the statement following the end of switch. By convention, the default clause is the last clause, but it does not have to be so.

The expression is tested at the top of the loop (while)

The while expression is used to repeat an operation while a certain requirement is satisfied. For example, the following code snippet declares a numeric variable i. If the requirement (the value of i is less than 5) is satisfied, an operation takes place (increase the value of i by one and display its value in the browser console). Once the operation has completed, the accomplishment of the requirement will be checked again:

let i: number = 0; 
while (i < 5) { 
  i += 1; 
  console.log(i); 
} 

In a while expression, the operation will take place only if the requirement is satisfied.

The expression is tested at the bottom of the loop (do...while)

The do...while expression can be used to repeat an instruction until a certain requirement is not satisfied. For example, the following code snippet declares a numeric variable i and repeats an operation (increase the value of i by one and display its value in the browser console) for as long as the requirement (the value of i is less than five) is satisfied:

let i: number = 0; 
do { 
  i += 1; 
  console.log(i); 
} while (i < 5); 

Unlike the while loop, the do...while expression will execute at least once, regardless of the tested expression, as the operation will take place before checking whether a certain requirement is satisfied or not.

Iterate on each object's properties (for...in)

The for...in statement by itself is not a bad practice; however, it can be misused, for example, to iterate over arrays or array-like objects. The purpose of the for...in statement is to enumerate over object properties:

let obj: any = { a: 1, b: 2, c: 3 }; 
 
for (let key in obj) { 
    if (obj.hasOwnProperty(key)) { 
        console.log(key + " = " + obj[key]); 
    } 
} 
 
// Output: 
// "a = 1" 
// "b = 2" 
// "c = 3" 

The following code snippet will go up in the prototype chain, also enumerating the inherited properties. The for...in statement iterates the entire prototype chain, also enumerating the inherited properties. When you want to enumerate only the object's properties that aren't inherited, you can use the hasOwnProperty method.

Iterate values in an iterable (for...of)

In JavaScript, some built-in types are built-in iterables with a default iteration behavior. To be an iterable, an object must implement the @@iterator method, meaning that the object (or one of the objects in its prototype chain) must have a property with a @@iterator key, which is available via constant Symbol.iterator.

The for...of statement creates a loop iterating over iterable objects (including array, map, set, string, arguments object, and so on):

let iterable = [10, 20, 30]; 
 
for (let value of iterable) { 
  value += 1; 
  console.log(value); 
} 
You will learn more about iterables in Chapter 4, Object-Oriented Programming with TypeScript.

Counter-controlled repetition (for)

The for statement creates a loop that consists of three optional expressions, enclosed in parentheses and separated by semicolons, followed by a statement or a set of statements executed in the loop:

for (let i: number = 0; i < 9; i++) { 
   console.log(i); 
} 

The preceding code snippet contains a for statement. It starts by declaring the variable i and initializing it to 0. It checks whether i is less than 9, performs the two succeeding statements, and increments i by one after each pass through the loop.

Functions

Just as in JavaScript, TypeScript functions can be created either as a named function or as an anonymous function, which allows us to choose the most appropriate approach for an application, whether we are building a list of functions in an API or a one-off function to hand over to another function:

// named function 
function greet(name?: string): string { 
  if(name){ 
    return "Hi! " + name; 
  } else { 
    return "Hi!"; 
  } 
} 
 
// anonymous function 
let greet = function(name?: string): string { 
  if (name) { 
    return "Hi! " + name; 
  } else { 
    return "Hi!"; 
  } 
} 

As we can see in the preceding code snippet, in TypeScript, we can add types to each of the parameters and then to the function itself to add a return type. TypeScript can infer the return type by looking at the return statements, so we can also optionally leave this off in many cases.

There is an alternative syntax for functions that use the => operator after the return type and don't use the function keyword:

let greet = (name: string): string => { 
    if(name){ 
      return "Hi! " + name; 
    } 
    else 
    { 
      return "Hi"; 
    } 
}; 

Now that we have learned about this alternative syntax, we can return to the previous example, in which we were assigning an anonymous function to the greet variable. We can now add the type annotations to the greet variable to match the anonymous function signature:

let greet: (name: string) => string = function(name: string): 
string { if (name) { return "Hi! " + name; } else { return "Hi!"; } };
Keep in mind that the arrow function (=>) syntax changes the way the this keyword works when working with classes. We will learn more about this in the upcoming chapters.

Now you know how to add type annotations to force a variable to be a function with a specific signature. The usage of this kind of annotation is really common when we use a callback (functions used as an argument of another function):

function add( 
    a: number, b: number, callback: (result: number) => void 
) { 
    callback(a + b); 
} 

In the preceding example, we are declaring a function named add that takes two numbers and a callback as a function. The type annotations will force the callback to return void and take a number as its only argument.

We will focus on functions in Chapter 3, Working with Functions.

Classes

ECMAScript 6, the next version of JavaScript, adds class-based object-orientation to JavaScript and, since TypeScript includes all the features available in ES6, developers are allowed to use class-based object orientation today, and compile them down to JavaScript that works across all major browsers and platforms, without having to wait for the next version of JavaScript.

Let's take a look at a simple TypeScript class definition example:

class Character { 
  public fullname: string; 
  public constructor(firstname: string, lastname: string) { 
    this.fullname = `${firstname} ${lastname}`; 
  } 
  public greet(name?: string) { 
    if (name) { 
      return `Hi! ${name}! my name is ${this.fullname}`; 
    } else { 
      return `Hi! my name is ${this.fullname}`; 
    } 
  } 
} 
 
let spark = new Character("Jacob","Keyes"); 
let msg = spark.greet();              
console.log(msg); // "Hi! my name is Jacob Keyes" 
 
let msg1 = spark.greet("Dr. Halsey");  
console.log(msg1); // "Hi! Dr. Halsey! my name is Jacob Keyes" 

In the preceding example, we have declared a new class, Character. This class has three members: a property called fullname, a constructor, and a method greet. When we declare a class in TypeScript, all the methods and properties are public by default. We have used the public keyword to be more explicit; being explicit about the accessibility of the class members is recommended but it is not a requirement.

You'll notice that when we refer to one of the members of the class (from within itself), we prepend the this operator. The this operator denotes that it's a member access. In the last lines, we construct an instance of the Character class using a new operator. This calls into the constructor we defined earlier, creating a new object with the Character shape and running the constructor to initialize it.

TypeScript classes are compiled into JavaScript functions in order to achieve compatibility with ECMAScript 3 and ECMAScript 5.

We will learn more about classes and other object-oriented programming concepts in Chapter 4, Object-Oriented Programming with TypeScript.

Interfaces

In TypeScript, we can use interfaces to ensure that a class follows a particular specification:

interface LoggerInterface{ 
    log(arg: any): void; 
} 
 
class Logger implements LoggerInterface { 
    log (arg: any){ 
        if (typeof console.log === "function") { 
            console.log(arg); 
        } else { 
            console.log(arg); 
        } 
    } 
} 

In the preceding example, we have defined an interface LoggerInterface and a class Logger, which implements it. TypeScript will also allow you to use interfaces to declare the type of an object. This can help us to prevent many potential issues, especially when working with object literals:

interface UserInterface { 
    name: string; 
    password: string; 
} 
 
// Error property password is missing 
let user: UserInterface = { 
    name: "" 
}; 
We will learn more about interfaces and other object-oriented programming concepts in Chapter 4, Object-Oriented Programming with TypeScript.

Namespaces

Namespaces, also known as internal modules, are used to encapsulate features and objects that share a certain relationship. Namespaces will help you to organize your code. To declare a namespace in TypeScript, you will use the namespace and export keywords:

In older versions of TypeScript, the keyword to define an internal module was module instead of namespace.
namespace geometry { 
    interface VectorInterface { 
        /* ... */ 
    } 
    export interface Vector2DInterface { 
        /* ... */ 
    } 
    export interface Vector3DInterface { 
        /* ... */ 
    } 
    export class Vector2D 
        implements VectorInterface, Vector2dInterface { 
        /* ... */ 
    } 
    export class Vector3D 
        implements VectorInterface, Vector3DInterface { 
        /* ... */ 
    } 
} 
 
let vector2DInstance: geometry.Vector2DInterface = new  
geometry.Vector2D(); 
let vector3DInstance: geometry.Vector3DInterface = new  
geometry.Vector3d(); 

In the preceding code snippet, we have declared a namespace that contains the classes vector2D and vector3D and the interfaces VectorInterface, Vector2DInterface, and Vector3DInterface. Note that the first interface is missing the keyword export. As a result, the interface VectorInterface will not be accessible from outside the module's scope.

Namespaces are a good way to organize your code; however, they are not the recommended way to organize your code in a TypeScript application. We will not get into more details about this topic for now, but we will learn more about internal and external modules and we'll discuss when each is appropriate and how to use them in Chapter 4, Object-Oriented Programming with TypeScript.