Book Image

Tkinter GUI Application Development Blueprints - Second Edition

By : Bhaskar Chaudhary
Book Image

Tkinter GUI Application Development Blueprints - Second Edition

By: Bhaskar Chaudhary

Overview of this book

Tkinter is the built-in GUI package that comes with standard Python distributions. It is a cross-platform package, which means you build once and deploy everywhere. It is simple to use and intuitive in nature, making it suitable for programmers and non-programmers alike. This book will help you master the art of GUI programming. It delivers the bigger picture of GUI programming by building real-world, productive, and fun applications such as a text editor, drum machine, game of chess, audio player, drawing application, piano tutor, chat application, screen saver, port scanner, and much more. In every project, you will build on the skills acquired in the previous project and gain more expertise. You will learn to write multithreaded programs, network programs, database-driven programs, asyncio based programming and more. You will also get to know the modern best practices involved in writing GUI apps. With its rich source of sample code, you can build upon the knowledge gained with this book and use it in your own projects in the discipline of your choice.
Table of Contents (12 chapters)

Widgets – the building blocks of GUI programs

Now that we have our top level or the root window ready, it is time to think over the question: which components should appear in the window? In Tkinter jargon, these components are called widgets.

The syntax that is used to add a widget is as follows:

my_widget = tk.Widget-name (its container window, ** its configuration options)

In the following example ( 1.02.py ), we will add two widgets, a label and a button, to the root container. Also, note how all the widgets are added between the skeleton code that we defined in the first example:

import tkinter as tk
root = tk.Tk()
label = tk.Label(root, text="I am a label widget")
button = tk.Button(root, text="I am a button")
label.pack()
button.pack()
root.mainloop()

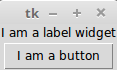
Running the preceding code(1.02.py) will generate a window with a label and a button widget, as shown in the following screenshot:

The following is a description of the preceding code:

  • This code added a new instance named label for the label widget. The first parameter defined root as its parent or container. The second parameter configured its text option to read I am a label widget.
  • Similarly, we defined an instance of a Button widget. This is also bound to the root window as its parent.
  • We used the pack() method, which is essentially required to position the label and button widgets within the window. We will discuss the pack() method and several other related concepts when exploring the geometry management task. However, you must note that some sort of geometry specification is essential for the widgets to be displayed.

Some important widget features

Note the following few important features that are common to all widgets:

  • All widgets are actually objects derived from their respective widget classes. So, a statement such as button = Button(its_parent) actually creates a button instance from the Button class.
  • Each widget has a set of options that decides its behavior and appearance. This includes attributes such as text labels, colors, and font size. For example, the Button widget has attributes to manage its label, control its size, change its foreground and background colors, change the size of the border, and more.
  • To set these attributes, you can set the values directly at the time of creating the widget, as demonstrated in the preceding example. Alternatively, you can later set or change the options of the widget by using the .config() or .configure() method. Note that the .config() or .configure() methods are interchangeable and provide the same functionality. In fact, the .config() method is simply an alias of the .configure() method.

Ways to create widgets

There are two ways to create widgets in Tkinter.

The first way involves creating a widget in one line and then adding the pack() method (or other geometry managers) in the next line, as follows:

my_label = tk.Label(root, text="I am a label widget")
my_label.pack()

Alternatively, you can write both the lines together, as follows:

tk.Label(root, text="I am a label widget").pack()

You can either save a reference to the widget created ( my_label, as in the first example), or create a widget without keeping any reference to it (as demonstrated in the second example).

You should ideally keep a reference to the widget in case the widget has to be accessed later on in the program. For instance, this is useful in case you need to call one of its internal methods or for its content modification. If the widget state is supposed to remain static after its creation, you need not keep a reference to the widget.

Note that calls to pack() (or other geometry managers) always return None. So, consider a situation where you create a widget, and add a geometry manager (say, pack()) on the same line, as follows: my_label = tk.Label(...).pack(). In this case, you are not creating a reference to the widget. Instead, you are creating a None type object for the my_label variable. So, when you later try to modify the widget through the reference, you get an error because you are actually trying to work on a None type object. If you need a reference to a widget, you must create it on one line and then specify its geometry (like pack()) on the second line, as follows:
my_label = tk.Label(...)
my_label.pack()
This is one of the most common mistakes committed by beginners.

Getting to know the core Tkinter widgets

Now you will get to know all the core Tkinter widgets. You have already seen two of them in the previous example—the Label and Button widgets. Now, let's explore all the other core Tkinter widgets.

Tkinter includes 21 core widgets, which are as follows:

Top-level Label Button
Canvas Checkbutton Entry
Frame LabelFrame Listbox
Menu Menubutton Message
OptionMenu PanedWindow Radiobutton
Scale Scrollbar Spinbox
Text Bitmap Image

Let's write a program to display all of these widgets in the root window.

Adding widgets to a parent window

The format used to add widgets is the same as the one that we discussed in the previous task. To give you an idea about how it's done, here's some sample code that adds some common widgets:

Label(parent, text="Enter your Password:")
Button(parent, text="Search")
Checkbutton(parent, text="Remember Me", variable=v, value=True)
Entry(parent, width=30)
Radiobutton(parent, text="Male", variable=v, value=1)
Radiobutton(parent, text="Female", variable=v, value=2)
OptionMenu(parent, var, "Select Country", "USA", "UK", "India","Others")
Scrollbar(parent, orient=VERTICAL, command= text.yview)

Can you spot the pattern that is common to each widget? Can you spot the differences?

As a reminder, the syntax for adding a widget is as follows:

Widget-name(its_parent, **its_configuration_options)

Using the same pattern, let's add all the 21 core Tkinter widgets into a dummy application (1.03.py). We do not reproduce the entire code here. A summarized code description for 1.03.py is as follows:

  1. We create a top-level window and a mainloop, as shown in the earlier examples.
  2. We add a frame widget and name it menu_bar. Note that frame widgets are just holder widgets that hold other widgets. Frame widgets are great for grouping widgets together. The syntax for adding a frame is the same as that for all the other widgets:
        frame = Frame(root)
frame.pack()
  1. Keeping the menu_bar frame as the container, we add two widgets to it:
    • Menubutton
    • Menu
  2. We create another frame widget and name it frame. Keeping frame as the container/parent widget, we add the following seven widgets to it:
    • Label
    • Entry
    • Button
    • Checkbutton
    • Radiobutton
    • OptionMenu
    • Bitmap Class
  3. We then proceed to create another frame widget. We add six more widgets to the frame:
    • Image Class
    • Listbox
    • Spinbox
    • Scale
    • LabelFrame
    • Message
  4. We then create another frame widget. We add two more widgets to the frame:
    • Text
    • Scrollbar
  1. We create another frame widget and add two more widgets to it:
    • Canvas
    • PanedWindow

These constitute the 21 core widgets of Tkinter. Now that you have had a glimpse of all the widgets, let's discuss how to specify the location of these widgets using geometry managers.