

Typically debugging enterprise Java EE applications is a somewhat complicated process, our application server needs to be started in the "debug mode". The procedure for doing this is different depending on the application server, but typically involves passing some command line parameters to the shell script or executable that starts the application server. Our code must also be compiled with debugging enabled; this is usually done by either setting a parameter on the IDE or passing some arguments to the javac executable. Also, our debugger must be "attached" to the application server so that it can "see" the code running in a separate JVM.
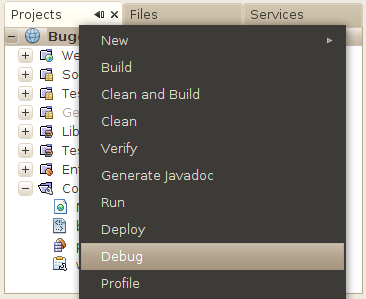
Thankfully all of the steps described in the previous paragraph are automated when using NetBeans with the bundled GlassFish application server. When using this combination, all we need to do is open our Enterprise Application Project then right-click on it and select Debug, at this point the application server is started in debug mode (or restarted in debug mode if it was already running in standard mode), the application is deployed and the debugger is automatically attached to the application server.
We will use a simple application involving JSF, CDI, and JPA to illustrate NetBeans debugging capabilities.
When persisting data in JPA entities, we either need to set the primary key explicitly when inserting a new row in the database, or we need to set automatic primary key generation using the @GeneratedValue annotation. In our example we will use neither approach, this will make our application break when inserting new rows. Here is the relevant code for the JPA entity:
package com.ensode.nbbook.buggywebapp.entitity;

import java.io.Serializable;
import javax.persistence.Basic;
import javax.persistence.Column;
import javax.persistence.Entity;
import javax.persistence.Id;
import javax.persistence.NamedQueries;
import javax.persistence.NamedQuery;
import javax.persistence.Table;
import javax.validation.constraints.NotNull;
import javax.validation.constraints.Size;
import javax.xml.bind.annotation.XmlRootElement;


@Entity
@Table(name = "CUSTOMER")
public class Customer implements Serializable {

    private static final long serialVersionUID = 1L;
    @Id
    @Basic(optional = false)
    @NotNull
    @Column(name = "CUSTOMER_ID")
    private Integer customerId;
    @Size(max = 20)
    @Column(name = "FIRST_NAME")
    private String firstName;
    @Size(max = 20)
    @Column(name = "MIDDLE_NAME")
    private String middleName;
    @Size(max = 20)
    @Column(name = "LAST_NAME")
    private String lastName;
    @Size(max = 30)
    @Column(name = "EMAIL")
    private String email;

    public Customer() {
    }

    public Customer(Integer customerId) {
        this.customerId = customerId;
    }

    //getters and setters omitted for brevity.
}
Notice that the above JPA entity does not use the @GeneratedValue annotation, therefore the value for its primary key needs to be explicitly set before persisting its data.
The following CDI Named bean acts as a controller in our example application, it has a method that is meant to persist data in an instance of the Customer JPA entity.
package com.ensode.nbbook.buggywebapp.controller;

//imports omitted for brevity

@Named
@RequestScoped
@Stateful
public class CustomerController {

    @PersistenceContext(unitName = "BuggyWebAppPU")
    private EntityManager em;
    @Inject
    private CustomerModel customerModel;

    public String createCustomer() {
        Customer customer = entityFromModel(customerModel);
        try {
            persist(customer);
            return "confirmation";
        } catch (Exception e) {
            Logger.getLogger(getClass().getName()).log(
                Level.SEVERE, "exception caught", e);
            return "error";
        }
    }

    public void persist(Object object) {
        try {
            em.persist(object);
        } catch (Exception e) {
            Logger.getLogger(getClass().getName()).log(
                Level.SEVERE, "exception caught", e);
            throw new RuntimeException(e);
        }
    }

    private Customer entityFromModel(CustomerModel customerModel) {
        Customer customer = new Customer();

        customer.setFirstName(customerModel.getFirstName());
        customer.setLastName(customerModel.getLastName());

        return customer;
    }

    public CustomerModel getCustomerModel() {
        return customerModel;
    }

    public void setCustomerModel(CustomerModel customerModel) {
        this.customerModel = customerModel;
    }

    public EntityManager getEm() {
        return em;
    }

    public void setEm(EntityManager em) {
        this.em = em;
    }
}
Notice that nowhere in the above code is the primary key property in the Customer JPA entity set. Since we are not using automatic primary key generation, and we are not explicitly setting the primary key value, our application will throw an exception when attempting to persist an instance of the Customer JPA entity.
If we examine the GlassFish log in the NetBeans output window, we can see the following line:
at com.ensode.nbbook.buggywebapp.controller.CustomerController.createCustomer(CustomerController.java:35)
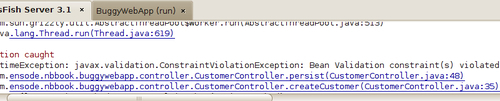
The above line is telling us that an exception occurred on line 35 of CustomerController.java. Therefore we need to pause our application's execution just before that line is executed so that we can inspect the values of all relevant variables at that point.
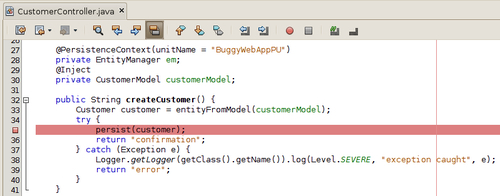
One central feature of debuggers is the ability to pause execution of the application being debugged by adding breakpoints to it. When a line of code where a breakpoint has been placed is about to be executed, the application pauses, allowing us to inspect the values of all instance and method scoped variables in the class where the breakpoint was placed. In NetBeans, placing a breakpoint in a line is very simple, all we need to do is click on the left margin of the source editor right next to the line where the breakpoint will be added, at this point the line will be highlighted in red plus a red square icon will be placed in the left margin.
Tip
To display line numbers, right-click on the left margin and click on the checkbox labeled Show Line Numbers.
At this point we are ready to debug our application, which we can do by simply right-clicking on our project and selecting Debug. Doing this causes our application to be deployed and executed as in debug mode.
We need to test our application as usual in order to get to the point where it is failing. In our example application we simply need to execute the code until it attempts to persist our JPA entity.
Looking at the editor, we will see that the line containing the breakpoint is now highlighted in green, plus an arrow has been placed on the left side margin.
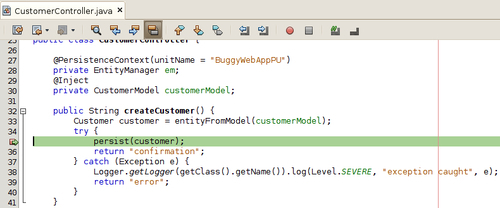
These changes indicate the current line in the execution path. Once the execution has been paused, we can execute the code line-by-line in order to pin point exactly where the problem is happening. There are two ways we can execute each line, we can either step over the line, or step into it, the difference being when we step over, we will not go "into" any method calls, simply going "over" the line. When we step into it, we actually navigate inside any method calls that are being invoked in the current line.
In our example, stepping over the current line would skip the line that is actually persisting the data, therefore the most appropriate course of action is to step into the current line.
In NetBeans, we can step over the current line by pressing F7 or clicking on the icon:

Doing so will take us to the method being invoked in the current line, execution will pause at this point, the next line to be executed will be highlighted in green and an arrow will be placed next to it in the left margin.

Since there is only one executable line in this method, we know that stepping over this line will cause the exception. We can inspect any local variables in the current class and method by looking at the Local Variables window.
Tip
The Local Variables window can be opened by going to Window | Debugging | Local Variables or by pressing Alt+Shift+1 on windows and Linux systems, and Ctrl+Shift+1 on Mac OS X systems.
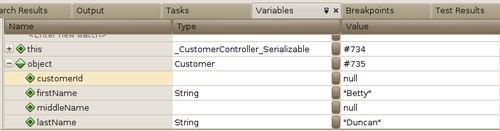
By expanding the node corresponding to our customer object, we can see the values of all of its properties. At this point we should notice that the customerId property is null, which results in the code attempting to insert a new row with a null primary key. At this point we have discovered the problem. Now that the problem is known, fixing the code is trivial, in our example, the easiest way to fix it is to add the @GeneratedValue annotation to the customerId property of our entity bean.