

In this recipe, we will learn how to create a custom event handler for the ItemAdding synchronous event. We will validate the data that is being added to the contact list. We will validate the format of the phone number and e-mail address. The phone number should be of U.S. format. It must consist of three numeric characters, optionally enclosed in parenthesis, followed by a set of three numeric characters, and a set of four numeric characters. The e-mail should follow the standard e-mail notation. We will not allow users to enter some garbage information in these fields. If the data fails, our custom validation will cancel the event so that the data is not inserted into the list.
You should have a fully functional development machine with SharePoint 2010 installed and configured. You also need Visual Studio 2010 IDE installed on the same development machine. The following is the baseline software that is needed to set up the development machine:
Windows 64-bit compliant OS (like Windows 7 or Windows 2008 R2 server)
NET Framework 4.0 (Visual Studio 2010 will install Framework 4.0 whereas SharePoint 2010 requires .NET Framework 3.5)
Visual Studio 2010 with or without Service Pack 1
Expression Blend (optional, but would be helpful in following on Silverlight example)
SQL Server 2008 or SQL Server 2008 R2 (express version is also okay)
SharePoint Designer (optional)
SharePoint Server 2010
Microsoft Office 2010 (InfoPath forms)
You can refer to step-by-step installation instructions of SharePoint on MSDN (http://msdn.microsoft.com/en-us/library/ee554869.aspx). You can also refer to Microsoft 2010 SharePoint Administration Cookbook by Peter Serzo published by Packt Publishing for initial configuration tasks. Peter provides detailed, step-by-step instructions on enabling Developer Dashboard, configuring Secure Store, and so on, which we will be using in the coming chapters. As a developer, it is good to have an understanding of SharePoint Administration as well.
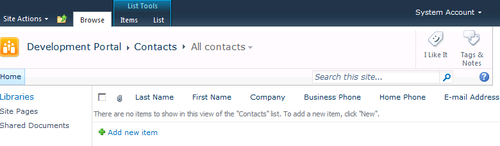
Create a list from the SharePoint user interface called Contacts of template Contacts. The following screenshot shows the end result:
Launch your Visual Studio 2010 IDE as an administrator (right-click the shortcut and select Run as administrator).
Select File | New | Project. The new project wizard dialog box as shown will be displayed (Make sure to select .NET Framework 3.5 in the top drop-down box):

Select Event Receiver under Visual C# | SharePoint | 2010 node from Installed Templates section on the left-hand side.
Name the project ListItemEventReceiver and provide a directory location where you want to save the project and click on OK to proceed to the next step in the wizard.
By default, Visual Studio selects the SharePoint site available on the machine. Select Deploy as a Farm Solution and click on Next to proceed to the next step in the wizard:

In here, make sure to select List Item Events from the drop-down for What type of event receiver do you want? and select Contacts for What item should be the event source?. Select the An Item is being added checkbox in the Handle the following events list box. The following screenshot indicates the selection:

Click on Finish and Visual Studio adds in the necessary files and opens up the
EventReceiver1.cs. This is the code file in which you are going to write your custom event handler.Add the code necessary to validate the phone numbers and e-mail address of the list. Your code should look as follows:
using System;
using System.Security.Permissions;
using Microsoft.SharePoint;
using Microsoft.SharePoint.Security;
using Microsoft.SharePoint.Utilities;
using Microsoft.SharePoint.Workflow;
using System.Text.RegularExpressions;

namespace ListItemEventReceiver.EventReceiver1
{
    /// <summary>
    /// List Item Events
    /// </summary>
    public class EventReceiver1 : SPItemEventReceiver
    {
       /// <summary>
       /// An item is being added.
       /// </summary>
       public override void ItemAdding(SPItemEventProperties properties)
       {
           base.ItemAdding(properties);

           string sWorkPhone = properties.AfterProperties["WorkPhone"].ToString();

           string sEmail = properties.AfterProperties["Email"].ToString();

           if (!string.IsNullOrEmpty(sWorkPhone))
           {
               if (!System.Text.RegularExpressions.Regex.IsMatch(sWorkPhone, @"^[01]?[- .]?(\([2-9]\d{2}\)|[2-9]\d{2})[- .]?\d{3}[- .]?\d{4}$"))
               {
                   properties.Cancel = true;
               }
           }

           if (!string.IsNullOrEmpty(sEmail))
           {
               if (!System.Text.RegularExpressions.Regex.IsMatch(sEmail, @"^(?("")("".+?""@)|(([0-9a-zA-Z]((\.(?!\.))|[-!#\$%&'\*\+/=\?\^`\{\}\|~\w])*)(?<=[0-9a-zA-Z])@))(?(\[)(\[(\d{1,3}\.){3}\d{1,3}\])|(([0-9a-zA-Z][-\w]*[0-9a-zA-Z]\.)+[a-zA-Z]{2,6}))$"))
               {
                   properties.Cancel = true;
               }
           }

       }


    }
}
Build and execute the solution by pressing F5 or from menu Debug | Start Debugging. This should bring up the default browser with the local site that you provided in the project creation wizard.
From your contacts list, select Add new Item to add a new item to the contact list. Here, we will deliberately enter a bad phone format for the Business Phone field as shown in the following screenshot to verify our list event handler:

Click on the Save button on the toolbar, this will invoke the event handler and throws an error as shown in the next screenshot. If you notice, the error page indicates that an event receiver cancelled the request:

Close the error dialog and enter a new contact, but this time using the proper phone and e-mail format. The contact gets added without any problem as follows:

When Visual Studio created the EventReceiver solution, it created a project item called EventReceiver1. This project item is a folder with two files Elements.xml and EventReceiver1.cs. The file
EventReceiver1.cs is used to write our custom event handler code.
Elements.xml is the configuration file for our event receiver. It contains properties such as Name, Type, and ListTemplateId. Property Type indicates the event that we are handling. In this case we are handling ItemAdding event. In our solution, we associated our event receiver with the contacts list in the wizard. That information can be seen from the value associated with ListTemplateId attribute as shown in the next code snippet. The ListTemplatId of 105 corresponds to the contacts template. For the complete list of template IDs refer to MSDN at: http://msdn.microsoft.com/en-us/library/microsoft.sharepoint.splisttemplatetype.aspx.
If we deploy
this solution to our website then any lists that are created using this template as the base will have our event receiver associated. Our code will get executed whenever SharePoint triggers the ItemAdding event for this ListTemplateId.
<?xml version="1.0" encoding="utf-8"?>
<Elements xmlns="http://schemas.microsoft.com/sharepoint/">
  <Receivers ListTemplateId="105">
      <Receiver>
        <Name>EventReceiver1ItemAdding</Name>
        <Type>ItemAdding</Type>
        <Assembly>$SharePoint.Project.AssemblyFullName$</Assembly>
        <Class>ListItemEventReceiver.EventReceiver1.EventReceiver1</Class>
        <SequenceNumber>10000</SequenceNumber>
      </Receiver>
  </Receivers>
</Elements>
Assembly element has some funny looking string. This is called the Visual Studio substitution token. When we build the package, these tokens are substituted by the actual value. In our case, the full assembly name will be added at this location. Class element just provides the fully qualified class name including the namespace.
In the Elements.xml, the SequenceNumber element has a special task. If there is multiple event receivers for the same list and if all are handling the same ItemAdding event like ours then SharePoint refers to this sequence number to determine the order of execution of the handlers. There is a missing element named Synchronization—that is an optional item not shown. It refers to execution of the event. You can set this to execute an event asynchronously or synchronously. But this element does not apply to a synchronous event like ItemAdding. Do not set this property in the Elements.xml file for synchronous events. You can set this property for asynchronous events like ItemAdded to run synchronously.
Visual Studio also added another project item called Features. This is another folder which contains a feature called Feature1. Features are the way to deploy customizations like Event Receivers, Visual Web Parts, Workflows, and so on to a SharePoint environment. If you have a large custom code that makes changes for example to site templates and creates various lists and so on, by using Features, you can package this code together and deploy this code across all the web front ends of your SharePoint farm in one go. This reduces the complexity of going to each and every location of your site template to add your customizations. Some of the capabilities that Features provide in SharePoint are as follows:
Using Features reduces the inconsistencies and versioning discrepancies across the web farm. In our case, it helps us deploy our custom Event Receiver. If you double-click on the Feature1.feature in Visual Studio, you can see as shown in the following screenshot that our Event Receiver is an item inside this feature. Here you can make modifications to the Feature's Title, Scope, and Description. We can deploy this feature across different sites and also on different farms.

When we built and ran our solution, Visual Studio automatically created a package with an extension WSP and deployed it to our test site and activated it. When we stopped debugging the solution, Visual Studio deactivated this feature, uninstalled it, and did all the necessary clean-up work.
WSP extension files are SharePoint solution files. This is basically a CAB file with one or more features. Each of these features can refer to one or more items like Event Receivers, List Definitions, Web Parts, Workflows, and so on.
Document libraries or form libraries in SharePoint are lists but with different content types. We will learn about content types in Chapter 4, List Definitions and Content Types. The recipe we learnt in here will work with any kind of list template. But some list templates populate different values in BeforeProperties and AfterProperties. For more information on AfterProperties and BeforeProperties, refer to MSDN (http://msdn.microsoft.com/en-us/library/microsoft.sharepoint.spitemeventproperties_members.aspx).
Event Receivers you create in Visual Studio inherits from particular SharePoint event receiver class that corresponds to the object to which you are writing the handler. For example, in the recipe we inherited our handler from SPItemEventReceiver. If we were to write an event handler for the List events, we would have inherited our class from SPListEventReceiver. The following table shows the complete list of the Event Receivers class that are used to inherit the event handlers.
|
List Item events |
SPItemEventReceiver |
|---|---|
|
Web events |
|
|
List events |
|
|
Workflow events |
|
|
List Email events |
|
The entire event receivers except for Feature Event Receivers and List Email Event Receivers are derived from a base class called SPEventReceiverBase. FeatureReceivers are derived from a base class called SPFeatureReceiver and Email Event Receiver is derived from a base class called System.Object.
Not all event hosts will support all the event types. Say for example, the list event type ListAdding makes sense from the site or web level perspective. It does not make sense at the list level. Whereas FieldAdding event makes lots of sense for List even though both of these event types have the same base class. For a full list of hosts for event types and their supported events, refer to MSDN at: http://msdn.microsoft.com/en-us/library/gg749858.aspx.
To debug Event Receivers, like any other Visual Studio project, put a breakpoint on the line you want to break. In our example, put a breakpoint on the first line in the method ItemAdding in the file EventReceiver1.cs and press F5 to debug the solution.
Debugging helps you understand your code better. You must build your code with debug configuration enabled for debugger to work. By default, Visual Studio starts with this configuration. When you use debugging, you should stop your code at a certain location and complete the following:
Inspect it for data that is being used by the code
Inspect it for exceptions that occur on conditions
Test while you write your code
Figure out any logical errors
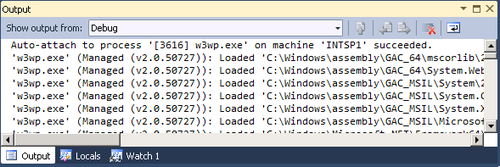
When you press F5, Visual Studio automatically starts a w3wp.exe process and attaches the debugger to that process. W3wp.exe is an IIS worker process that handles all the requests for a particular application pool. The following screenshot shows the output window (you can open the output window from menu View | Output). Here you can see that the first line indicates the process that the debugger has attached to. It also provides the process ID (in this case it is 3616—it may be different for you).
So whenever any requests arrive through this process, the debugger will be able to break at the line you have indicated and highlight the line as shown here. From here on, you can step into code by pressing F11 or step over the code by pressing F10.

You can add watch on the variables in the code. But you cannot change the variable values while running.
SharePoint 2010 offers Developer Dashboard
which provides information that can help developers to debug a problem. By default, Developer Dashboard is not turned on. Turn it on by executing the following command. The following command sets a value on a property named developer-dashboard to ondemand:
Stsadm –o setproperty –pn developer-dashboard –pv ondemand

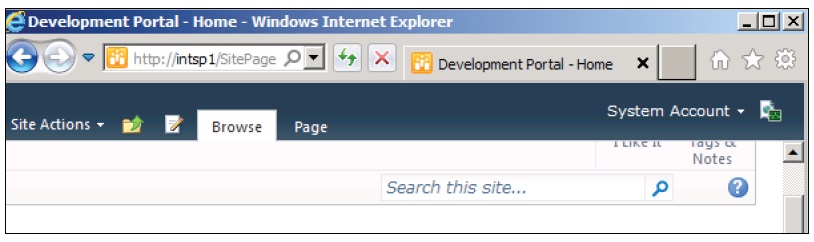
When you refresh your site, you should be able to see a green icon next to the login name on the right-hand side as shown. Clicking that will open the Developer Dashboard which provides information on all the calls SharePoint makes in order to open a page or to execute an event handler.
The following screenshot shows the Developer Dashboard on the initial opening page. If you look closely, you can see that it also provides information on how long certain methods took to process. It also provides information on SQL stored procedures or queries that were executed. You can click on each of these procedures and verify the data that is passed to the queries. Remember, Developer Dashboard does not provide information on how long the custom code took to execute, it provides information on the calls that the custom code made.
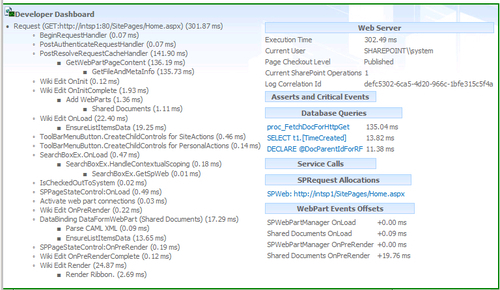
The Log Correlation Id helps you to dig through the ULS logs and find any corresponding problems related to the events that are shown in the Developer Dashboard. Using both the Developer Dashboard and ULS logs, you should be able to find any problem with your custom code.