

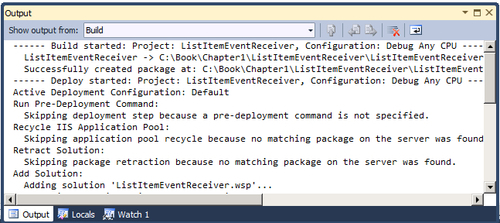
During the previous recipes, we saw Visual Studio automatically uploading a solution and activating it for our test purposes. The entire step-by-step process that Visual Studio does in order to deploy a solution to the site can be seen in the output window as shownin the following screenshot Development is all done and now we need to deploy this solution to production. Here are the step-by-step instructions on how we deploy solutions:
It is necessary to understand the concept of event receivers to follow through this recipe. It is advised to complete the previous recipes sucessfully.
If you have closed Visual Studio IDE, launch it as an administrator.
Open the previously created ListItemEventReceiver solution.
Open the project properties window by right-clicking the project and selecting Properties.
Select the Build Tab and set the Configuration to Active (release).
Rebuild the solution from menu Build | Rebuild.
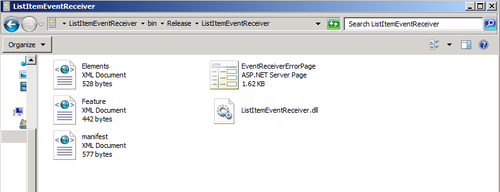
From the same build menu, select Package to make a package of this solution. This will generate a
.wspsolution file in thebinfolder of your solution as shown:
You can use the
stsadmcommand to deploy this solution file to any site in the farm.To add the solution to the solution store use the command:
stsadm –o addsolution –filename ListItemEventReceiver.wspTo deploy the solution use the command:
stsadm –o deploysolution –name ListItemEventReceiver.wsp –local -allowgacdeploymentNow install the feature by using the command:
stsadm –o installfeature –filename ListEventReceiver_Feature1\Feature.xmlYou can navigate to Manage Site Features from Site Action | Site Actions | Manage Site Features. You should see your Feature deployed to the site but not activated as shown:

You can activate the feature by clicking the Activate button.
When we built and packaged our solution, a .wsp solution file was created. This is nothing but a CAB file contaning feature file and the items that the feature is going to install. You can rename the .wsp file to a .CAB extension and open it through any ZIP file extractor. The following is a screenshot showing the contents of a .wsp file:
The
.wsp file contains the DLL, Application Page, and three different XML documents. These XML documents provide the necessary information on where the resources need to be deployed. Open up the manifest.xml in notepad. You can see it lists the locations of the Application Page, Event Receiver DLL, and the Feature.
In SharePoint, a Feature is nothing but an XML file. The XML file is named Feature.xml. This XML contains the name, the ID, and the scope information of the feature. The name and the ID attributes of the Feature uniquely identifies the Feature. An ID is a GUID in the format "xxxxxxxx-xxxx-xxxx-xxxx-xxxxxxxxxxxx" where x is a hexadecimal number that can be from 0-9 and a-f. When you created the solution, Visual Studio automatically created this GUID. Feature.xml also includes the location of the Event Receiver's Elements.xml.
Scope indicates how the Feature needs to be scoped. You can scope a Feature in four ways:
Farm Level: This can be activated at a farm level. That is, all the web applications in the farm will have access to the feature.
Site Level: Can be activated at site collection level, meaning all the sites in the sites collection will have access to this feature.
Web Level: Can be activated for a specific website.
Web Application Level: Can be activated for all sites in the web application.
We
already went through the Elements.xml in the previous recipe and it basically contains the information about the Event Receiver that we deployed.
You can use PowerShell commands to install and activate features instead of stsadm commands. The corresponding PowerShell commands for the STSADM commands that we have used in this recipe are:
Add-SPSolution –LiteralPath <Location of your wsp>
Install-SPSolution -Identity <WSPName> -WebApplication <URLname>
Enable-SPFeature FeatureFolderName -Url <URLName>