Now it is time to create and run a simple Ruby on Rails application using RubyMine exclusively.
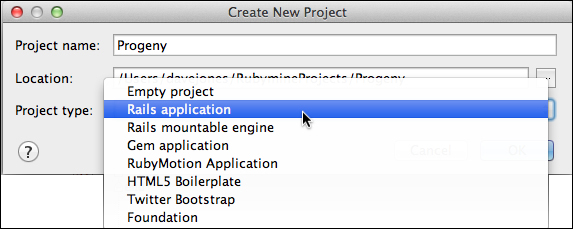
Open RubyMine and navigate to File | New Project. From this window, you can now select what type of project to begin with. RubyMine gives you several options that you can use later. Right now, select Rails application, as shown in the following screenshot:

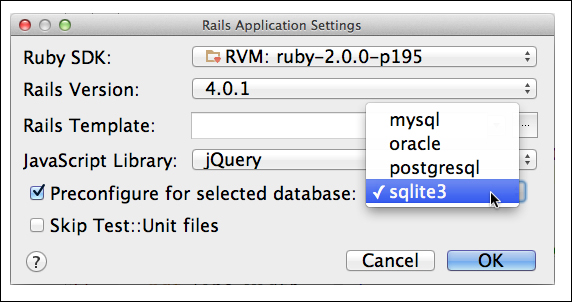
Hit OK and you will see the next settings window which allows you to select which version of Rails you would like to use in your project, along with the JavaScript library and database configurations.
Select the checkbox for Preconfigure for selected database and choose the sqlite3 option, as shown in the following screenshot. Leave the rest as default and hit OK.

Now that you have created a new Rails project, RubyMine takes over and starts using Rails to generate all of the files and configuration necessary for a complete project, including running the command bundle install at the end. This will make sure that you have all the proper Gems installed for your Rails project.
Now, we can run what we have and see that everything is installed correctly, using the following steps:
At the top of the window, select the green arrow to run the Development: Progeny configuration. Running, in this case, means that it will start the default Rails webserver, Webrick, and begin listening on port 3000 for web browser requests.
Once it is running, open your favorite browser and go to the address
http://localhost:3000, and you should see the opening Rails Welcome Aboard screen.Click on the link About your application's environment, you can see some details about your installation including the various version numbers of Rails and Ruby, and the database that your application will be using.
Now, we can build some features for our app. Let's begin by creating an interface to our database of species that we have already assimilated. For this, we can use the Rails generators to build the scaffolding of our application that gives us something to build on.
All of the functionalities of Rails can be accessed from within the RubyMine environment, as shown in the following steps, so it is not necessary to go out to a command window at all:
To run the generators, we just need to navigate to Tools | Run Rails Generator.
As you type, the list is filtered to match your selection. Select the scaffold generator and hit Return:

The following window gives us the opportunity to name our table and the various fields that it will contain. The database table will become the name of our model as well.
Type the following into the top text box:
Species name:string identification:integer assimilated:Boolean
Leave the other settings at their default and hit OK, as shown in the following screenshot:

Now if you reload your browser window, you should see an error like
ActiveRecord:: PendingMigrationError.Oops! We forgot to do something after creating the code for the database tables. We need to run the migrations that will create the actual tables.
Navigate to Tools | Run Rake Task… and start typing
db:migrate. Just like the generator window, the various rake tasks will begin to be filtered by what you type.Hit Return and then select the defaults in the next window Latest migration and the migrations will be run for you.
Now that the tables are created, point your browser to a new location,
http://localhost:3000/species. You will see the index page for yourSpeciesdatabase table, similar to the following screenshot:
Click on the links and add some species to your database. The scaffolding that we generated, produced all of the CRUD (Create Read Update Delete) forms and screens necessary for managing our
Speciesdatabase table, without typing any commands in our terminal or leaving RubyMine at all.
Of course it has no style, but who cares about style? We are the Borg and only care about technology!
Ok. Maybe we can spruce it up a little bit. Lets add a Gem called Bourbon that helps with the following:
Open the Gemfile from the project window and add the following line to it:
gem 'bourbon'
Now we need to install the Gem by running
bundle install. We can do this directly from RubyMine by navigating to Tools | Bundler | Install.Hit the Install button on the window that shows and the Gem will be installed correctly.
Now we can edit the CSS file that is in the
App/Assetsfolder calledspecies.css.scss. Open this file and add the following CSS code to the file:@import "bourbon"; p { @include linear-gradient(to top, white, steelblue); }Reload the page that shows one of the species that you created such as
http://localhost:3000/species/1,as shown in the following screenshot. Now isn't that much better?


