
We will now investigate how to navigate and customize the RubyMine environment, including windows and panel placement, configuration options, tools, and settings.
Assimilation is easier if you are comfortable with your skin.
RubyMine has a wide variety of options and configuration changes that you can make to precisely match your work style. It allows the use of TextMate plugins and even lets you emulate the VIM text editor if you are so inclined to such madness.
Let's start by changing the basic template that comes with RubyMine into an alternate color structure.
To change the colors and fonts by switching themes, follow the steps listed below:
-
Click on the item
 in Settings from the Tools menu. On the left-hand side of the Settings window, there is a setting named Editor.
Click on the gray arrow to open up this setting, as shown in the following screenshot:

Then, click on the Colors and Fonts setting. This window will let you change the overall theme for the entire RubyMine window system.
Click on the default pull-down menu and select the theme Darcula.
Hit OK at the bottom of this window and RubyMine will confirm that you want to change the look and feel of the program.
Select OK in this dialog box and your theme will be set. RubyMine will then ask you to restart the program and you will then be able to see your changes completely. The environment should now look something like this:

All of the settings, colors, fonts, sizes, and so on can be modified through these various settings dialogs and saved as your own custom theme.
We can reset the default colors by selecting the Appearance option in the Settings window. There is a pull-down menu that has default and Darcula in it under the heading of Theme:. The RubyMine environment is made up of various panels that fit together on the screen. You have full control to modify your workspace for easier assimilation. Each panel can be resized, pinned, docked, floating, and split.
The panels all have a common menu that looks like the following screenshot:
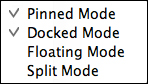
There is a menu item for each of those main controls as follows:
Pinned Mode – If this option is selected, this means that the panel will remain open even if the focus moves away from the panel
Docked Mode – If this option is selected, this means that the panel is part of the entire RubyMine window structure
Floating Mode – If this option is selected, this means that the panel can become its own window completely and moved out of the structure, even into another screen entirely
Split Mode – If this option is selected, it allows for multiple views to occupy the same panel
In order to maximize the screen for writing code specifically, select all of the panels and uncheck the Pinned menu. Now, click on the text window in the center and all of the panels should now be hidden against the main frame of the RubyMine window. There is one more button at the bottom-left corner of the main window that looks like a square. Press that button and even the thick frame will be removed. Now, your screen is ready to construct some serious code.
If you want any of the panels back, you just have to click on the specific panel button on the thick frame to reopen the panel.