
Now that we can play sounds using an audio buffer, let's take a look at playing them in a loop. In this recipe, we'll create an application with a toggle button which toggles the playback of a choir loop.
The complete source code for this recipe is available in the code bundle at recipes/Recipe3_1.
Start with a clean copy of the base framework template. The template bundle is located at
tools/RecipeFrameworkin the code bundle.Open
index.htmlwith a text editor.In the HTML section, declare the HTML toggle control:
<div id="appwindow">
    <h2>Playing Audio In A Loop</h2>
    <form>
        <input type="checkbox" id="choir" />
        <label for="choir">Choir Loop</label>
    </form>
</div>
We'll need the Web Audio initialization and the audio file loading routines covered in previous recipes—we'll add these to the JavaScript section:
function loadAudioFromUrl( url, loadedCallbackFn,
                           callbackContext ) {
    var request = new XMLHttpRequest();
    request.open("GET", url, true);
    request.responseType = "arraybuffer";

    request.onload = function() {
        consoleout( "Loaded audio '" + url + "'" );
        later( 0, loadedCallbackFn, callbackContext,
               request.response );
    };

    request.onerror = function() {
        consoleout( "ERROR: Failed to load audio from "
                    + url );
    };

    request.send();
}

WebAudioApp.prototype.initWebAudio = function() {
    var audioContextClass = window.webkitAudioContext
                            || window.AudioContext;

    if( audioContextClass == null )
        return false;

    this.audioContext = new audioContextClass();
    return true;
};
We'll implement the HTML toggle control initialization and loop playback logic in
WebAudioApp.initBufferedAudioLoopToggle():WebAudioApp.prototype.initBufferedAudioLoopToggle = function( elemId, audioSrc ) { // Initialize the button and disable it by default var jqButton = $( elemId ).button({ disabled: true }); // Load the audio var audioBuffer; loadAudioFromUrl( audioSrc, function(audioData){ // Decode the audio data into an audio buffer this.audioContext.decodeAudioData( audioData, function( audioBufferIn ) { consoleout( "Decoded audio for '" + audioSrc + "'" ); // Cache the audio buffer audioBuffer = audioBufferIn; // Audio ready? Enable the button jqButton.button( "option", "disabled", false ); } ); }, this ); // Register a click event listener to trigger playback var me = this; var activeNode; jqButton.click(function( event ) { // Stop the active source node... if( activeNode != null ) { if( activeNode.stop instanceof Function ) activeNode.stop( 0 ); if( activeNode.noteOff instanceof Function ) activeNode.noteOff( 0 ); activeNode = null; consoleout( "Stopped audio loop '" + audioSrc + "'" ); } // Start new playback if the button is checked if($(this).is(':checked')) { var sourceNode = me.audioContext .createBufferSource(); sourceNode.buffer = audioBuffer; // Connect it to the speakers sourceNode.connect( me.audioContext.destination ); // Start the audio playback if( sourceNode.start instanceof Function ) sourceNode.start( 0 ); if( sourceNode.noteOn instanceof Function ) sourceNode.noteOn( 0 ); // Turn on looping sourceNode.loop = true; // Keep track of the active sound loop activeNode = sourceNode; consoleout( "Played audio loop '" + audioSrc + "'" ); } }); };Finally, we'll initialize Web Audio to set up the loop playback logic in
WebAudioApp.start():WebAudioApp.prototype.start = function() { if( !this.initWebAudio() ) { consoleout( "Browser does not support WebAudio" ); return; } this. initBufferedAudioLoopToggle( "#choir", "assets/looperman-morpheusd-amazing-pt2-choir-120-bpm.wav" ); };
Launch the application test URL in a web browser (http://localhost/myaudiomixer) and click on the Choir Loop button to toggle the loop playback. The following is a screenshot of what we should see in the web browser:

Let's take a closer look at the toggle control's click event handler in WebAudioApp.initBufferedAudioLoopToggle():
When the user deactivates playback, we use the method
stop()ornoteOff()of theAudioBufferSourceNodeinstance to explicitly stop the activeAudioNodeclass:jqButton.click(function( event ) { // Stop the active source node... if( activeNode != null ) { if( activeNode.stop instanceof Function ) activeNode.stop( 0 ); if( activeNode.noteOff instanceof Function ) activeNode.noteOff( 0 ); activeNode = null; ... }When a user activates playback, we trigger sound playback as per the previous recipe:
    if($(this).is(':checked')) {
        // Decode the audio data into an audio buffer
        var sourceNode = me.audioContext.createBufferSource();
        sourceNode.buffer = audioBuffer;

        // Connect it to the AudioContext destination node
        sourceNode.connect( me.audioContext.destination );

        // Start the audio playback
        if( sourceNode.start instanceof Function )
            sourceNode.start( 0 );
        if( sourceNode.noteOn instanceof Function )
            sourceNode.noteOn( 0 );
Then, we turn on the looping behavior by setting the
AudioBufferSourceNodeinstance'sloopattribute totrue:// Turn on looping sourceNode.loop = true;
The following are the new Web Audio API members covered in this recipe:
Set the
loopattribute ofAudioBufferSourceNodetotrueto enable looping; by default, the playback will loop from start to end:interface AudioBufferSourceNode : AudioSourceNode { var loop:Boolean;The
loopStartandloopEndattributes ofAudioBufferSourceNodeallow the application to customize the audio section to play in a loop. When specified, playback will loop infinitely once inside the loop time frame:var loopStart:Number; var loopEnd:Number; };
The ability to limit looping to a subsection within a larger playing segment is a powerful mojo—it lets developers implement some pretty complicated playback behavior with just a few lines of code. Let's use this functionality to improve our choir loop quality.
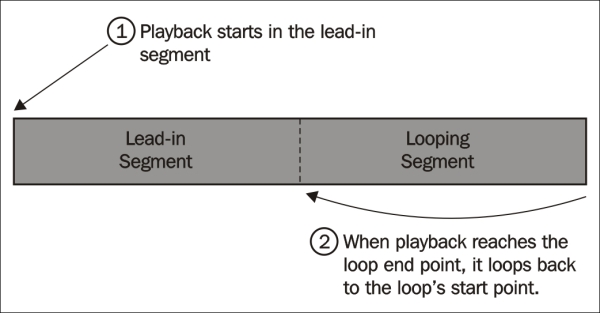
The choir loop audio sample is actually composed of two audio segments of equal lengths:
A lead-in segment with a soft start
A looping segment
As a result, the choir loop is disjointed whenever the sound loops from start to end. Using the loopStart and loopEnd attributes of AudioBufferSourceNode, we can modify the looping behavior so that looping only occurs in the looping segment. The following diagram describes what we're trying to accomplish:
Let's modify the toggle's click event handler to fix the loop; add the following highlighted code snippet to the handler:
jqButton.click(function( event ) {
...
        // Turn on looping
        sourceNode.loop = true;
// Specify a custom loop segment
sourceNode.loopStart = audioBuffer.duration * 0.5;
sourceNode.loopEnd = audioBuffer.duration;
// Keep track of the active sound loop
activeNode = sourceNode;
...
});We retrieve the sample's duration from the duration attribute of AudioBuffer and use it to calculate the start and end points for the loop segments. Then, we fill the loopStart and loopEnd attributes of AudioBufferSourceNode with the loop start and end times, respectively.
Tip
The loopEnd attribute must be set if the loopStart attribute is set. Otherwise, the loop segment settings will have no effect.
Now, the choir loop playback starts with a gentle lead-in before entering a seamless infinite loop.
The AudioBuffer class is much more than a container for audio data. Applications can gather metrics about the audio sample from an AudioBuffer instance. Applications can even retrieve and modify the waveform data!
The following is the AudioBuffer class definition:
interface AudioBuffer {

    var duration:Number;          // readonly
    var numberOfChannels:Number;  // readonly
The duration attribute contains the audio sample's duration measured in seconds and the numberOfChannels attributes contain the number of audio channels in the sample:
    var sampleRate:Number;        // readonly
    var length:Number;            // readonly

    function getChannelData(channel:Number):Float32Array;
};
The sampleRate attribute contains the sample rate of the audio data measured in Hz.
The length attribute contains the length of the audio data measured in sample frames.
The function getChannelData() retrieves the channel waveform for the target channel. It returns the waveform as an array of the size length containing all the frame samples. Each sample is the waveform's PCM float value normalized to the [-1, +1] range.