
Now that we've wrapped our heads around playing audio, it's time to look at controlling the sound volume. In this recipe, we'll build an audio player with real-time volume controls. We'll use a piano sound loop instead of the choir loop this time around to keep things fresh.
The complete source code for this recipe is available in the code bundle at recipes/Recipe4_1a.
Start with a clean copy of the base framework template. The template bundle is located at
tools/RecipeFrameworkin the code bundle.Open
index.htmlwith a text editor.In the HTML section, we'll add the piano loop toggle and the volume control widget:
<div id="appwindow">

<h2>Setting The Volume</h2>
<form>
    <input type="checkbox" id="piano" />
    <label for="piano">Piano Loop</label>
    <span>VOLUME</span>
    <span id="pianovol" style="display: inline-block;
          width: 300px;"></span>
</form>

</div>
Like the previous recipes, we'll need the Web Audio initialization and audio file loading routines; we'll add these to the JavaScript section:
function loadAudioFromUrl( url, loadedCallbackFn,
                           callbackContext ) {
    var request = new XMLHttpRequest();
    request.open("GET", url, true);
    request.responseType = "arraybuffer";

    request.onload = function() {
        consoleout( "Loaded audio '" + url + "'" );
        later( 0, loadedCallbackFn, callbackContext,
               request.response );
    };

    request.onerror = function() {
        consoleout( "ERROR: Failed to load audio from "
                    + url );
    };

    request.send();
}

WebAudioApp.prototype.initWebAudio = function() {
    var audioContextClass = window.webkitAudioContext
                            || window.AudioContext;

    if( audioContextClass == null )
        return false;

    this.audioContext = new audioContextClass();
    return true;
};
Let's take a first stab at tidying up the boilerplate code for controlling node playback; we'll wrap the
startandstopaudio playback functionalities into the functionsstopNode()andstartNode(), respectively. It's a marginal improvement, but an improvement nonetheless:function stopNode( node, stopSecs ) { if( node.stop instanceof Function ) node.stop( stopSecs ); else if( node.noteOff instanceof Function ) node.noteOff( stopSecs ); } function startNode( node, startSecs,loop ) { // Turn on looping if necessary if( loop ) node.loop = true; // Start playback at a predefined time if( node.start instanceof Function ) node.start( startSecs ); else if( node.noteOn instanceof Function ) node.noteOn( startSecs ); return node; }We'll create the function
WebAudioApp.initMusicControls()to wrap all the sound manipulation logic:WebAudioApp.prototype.initMusicControls = function( elemId, audioSrc, elemVolId ) { }We'll start by adding the logic for loading the audio data into
WebAudioApp.initMusicControls()and initializing the sound toggle:// Initialize the button and disable it by default var jqButton = $( elemId ).button({ disabled: true }); // Load the audio var audioBuffer; loadAudioFromUrl( audioSrc, function(audioData){ // Decode the audio data into an audio buffer this.audioContext.decodeAudioData( audioData, function( audioBufferIn ) { consoleout( "Decoded audio for '" + audioSrc + "'" ); // Cache the audio buffer audioBuffer = audioBufferIn; // Enable the button once the audio is ready jqButton.button( "option","disabled",false ); } ); }, this );It's time to enhance our node graph with a volume controller. In Web Audio, volume is controlled using a separate
GainNodenode instance. We'll instantiate aGainNodeinstance and attach it to our node graph; the instance will serve as our application's volume controller:// Create the volume control gain node var context = this.audioContext, volNode; if( context.createGain instanceof Function ) volNode = context.createGain(); else if( context.createGainNode instanceof Function ) volNode = context.createGainNode(); // Connect the volume control the the speaker volNode.connect( context.destination );Next, we'll initialize our HTML slider widget and link the slider changes to the
GainNodeinstance, of our volume controller:// Create the volume control $( elemVolId ).slider({ min: volNode.gain.minValue, max: volNode.gain.maxValue, step: 0.01, value: volNode.gain.value, // Add a callback function when the user // moves the slider slide: function( event, ui ) { // Set the volume directly volNode.gain.value = ui.value; consoleout( "Adjusted music volume: " + ui.value ); } });We complete the
WebAudioApp.initMusicControls()function by implementing the sound toggle event handler for starting and stopping the audio loop:var me = this; var activeNode; jqButton.click(function( event ) { // Stop the active source node if( activeNode != null ) { stopNode( activeNode, 0 ); activeNode = null; consoleout( "Stopped music loop '" + audioSrc + "'" ); } // Start a new sound on button activation if($(this).is(':checked')) { // Start the loop playback activeNode = me.audioContext.createBufferSource(); activeNode.buffer = audioBuffer; startNode( activeNode, 0, true ); // Connect it to the volume control activeNode.connect( volNode ); consoleout( "Played music loop '" + audioSrc + "'" ); } });Finally, in
WebAudioApp.start(), we initialize Web Audio and the music controls:WebAudioApp.prototype.start = function() { if( !this.initWebAudio() ) { consoleout( "Browser does not support WebAudio" ); return; } this.initMusicControls( "#piano", "assets/looperman-morpheusd-dreamworld-fullpiano-120-bpm.wav", "#pianovol" ); };
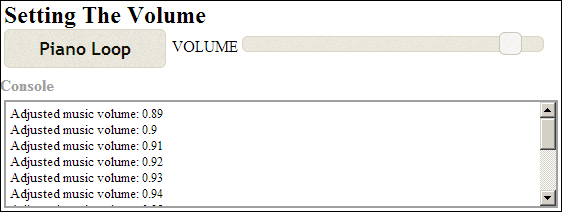
Launch the application test URL in a web browser (http://localhost/myaudiomixer) to see the end result. The following is a screenshot of what we should see in the browser:
We add in volume control support by inserting a GainNode instance between the audio source node and the speaker output node, as shown in the following diagram:

We control the output volume from a GainNode instance by adjusting its gain audio parameter. The gain audio parameter specifies the multiplier applied to the GainNode input signal when producing its output signal.
Let's take a deeper look at WebAudioApp.initLoopToggle() and its implementation to support volume control:
We create
GainNodeusing the methodcreateGain()orcreateGainNode()ofAudioContextand cache the instancevolNode:var context = this.audioContext; var volNode; if( context.createGain instanceof Function ) volNode = context.createGain(); else if( context.createGainNode instanceof Function ) volNode = context.createGainNode();New
GainNodeinstances have theirgainaudio parameter automatically set to1.We connect the
GainNodeinstance to the context'sAudioDestinationNodeinstance:volNode.connect( context.destination );
Whenever we start playing sounds, we instantiate and activate a new
AudioBufferSourceNodeinstance as before, except that we connect its output to the volume controller,volNode, instead of directly connecting it to the speaker node. Notice how we're reusing the sameGainNodeinstance for all sounds played:var me = this; var activeNode; jqButton.click(function( event ) { // Stop the active source node if( activeNode != null ) { me.stopNode( activeNode, 0 ); activeNode = null; ... } // Start a new sound on button activation if($(this).is(':checked')) { // Start the loop playback activeNode = me.startNode( audioBuffer, 0, true ); // Connect it to the volume control activeNode.connect( volNode ); ... } });The
GainNodeinstances are reusable unlike theAudioBufferSourceNodeinstances. TheGainNodeinstance will remain alive so long as we maintain an active JavaScript reference throughvolNode.We initialize the volume control element and configure the range and starting values using the
GainNodeinstance'sgainaudio parameter settings:$( elemVolId ).slider({ min: volNode.gain.minValue, max: volNode.gain.maxValue, step: 0.01, value: volNode.gain.value,When the slider is moved, we set the
GainNodeinstance'sgain.valueattribute to the slider value:slide: function( event, ui ) { volNode.gain.value = ui.value; ... } });
Let's take a look at the Web Audio API methods/attributes introduced in this recipe:
AudioContext.createGain()instantiates and returns aGainNodeinstance:interface AudioContext { function createGain():GainNode; };The
GainNodeinstance multiplies its input signal values by a gain multiplier. TheGainNodeinstance stores the gain multiplier in anAudioParaminstance accessible through thegainattribute:interface GainNode : AudioNode { var gain:AudioParam; };AudioParamis Web Audio's standard audio parameter interface. It allows applications to retrieve the parameter configuration and to tweak its value. The interface also allows applications to script the parameter behavior.
We'll look at its basic attributes for the moment and explore the scripting functionality in the next recipe:
The
AudioParam.valueattribute stores the applied parameter value of the instance. Applications write to this attribute to change the parameter value directly:interface AudioParam { var value:Number;The
minValueandmaxValueattributes store the parameter's minimum and maximum values, respectively.var minValue:Number; // readonly var maxValue:Number; // readonlyThe
AudioParaminstance's default value is stored indefaultValue:var defaultValue:Number; // readonly };
Encapsulating the audio playback logic into the functions startNode() and stopNode() improved the code's readability, but only marginally. In addition, it's tiring having to reimplement the same boilerplate code for initializing Web Audio and for handling audio file loads. It's time to take the next step—we'll integrate the Web Audio boilerplate functionality into the framework template:
We'll make the Web Audio initialization and sound loading logic a permanent part of the framework.
We'll wrap the node graph construction and sound playback logic into an
AudioLayerclass.
This is the framework template we'll be using for the rest of the recipes.
The following are the class definitions for the new AudioLayer class and the updated WebAudioApp class:
The
AudioLayerconstructor constructs the basic Node Graph:class AudioLayer { function AudioLayer( context:AudioContext );AudioLayerexposes the volume gain audio parameter through itsgainattribute:var gain:AudioParam;
AudioLayer.playAudioBuffer()implements the audio buffer playback logic:function playAudioBuffer( audioBuffer:AudioBuffer, startSecs:Number, loop:Boolean ):AudioBufferSourceNode };WebAudioApp.initWebAudio()contains the WebAudio initialization logic:class WebAudioApp { function start(); function initWebAudio();WebAudioApp.loadAudio()contains the audio buffer loading logic:function loadAudio( audioSrc:String, callbackFn:function(buffer:AudioBuffer), context:*? ); };
We'll also clean up the logic for handling backwards compatibility.
Previously, we searched for the appropriate method name at the time of execution:
    // Start playback at a predefined time
    // Call the appropriate playback start function
    // on the AudioBufferSourceNode
    if( sourceNode.start instanceof Function )
        sourceNode.start( startSecs );
    if( sourceNode.noteOn instanceof Function )
        sourceNode.noteOn( startSecs );
This approach is tedious and error prone.
A better approach is to ensure that the new method name always exists. If it does not exist, we'll map the old method to its new name as shown in the following code:
    // Make sure that an AudioBufferSourceNode instance
    // always has the new method name. This code occurs after
    // the AudioBufferSourceNode is constructed
    if( sourceNode.start == null )
        sourceNode.start = sourceNode.noteOn;

    // The rest of the code can now assume that the start()
    // function always exists...
The updated template framework is found in the tools/RecipeFrameworkV2 subdirectory in the code bundle.
The directory recipe/Recipe4_1b contains this recipe's source code after it's adapted to the new template framework.