Our video has been exported to Compressor and the chapter markers have been set in place. The last piece of the puzzle is learning how to tell Compressor to take our FCPX timeline and burn it to a disc of our choosing—DVD or Blu-ray.
No factory-issued Mac comes with a Blu-ray drive of any sort. You can get them installed with a bit of hassle, or, much easier, you can buy yourself an external unit for about $100. Either way, you've got to get your hands on one!
As for burning DVDs, Apple is slowly cutting the SuperDrive from their computer lineup, so if you don't have one, you can buy their external SuperDrive for $80 at any Apple Store or online. Most third party drives work as well, but the Apple one sure is tiny and pretty!
1. If you haven't done so already, open your project in FCPX and choose Share | Send to Compressor. If you're picking up from where we left off in the previous recipe, ignore this step!
2. In the Settings window, click on the disclosure triangle next to the folder labeled Apple. More folders appear inside:

3. Drag the entire Disc Burning folder up into your batch window and drop it on top of your job (in the following screenshot, we dropped it on top of TBS — Episode 2):

Three lines, called targets in Compressor, appear on our job. The one labeled Dolby Digital Professional is the compression setting for our audio. The H.264 for Blu-ray is, unsurprisingly, the compression setting for Blu-ray video and the MPEG-2 for DVD is for burning to DVD.
Note
Most of the time, video and audio are merged into one target, but the world of DVDs and Blu-rays works a bit different than normal digital movie files on computers.

In reality, you're probably burning to just Blu-ray or DVD, but not both. So let's get rid of the extraneous option. In our case, we want to burn a Blu-ray disc, so we'll delete the DVD option.
4. Click on MPEG-2 for DVD and hit Delete. The target disappears:

5. Click on the Destinations tab in the Settings window and then on the disclosure triangle next to the Apple folder:

6. Drag the Desktop destination onto each of the two targets:

This tells Compressor where to create the two files. You can pick a different location, but we used the Desktop for ease.
7. Click somewhere in the empty space of the job to ensure it's highlighted. You'll know you've successfully highlighted the entire job if the whole item in the batch window turns blue-gray:

8. In the Inspector, click on the Job Action tab and choose Create Blu-ray Disc from the drop-down menu (or Create DVD if that's what you're choosing to burn). A series of preferences will appear:

9. If you have a Blu-ray burner, make sure it is selected in the Output Device drop-down menu. If you do not have a Blu-ray burner, you can choose the Hard Drive (Blu-ray) option to create a disc image file that can be taken to another computer with a Blu-ray burner to burn at a later time.
10. Select a Disc Template from the drop-down menu and choose from the rest of the rather self-explanatory options.
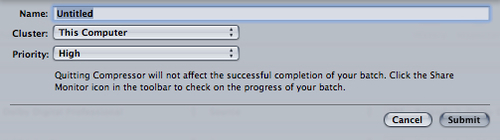
11. When you are done selecting your disc burning options, click on Submit in the lower-right corner of the batch window. Click on Submit again in the second dialog box that pops up (more on that in the More Info section):

Compressor begins the task of compressing the video for Blu-ray and when it is done, it will prompt you to insert a blank disc if you have not done so already. If you choose the Hard Drive (Blu-ray) option, it will create the disc image. Once you submit the batch, this process can take a wildly varied time depending on the length of your movie and your computer's processing power. Compressor will do its best to give you an estimated wait time, but it's rarely accurate, so don't hold your breath!

This exercise glossed over what the dialog box was all about after clicking on Submit the first time in step 9. The Name field lets us optionally name the batch in case we're going to be submitting many batches for compression and we want to easily keep tabs on all of them. The Cluster option is well beyond the scope of this book, but has to do with distributed processing, that is, the ability to split the batch up into chunks that will be processed on multiple networked machines to speed up the workflow. Finally, the Priority option let's us set a priority level for the batch (that is how much processing power it will throw at the batch):