
Sometimes during the project we may face a radical change in a 3D model we have already imported into the Lumion project. The worst scenario is reassigning all the materials to the new 3D model and perhaps relocating to the correct place. However, Lumion has an option to help us with this and to avoid reassigning all the materials or at least not all of them, and the 3D model will stay in exactly the same place.
Before we begin replacing the 3D model, we may want to save another version just in case something goes wrong, and another safety measure is saving a material set as a backup.
With the Import menu selected, perform the following steps:
Select the Edit materials menu.
Click on the small white dot on our 3D model to select the model.
On the bottom-right corner of the screen, we can see the Reload model and re apply materials button.
Press the Ctrl key to activate the Reload model and re apply materials new file button, as you can see in the following screenshot:
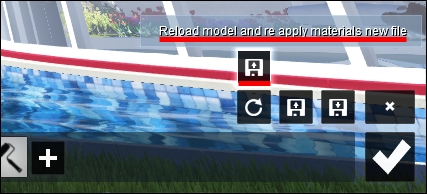
Click on the Reload model and re apply materials new file button to open a new window.
Select the file and click on the Open button.
Click on the OK button to accept the changes.
In most situations, this will work as long we don't modify the names of the objects inside the 3D file. What that means is, for example, we can change the size, rotation, and even the position of the wall_01 object, and when we reload the model, the material that was assigned to the wall_01 object will be the same. However, if you change the name of the object for something like Wall_01, just the fact that you used a capital letter will be enough to confuse Lumion, and the material will not be assigned.
To save the materials assigned to the model, check the Saving materials recipe found in Chapter 6, Working With Lumion Materials