

Secure Shell (SSH) is a network protocol that guarantees robust authentication, data encryption, and data integrity between two networked machines that connect over an insecure network. It uses the client-server architecture and transparently encrypts the data between the client and server. SSH clients communicate with SSH servers over encrypted network connections. There are plenty of free and commercial products available that implement the SSH protocol. SSH has various authentication mechanisms where OpenShift uses the public-private key pair authentication mechanism. Other SSH authentication methods such as password authentication and host-based authentication are beyond the scope of this book.
In this recipe, you will learn how to create a public-private key pair and upload the public key to your OpenShift account. OpenShift uses SSH for the following purposes:
Providing a secure and encrypted connection between your machine and application gear
Allowing remote access to your application gear
Working with your application Git repository and deploying code to OpenShift
Port forwarding, which allows users to connect to OpenShift services such as databases from their own machines
To complete this recipe, you will need the OpenSSH SSH connectivity tools installed on your machine. These are very common as they come bundled with most Linux installations, Macintosh OS X, and almost all Unix-inspired operating systems. Microsoft Windows also has plenty of free and commercial SSH clients as mentioned at http://www.openssh.com/windows.html. Also, if you use PuTTy on your Windows machine, then you can refer to the official documentation at https://www.openshift.com/developers/install-and-setup-putty-ssh-client-for-windows.
To verify that the OpenSSH client tool is installed, run the following command:
$ ssh -V
OpenSSH_6.2p2, OpenSSL 1.0.1e-fips 11 Feb 2013
Perform the following steps:
Run the
ssh-keygencommand to generate a new pair of SSH keys. Thessh-keygencommand is one of the SSH tools installed by OpenSSH. This command will generate a key pair in the.sshfolder under the user's home directory:$ ssh-keygen -t rsa -b 2048 -C 'SSH keys to connect with OpenShift'Go to the Settings web page at https://openshift.redhat.com/app/console/settings and paste the content of the public key. The public key is the key with the
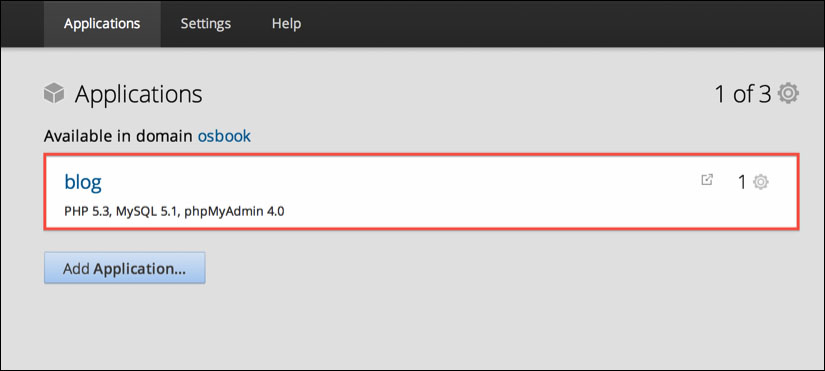
.pubextension. After pasting the public key content, click on the save button.Go to the Applications web page at https://openshift.redhat.com/app/console/applications and click on the application for its details, as shown in the following screenshot:
Next, view the application SSH details by clicking on Want to log in to your application?, as shown in the following screenshot:
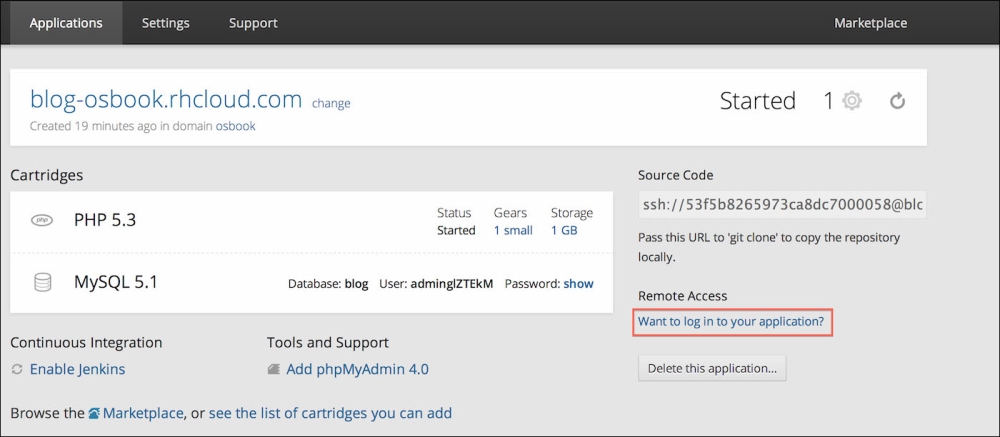
Copy the application SSH information shown in the following screenshot:

Open a new command-line terminal on your local machine and run the following command. Here, you will list the directories in the application's gear home folder. Replace the SSH information with your application SSH information.
$ ssh [email protected] ls
app-deployments
app-root
git
mysql
php
phpmyadmin
First, let's try to understand what you did in the preceding section. In the first step, you created a new pair of SSH keys. The ssh-keygen utility can take a number of options. Three of the many options used are as follows:
The
-toption is used to specify the type of the key. It can be either RSA or DSA, and in this case, the RSA key type is used. Note that OpenShift supports both the RSA and DSA key types.The
-boption is used to specify the number of bits in the key. For RSA keys, the minimum size is 768 bits and the default is 2048 bits. Generally, 2048 bits is considered sufficient.The
-Coption is used to provide a comment, which can be useful to identify a key. This is appended to the public key.
The ssh-keygen command prompts the user with a few questions, as shown in the following command:
$ ssh-keygen -t rsa -b 2048 -C 'SSH keys to connect with OpenShift'
Generating public/private rsa key pair.
Enter file in which to save the key (/home/vagrant/.ssh/id_rsa):
Enter passphrase (empty for no passphrase):
Enter same passphrase again:
Your identification has been saved in /home/vagrant/.ssh/id_rsa.
Your public key has been saved in /home/vagrant/.ssh/id_rsa.pub.
The key fingerprint is:
ad:59:8a:02:e6:94:35:92:a3:b9:94:93:c8:9a:30:47 SSH keys to connect with OpenShift
The key's randomart image is:
+--[ RSA 2048]----+
|                 |
|   .             |
|  E o            |
|o+o= .   .       |
|***     S o      |
|+O..   . =       |
|+ . . . +        |
|     .           |
|                 |
+-----------------+
Firstly, this command asks the user to provide the SSH key filename and its location. The default filename for RSA keys is id_rsa for a private key and id_rsa.pub for a public key. The default location to store these keys is the .ssh folder under the user's home directory.
Secondly, it asks the user to provide a passphrase. In order to not use a passphrase, just press Enter twice. The passphrase is used to secure the private key. If you enter a passphrase, you will be prompted to enter the passphrase every time you perform any operation that requires SSH. In the next recipe, you will learn how to use a passphrase without entering it each time.
When you run any SSH client, such as ssh, to connect with an SSH server, the client uses the private key to prove your identity to the server. The server uses the public key for authentication. If the authentication succeeds, then the connection proceeds. Otherwise, you will get an error message.
In the second step, you uploaded the public SSH key to the OpenShift account. OpenShift copies the public key into an authorization file on the application gear at ~/.ssh/authorized_keys. Thereafter, when an SSH client requests a connection to the application gear, the SSH server running on the application gear consults the authorized_keys file to find the matching public key.
From step 3 to step 5, you learned how to find the SSH information for an application using the web console. In step 6, you tested the SSH connection by executing the ls command on the application gear. The first time you connect to an SSH server, you will be asked whether you want to connect to the server. This is because the client does not know about the server. The SSH client consults the known_hosts file at ~/.ssh/known_hosts for the server information. If there is no entry in ~/.ssh/known_hosts, then it will ask for confirmation, as shown in the following command:
$ ssh [email protected] ls

The authenticity of host 'blog-osbook.rhcloud.com (54.221.64.115)' can't be established.
RSA key fingerprint is cf:ee:77:cb:0e:fc:02:d7:72:7e:ae:80:c0:90:88:a7.
Are you sure you want to continue connecting (yes/no)? yes

Warning: Permanently added 'blog-osbook.rhcloud.com,54.221.64.115' (RSA) to the list of known hosts.

app-deployments
app-root
git
mysql
php
phpmyadmin
After you enter yes, a new entry will be added to the known_hosts file at ~/.ssh/known_hosts. The known_hosts file at ~/.ssh/known_hosts acts as a database, and the client will check this file for the server entry on every subsequent request.
You can decide to use another name or location for the SSH key pair. You can create another SSH key using the ssh-keygen utility. This time, name the key openshift_key:
$ ssh-keygen
Generating public/private rsa key pair.
Enter file in which to save the key (/home/vagrant/.ssh/id_rsa): /home/vagrant/.ssh/openshift_key
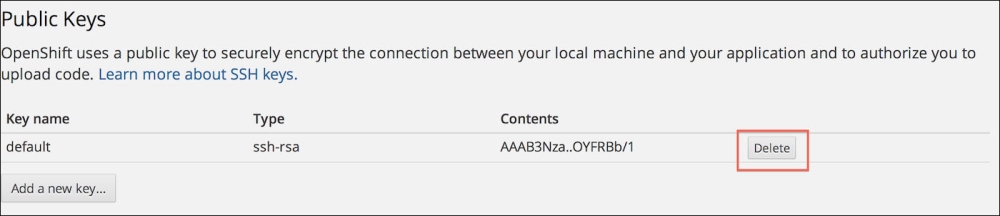
Go to the OpenShift account settings web page at https://openshift.redhat.com/app/console/settings and delete the existing key, as shown in the following screenshot:
Now, upload the openshift_key.pub SSH key to your OpenShift account as discussed previously.
Run the ssh command again. This time, you will get an error, as the SSH client used the default key to connect with the SSH server. The default key name is id_rsa. Now, let's try to run the ls command on the application gear to confirm whether we get the Permission denied error:
$ ssh [email protected] ls
Permission denied (publickey,gssapi-keyex,gssapi-with-mic).
Tip
To get debug information, you should use the following command:
ssh -v [email protected] ls
To get even more debug information, you should use the following command:
ssh -v -v -v [email protected] ls
The number of –v options in the preceding command defines the verbosity.
To connect with the application gear, you have to connect using openshift_key. To use a different key, run the following command:
$ ssh -i /home/vagrant/.ssh/openshift_key [email protected] ls
The -i option is used to tell the SSH client to pick a different SSH key.