
If you cannot rebalance CPU load or increase processor efficiency even after all of the recipes discussed earlier, then it might be something else that is keeping the host CPU still saturated.
It could be a resource pool and its allocation of resources toward the VM.
Many applications, such as batch jobs, respond to a lack of CPU resources by taking longer to complete but still produce correct and useful results. Other applications might experience failure or might be unable to meet critical business requirements when denied sufficient CPU resources.
The resource controls available in vSphere can be used to ensure that resource-sensitive applications always get sufficient CPU resources, even when host CPU saturation exists. You need to make sure that you understand how shares, reservations, and limits work when applied to resource pools or to individual VMs. The default values ensure that ESXi will be efficient and fair to all VMs. Change the default settings only when you understand the consequences.
To step through this recipe, you need a running ESXi Server, a couple of running CPU-hungry VMs, a vCenter Server, and vSphere Web Client. No other prerequisites are required.
Let's get started:
- Log in to vCenter Server using vSphere Web Client.
- On the home screen, navigate to
Hosts and Clusters. - Expand the ESXi host and go to the CPU-hungry VM.
- Navigate to the
Monitortab. - Navigate to the
Performancetab. - Navigate to the
Advancedview. - Click on
Chart Options. - Navigate to
CPUfromChart metrics. - Navigate to the VM object.
- Navigate to the
Advancedtab and click on theChart Options. - Select only
ReadyandUsedin theCounterssection and click onOK.
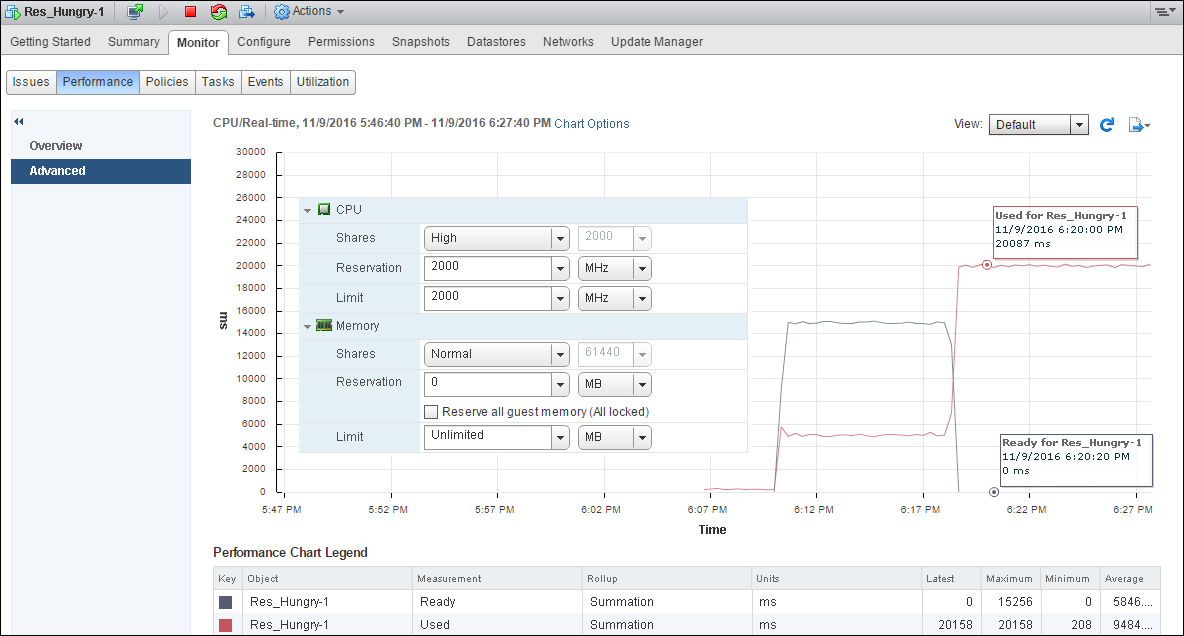
Now if there is a lower limit configured on the VM, and at the same time if it is craving for a resource, then you will see high ready time and a low used metric. An example of what it may look like is given in the following image:

Look at the preceding example and see when the VM is craving for more CPU resource. If you put a limit on top of it, then it will experience high ready time and low used time. Here, in the preceding example, this VM is set with a limit of 500MHz.
Now to rectify this, we can change the limit value and the VM should perform better with low ready time and high used value.
- Right-click on the CPU-hungry VM and select
Edit Resource Settings. - Under CPU, change the
Sharesvalue toHigh(2,000 Shares). - Change
Reservationto2000MHzand theLimitvalue to2000MHz. - Click on
OK.
Now the VM should look and perform as shown in the following screenshot: