Book Image

Powershell Core 6.2 Cookbook

By : Jan-Hendrik Peters
Book Image

Powershell Core 6.2 Cookbook

By: Jan-Hendrik Peters

Overview of this book

This book will follow a recipe-based approach and start off with an introduction to the fundamentals of PowerShell, and explaining how to install and run it through simple examples. Next, you will learn how to use PowerShell to access and manipulate data and how to work with different streams as well. You will also explore the object model which will help with regard to PowerShell function deployment. Going forward, you will get familiar with the pipeline in its different use cases. The next set of chapters will deal with the different ways of accessing data in PowerShell. You will also learn to automate various tasks in Windows and Linux using PowerShell Core, as well as explore Windows Server. Later, you will be introduced to Remoting in PowerShell Core and Just Enough Administration concept. The last set of chapters will help you understand the management of a private and public cloud with PowerShell Core. You will also learn how to access web services and explore the high-performance scripting methods. By the end of this book, you will gain the skills to manage complex tasks effectively along with increasing the performance of your environment.
Table of Contents (14 chapters)

Installing PowerShell Core on Windows

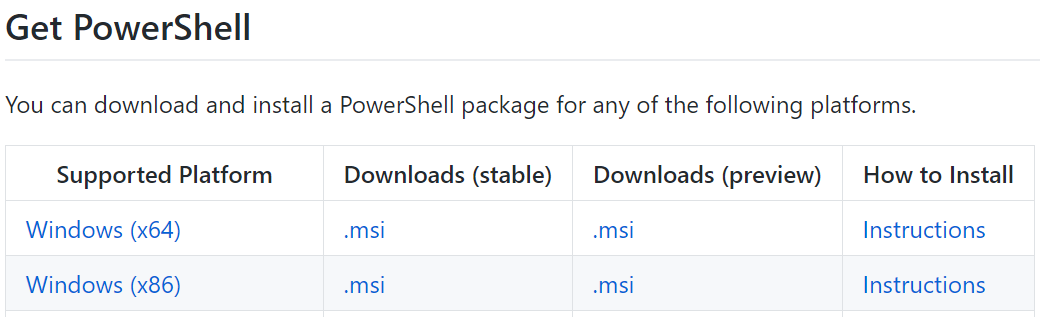
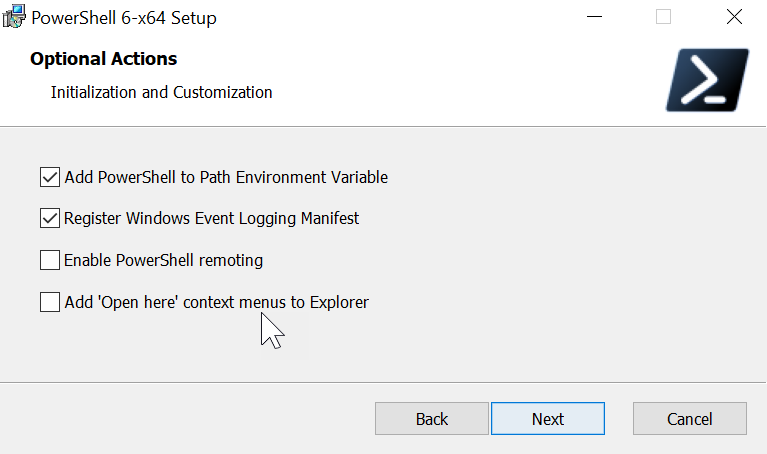
In this recipe, you'll learn how to provision PowerShell Core on a Windows system starting with Windows 6.1 (Server 2008 R2/Windows 7).

Getting ready

To follow this recipe, you'll need a Windows machine with at least Windows Server 2008 R2 or Windows 7. If this machine isn't connected to the internet, you'll need a way of transferring the installer to the machine.

How to do it...

Please perform the following steps:

  1. In order to get the most recent release of PowerShell Core for Windows, browse to https://github.com/powershell/powershell:
  1. Download the release for your platform. I recommend using the stable 64 bit (x64) edition if possible.

  1. Open the installer file, for example, PowerShell-6.2.0-win-x64.msi.
  2. Follow the instructions on screen to install PowerShell Core
  3. On the final page, you can directly enable PowerShell remoting if you want. Leave the option disabled for now; you'll configure it properly later on:
  1. Start PowerShell Core by typing pwsh into the search bar!

How it works...

Using the standard MSI installer methods, PowerShell Core will be installed for your system in the 64 bit Program Files directory by default. It won't replace Windows PowerShell but will simply coexist peacefully and include the most recent updates to PowerShell.

If left on the default settings, an event manifest will be registered on the system, enabling an event log for PowerShell Core. The log file will be placed at %SystemRoot%\System32\Winevt\Logs\PowerShellCore%4Operational.evtx and can be found in the Applications and Services Logs.

By default, no remoting configuration will be made. We'll talk about remoting in Chapter 8, Running Remote Commands and Understanding Just Enough Administration, where you'll enable PowerShell remoting for a system.

There's more...

Besides the installer that you can download and install manually or through any software deployment solution, you can also use Chocolatey. Chocolatey is a NuGet package source for binary packages and can be used to bootstrap software on a system.

The following steps will install Chocolatey and PowerShell Core on a Windows system. These steps require using Windows PowerShell for the initial process:

  1. Run the following command in Windows PowerShell (see https://chocolatey.org/docs/installation for details):
Set-ExecutionPolicy Bypass -Scope Process -Force
iex ((New-Object System.Net.WebClient).DownloadString('https://chocolatey.org/install.ps1'))
  1. After the installation of Chocolatey, simply execute choco install powershell /y.
  2. Start PowerShell Core by searching for pwsh in the search bar!

If you're so inclined, compiling the code from scratch is of course also an option. Simply follow the guidelines laid out in the GitHub repository to do so:

# Clone the repository
git clone https://github.com/powershell/powershell

Set-Location -Path .\powershell
Import-Module ./build.psm1

# Ensure you have the latest version of .NET Core and other necessary components
Start-PSBootStrap

# Start the build process
Start-PSBuild

# Either run PowerShell directly...
& $(Get-PSOutput)

# ...or copy it to your favorite location (here: Program Files on Windows, necessary access rights required)
$source = Split-Path -Path $(Get-PSOutput) -Parent
$target = "$env:ProgramFiles\PowerShell\$(Get-PSVersion)"
Copy-Item -Path $source -Recurse -Destination $target

See also