
Introducing CloudFormation
If you are looking for a tool that will automate your entire AWS infrastructure deployment, then CloudFormation is the right solution. It gives you the ability to create resource templates to define the AWS resource you need to create. You can version-control these templates, and using these templates replicate your infrastructure quickly and in a repeatable manner, as illustrated in the following screenshot:
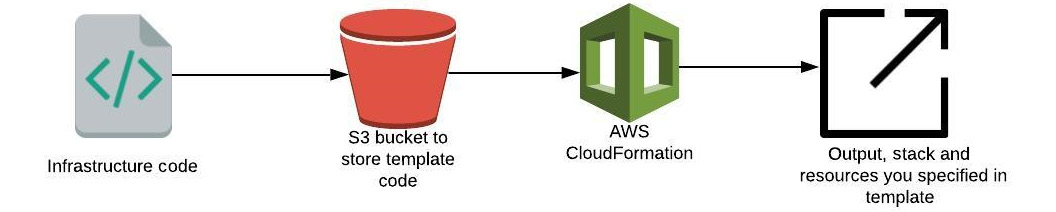
Figure 1.7 – How CloudFormation works
For example, we can instruct the CloudFormation template to do the following:
- Create a security group.
- Create an EC2 machine using this security group.
CloudFormation creates this for us, in exactly the right order and with the exact configuration that we provide.
Here are some advantages of using CloudFormation:
- We can version-control the CloudFormation code using Git (GitHub, GitLab, Bitbucket...).
- You can code your infrastructure using JSON or YAML.
- Before pushing the change, someone in the team can review the code.
- CloudFormation works as Infrastructure as Code (IaC); that is, no resources are created manually.
- CloudFormation is free of charge.
- It automatically creates a diagram for your template.
- It involves declarative programming, which means we define the end goal, and CloudFormation will figure out how to achieve that goal.
Important note
For CloudFormation, we don't need to install any separate tool. The AWS CLI is sufficient in order to create the stack from the command line, and we can also create it with the help of the AWS console.
Writing your first CloudFormation template
Let's start with a basic CloudFormation stack template that simply launches an EC2 instance. A CloudFormation stack is a group of AWS resources. To create an AWS resource, we can create, update, or delete the stack.
To create a stack, we need the following:
- AWSTemplateFormatVersion section (optional): AWS only allows you to use
2010-09-09as a template version (only valid value). The version of the template defines what this template is capable of. - Description (optional): If you want to define your template or add a comment, you can add that in a description section.
- Resources (required): This is the mandatory section of the CloudFormation template, where you define the resource you want to create—for example, for an Amazon EC2 instance (
AWS::EC2::Instance) or an Amazon S3 bucket (AWS::S3::Bucket). - Amazon Machine Image (AMI): This is an operating system image used to run EC2 instances. For this example, I am using the
ami-0bc06212a56393ee1CentOS 7 image.To find out the AMI ID for the CentOS 7 image, run the following command (the last column of the query returns the AMI ID—for example:
ami-0bc06212a56393ee1):aws ec2 describe-images --owners aws-marketplace --filters Name=product-code,Values=aw0evgkw8e5c1q413zgy5pjce --query 'Images[*].[CreationDate,Name,ImageId]' --filters "Name=name,Values=CentOS Linux 7*" --region us-west-2 --output table | sort -r | 2020-03-09T21:54:48.000Z| CentOS Linux 7 x86_64 HVM EBS ENA 2002_01-b7ee8a69-ee97-4a49-9e68-afaee216db2e-ami-0042af67f8e4dcc20.4 | ami-0bc06212a56393ee1 | | 2019-01-30T23:43:37.000Z| CentOS Linux 7 x86_64 HVM EBS ENA 1901_01-b7ee8a69-ee97-4a49-9e68-afaee216db2e-ami-05713873c6794f575.4 | ami-01ed306a12b7d1c96 | | 2018-06-13T15:58:14.000Z| CentOS Linux 7 x86_64 HVM EBS ENA 1805_01-b7ee8a69-ee97-4a49-9e68-afaee216db2e-ami-77ec9308.4 | ami-3ecc8f46 | | 2018-05-17T09:30:44.000Z| CentOS Linux 7 x86_64 HVM EBS ENA 1804_2-b7ee8a69-ee97-4a49-9e68-afaee216db2e-ami-55a2322a.4 | ami-5490ed2c | | 2018-04-04T00:11:39.000Z| CentOS Linux 7 x86_64 HVM EBS ENA 1803_01-b7ee8a69-ee97-4a49-9e68-afaee216db2e-ami-8274d6ff.4 | ami-0ebdd976 | | 2017-12-05T14:49:18.000Z| CentOS Linux 7 x86_64 HVM EBS 1708_11.01-b7ee8a69-ee97-4a49-9e68-afaee216db2e-ami-95096eef.4 | ami-b63ae0ce | | DescribeImages | ----------------------------------------------------------------------------------------------------------------------------------------------------------------- +--------------------------+----------------------------------------------------------------------------------------------------------+-------------------------+ +--------------------------+----------------------------------------------------------------------------------------------------------+-------------------------+
- Instance type: The type of EC2 instance to run, as every instance type provides different capabilities (CPU, memory, input/output (I/O)). For this example, I am using
t2.micro(one virtual CPU; 1 GB memory).
The CloudFormation template will look like this. Save the following code as ec2-instance.yml or download the file from https://github.com/PacktPublishing/AWS-for-System-Administrators/blob/master/Chapter1/cloudformation/ec2-instance.yml:
{
  "AWSTemplateFormatVersion" : "2010-09-09",
  "Description" : "Simple Stack to launch an EC2 instance.",
  "Resources" : {
    "Ec2Instance" : {
      "Type" : "AWS::EC2::Instance",
      "Properties" : {
        "InstanceType": "t2.micro",
        "ImageId" : "ami-0bc06212a56393ee1"
      }
    }
  }
}
Now, we have created our first CloudFormation template. In the next section, we will create our first stack using this template.
Creating a CloudFormation stack using the AWS console
To create a stack on the AWS CloudFormation console, follow these steps:
- Go to the AWS console and search for CloudFormation (https://us-west-2.console.aws.amazon.com/cloudformation/home?region=us-west-2#/).
- In the CloudFormation screen, click on Create stack, as illustrated in the following screenshot:

Figure 1.8 – CloudFormation stack creation wizard
- Click on Upload a template file and upload the earlier-mentioned CloudFormation template, then click Next.
- Provide a Stack name and click Next, as illustrated in the following screenshot:

Figure 1.9 – Specify stack name
- Keep the rest of the parameters as default and click the Create stack button at the bottom of the page, as illustrated in the following screenshot:

Figure 1.10 – Create stack
- Monitor the progress of stack creation by clicking on the Events tab, as illustrated in the following screenshot:

Figure 1.11 – CloudFormation Events
Once the stack creation is completed, the CREATE_COMPLETE event is displayed, as shown in the following screenshot:

Figure 1.12 – CloudFormation Events completion
- Verify the instance ID (Physical ID) under the Resources section, as illustrated in the following screenshot:

Figure 1.13 – CloudFormation resource
- The instance ID can also be verified via the EC2 console (https://console.aws.amazon.com/ec2/v2/home?region=us-west-2), as illustrated in the following screenshot:

Figure 1.14 – EC2 console
Up to this point, you now understand how to create a CloudFormation stack using the AWS console. In the next part, you will see how to create it using the AWS CLI.
Creating a CloudFormation stack using the AWS CLI
In the previous example, you created the CloudFormation stack using the AWS console. We can perform the same steps with the help of the AWS CLI, to assist in automating the entire process, as follows:
- Validate the template to make sure there is no syntax error, as follows:
aws cloudformation validate-template --template-body file://ec2-instance.yml { "Parameters": [], "Description": "Simple Stack to launch an EC2 instance." } - Create the stack by specifying the template file and the necessary IAM capabilities, as follows:
aws cloudformation create-stack --stack-name first-ec2-instance-creation --template-body file://ec2-instance.yml --capabilities "CAPABILITY_IAM" "CAPABILITY_NAMED_IAM" { "StackId": "arn:aws:cloudformation:us-west-2:XXXXXXXX:stack/first-ec2-instance-creation/cf6e6100-b3ed-11ea-b69a-0a233d312e0a" } - The command will wait, and the user will not get Command Prompt back until the stack creation is complete, as illustrated in the following code snippet:
aws cloudformation wait stack-create-complete --stack-name first-ec2-instance-creation
aws cloudformation describe-stacks --stack-name first-ec2-instance-creation
- Execute the
describe-stackscommand, which will return the description of the created stack, as follows:aws cloudformation describe-stacks --stack-name first-ec2-instance-creation --query 'Stacks[].[StackName,StackStatus]' --output text first-ec2-instance-creation CREATE_COMPLETE
- To verify all the resources have been created successfully, we are going to use
describe-stack-resourceswithaws cloudformation. From the output, we can verify the newly created instance ID (PhysicalResourceId": "i-0dfaad58d59b59717), as follows:aws cloudformation describe-stack-resources --stack-name first-ec2-instance-creation { "StackResources": [ { "StackName": "first-ec2-instance-creation", "StackId": "arn:aws:cloudformation:us-west-2:XXXXXX:stack/first-ec2-instance-creation/cf6e6100-b3ed-11ea-b69a-0a233d312e0a", "LogicalResourceId": "Ec2Instance", "PhysicalResourceId": "i-0dfaad58d59b59717", "ResourceType": "AWS::EC2::Instance", "Timestamp": "2020-06-21T18:34:51.773000+00:00", "ResourceStatus": "CREATE_COMPLETE", "DriftInformation": { "StackResourceDriftStatus": "NOT_CHECKED" } } ] } - Once you are done with your testing (as this will cost you), to clean up the CloudFormation stack, please pass
delete-stackto thecloudformationcommand, as follows:aws cloudformation delete-stack --stack-name first-ec2-instance-creation
In this section, you have understood different CloudFormation components and how to create a stack using the CloudFormation template. In the next section, we will learn about another popular infrastructure automation tool Terraform.