Book Image

Azure Serverless Computing Cookbook - Third Edition

By : Praveen Kumar Sreeram
Book Image

Azure Serverless Computing Cookbook - Third Edition

By: Praveen Kumar Sreeram

Overview of this book

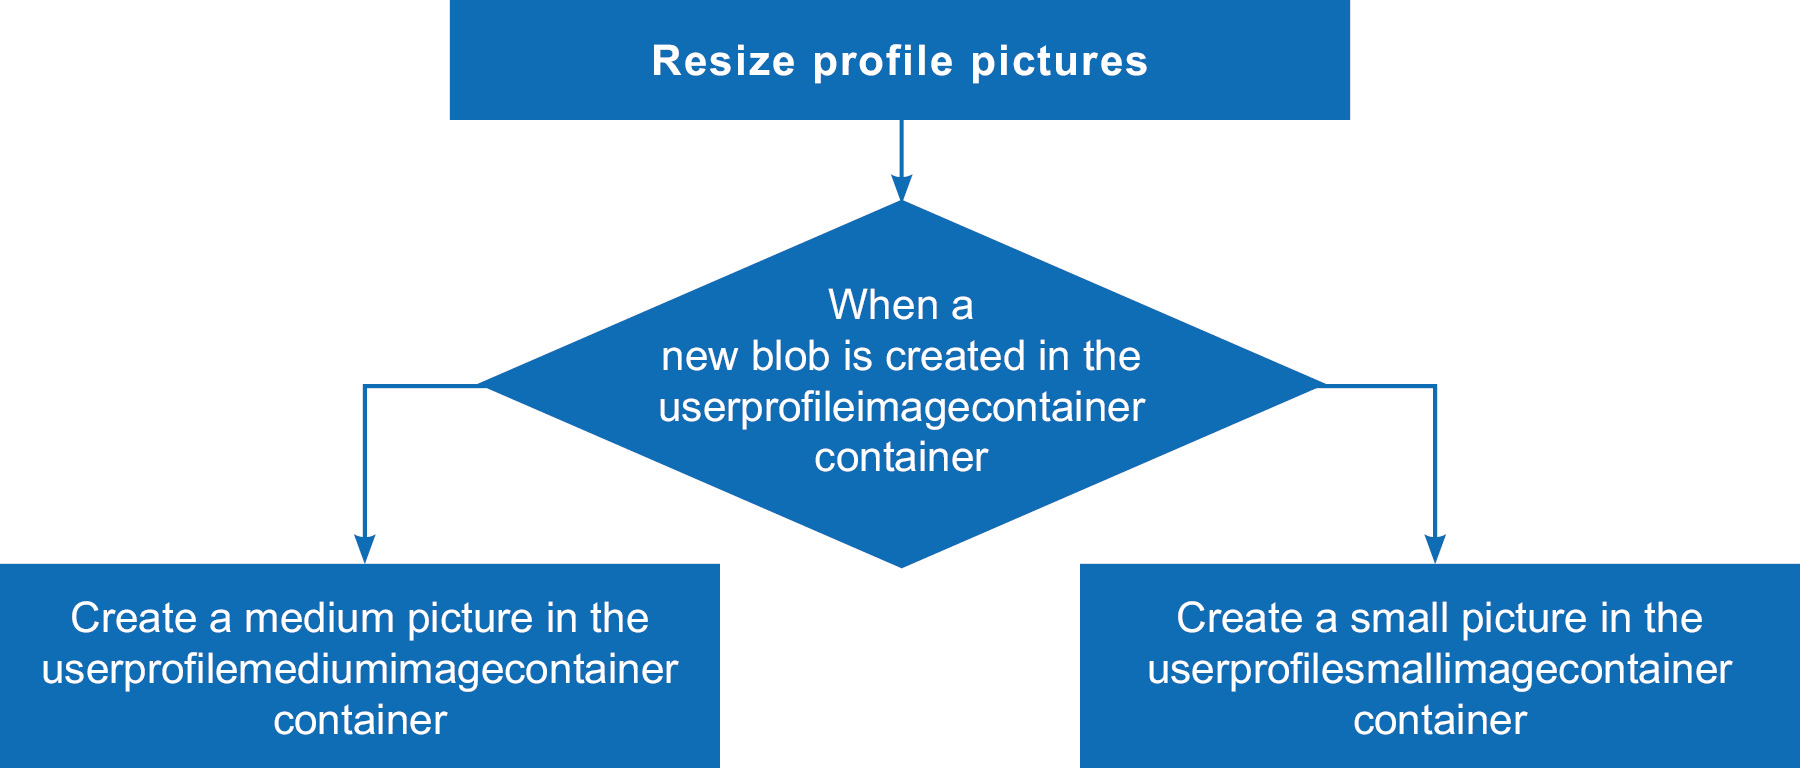
This third edition of Azure Serverless Computing Cookbook guides you through the development of a basic back-end web API that performs simple operations, helping you understand how to persist data in Azure Storage services. You'll cover the integration of Azure Functions with other cloud services, such as notifications (SendGrid and Twilio), Cognitive Services (computer vision), and Logic Apps, to build simple workflow-based applications. With the help of this book, you'll be able to leverage Visual Studio tools to develop, build, test, and deploy Azure functions quickly. It also covers a variety of tools and methods for testing the functionality of Azure functions locally in the developer's workstation and in the cloud environment. Once you're familiar with the core features, you'll explore advanced concepts such as durable functions, starting with a "hello world" example, and learn about the scalable bulk upload use case, which uses durable function patterns, function chaining, and fan-out/fan-in. By the end of this Azure book, you'll have gained the knowledge and practical experience needed to be able to create and deploy Azure applications on serverless architectures efficiently.
Table of Contents (14 chapters)
13
Index

Resizing an image using an ImageResizer trigger

With the recent revolution in high-end smartphone cameras, it has become easy to capture high-quality pictures that tend to have larger sizes. While a good quality picture is beneficial to the consumer, for an application developer or administrator, it proves to be a pain to manage the storage of a popular website, since most platforms recommend that users upload high-quality profile pictures. Given the dilemma, it makes sense to make use of libraries that help us reduce the size of high-quality images while maintaining aspect ratio and quality.

This recipe will focus on implementing the functionality of resizing images without losing quality using one of the NuGet packages called SixLabors.ImageSharp.

Getting ready

In this recipe, you'll learn how to use a library named SixLabors to resize an image to the required dimensions. For the sake of simplicity, we'll resize the image to the following dimensions:

  • Medium with 200*200 pixels.
  • Small with 100*100 pixels.

How to do it…

  1. Create a new Azure function by choosing Azure Blob Storage Trigger from the templates.
  2. Provide the following details after choosing the template:

    Name the function: Provide a meaningful name, such as ResizeProfilePictures.

    Path: Set this to userprofileimagecontainer/{name}.

    Storage account connection: Choose the storage account for saving the blobs and click on the Save button.

  3. Review all the details and click on Create to create the new function.
  4. Once the function is created, navigate to the Integrate tab, click on New Output, and choose Azure Blob Storage.
  5. In the Azure Blob Storage output section, provide the following:

    Blob parameter name: Set this to imageSmall.

    Path: Set this to userprofilesmallimagecontainer/{name}.

    Storage account connection: Choose the storage account for saving the blobs and click on the Save button.

  6. In the previous step, we added an output binding for creating a small image. In this step, let's create a medium image. Click on New Output and choose Azure Blob Storage. In the Azure Blob Storage output section, provide the following:

    Blob parameter name: Set this to imageMedium.

    Path: Set this to userprofilemediumimagecontainer/{name}.

    Storage account connection: Choose the storage account for saving the blobs and click on the Save button.

  7. Now, we need to add the NuGet package references to the Function App. In order to add the packages, a file named function.proj needs to be created, as shown in Figure 1.18:
    Adding a new function.proj file to add Nugetpackages
    Figure 1.18: Adding a new file
  8. Open the function.proj file, paste the following content to download the libraries related to SixLabors.ImageSharp, and then click on the Save button:
    <Project Sdk="Microsoft.NET.Sdk">
        <PropertyGroup>
            <TargetFramework>netstandard2.0</TargetFramework>
        </PropertyGroup>
        <ItemGroup>
            <PackageReference Include="SixLabors.ImageSharp" Version="1.0.0-beta0007" />
        </ItemGroup>
    </Project>
  9. Once the package reference code has been added in the previous step, you'll be able to view a Logs window similar to Figure 1.19. Note that the compiler may throw a warning in this step, which can be ignored:
    Viewing the logs, showing the installation of the Nugetpackages
    Figure 1.19: A Logs window
  10. Now, let's navigate to the code editor and paste the following code:
    using SixLabors.ImageSharp;
    using SixLabors.ImageSharp.Formats;
    using SixLabors.ImageSharp.PixelFormats;
    using SixLabors.ImageSharp.Processing;
    public static void Run(Stream myBlob, string name,Stream imageSmall,Stream imageMedium, ILogger log)
    {
               try
                {
                    IImageFormat format;
                    using (Image<Rgba32> input = Image.Load<Rgba32>(myBlob, out format))
                    {
                        ResizeImageAndSave(input, imageSmall, ImageSize.Small, format);
                    }
                    myBlob.Position = 0;
                    using (Image<Rgba32> input = Image.Load<Rgba32>(myBlob, out format))
                    {
                        ResizeImageAndSave(input, imageMedium, ImageSize.Medium, format);
                    }
                }
                catch (Exception e)
                {
                    log.LogError(e, $"unable to process the blob");
                }
    }
            public static void ResizeImageAndSave(Image<Rgba32> input, Stream output, ImageSize size, IImageFormat format)
            {
                var dimensions = imageDimensionsTable[size];
                input.Mutate(x => x.Resize(width: dimensions.Item1, height: dimensions.Item2));
                input.Save(output, format);
            }
            public enum ImageSize { ExtraSmall, Small, Medium }
            private static Dictionary<ImageSize, (int, int)> imageDimensionsTable = new Dictionary<ImageSize, (int, int)>() 
            {
                { ImageSize.Small,      (100, 100) },
                { ImageSize.Medium,     (200, 200) }
            };
  11. Now, navigate to the RegisterUser function and run it again. If everything is configured properly, the new containers should be created, as shown in Figure 1.20:
    Viewing the output in Azure Storage Explorer. The three containers have been created
    Figure 1.20: Azure Storage Explorer
  12. Review the new images created in the new containers with the proper sizes, as shown in Figure 1.21:
    Viewing the various images with different sizes
Figure 1.21: Displaying the output

How it works…

Figure 1.22 shows how the execution of the functions is triggered like a chain:

Illustration of the execution of the functions
Figure 1.22: Illustration of the execution of the functions

We have created a new blob trigger function sample named ResizeProfilePictures, which will be triggered immediately after the original blob (image) is uploaded. Whenever a new blob is created in the userprofileimagecontainer blob, the function will create two resized versions in each of the containers—userprofilesmallimagecontainer and userprofilemediumimagecontainer—automatically.