

Creating a secure Docker Cloud
Required plugins
Docker
In addition to the static agents, we will add a Docker Cloud in order to dynamically generate agents using Docker containers. We need to set up a Docker host where the containers will run. It's possible to reuse an existing agent to act as a Docker host; however, this is not recommended because the Docker engine is modified to require a certificate. Here is what the connection flow looks like:
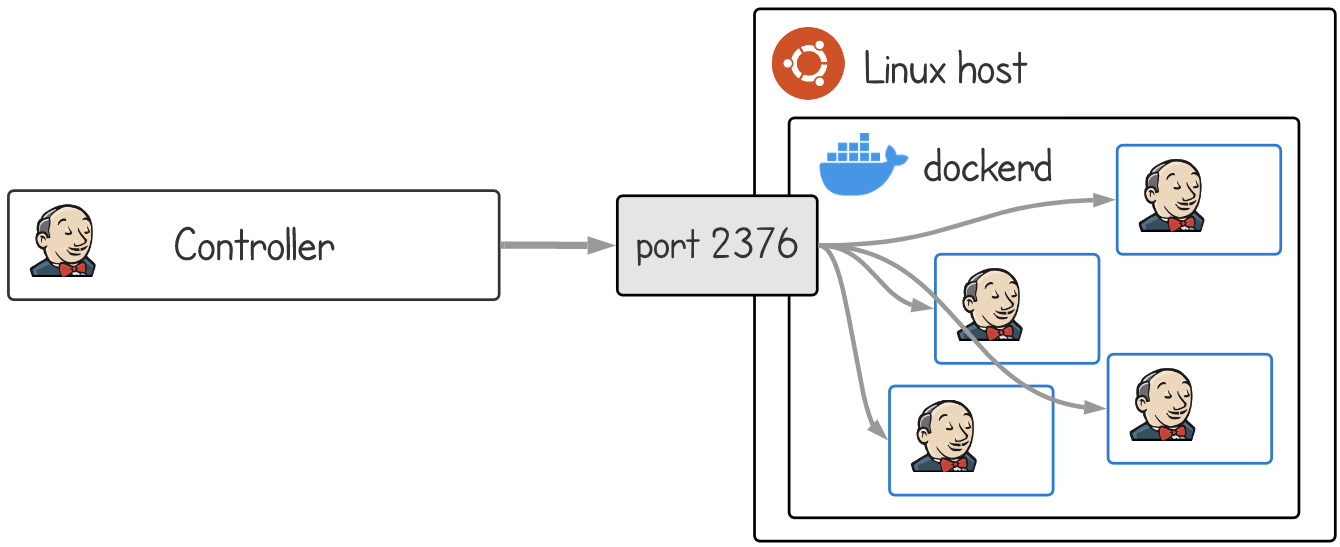
Figure 2.26 – Architecture of the Docker Cloud host
There are a few things to understand about the Docker Cloud. First, the Docker Cloud doesn't support an inbound setup. This means that a Docker host for the AWS controller must also be on AWS (or similar network locations where the controller can access). Second, setting up a secure connection is complex. It involves creating multiple self-signed SSL certificates and placing them in just the right places for both the host and the clients. Third, an insecure connection is very insecure. Not only is it unencrypted, but it also doesn't require authentication. In other words, it creates a server for anyone in the world to connect to freely. Finally, it can only run a specific set of images that we pre-populate. It can't run a random image that a pipeline needs, which means it's really only good for providing generic catch-all images.
Never create an insecure Docker host on AWS!
Anyone can connect without authentication and start mining bitcoin. Don't ask me how I know =(
Setting up a secure Docker Cloud is a four-step process that applies to both AWS and firewalled Jenkins:
- Create a certificate authority (CA). Create server and client certificates signed by the CA. Only the client who presents a certificate from this CA will be accepted by the server.
- Configure the Docker engine to use the host certificate and listen to TCP port
2376. - Configure Jenkins to use the client certificate.
- Connect Jenkins to the Docker host using the client certificate.
Here is what the certificate architecture looks like:
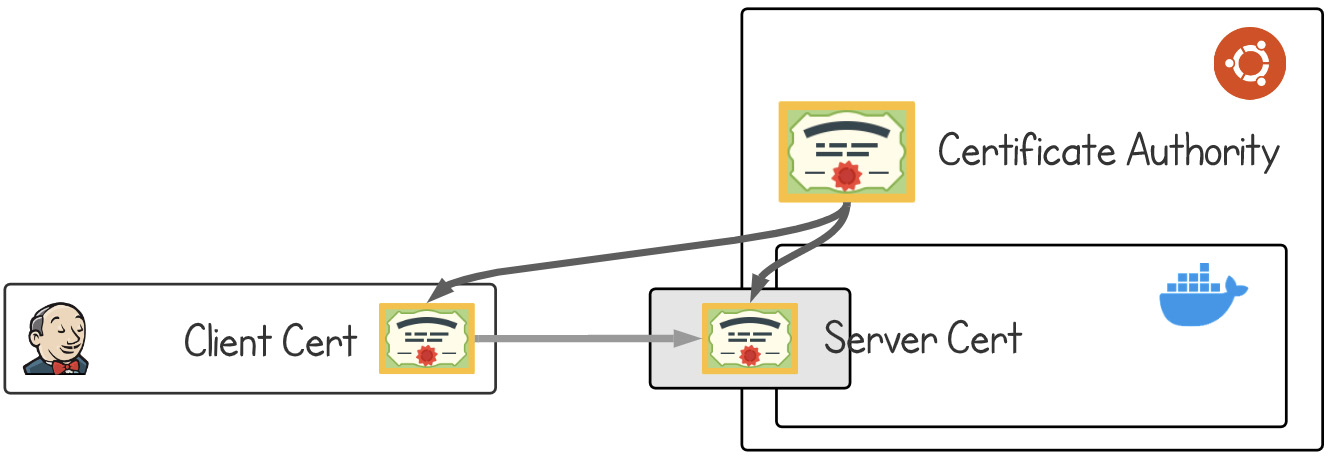
Figure 2.27 – Architecture of Docker certificates
Let's get started. SSH into the Docker host. It's a VM running Ubuntu 20.04 just like all other VMs. Docker was installed in Chapter 1, Jenkins Infrastructure with TLS/SSL and Reverse Proxy.
Generating a CA, server certificates, and client certificates
We'll start by generating the necessary certificates. First, we'll generate a CA, then, using the CA, we'll generate the certificates for the server and the client. Let's begin:
- Generate a CA. This is done by first creating a private key, and then creating a public certificate signed by the private key:
docker-host:~$ openssl genrsa -aes256 -out ca.key 4096
docker-host:~$ openssl req -new -x509 -days 3650 -key ca.key -sha256 -out ca.crt
- Next, create server certificates for the Docker host. First, create a private key and create a certificate signing request (CSR):
docker-host:~$ openssl genrsa -out server.key 4096
docker-host:~$ openssl req -sha256 -new -key server.key -out server.csr
- Enter the domain and/or the IP for the Docker host. It's possible to add multiple as follows:
docker-host:~$ echo 'subjectAltName = DNS:firewalled-docker-host.lvin.ca,IP:192.168.1.18,IP:127.0.0.1' > extfile.cnf
For the firewalled Docker host, enter just one IP. For the AWS Docker host, enter both the public and the private IPs, so that the controller can connect to the Docker host using either IP:
docker-host:~$ echo 'subjectAltName = IP:192.168.1.18' > extfile.cnf
- Set
extendedKeyUsagetoserverAuthso that the certificate can only be used for a server. Notice the>>characters for appending to the file rather than overwriting:docker-host:~$ echo 'extendedKeyUsage = serverAuth' >> extfile.cnf
- Finally, sign the CSR to create a server certificate for the Docker host using the newly created CA. The resulting certificate is valid for 1 year. We can run through the same steps again in about 300 days to generate a new certificate with an updated expiry date. Generating a new certificate doesn't invalidate the existing certificates:
docker-host:~$ openssl x509 -req -days 365 -sha256 -extfile extfile.cnf -CA ca.crt -CAkey ca.key -CAcreateserial -in server.csr -out server.crt
- Next, create client certificates for the Jenkins Docker client. Create a private key and a CSR:
docker-host:~$ openssl genrsa -out client.key 4096
docker-host:~$ openssl req -subj '/CN=client' -new -key client.key -out client.csr
- Set
extendedKeyUsagetoclientAuthso that the certificate can only be used for a client. Notice the>character for overwriting the file:docker-host:~$ echo 'extendedKeyUsage = clientAuth' > extfile.cnf
- Finally, sign the CSR to create a client certificate for the Jenkins Docker client using the newly created CA. This certificate is also valid for 1 year:
docker-host:~$ openssl x509 -req -days 365 -sha256 -extfile extfile.cnf -CA ca.crt -CAkey ca.key -CAcreateserial -in client.csr -out client.crt
Client certificates are passwords
Anyone with client certificates can connect and launch a container. Treat the certificates like a password and store them securely.
All the required keys are created. Delete the intermediary files to clean up. Verify that the permissions for the certificates and the keys are 644 and 600, respectively:
docker-host:~$ rm -v ca.srl client.csr server.csr extfile.cnf
removed 'ca.srl'
removed 'client.csr'
removed 'server.csr'
removed 'extfile.cnf'
robot_acct@firewalled-docker-host:~$ ls -l
total 24
-rw-r--r-- 1 robot_acct dip 2199 Dec 29 04:41 ca.crt
-rw------- 1 robot_acct dip 3326 Dec 29 04:35 ca.key
-rw-r--r-- 1 robot_acct dip 1919 Dec 29 05:08 client.crt
-rw------- 1 robot_acct dip 3243 Dec 29 05:02 client.key
-rw-r--r-- 1 robot_acct dip 2114 Dec 29 05:01 server.crt
-rw------- 1 robot_acct dip 3247 Dec 29 04:57 server.key
The certificates are ready. Let's distribute them to the right places.
Storing the certificates
Save the CA and server certificates in /etc/ssl/docker-host/:
docker-host:~$ sudo mkdir /etc/ssl/docker-host
docker-host:~$ sudo mv ca.crt ca.key server.crt server.key /etc/ssl/docker-host/
Save the client certificates in Jenkins. Go to the Global Credentials page, click Add Credentials, and then choose Kind as X.509 Client Certificate. Copy and paste the content of client.key, client.crt, and ca.crt into the three boxes. Enter docker-host-client for ID and Description, and then click OK to save:
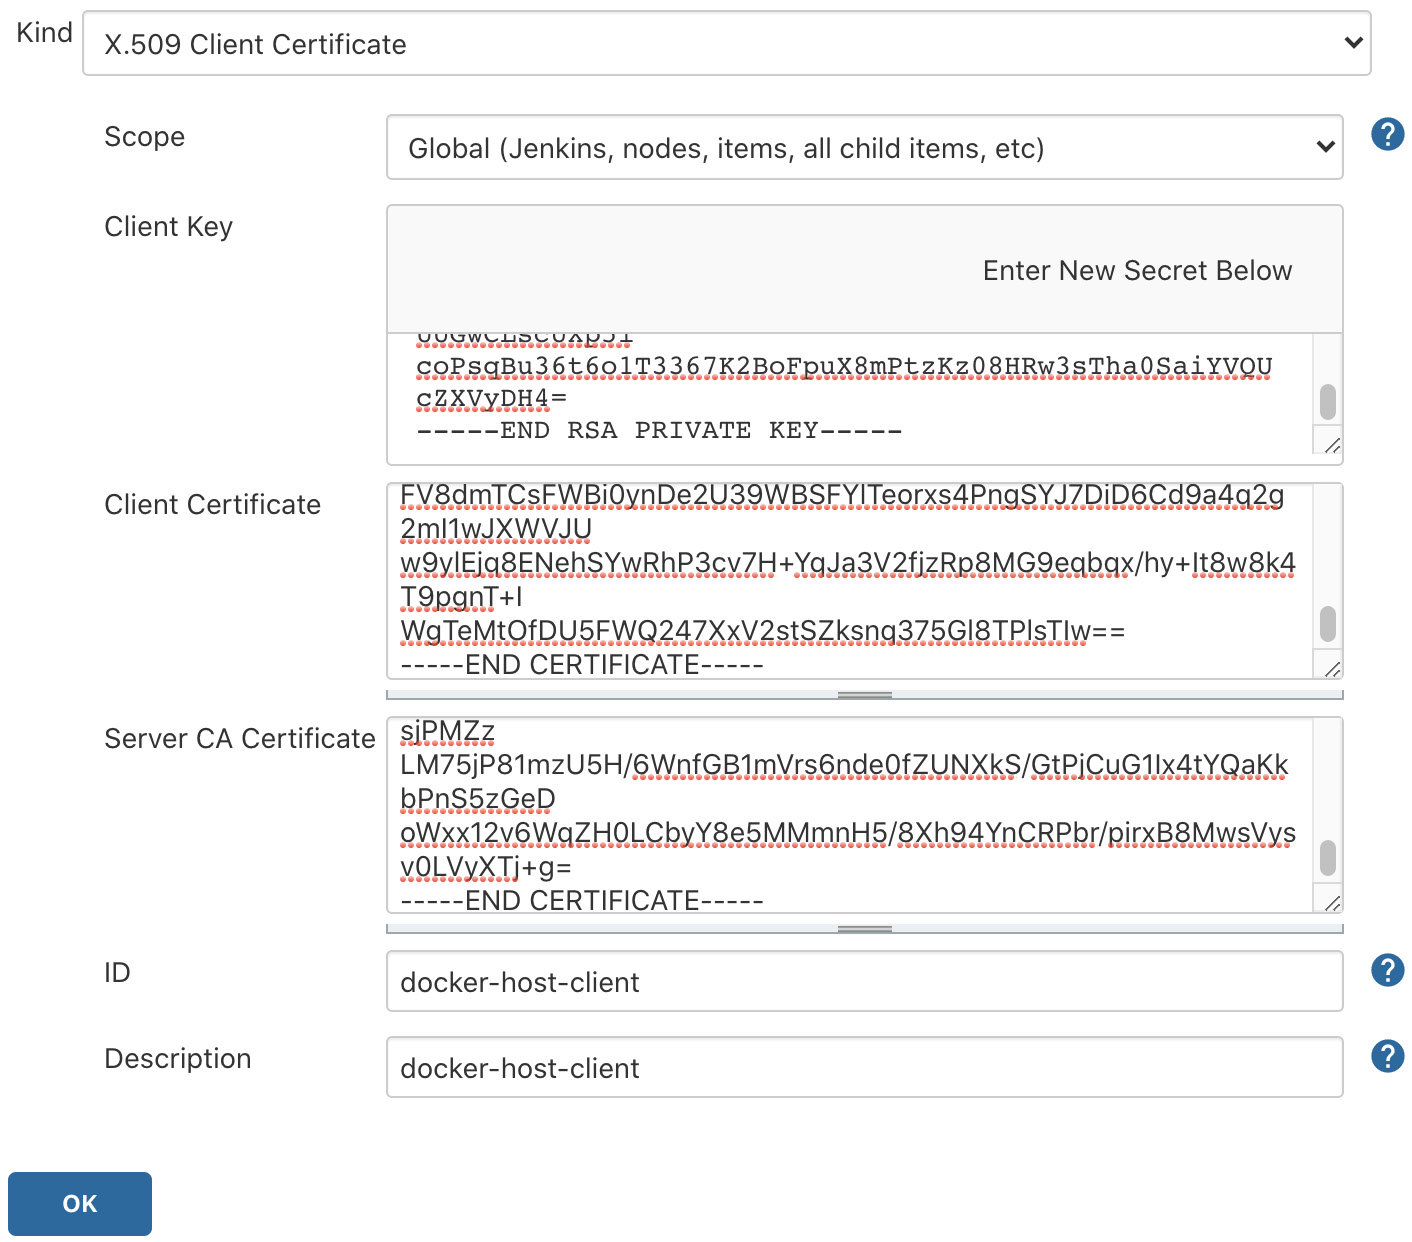
Figure 2.28 – Docker client keys stored in Jenkins
Both the server and client certificates are ready. Let's continue to configure the Docker service.
Configuring the Docker service
Configure docker.service on the Docker host to listen to TCP port 2376 while using the server certificates:
- Open an override file for
docker.serviceand paste in the following content. The syntax is a bit odd here. The line withExecStart=seems useless but is actually required. Also, the last line with/usr/bin/dockerdis one long line without a line break. It may be better if you just download this file from the book's GitHub repository because writing this out can be very error-prone:docker-host:~$ sudo systemctl edit docker.service
[Service]
ExecStart=
ExecStart=/usr/bin/dockerd -H tcp://0.0.0.0:2376 -H unix:///var/run/docker.sock --tlsverify --tlscacert=/etc/ssl/docker-host/ca.crt --tlscert=/etc/ssl/docker-host/server.crt --tlskey=/etc/ssl/docker-host/server.key
- Apply the changes: save, exit,
systemctl daemon-reload, and restart Docker. Check that it's listening on port2376:
docker-host:~$ sudo systemctl daemon-reload
docker-host:~$ sudo systemctl restart docker.service
docker-host:~$ sudo netstat -lntp | grep dockerd
tcp6 0 0 :::2376 ::: LISTEN 5351/dockerd
The Docker service is now ready to accept traffic on port 2376 using the server certificate. In order to update the certificates with a new expiry date, replace the certificate files and restart the Docker service.
Directions on docker-plugin documents are insecure!
Do not follow the directions on docker-plugin documents as they configure the Docker host to be open to everyone without authentication. This is equivalent to allowing SSH as root without requiring a password.
Configuring Jenkins
Let's put it all together by configuring the Docker Cloud on Jenkins:
- Click Manage Jenkins | Manage Nodes and Clouds | Configure Clouds | Add a new cloud, and then choose Docker. A Docker configuration panel is created.
- Click Docker Cloud details.
- Enter the IP of the Docker host into the Docker Host URI field in the format of
tcp://<IP>:2376and choosedocker-host-clientfor Server credentials. - Clicking Test Connection should show the version and the API version of the Docker host.
- Check Enabled and then click Apply to save the progress:

Figure 2.29 – Docker Cloud connection configured and tested
- Finally, add some agent templates that the builds can use. Click Docker Agent templates and Add Docker Template:
- Labels:
linux - Enabled: Check
- Name:
docker - Docker Image:
jenkins/agent - Remote File System Root
: /home/jenkins
We can leave everything else as is, as shown in the following screenshot, and then click Save:
- Labels:
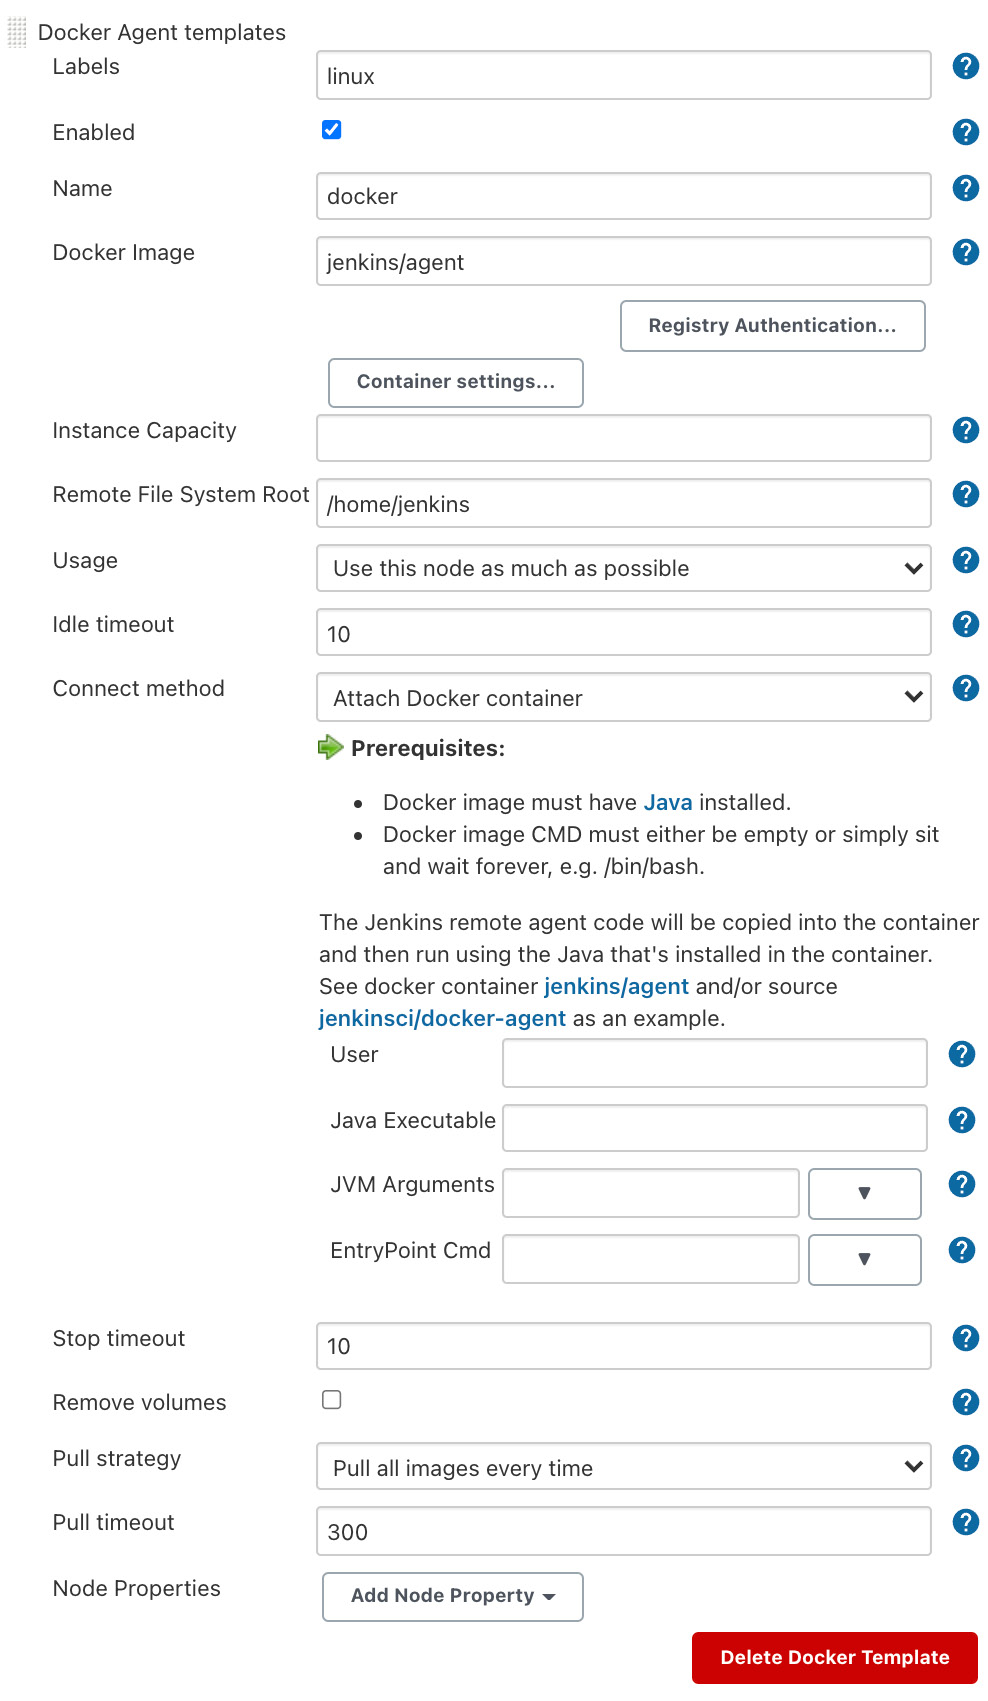
Figure 2.30 – Docker Agent template configuration
The Docker Cloud is now ready. When we build a pipeline that uses the linux agent label, a new agent will be created from the Docker Cloud on the fly. In addition, since we've set Usage to Use this node as much as possible, pipeline builds using agent any will also use an agent created from this template.