
Imagine load balancing a pair of NetScaler devices across geographical locations, so that traffic is always passing through, irrespective of whether it uses the main site or an alternate site (during major outages or if there is an excess load of traffic) based on the selected LB algorithms; that is GSLB for you. This section briefs about setting up the GSLB disaster recovery.
NetScaler can be set up in many different ways for GSLB, some of which are listed as follows:
NetScaler as the Authoritative DNS (ADNS) server (by configuring a service on DNS port number 53)
NetScaler as Authoritative subdomain name server (by assigning a part of the domain alone to NS)
NS as the DNS proxy (by configuring the LB vserver and binding DNS servers to it)
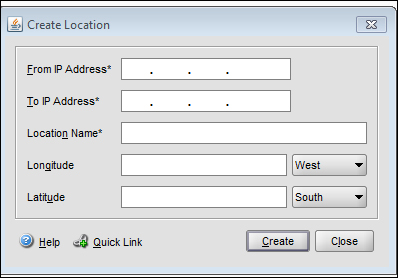
Starting from NetScaler version 10, even with static proximity configured, there is an option to override the static mapping of location database with a specific DNS policy, and action to direct the traffic coming from a specific Local DNS (LDNS) server, or network to specific gslb services. Follow the next screenshot to statically configure the IP address and location database on GUI.
On the Configuration Utility panel, go to GSLB | Location to create static location entries:
The setup entails a main site that processes traffic all the time and a disaster recovery site that comes up when the main site goes down. The entire GSLB algorithm is DNS-based. The GSLB configuration can be used for the following:
Disaster recovery
Load sharing
Proximity/performance
The Citrix NetScaler Metric Exchange Protocol (MEP) is a channel of communication between NetScaler devices across various geographical locations; it works on TCP port 3011 and, to be secure, port 3009. It is a NetScaler proprietary protocol and is used in GSLB to monitor the health of the sites. There are also the typical monitors that are bound to the load LB vserver.
With MEP and monitors enabled, the health of the remote sites can be measured from the monitors. But if monitors are not enabled, then the health of the site is measured with the help of MEP. The CLI command to enable MEP is as follows:
root@ns>set gslb site Packtsite -metricExchange  ?
 ENABLED
 DISABLED
The site metrics, the network metrics, and persistence information are shared between the GSLB sites only if the MEP is enabled. An important note is to check if the feature is enabled before you get started with the GSLB configuration. If you are going with the static proximity type of GSLB, then you would need to load the location database on the NetScaler device. To verify whether the database is properly loaded, issue the show locationparameter command and check the current static entries. If the incoming traffic does not match any entry in the location database, then the request is processed using the round robin method.
We will focus on a few case studies, most commonly seen in GSLB.
Case 1: The three critical aspects for GSLB are the Gslb site, Gslb vserver, and Gslb service. The site address references NetScaler at each location. These three aspects are interlinked to make it easier for the traffic to be sent to the right location.
For example, there are two sites in this recipe, main and DR. You will have to repeat the configuration on both the devices:
Domain:
www.packttest.comADNS servers:
172.16.1.6for the main and DR sitesVservers:
172.16.32.24for the main site and172.16.32.114for the DR siteSite addresses:
171.12.12.33for the main site and171.12.12.3for the DR site
Configure the gslb sites as follows:
add gslb site gslb_local 171.12.12.33 -publicIP 171.12.12.33
add gslb site gslb_remote 171.12.12.3-publicIP 171.12.12.3
Configure the gslb services: The gslb service might be a LB vserver or a direct third-party server:

Configure the gslb vserver and bind the services to the vserver:
add gslb vserver packtmain_gslb_vserver HTTP
add gslb vserver packtdr_gslb_vserver HTTP
bind gslb vserver packtmain_gslb_vserver -serviceName test
bind gslb vserver packtdr_gslb_vserver -serviceName test_dr
An important configuration is setting the backup vserver under the Advanced tab:
set gslb vserver packtmain_gslb_vserver -backupVServer packtdr_gslb_vserverBind the domain to the gslb vserver as follows:
bind gslb vserver packtmain_gslb_vserver -domainName www.packttest.com -TTL 5Last but not the least, the ADNS service should be configured in NetScaler in such a way that NS would become authoritative for the domain
www.packttest.com. The CLI command to configure NetScaler as an ADNS service is as follows:>add service main_site_adns_server 172.16.1.6 ADNS 53
The IP address that is used here can be a MIP or SNIP address.
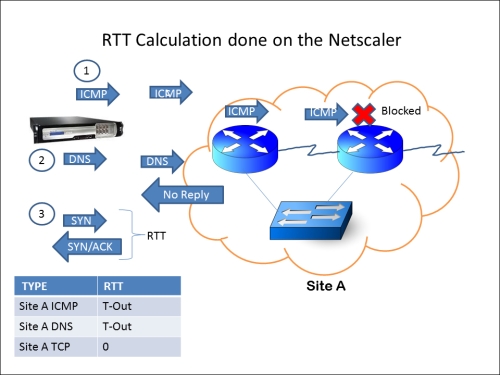
Case 2: The previous section shows the basic GSLB setup. In this case study, we will see the Dynamic proximity process, where NetScaler chooses the site that has the least Round trip time (RTT). For the first time alone, NetScaler chooses a site using the round robin method and then begins its RTT calculation using the following three steps in the same order sequentially:
ICMP
DNS
TCP
In the event that ICMP is blocked mid-way before reaching the site (anywhere on the Internet), it uses the second method listed (that is, DNS query), and finally a TCP handshake is used for the RTT calculation if the DNS query also does not give a response. This procedure is depicted in the next screenshot.
The RTT table can be viewed in the Configuration Utility tab under GSLB | LDNS Entries. If RTT shows as 0, then the time taken is less than one millisecond and if RTT shows as T-out then it indicates that the destination is unreachable. If all three preceding methods fail, it will take the backup LB method configured.
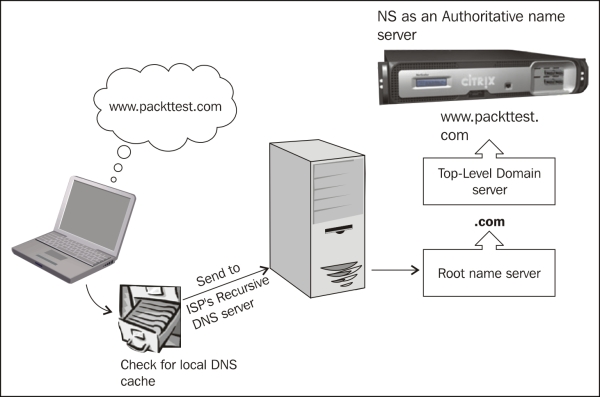
We can also use the static location database that maps the IP address range to the location area. This database is then loaded on the appliance. When the client's LDNS requests the site IP address from NetScaler, which acts as the ADNS, NetScaler parses through this location database to determine the location of the client's LDNS IP address, and then sends the nearest site IP address to the client. This method is called Static Proximity:
The CLI command to configure dynamic proximity is as follows:
>set gslb vserver packtGSLB -lbMethod MethodType
>set gslb vserver packtGSLB –lbMethod RTT
The RTT is calculated between the LDNS of the client and the site IP address.
In both the case studies, NetScaler first receives the DNS request in case it is acting as the ADNS for that particular domain, and according to the LB algorithm set, it directs the response either to itself or another NetScaler situated in a different geographical location. In this recipe, since we are only focusing on disaster recovery, the main site will continue to process traffic until it goes down.
The GSLB local and remote site is used for the Metric Exchange Protocol (MEP) communication to share the status and health of the sites. When configuring sites on NetScaler, there is an option for the public IP address. This can be left blank if there is no firewall in the picture that does any NAT translation.
To check if the configuration is accurate, run the following command:
root@ns# host www.packttest.com 172.16.1.6
The output will be similar to the following:
Using domain server:
Name: 172.16.1.6
Address: 172.16.1.6#53
The aliases are:
www.domain.com has address 171.12.12.33.
The following image shows the flow of GSLB at its basic level:
This section concentrates on tidbits and troubleshooting techniques:
Run the following CLI command to check the GSLB sites:
root@NS> show gslb site
         1)      packtsiteA (10.xx.xx.xx)        Site Type: REMOTE
            Metric exchange: ENABLED        Metric exchange status:         ACTIVE  Public IP: 10.xx.xx.xxNetwork metric exchange: ENABLED        Persistence session     exchange: ENABLEDTrigger Monitors: ALWAYS
         2)      packtsiteA (10.xx.xx.xx)  Site Type: LOCALMetric exchange: ENABLED        Public IP: 10.xx.xx.xx
------OUTPUT SNIPPED------
From the preceding output, we can see that NetScaler configured for GSLB will have one local and one or many remote sites (NetScalers in different data center locations).
Check for the GSLB vserver as follows:
root@NS> show gslb vservers
1)      packtvserver - HTTP        State: UP
        Last state change was at XXXXXXXXXXXXXXX (x ms)
        Time since last state change: 0 days, xx:xx:xx.xx
        Configured Method: LEASTCONNECTION
        Current Method: Round Robin, Reason:  Bound service's state changed to UP
        No. of Bound Services :  1 (Total)       1 (Active)
        Persistence: NONE
        Disable Primary Vserver on Down: DISABLED       Site Persistence: NONE
        Backup: packt_gslb_vserver Backup Session Timeout: 0
----OUTPUT SNIPPED----------
The preceding output shows the gslb vserver, where the domain name for the site is configured and the gslb services are bound.
Check for GSLB services as follows:
root@ns> show gslb service
1)      packtsvc (10.xx.xx.xx: 80)- HTTP     Server:    10.xx.xxx.xx          State: UP
        Effective State: UP
        Max Conn: 0                     Max Bandwidth: 0 kbits
        PublicIP: 10.xx.xxx.xx PublicPort: 80
        Type: REMOTE                    Site Name: packtsiteA
        Client IP: DISABLED
        Down state flush: ENABLED
        Site Persistence: NONE
        Threshold: BELOW
The preceding output shows the target LB or CS vserver and the LB method configured. NetScaler can be configured with a local and many remote GSLB services.