
Tudor-style house (Simple)
In this recipe, we'll be building a Tudor-style house. We'll be employing some manual building methods, and we'll also introduce some WorldEdit CUI commands and VoxelSniper actions into our workflow.
Getting ready
Once you have installed the recommended mods, you will need to have Equip an Arrow tools equipped on your action bar. This is used by VoxelSniper to perform its functions. You will also need to equip a Wooden Axe as this item becomes the WorldEdit tool and will be used for making selections. Don't try and use them to break blocks especially if you have made a selection that you don't want to lose. Not only will they not break the block, they will also wreck your selection or worse.

How to do it…
Let's get started with building our Tudor-style house by performing the following steps:
Find a nice area or clear one with roughly 40 x 40 squares of flat land.
Mark out a selection of 37 x 13 blocks by left-clicking with the Wooden Axe to set the first point and then right-clicking for the second point.
Hit your T key and type the
//set 5:1command. This will make all of the blocks in the selected area turn into Spruce Wood Planks. If you make a mistake, you can do//undo.
Note
The
//undocommand does not alter the selection itself, only the changes made to blocks.Now create a selection 20 x 13 that will complete the L shape of the mansion's bottom floor. Remember to left-click and right-click with the Wooden Axe tool.

Now type
//set 5:1. In the corner that will be at the end of the outside wall of the longest wing, place a stack of three Spruce Wood blocks on top of each other. Right beside this, place two stacked Wool blocks and one Spruce Wood block on top of them, as shown in the inset of the following screenshot:
With the selection in place, we will now stack these six blocks horizontally along the 37 block wall.
The
stackcommand works in the direction you face. So face directly down the length of the floor and type//stack 17.Tip
If you make a mistake, do
//undo.Go to the opposite end of the wall you just made and place a stack of three Spruce Wood blocks in the missing spot at the end.
Then just like before, put two blocks of White Wool on the side of the corner Spruce Wood pole with one Spruce Wood block on top. Select these six blocks and facing along the short end wall, type
//stack 5.Go to the end of this wall and complete it with the three Spruce Logs and two blocks of Wool with one Spruce block on top where the next wall will go. Select these six blocks. Remember! Wooden Axe, left-click, right-click.
Facing down the inside wall, type
//stack 11.Place another three Spruce Wood blocks upright in the corner and two Wool blocks with one Spruce block on top for the adjacent inner wall.
Make a selection, face in the correct direction, and then type
//stack 9.Repeat this same process of placing the six blocks, selecting them, facing in correct direction for the next wall, and typing
//stack 5.Finally, type
//stack 15and your base should now be complete.
On the corner section, we're going to make some bay windows. So let's create the reinforcing structure for those:
Inset by two blocks from the corner place five of these reinforcement structures. They consist of one Spruce Wood upright and two upside down Nether Brick steps, each aligned to the Spruce Wood uprights behind them.
Now we'll place the wall sections of the bay windows. You should be able to create these by referring to the right-hand section of the following screenshot:

Now comes the use of VoxelSniper GUI. So let's add some windows using it. Hit your V key to bring up the VoxelSniper GUI. We're going to "snipe" some windows into place.
The first section, Place, in the top left-hand side represents the block you wish to place. For this we will select Glass.
The section directly below Place is the Replace panel. As the name suggests, this is the block you wish to replace. We wish to replace White Wool, so we'll select that. Scroll through and locate the Wool block. In the right-hand side, under the Ink panel scroll box, select the White Wool block. Make sure the No-Physics checkbox is not selected.
In the right-hand panel, we will select the tool we wish to use. If it's not already selected, click on the Sized tab and choose Snipe.

Tip
If you get lost, just follow the preceding screenshot.
Choose your Arrow tool and right-click on the White Wool blocks you wish to change to Glass. VoxelSniper works from a distance hence the "Sniper" part of the name, so be careful when experimenting with this tool.
Tip
If you make a mistake in VoxelSniper, use
/uto undo. You can also do/u 5, or/u 7, or/u 22, and so on and so on if you wish to undo multiple actions.The upcoming screenshots should illustrate the sort of pattern we will implement along each of the walls. The VoxelSniper GUI tool retains the last settings used so you can just fill in all the Glass sections of the wall with Wool initially, and then replace them using VoxelSniper once you are done. For now, just do it for the two longest outer walls.
The following screenshot shows the 37 and 33 block length walls:

On the short wing end wall, we'll fill the whole area with White Wool. So let's type
//set 35.
On the short side, make a 21 x 4 selection like the one shown in the following screenshot (top-left section), and stand directly on the block as indicated by the player in the top-left section of the screenshot. Do
//copyand then move to the pole on the opposite side.
Once you are on the corner column like in the bottom-left section of the preceding screenshot, do
//paste.Tip
To be sure that you are standing exactly on the right block, turn off flying (double-click Space bar), knock the block out below your feet, and make sure you fall down to the block below. Then jump up and replace the block.
Do the same for the other wing. Select the wall section with the windows, repeat the process like you did for the previous wall, and then fill in the end wall with Wool blocks for now.
Add a wooden floor that is level with the three Wool blocks below the Spruce Window frames. You can use the
//set 5:1command to fill in the large rectangular areas.
In the following steps, we will be doing some slightly more complex operations so follow the instructions carefully:
Using the Wooden Axe, left-click to select the corner block of the house that is between the bottom of the windows and the floor.
Now go to the opposite corner of the house and right-click to select the block at the same level. Don't worry that the bay windows aren't selected; we'll fix those up later. Now execute the following commands:
//copy
//up 3
//paste
When executing the
//copyand//up 3commands, do not move off the current block you are standing on.Remove the Glass block that appeared when you used the
//upcommand. Don't use the Wooden Axe, Arrow, or Gun Powder tools to do this because they don't break blocks and may cause enormous problems instead.Manually place a layer around the entire house. You can fix up the bay window top section also (see the next screenshot). Now execute the following commands:
//shift 2 down
//copy
//up 7
//paste
Again, make sure you do not move off the current block you are standing on when executing the
//copyand//up 7commands.You should now have a top layer of Spruce Wood.
Look directly down at the ground and type the
//expand 2command.Note
The
expandcommand is based on the direction you are looking just like thestackcommand.For the following series of commands, don't move off the current block you are standing on:
//copy
//up 10
//paste
//shift 5 up
Now look directly up, but don't move and execute the following commands:
//expand 2
//copy
//up 8
//paste

Now select only the top layer of the bay window. Look directly up and type
//stack 9. Do the same for the other bay window.Using the VoxelSniper tool (press V), replace the 2 x 3 Wool block sections with Glass blocks where the windows should be.
Go to the end of the short wing and place a 5 x 5 rectangle outline of Red Bricks. Now using your Wooden Axe, select them.
Look directly up and type
//stack 11.
Now using Red Bricks and Red Brick steps, taper the chimney in by a block and extend it up to the top, both inside and outside.
In the courtyard area, we're going to build an entryway/foyer to the house. Using Nether Brick steps, create the following pattern on the wall and then make a selection containing it, as shown in the following screenshot:

Placing the steps the right way up can be a little bit of trial and error. To make the selection, just left-click one of the lowest steps. Then move to where you would need to select the second position. Place a block there and right-click on it. When you have the selection in place, you can then remove that block.
The top middle block is a normal Nether Brick block.
Facing directly away from the wall with the gable roof selection you have just made, type
//stack 7. Now fill in underneath the roof as illustrated in the following screenshot:
When you're happy that your foyer is complete, add in the second floor of your Tudor house. The floor should be one block below the windows, leaving the bottom Spruce Wood layer exposed above the floor, but below the window. Place a block in the corners to aid in your selection process and use
//set 5:1to fill in the floor.We'll go and add a design feature to the other end of the longest wing of the house. Select the area shown in the following screenshot:

Now face directly away from the selection and type the
//move 5command.
Fill in the gaps with Spruce Wood, Glass, and Wool much like what's shown in the preceding screenshot and add a Nether Brick step roof.
We will now create the roof for the main house. First we will start with the eaves.
Create the eaves of the house by placing a Spruce Wood block on the side of the end upright. Then place four Nether Brick step gables as shown in the next screenshot.
Select these five blocks and face directly down the wall towards the bay window. Now type
//stack 12.
This should meet up perfectly with the wall of the bay window.
On the opposite side, place the five eaves blocks as you did previously and then select them. Facing along that wall, type
//stack 11.We'll fill in the top part of the roof now. Make a Nether Brick step roof section with a Nether Brick block at the very top. Placing additional blocks underneath where the steps go is necessary to do this. Just break the extra blocks once you are done.
Select these blocks and then go stand on the full Nether block at the top of the roof section you just made.

Type
//copy, followed by//rotate 180, and then do//paste.Facing the unselected side of the roof section you just made, type
//expand 6to select the entire gable.Now face down the length of the wing and type
//stack 37.Add an extra layer just behind you to the roof so it has some overhang as shown in the previous screenshot. Go to the shorter wing and do the same process, just with a variation on the numbers used in the
//stackcommands. For the inner courtyard eaves do//stack 8, and for the gable roof do//stack 19.Manually join the two roofs together with Nether Brick steps and Nether Brick blocks.

Extend the chimney through the roof and fill in the walls. I've tapered the chimney down to a single block thickness so the part protruding through the roof wasn't too large.

You can finish off the bay windows now. Just place the blocks manually by using the preceding screenshot as a guide.
And that is how you build a Tudor house with WorldEdit CUI and VoxelSniper GUI. I'll leave the interior decorations and so forth up to you. Add your own personal touch, add another wing, a boathouse, a well, whatever you wish. I really hope you have enjoyed this project.
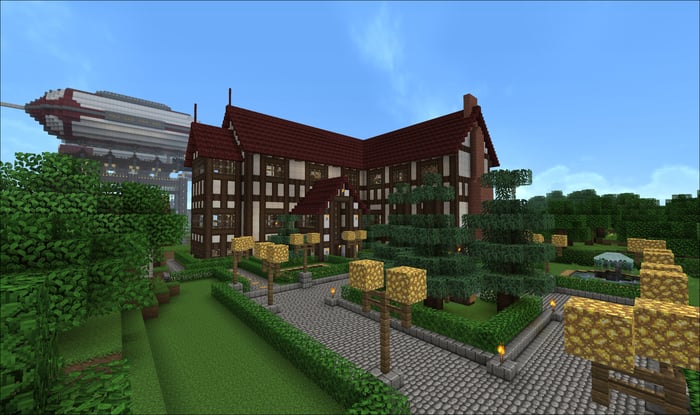
The following screenshot is how the Tudor house looks in the Inspiration 4 texture pack. The airship you can see in the background is the subject of our next project.