
The most evident change in the XenDesktop 7.6 is the change for the Web Interface portal component to access their own contents (desktop or applications). This historical component has been now substituted by the StoreFront platform, starting from the XenDesktop 7 release. In this recipe, we will discuss how to install and configure it, to enable users to access their published resources.
StoreFront can be installed on both Windows Server 2008 R2 SP2 (Standard, Enterprise, and Datacenter Editions), Windows Server 2012 (Standard and Datacenter Editions), and Windows Server 2012 R2 (Standard and Datacenter Editions).
The following ports need to be opened on the firewalls within your network:
TCP ports 80 and 443, in order to access the StoreFront Web Portal
TCP port 808, used to the intercommunications between StoreFront servers
TCP port 8008, used by the Citrix Receiver to communicate with the HTML5 store version
Moreover, you need to configure the Internet Information Service (IIS) role (Web Server) on the Windows Server machine dedicated to StoreFront.
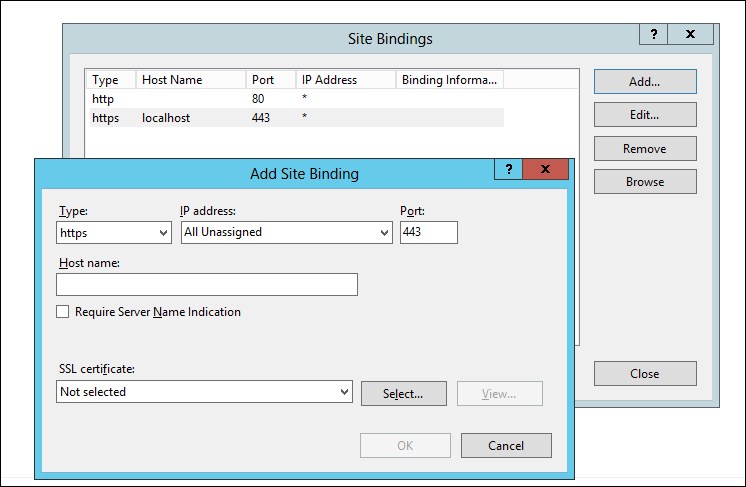
After this configuration is completed, remember to bind the IIS Web Server address to the HTTPS connection, by clicking on the Bindings link in the right-side menu of the IIS control panel—Default Web Site view.
Be sure that you are installing the software on a domain-joined machine within the same forest of the XenDesktop components earlier installed.
Follow the detailed step required to install and configure the StoreFront 2.6 platform:
After downloading the software from your personal Citrix account, run the
CitrixStoreFront-x64.exeinstaller, located under the following installation media path:x64\StoreFront.Accept the Citrix StoreFront License Agreement and click on the Next button.
Accept to install the missing Web Server IIS components and click on Next to continue.
After that, all the required components have been installed. Click on the Install button on the Ready to Install screen to proceed. After the installation is completed, click on Finish to start automatically the StoreFront administration console.
After the console has been opened, click on the Create a new deployment button in the StoreFront main menu.

In the Base URL screen, assign a valid URL to which the StoreFront server will be available to the end users, and then click on Next and wait until the end of the deployment.

In the Store Name field inside the Store Name category, enter a name of the store you are going to create, then click on Next.
In the Delivery Controllers section, click on the Add button to open the Add Delivery Controller menu.
In the Add Delivery Controller menu, perform the following configuration steps:
Assign a name to the controller by populating the Display name field.
Select the controller type by clicking on the specific radio button option (XenApp 7.5 (or later) or XenDesktop, XenApp 6.5 (or earlier), AppController, or VDI-in-a-box).
In the Servers (load balanced) field, click on the Add button and enter the name of your configured Delivery machine.
Select the relative transport type and port (HTTP/80 or HTTPS/443).
After completion, click on the OK button. Then, click on Next to continue with the procedure.
Note
To be able to use the HTTPS connection, you need a valid SSL certificate on the Delivery Controller server.

In the Remote Access section, select the option you want to configure (None, No VPN tunnel, or Full VPN tunnel).
To complete the configuration process, click on the Create button. At the end of the store creation, click on Finish.
To check the configuration of your StoreFront platform, type the configured address in a compatible browser, in the form of
https://FQDN/Citrix/<storename>.Note
Before being able to use the web platform, you have to install the Citrix Receiver on the machine from which you want to use the web store.

In the left-side menu, click on the Server Group link. Within this section, you will have the option to add a server to the configured StoreFront infrastructure (Add server link on the right-side menu) and change the default URL to access the platform (Change Base URL link in the right-side menu).
Generate Security Keys option is used to satisfy the general security practices, you can regenerate the security keys before their expiration date, by clicking on the Generate Keys button.

Click on the Authentication link in the left-side menu and configure the following options:
Authentication section | Add/Remove Authentication Methods: Select the authentication methods you want to configure for the login on your infrastructure.

Authentication section | User name and password subsection | Configure Trusted Domains: With this option, it is possible to restrict the domains from which users can perform the login phase. The Trusted Domain section will also avoid users to specify the domain for their user every time they log on to Storefront. Instead of typing it, they will choose the domain from the drop-down list of trusted domains. Click on the OK button to complete the configuration.

Authentication section | User name and password subsection | Manage Password Options: This section permits users to change their password based on the configured option.

Click on the Stores link in the left-side menu and configure the following options:
Stores section | Create store: This options permits you to create a new store in the StoreFront infrastructure.
Stores section | Export Multi-Store Provisioning File: This section permits you to export all the configured stores to the store configuration file to be used by the end user devices on which you have installed the Citrix Receiver. The file will be saved with the
.crextension.
Configured store section | Manage Delivery Controllers: With this link, you can Add, Edit, or Remove the Delivery Controllers configured within your farm.
Configured store section | Enable Remote Access: This option is used to configure external remote access using a NetScaler Gateway appliance.
Configured store section | Disable User Subcriptions: By enabling this link, users will receive all the applications configured within StoreFront and not only the apps that they selected and enabled.
Configured store section | Integrate with Citrix Online: This option permits you to include the three main Citrix online applications in your configured store.

Configured store section | Export Provisioning File: This option is similar to the multistore export earlier seen, with the difference that this is related only to the current used store.
Configured store section | Configure Kerberos Delegation: This option enables StoreFront to use single-domain Kerberos delegation when authentication is performed to delivery controller(s).
Note
More information about Kerberos Delegation parameter can be found at the following Citrix link:
http://docs.citrix.com/en-us/storefront/2-6/dws-manage/dws-manage-store/dws-configure-kcd.html
Configured store section | Configure XenApp Services Support: This option activates the retro compatibility access for old Citrix legacy clients. In the previous releases, this option was called Configure Legacy Support.
Configured store section | Remove Store: With this option, customers have the ability to remove configured stores.
Click on the Receiver for Web link in the left-side menu and configure the following options:
Configured store section | Choose Authentication Methods: This option lets customers decide which kind of authentication enables the Web version of the store.

Configured store section | Add Shortcuts to Websites: This interesting option permits you to add a StoreFront shortcut to a specified websites, to make access to your published resources quicker.
Configured store section | Change Store: By clicking on this link, you can change the store to which the Web Receiver is configured.
Configured store section | Set Session Timeout: By clicking this option, you can configure the time period after which inactive logged on users are disconnected.
Configured store section | Deploy Citrix Receiver: In this section, you can choose how to deploy the Citrix Receiver to end users.

Configured store section | Remove Website: This option must only be used in case you want to remove a configured Receiver Website.
Note
The options NetScaler Gateway and Beacons will be discussed in the Chapter 8, Installing and Configuring NetScaler GatewayTM 10.5.
StoreFront 2.6 is the latest version of this platform used with XenDesktop to access published resources. It is structured in the form of a catalog, which is able to deploy resources like desktops and applications from heterogeneous Citrix software (XenDesktop, XenApp, XenMobile, and so on).
StoreFront offers the same login methodologies used by the Web Interface. Customers can access their contents using simple authentication, smart card, or smart card pass-through; in addition, it is also possible to access the Citrix farm with the pass-through from the NetScaler Gateway.
The great step forward with the use of this platform is given in the new features listed as follows:
StoreFront no longer needs to use an external database, now it can use its local repository for users' subscriptions.
The high availability has been improved, thanks to the Storefront's capacity to replicate its database content among all the StoreFront machines within a configured site.
StoreFront gives you a choice in how to access the resources, through the use of the Citrix Receiver or using the new HTML5 web client.
StoreFront is able to apply a sync between all the configured StoreFront servers used by customers to access their resources, this permits to do not apply again for application subscription.
StoreFront 2.6 permits you to change the password of your Active Directory account used to connect to the store.
With StoreFront 2.6 release, you can configure unauthenticated access. This means that users accessing a StoreFront store will insert accessing credentials directly within the application and not twice (StoreFront + application). This is particularly useful for mission critical applications, such as medical software.
With StoreFront 2.6, applications can be organized in folders, using the Receiver for Web store.
Note
We will discuss in more detail unauthenticated access and folder views in the Chapter 6, Deploying Applications.
The Citrix Receiver installed on the end user workstations can be easily configured using the exported Store configuration file also in multistore mode. This means that it is possible to export and configure all the available stores configured in the infrastructure on a client device.
In a configured store, the Citrix online application is already available to be deployed to the end users (Citrix GoToMeeting, GoToWebinar, and GoToTraining).
Also in case of StoreFront installation, users can perform this task by the use of the command line. You have to execute from a command prompt shell the same executable file used for the graphical installation (CitrixStoreFront-x64.exe), followed by one or more of these options:
-silent: This option executes all the required steps in silent way.-INSTALLDIR: This option specifies the destination folder on which StoreFront 2.6 is installed.-WINDOWS_CLIENT: This option will make the Citrix Receiver installation files for Windows available on the StoreFront server.-MAC_CLIENT: This option will make the Citrix Receiver installation files for Mac available on the StoreFront server.
The Configuring Citrix ReceiverTM recipe in Chapter 4, User Experience – Planning and Configuring