Book Image

Building Minecraft Server Modifications

By : Cody M. Sommer
Book Image

Building Minecraft Server Modifications

By: Cody M. Sommer

Overview of this book

If you have ever played Minecraft on a public server then the chances are that the server was powered by Bukkit. Bukkit plugins allow a server to be modified in more ways than you can imagine. Learning to program your own server mods will allow you to customize the game to your own liking. Building Minecraft Server Modifications is a complete guide that walks you through the creation of Minecraft server mods. From setting up a server, to testing your newly made plugins, this book teaches you everything you need to know. With the help of this book you can start practising for a career in software development or simply create something awesome to play with your friends. This book walks you through installing your own Minecraft server for you and your friends. Once your server is running, it will aid you in modifying the game by programming Bukkit plugins. You will learn how to program simple plugin features such as player commands and permissions. You will also learn more complex features including listening for events, creating a configurable plugin, and utilizing the Bukkit scheduler. All of this will be accomplished while writing your own server mods. You will become familiar with the most important aspects of the Bukkit API. Additional API features will become a breeze to learn after tackling these more complicated tasks.
Table of Contents (17 chapters)
Building Minecraft Server Modifications
Credits
About the Author
About the Reviewers
www.PacktPub.com
Preface
Index

Building the JAR file


In order to install a plugin on our server we need the.jar file. The jar file is a Java executable that contains all of your written code which has been translated so that the computer can understand and run it.

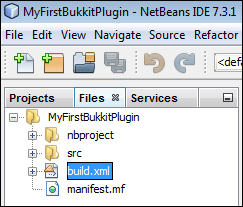
In NetBeans there is a single button which we can click on to build our project. This will generate the .jar file that we need. Let's add a block of code to our project to automatically copy the created .jar file to a more convenient location. In NetBeans, click on the Files tab to access the build.xml for your project.

Open build.xml and add the following block of code after the import file line:

<target name="-post-jar">
  <copy file="${dist.jar}" todir="../Plugin Jars" failonerror="true"/>
</target>

This additional code will be executed after your jar is successfully built. It will copy the jar from the dist directory to the specified location. You can change "../Plugin Jars" to whichever directory you wish. Here, .. means to go up one folder...