
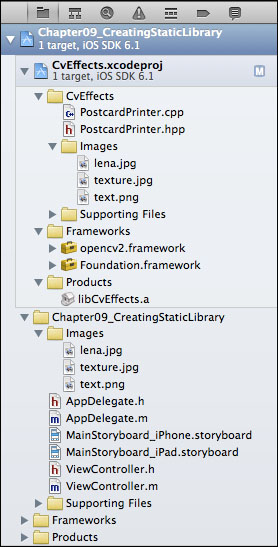
In this recipe we will learn how to create a static library for use in iOS applications. This is one of the classic types, and can prove as a convenient way to share your computer vision code between multiple platforms, including desktop ones. In addition to library and headers, we will also put images to the resources of the project. Our overall goal is to build a reusable library that could be linked from multiple iOS projects. The following is what it looks like in Xcode:
The source code for this recipe is available in the Recipe09_CreatingStaticLibrary and CvEffects folders in the code bundle that accompanies this book. You can use the iOS Simulator to work on this recipe.
This recipe is actually a refactoring of our Recipe05_PrintingPostcard project. We will split it into two, one will be a core computer vision library written in C++, and the second will be an iOS application, written in Objective-C.
The following is the high-level description of the required steps:
Create a new project of the Cocoa Touch Static Library type.
Reference the library project from your application project.
Move the source files of the
PostcardPrinterclass to the library project.Add a reference to the OpenCV framework in the library project.
Move the images to the same project.
Configure your application to link the library.
Configure the application to use resources from the library project.
Let's implement the described steps:
First of all, we'll create a Cocoa Touch Static Library project in Xcode. Give it the name
CvEffects, and delete the autogeneratedCvEffects.handCvEffects.mfiles. We'll continue to work with this project from the main application workspace, so now close library project in Xcode.Now we'll add a reference to the created static library project to our application project. Create a copy of the
Recipe05_PrintingPostcardfolder in Finder, and then open the project in Xcode. Now you need to drag yourCvEffects.xcodeprojfrom the Finder into the Project Navigator Area of the Xcode project.Now select both
PostcardPrinter.hppandPostcardPrinter.cppand drag them to the CvEffects group that is located under CvEffects.xcodeproj. In the appeared window, check both Copy items into the destination group's folder and Add to targets checkboxes. Now move the same source files to trash from the application project.In order to make the header file visible to the application project, we need to set up its copying during build. Open the Build Phases settings window of CvEffects.xcodeproj and expand the Copy Files build phase. Then add
PostcardPrinter.hppto the list, as shown in the following screenshot:
Note
Please note that if you're going to add new classes to the library project, they will be not visible in your main application project until you set up the copying of the headers. So, every time you update the library project, you need to update this list of public headers and rebuild the project.
Now add the reference to OpenCV framework as we did in the previous recipes. In the library project, create a new group called
Images. Then in the application project, select all the images needed for postcard printing:lena.jpg,texture.jpg, andtext.png, and drag them to the Images group. Make sure that you've checked the Copy items into the destination group's folder checkbox and unchecked the Add to targets checkbox. Now, move these images to trash from the application project.Our library is configured properly, and it's time to link it from our application. First of all, you need to update your import to the following line:
#import "CvEffects/PostcardPrinter.hpp"
Then you have to open the Build Phases settings of the Recipe09_CreatingStaticLibrary.xcodeproj project, expand the Link Binary With Libraries phase, and add the
libCvEffects.liblibrary, as shown in the following screenshot:
Finally, you need to add references to images. First, create the Images group as a subgroup of Recipe09_CreatingStaticLibrary.xcodeproj. Then select all three images in the library project, and drag them to the created Images group. In the window that appears, uncheck the Copy items into the destination group's folder checkbox (as we want application to reference images from the library project), and check the Add to targets checkbox.
The setup is complete; now you can build and run the application.
The static library project on iOS doesn't differ much from the static libraries for other platforms, so we'll not dig deeper into this subject. As you can see, such project type allows you not only to keep the source files, but also to keep the images and other resources. This is a good opportunity to reduce duplication in your code base.
For a more detailed introduction into static libraries in iOS, you can refer to the official documentation at http://bit.ly/3848_iOSStaticLibraries.
A static library is a good way to reuse your code between projects, but there are some additional opportunities for developers. Let's discuss them.
The described approach allows you to isolate the computer vision logic from the user interface and user interaction logic. This allows you to reuse your code in other iOS projects, but more importantly, you can also use the same library code on multiple platforms, including desktop. This could significantly simplify your development and debugging processes. It is generally a good practice to initially develop the computer vision logic on a desktop computer, because debugging may be a tricky problem.
One of drawbacks of static libraries is that they require some work from users, as they need to add header files and the library to the linking process. iOS provides a more convenient way when you wrap your code into a framework. As a result, user just points to the framework in the Xcode, and all dependencies are added automatically. This is actually how OpenCV is distributed. We will not cover the creation of frameworks in this book, but please keep in mind that if you want to distribute your libraries, you should consider this approach, as it simplifies the life of your users. The Xcode community has created several Xcode templates that could help you start; they can be found at https://github.com/kstenerud/iOS-Universal-Framework.