

To show how we can connect to a Hadoop database, I will use two virtual machines: one with MicroStrategy Suite and the second with Cloudera Hadoop distribution, specifically, a virtual appliance that is available for download from their website.
The configuration of the Hadoop cluster is out of scope; moreover, I am not a Hadoop expert. I'll simply give some hints, feel free to use any other configuration/vendor, the procedure and ODBC parameters should be similar.
Start by going to http://at5.us/AppAU1
The Cloudera VM download is almost 3 GB (cloudera-quickstart-vm-4.3.0-vmware.tar.gz) and features the CH4 version. After unpacking the archive, you'll find a cloudera-quickstart-vm-4.3.0-vmware.ovf file that can be opened with VMware, see screen capture:
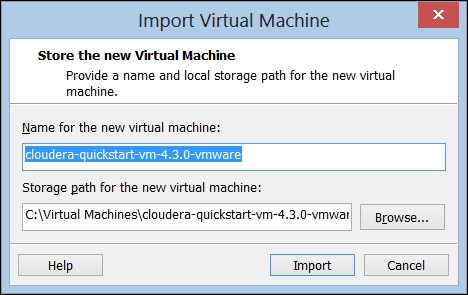
Accept the defaults and click on Import to generate the cloudera-quickstart-vm-4.3.0-vmware virtual machine.
Before starting the Cloudera appliance, change the network card settings from NAT to Bridged since we need to access the database from another VM:
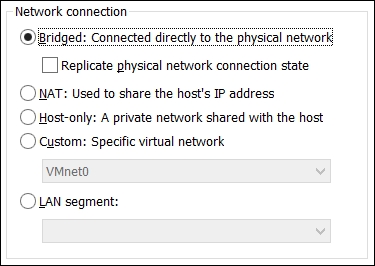
Leave the rest of the parameters, as per the default, and start the machine.
After a while, you'll be presented with a graphical interface of Centos Linux. If the network has started correctly, the machine should have received an IP address from your network DHCP. We need a fixed rather than dynamic address in the Hadoop VM, so:
Open the System | Preferences | Network Connections menu.
Select the name of your card (should be something like Auto eth1) and click on Edit….
Move to the IPv4 Settings tab and change the Method from Automatic (DHCP) to Manual.
Click on the Add button to create a new address. Ask your network administrator for details here and fill Address, Netmask, and Gateway.
Click on Apply… and when prompted type the root password
clouderaand click on Authenticate. Then click on Close.Check if the change was successful by opening a Terminal window (Applications | System Tools | Terminal) and issue the
ifconfigcommand, the answer should include the address that you typed in step 4.From the MicroStrategy Suite virtual machine, test if you can ping the Cloudera VM.
When we first start Hadoop, there are no tables in the database, so we create the samples:
In the Cloudera virtual machine, from the main page in Firefox open Cloudera Manager, click on I Agree in the Information Assurance Policy dialog.
Log in with username
adminand passwordadmin.Look for a line with a service named oozie1, notice that it is stopped. Click on the Actions button and select Start….
Confirm with the Start button in the dialog. A Status window will pop up, wait until the Progress is reported as Finished and close it.
Now click on the Hue button in the bookmarks toolbar.
Sign up with username
adminand passwordadmin, you are now in the Hue home page.Click on the first button in the blue Hue toolbar (tool tip: About Hue) to go to the quick Start Wizard.
Click on the Next button to go to Step 2: Examples tab.
Click on Beeswax (Hive UI) and wait until a message over the toolbar says Examples refreshed.
Now in the Hue toolbar, click on the seventh button from the left (tool tip: Metastore Manager), you will see the default database with two tables: sample_07 and sample_08.
Enable the checkbox of sample_08 and click on the Browse Data button. After a while the Results tab shows a grid with data. So far so good.
We now go back to the Cloudera Manager to start the Impala service. Click on the Cloudera Manager bookmark button.
In the Impala1 row, open the Actions menu and choose Start…, then confirm Start.
Wait until the Progress says Finished, then click on Close in the command details window.
Go back to Hue and click on the fourth button on the toolbar (tool tip: Cloudera Impala (TM) Query UI).
In the Query Editor text area, type
select * from sample_08and click on Execute to see the table content.
Next, we open the MicroStrategy virtual machine and download the 32-bit Cloudera ODBC Driver for Apache Hive, Version 2.0 from http://at5.us/AppAU2.
Download the ClouderaHiveODBCSetup_v2_00.exe file and save it in C:\install.
We install the ODBC driver:
Run
C:\install\ClouderaHiveODBCSetup_v2_00.exeand click on the Next button until you reach Finish at the end of the setup, accepting every default.Go to Start | All Programs | Administrative Tools | Data Sources (ODBC) to open the 32-bit ODBC Data Source Administrator (if you're on 64-bit Windows, it's in the
SysWOW64folder).Select Cloudera ODBC Driver for Apache Hive and click on Finish.

Fill the Hive ODBC DSN Configuration with these case-sensitive parameters (change the Host IP according to the address used in step 4 of the Getting ready section):
Data Source Name:
Cloudera VMHost:
192.168.1.40Port:
21050Database:
defaultType:
HS2NoSasl
Click on OK and then on OK again to close the ODBC Data Source Administrator.
Now open the MicroStrategy Desktop application and log in with administrator and the corresponding password.
Right-click on MicroStrategy Analytics Modules and select Create New Project….
Click on the Create project button and name it
HADOOP, uncheck Enable Change Journal for this project and click on OK.When the wizard finishes creating the project click on Select tables from the Warehouse Catalog and hit the button labeled New….
Click on Next and type
Cloudera VMin the Name textbox of the Database Instance Definition window.In this same window, open the Database type combobox and scroll down until you find Generic DBMS. Click on Next.
In Local system ODBC data sources, pick Cloudera VM and type
adminin both Database login and Password textboxes.Click on Next, then on Finish, and then on OK.
When a Warehouse Catalog Browser error appears, click on Yes.
In the Warehouse Catalog Options window, click on Edit… on the right below Cloudera VM.
Select the Advanced tab and enable the radio button labeled Use 2.0 ODBC calls in the ODBC Version group.
Click on OK. Now select the category Catalog | Read Settings in the left tree and enable the first radio button labeled Use standard ODBC calls to obtain the database catalog.
Click on OK to close this window. When the Warehouse Catalog window appears, click on the lightning button (tool tip: Read the Warehouse Catalog) to refresh the list of available tables.
Pick sample_08 and move it to the right of the shopping cart. Then right-click on it and choose Import Prefix.
Click on Save and Close and then on OK twice to close the Project Creation Assistant.
You can now open the project and update the schema.
From here, the procedure to create objects is the same as in any other project:
Go to the Schema Objects | Attributes folder, and create a new Job attribute with these columns:
ID:
Table: sample_08
Column: code
DESC:
Table: sample_08
Column: description
Go to the Fact folder and create a new Salary fact with salary column. Update the schema.
Go to the Public Objects | Metrics folder and create a new Salary metric based on the Salary fact with
Sumas aggregation function.Go to My Personal Objects | My Reports and create a new report with the Job attribute and the Salary metric:

There you go; you just created your first Hadoop report.
Executing Hadoop reports is no different from running any other standard DBMS reports. The ODBC driver handles the communication with Cloudera machine and Impala manages the creation of jobs to retrieve data. From MicroStrategy perspective, it is just another SELECT query that returns a dataset.
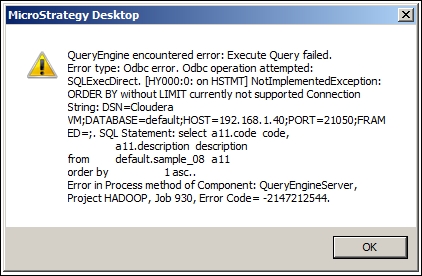
Impala and Hive do not support the whole set of ANSI SQL syntax, so in some cases you may receive an error if a specific feature is not implemented:
The Connecting to a Vertica database recipe in Appendix D, HP Vertica