
One feature that really sets Couchbase apart from the other NoSQL databases is its administrative interface. When you install Couchbase, you also get this powerful web app to manage your server. Moreover, the admin tool is simply a wrapper over a RESTful management API supported by the server. In other words, any action you can perform with the admin GUI can also be performed via your favorite DevOps tools.
You can get to the Couchbase Server web admin by opening your browser and going to http://localhost:8091. If you've just completed installing Couchbase, there may be a brief delay between the startup of the server and the startup of the admin. Refresh a couple of times, and you should see something like this:
Couchbase Console for new install
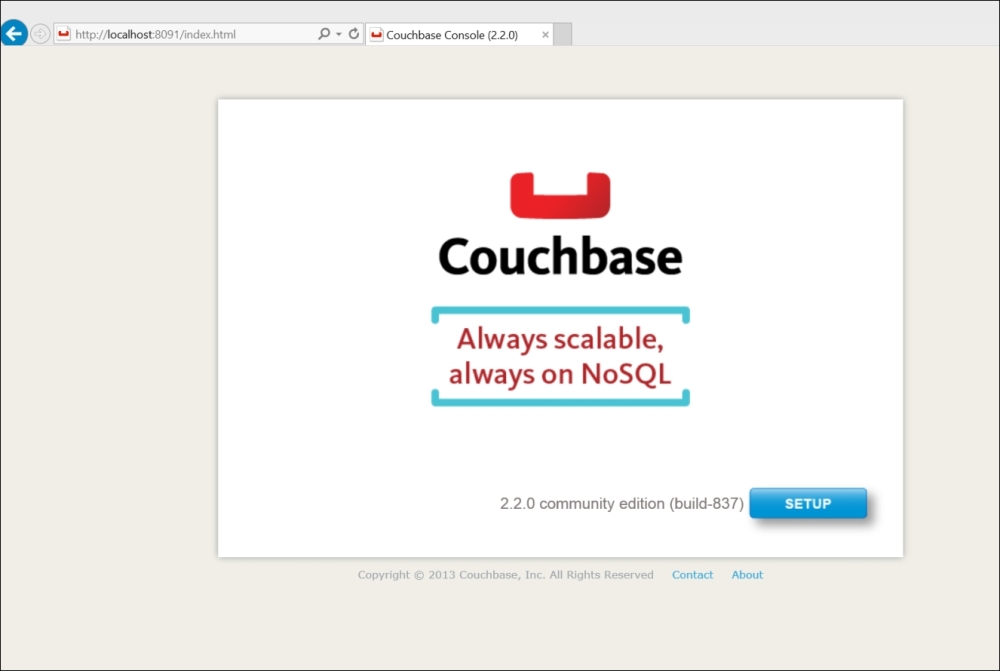
The Couchbase Web Console provides a setup utility to get your cluster up and running. Click on the blue Setup button to begin. The following screenshot shows the configuration screen:
Configuring the server
The options found in step 1 of the configuration screen are fairly straightforward. The first two fields are the paths where Couchbase will store data and indexes. The server hostname uniquely identifies a node in a cluster. I'll discuss clusters in more detail later in this chapter. For now, you can think of a cluster as a collection of Couchbase server instances, or nodes, with the same buckets.
For development, it's generally useful to set this to 127.0.0.1. Basically, you want to ensure that whatever hostname you choose, it is not subject to change, as could be the case when running in the cloud or attaching the cluster to a network outside of your home or office.
The final option is whether to start a new cluster or connect to an existing cluster. In our case, we'll obviously be starting a new cluster. In a production environment, you'd want to maximize the amount of RAM available to your node. For development purposes, you are free to choose a lesser amount. The important thing to note here is that the amount of RAM you allocate will be required by each node in your cluster. If you click on the Join a cluster now option, you'll be asked to provide the address of a node in the cluster and the cluster credentials, as shown here:

Connecting to a new cluster
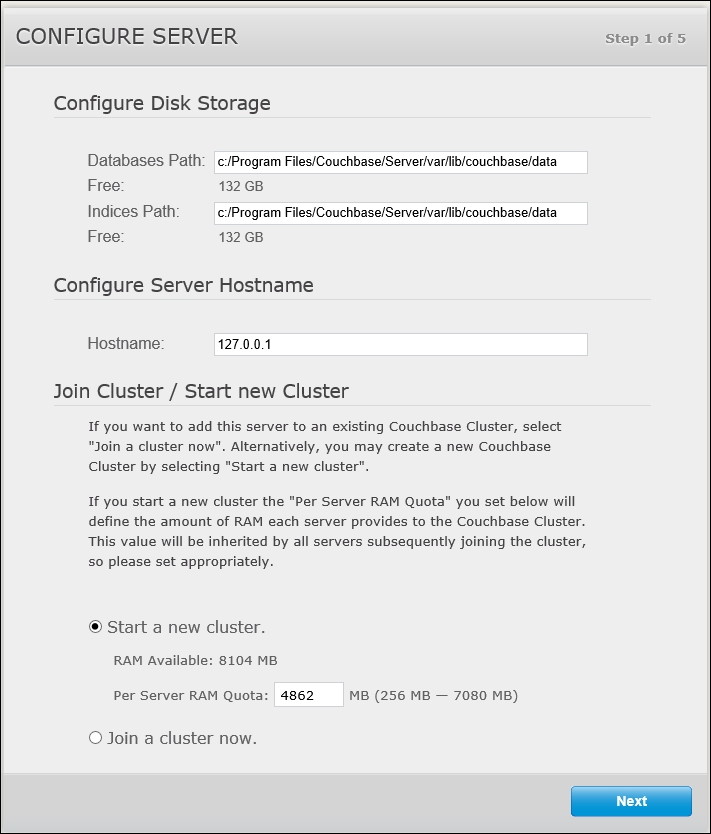
Click on Next to be brought to step 2, where you'll be asked whether you want to install one of the two available sample buckets. We'll dig into buckets in the next step, so for now, just check the beer-sample bucket. That's the sample data source we'll use as we explore the development APIs. The following screen shows the sample buckets to be selected:
Sample buckets
In step 3, you're prompted to configure the default bucket for the new cluster. Couchbase buckets are loosely analogous to databases in relational systems. If you've used MySQL, SQL Server, or any other relational database server, you know that you must create an object called a database in which you'll create your tables and other database objects. Similarly, with Couchbase Server, a bucket is a container for the documents and indexes you'll store.
You must have at least one bucket on your cluster, and during the setup you are required to create a bucket named default. As you can see in the next screenshot, you are not allowed to change the name of this first bucket. You do, however, have other decisions to make about the default bucket.
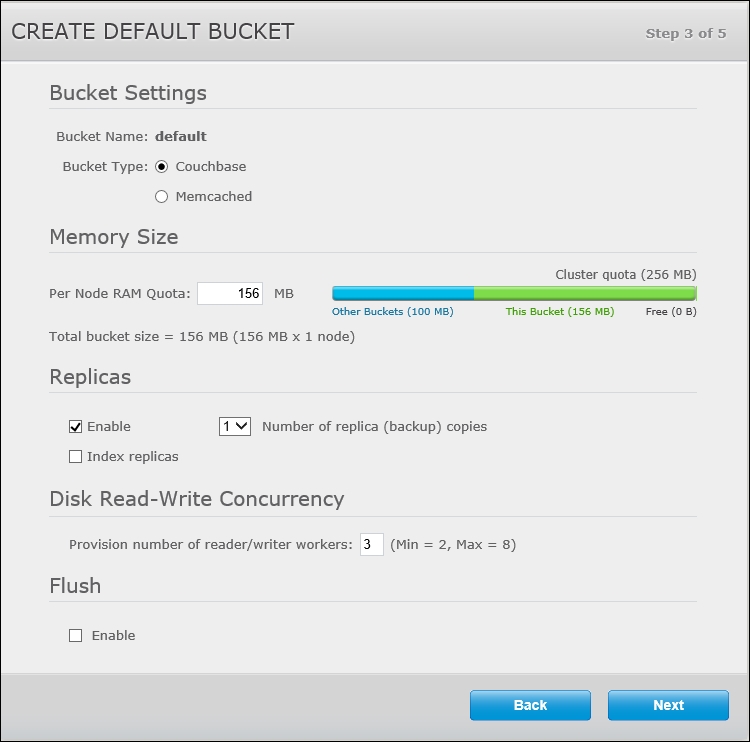
Bucket configuration
Couchbase, a being of Membase and therefore of Memcached lineage, fully supports the Memcached binary protocol. What this means is that Couchbase Server can be used as a stand-in replacement for a Memcached cluster. If you're currently using Memcached as a distributed cache for your application, you would be able to replace it with Couchbase Server and a Memcached bucket.
If you set the bucket type to Memcached, your bucket won't be persistent, and it won't be able to take advantage of the document capabilities that Couchbase provides. Even for use as a distributed cache, a Couchbase bucket is almost always the right choice. Couchbase disk writes are performed asynchronously, and it's unlikely that your application will be impeded by I/O problems. We'll stick to Couchbase buckets for this text, but it's important to understand the difference between these two bucket types.
Because Couchbase relies heavily on RAM to achieve its blazingly fast performance, it's important to allocate as much RAM as possible to your bucket. I'll discuss Couchbase Server's architecture towards the end of this chapter, but for now, know that more RAM generally means better performance. For development purposes, feel free to allocate the minimum amount of RAM required for each node (for instance, 100 MB).
Couchbase Server supports replication within your cluster. When you set up a bucket, you may choose to replicate the data to up to three other nodes. Replication will also be discussed at the end of this chapter. Since we are using a single-node cluster, uncheck the Enable option.
Couchbase allows you to specify the number of reader/writer workers to allocate for a bucket. This setting exists to allow administrators to optimize disk I/O. We'll leave the default value, 3, in place. If you enable Flush on your buckets, you'll have the ability to remove all documents from a bucket with a single command. This action is like truncating all the tables in your relational database, so obviously it should be set only when absolutely necessary.
In step 4, the wizard simply asks whether you wish to receive update notifications, and allows you to sign up for Couchbase's community update e-mails. Neither choice will affect the setup. The fifth and final step is to set up a username and password for cluster administration.
After completing the wizard, you'll be presented with a Cluster Overview page. When this page first loads, it's possible that you'll see a brief notification that the node is down while the bucket is activated. You're also likely to see a notification that the sample bucket is being loaded. Once ready, your cluster should show as healthy with active buckets, as in shown in the following screenshot:
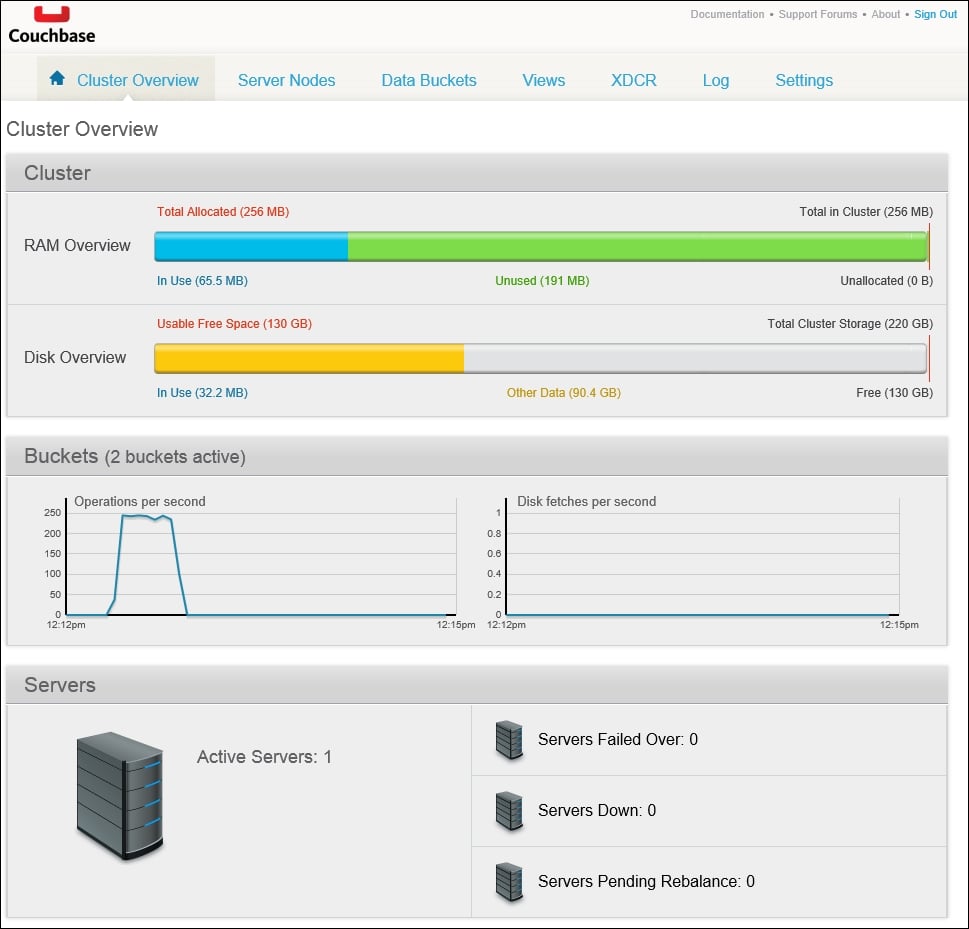
Initialization