
The largest repository of unstructured text is the Web, and if you know how to crawl it, then you have all the data you need readily available for your experiments. Hence, web crawling is something worth learning for people who are interested in NLTK. This chapter is all about gathering data from the Web.
In this chapter we will use an amazing Python library called Scrapy to write our web crawlers. We will provide you all the details to configure different settings that are required. We will write some of the most common spider strategies and many use cases. Scrapy also requires some understanding about XPath, crawling, scraping, and some concepts related to the Web in general. We will touch upon these topics and make sure you understand their practical aspects, before really getting in to their implementation. By the end of this chapter, you will have a better understand of web crawler.
- How we can write our own crawler using Scrapy
- Understanding about all the major Scrapy functionality
One of the biggest web crawler is Google that crawls the entire World Wide Web (WWW). Google has to traverse every page that exists on the Web and scrape/crawl the entire content.
A web crawler is a computer program that systematically browses the web page by page and also scrapes/crawls the content of the pages. A web crawler can also parse the next set of URLs to be visited from the crawled content. So, if these processes run indefinitely over the entire Web, we can crawl through all the web pages. Web crawlers are interchangeably also called spiders, bots, and scrapers. They all mean the same.
There are a few main points we need to think about before writing our first crawler. Now, every time a web crawler traverses a page, we must decide what kind of content we want to select and what content we want to ignore. For applications such as a search engine, we should ignore all the images, js files, css files, and other files and should concentrate only on HTML content that can be indexed and exposed to the search. In some information extraction engines, we select specific tags or parts of a web page. We also need to extract the URLs if we want to do the crawling recursively. This brings us to the topic of crawling strategy. Here, we need to decide whether we want to go recursively in depth first manner or breadth first manner. We want to follow all the URLs on the next page and then go in depth first manner till we get the URLs, or we should go to all the URLs in the next page and do this recursively.
We also need to make sure that we are not going in the self loop stage because essentially, we traverse a graph in most of the cases. We need to make sure we have a clear revisit strategy for a page. One of the most talked about crawled policies is focused crawling, where we know what kind of domains/topics we are looking for, and the ones that need to be crawled. Some of these issues will be discussed in more detail in the spider section.
Let's start with a very basic crawler that will crawl the entire content of a web page. To write the crawlers, we will use Scrapy. Scrapy is a one of the best crawling solutions using Python. We will explore all the different features of Scrapy in this chapter. First, we need to install Scrapy for this exercise.
To do this, type in the following command:
$ pip install scrapy
This is the easiest way of installing Scrapy using a package manager. Let's now test whether we got everything right or not. (Ideally, Scrapy should now be part of sys.path):
>>>
import scrapy
At this point, we have Scrapy working for you. Let's start with an example spider app with Scrapy:
$ scrapy startproject tutorial
Once you write the preceding command, the directory structure should look like the following:
tutorial/
    scrapy.cfg   #the project configuration file
    tutorial/       #the project's python module, you'll later import your code from here.
        __init__.py
        items.py         #the project's items file.
        pipelines.py    #the project's pipelines file.
        settings.py      # the project's settings file.
        spiders/   #a directory where you'll later put your spiders.
              __init__.py
The top folder will be given the name of the example tutorial in this case. Then, there is the project configuration file (scrapy.cfg) that will define the kind of setting file that should be used for the project. It also provides the deploy URLs for the project.
Another important part of tutorial setting.py is where we can decide what kind of item pipeline and spider will be used. The item.py and pipline.py are the files that define the data and kind of preprocessing we need to do on the parsed item. The spider folder will contain the different spiders you wrote for the specific URLs.
For our first test spider, we will dump the contents of a news in a local file. We need to create a file named NewsSpider.py, and put it in the path /tutorial/spiders. Let's write the first spider:
>>>from scrapy.spider import BaseSpider
>>>class NewsSpider(BaseSpider):
>>>    name = "news"
>>>    allowed_domains = ["nytimes.com"]
>>>    start_URLss = [
>>>        'http://www.nytimes.com/'
>>>     ]
>>>def parse(self, response):
>>>        filename = response.URLs.split("/")[-2]
>>>        open(filename, 'wb').write(response.body)
Once we have this spider ready, we can start crawling using the following command:
$ scrapy crawl news
After you enter the preceding command, you should see some logs like this:
[scrapy] INFO: Scrapy 0.24.5 started (bot: tutorial)
[scrapy] INFO: Optional features available: ssl, http11, boto
[scrapy] INFO: Overridden settings: {'NEWSPIDER_MODULE': 'tutorial.spiders', 'SPIDER_MODULES': ['tutorial.spiders'], 'BOT_NAME': 'tutorial'}
[scrapy] INFO: Enabled extensions: LogStats, TelnetConsole, CloseSpider, WebService, CoreStats, SpiderState
If you don't see logs like the ones shown in the preceding snippet, you have missed something. Check the location of the spider and other Scrapy-related settings, such as the name of the spider matching to the crawl command, and whether setting.py is configured for the same spider and item pipeline or not.
Now, if you are successful, there should be a file in your local folder with the name www.nytimes.com that has the entire web content of the www.nytimes.com page.
Let's see some of the terms that we used in the spider code in more detail:
name: This is the name of the spider that works as an identifier for Scrapy to look for thespiderclass. So, the crawl command argument and this name should always match. Also make sure that it's unique and case sensitive.start_urls: This is a list of URLs where the spider will begin to crawl. The crawler with start from a seed URL and using theparse()method, it will parse and look for the next URL to crawl. Instead of just a single seed URL, we can provide a list of URLs that can start the crawl.parse(): This method is called to parse the data from start URLs. The logic of what kind of element is to be selected for specific attributes of item. This could be as simple as dumping the entire content of HTML to as complex as many parse methods callable from parse, and different selectors for individual item attributes.
So, the code does nothing but starts with the given URLs (in this case, www.nytimes.com) and crawls the entire content of the page. Typically, a crawler is more complex and will do much more than this; now, let's take a step back and understand what happened behind the scenes. For this, take a look at the following figure:
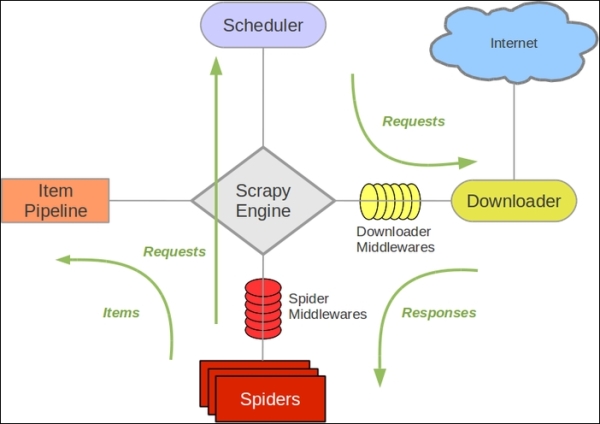
credit :Scrapy
The data flow in Scrapy is controlled by the execution engine and goes like this:
- The process starts with locating the chosen spider and opening the first URL from the list of
start_urls. - The first URL is then scheduled as a request in a scheduler. This is more of an internal to Scrapy.
- The Scrapy engine then looks for the next set of URLs to crawl.
- The scheduler then sends the next URLs to the engine and the engine then forwards it to the downloader using the downloaded middleware. These middlewares are where we place different proxies and user-agent settings.
- The downloader downloads the response from the page and passes it to the spider, where the parse method selects specific elements from the response.
- Then, the spider sends the processed item to the engine.
- The engine sends the processed response to the item pipeline, where we can add some post processing.
- The same process continues for each URL until there are no remaining requests.
The best way to understand Scrapy is to use it through a shell and to get your hands dirty with some of the initial commands and tools provided by Scrapy. It allows you to experiment and develop your XPath expressions that you can put into your spider code.
Now, let's start with a very interesting use case where we want to capture the trending topics from Google news (https://news.google.com/).
The steps to follow here are:
- Open https://news.google.com/ in your favorite browser.
- Go to the trending topic section on Google news. Then, right-click on and select Inspect Element for the first topic, as shown in the following screenshot:

- The moment you open this, there will be a side window that will pop up and you will get a view.
- Search and select the
divtag. For this example, we are interested in<div class="topic">. - Once this is done, you will come to know that we have actually parsed the specific part of the web page, as shown in the following screenshot:

Now, what we actually did manually in the preceding steps can be done in an automated way. Scrapy uses an XML path language called XPath. XPath can be used to achieve this kind of functionality. So, let's see how we can implement the same example using Scrapy.
To use Scrapy, put the following command in you cmd:
$scrapy shell https://news.google.com/
The moment you hit enter, the response of the Google news page is loaded in the Scrapy shell. Now, let's move to the most important aspect of Scrapy where we want to understand how to look for a specific HTML element of the page. Let's start and run the example of getting topics from Google news that are shown in the preceding image:
In [1]: sel.xpath('//div[@class="topic"]').extract()
The output to this will be as follows:
Out[1]:
[<Selector xpath='//div[@class="topic"]' data=u'<div class="topic"><a href="/news/sectio'>,
<Selector xpath='//div[@class="topic"]' data=u'<div class="topic"><a href="/news/sectio'>,
<Selector xpath='//div[@class="topic"]' data=u'<div class="topic"><a href="/news/sectio'>]
Now, we need to understand some of the functions that Scrapy and XPath provide to experiment with the shell and then, we need to update our spider to do more sophisticated stuff. Scrapy selectors are built with the help of the lxml library, which means that they're very similar in terms of speed and parsing accuracy.
Let's have a look at some of the most frequently used methods provided for selectors:
xpath(): This returns a list of selectors, where each of the selectors represents the nodes selected by the XPath expression given as an argument.css(): This returns a list of selectors. Here, each of the selectors represent the nodes selected by the CSS expression given as an argument.extract():This returns content as a string with the selected data.re(): This returns a list of unicode strings extracted by applying the regular expression given as an argument.
I am giving you a cheat sheet of these top 10 selector patterns that can cover most of your work for you. For a more complex selector, if you search the Web, there should be an easy solution that you can use. Let's start with extracting the title of the web page that is very generic for all web pages:
In [2] :sel.xpath('//title/text()')
Out[2]: [<Selector xpath='//title/text()' data=u' Google News'>]
Now, once you have selected any element, you also want to extract for more processing. Let's extract the selected content. This is a generic method that works with any selector:
In [3]: sel.xpath('//title/text()').extract()
Out[3]: [u' Google News']
The other very generic requirement is to look for all the elements in the given page. Let's achieve this with this selector:
In [4]: sel.xpath('//ul/li')
Out [4] : list of elements (divs and all)
We can extract all the titles in the page with this selector:
In [5]: sel.xpath('//ul/li/a/text()').extract()
Out [5]: [ u'India',
u'World',
u'Business',
u'Technology',
u'Entertainment',
u'More Top Stories']
With this selector, you can extract all the hyperlinks in the web page:
In [6]:sel.xpath('//ul/li/a/@href').extract()
Out [6] : List of urls
Let's select all the <td> and div elements:
In [7]:sel.xpath('td'')
In [8]:divs=sel.xpath("//div")
This will select all the divs elements and then, you can loop it:
In [9]: for d in divs:
    printd.extract()
This will print the entire content of each div in the entire page. So, in case you are not able to get the exact div name, you can also look at the regex-based search.
Now, let's select all div elements that contain the attribute class="topic":
In [10]:sel.xpath('/div[@class="topic"]').extract()
In [11]:  sel.xpath("//h1").extract()         # this includes the h1 tag
This will select all the <p> elements in the page and get the class of those elements:
In [12 ] for node in sel.xpath("//p"):
print node.xpath("@class").extract()
Out[12] print all the <p>

In [13]: sel.xpath("//li[contains(@class, 'topic')]")
Out[13]:
[<Selector xpath="//li[contains(@class, 'topic')]" data=u'<li class="nav-item nv-FRONTPAGE selecte'>,
<Selector xpath="//li[contains(@class, 'topic')]" data=u'<li class="nav-item nv-FRONTPAGE selecte'>]
Let's write some selector nuggets to get the data from a css file. If we just want to extract the title from the css file, typically, everything works the same, except you need to modify the syntax:
In [14] :sel.css('title::text').extract()
Out[14]: [u'Google News']
Use the following command to list the names of all the images used in the page:
In[15]: sel.xpath('//a[contains(@href, "image")]/img/@src').extract()
Out [15] : Will list all the images if the web developer has put the images in /img/src
Let's see a regex-based selector:
In [16 ]sel.xpath('//title').re('(\w+)')
Out[16]: [u'title', u'Google', u'News', u'title']
In some cases, removing the namespaces can help us get the right pattern. A selector has an inbuilt remove_namespaces() function to make sure that the entire document is scanned and all the namespaces are removed. Make sure before using it whether we want some of these namespaces to be part of the pattern or not. The following is example of remove_namespaces() function:
In [17] sel.remove_namespaces()
sel.xpath("//link")
Now that we have more understanding about the selectors, let's modify the same old news spider that we built previously:
>>>from scrapy.spider import BaseSpider
>>>class NewsSpider(BaseSpider):
>>>    name = "news"
>>>    allowed_domains = ["nytimes.com"]
>>>    start_URLss = [
>>>        'http://www.nytimes.com/'
>>>    ]
>>>def parse(self, response):
>>>    sel = Selector(response)
>>>        sites = sel.xpath('//ul/li')
>>>        for site in sites:
>>>            title = site.xpath('a/text()').extract()
>>>            link = site.xpath('a/@href').extract()
>>>            desc = site.xpath('text()').extract()
>>>            print title, link, desc
Here, we mainly modified the parse method, which is one of the core of our spider. This spider can now crawl through the entire page, but we do a more structured parsing of the title, description, and URLs.
Now, let's write a more robust crawler using all the capabilities of Scrapy.
Until now, we were just printing the crawled content on stdout or dumping it in a file. A better way to do this is to define items.py every time we write a crawler. The advantage of doing this is that we can consume these items in our parse method, and this can also give us output in any data format, such as XML, JSON, or CSV. So, if you go back to your old crawler, the items class will have a function like this:
>>>fromscrapy.item import Item, Field
>>>class NewsItem(scrapy.Item):
>>>    # define the fields for your item here like:
>>>    # name = scrapy.Field()
>>>    pass
Now, let's make it like the following by adding different fields:
>>>from scrapy.item import Item, Field
>>>class NewsItem(Item):
>>>    title = Field()
>>>    link = Field()
>>>    desc = Field()
Here, we added field() to title, link, and desc. Once we have a field in place, our spider parse method can be modified to parse_news_item, where instead dumping the parsed fields to a file now it can be consumed by an item object.
A Rule method is a way of specifying what kind of URL needs to be crawled after the current one. A Rule method provides SgmlLinkExtractor, which is a way of defining the URL pattern that needs to be extracted from the crawled page. A Rule method also provides a callback method, which is typically a pointer for a spider to look for the parsing method, which in this case is parse_news_item. In case we have a different way to parse, then we can have multiple rules and parse methods. A Rule method also has a Boolean parameter to follow, which specifies whether links should be followed by each response extracted with this rule. If the callback is None, follow defaults to True: otherwise, it default to False.
One important point to note is that the Rule method does not use parse. This is because the name of the default callback method is parse() and if we use it, we are actually overriding it, and that can stop the functionality of the crawl spider. Now, let's jump on to the following code to understand the preceding methods and parameters:
>>>from scrapy.contrib.spiders import CrawlSpider, Rule
>>>from scrapy.contrib.linkextractors.sgml import SgmlLinkExtractor
>>>from scrapy.selector import Selector
>>>from scrapy.item import NewsItem
>>>class NewsSpider(CrawlSpider):
>>>    name = 'news'
>>>    allowed_domains = ['news.google.com']
>>>    start_urls = ['https://news.google.com']
>>>    rules = (
>>>        # Extract links matching cnn.com
>>>        Rule(SgmlLinkExtractor(allow=('cnn.com', ), deny=(http://edition.cnn.com/', ))),
>>>       # Extract links matching 'news.google.com'
>>>       Rule(SgmlLinkExtractor(allow=('news.google.com', )), callback='parse_news_item'),
>>>    )
>>>    def parse_news_item(self, response):
>>>        sel = Selector(response)
>>>        item = NewsItem()
>>>        item['title'] = sel.xpath('//title/text()').extract()
>>>        item[topic] = sel.xpath('/div[@class="topic"]').extract()
>>>        item['desc'] = sel.xpath('//td//text()').extract()
>>>        return item
The Scrapy shell
The best way to understand Scrapy is to use it through a shell and to get your hands dirty with some of the initial commands and tools provided by Scrapy. It allows you to experiment and develop your XPath expressions that you can put into your spider code.
Now, let's start with a very interesting use case where we want to capture the trending topics from Google news (https://news.google.com/).
The steps to follow here are:
- Open https://news.google.com/ in your favorite browser.
- Go to the trending topic section on Google news. Then, right-click on and select Inspect Element for the first topic, as shown in the following screenshot:
- The moment you open this, there will be a side window that will pop up and you will get a view.
- Search and select the
divtag. For this example, we are interested in<div class="topic">. - Once this is done, you will come to know that we have actually parsed the specific part of the web page, as shown in the following screenshot:
Now, what we actually did manually in the preceding steps can be done in an automated way. Scrapy uses an XML path language called XPath. XPath can be used to achieve this kind of functionality. So, let's see how we can implement the same example using Scrapy.
To use Scrapy, put the following command in you cmd:
$scrapy shell https://news.google.com/
The moment you hit enter, the response of the Google news page is loaded in the Scrapy shell. Now, let's move to the most important aspect of Scrapy where we want to understand how to look for a specific HTML element of the page. Let's start and run the example of getting topics from Google news that are shown in the preceding image:
In [1]: sel.xpath('//div[@class="topic"]').extract()
The output to this will be as follows:
Out[1]:
[<Selector xpath='//div[@class="topic"]' data=u'<div class="topic"><a href="/news/sectio'>,
<Selector xpath='//div[@class="topic"]' data=u'<div class="topic"><a href="/news/sectio'>,
<Selector xpath='//div[@class="topic"]' data=u'<div class="topic"><a href="/news/sectio'>]
Now, we need to understand some of the functions that Scrapy and XPath provide to experiment with the shell and then, we need to update our spider to do more sophisticated stuff. Scrapy selectors are built with the help of the lxml library, which means that they're very similar in terms of speed and parsing accuracy.
Let's have a look at some of the most frequently used methods provided for selectors:
xpath(): This returns a list of selectors, where each of the selectors represents the nodes selected by the XPath expression given as an argument.css(): This returns a list of selectors. Here, each of the selectors represent the nodes selected by the CSS expression given as an argument.extract():This returns content as a string with the selected data.re(): This returns a list of unicode strings extracted by applying the regular expression given as an argument.
I am giving you a cheat sheet of these top 10 selector patterns that can cover most of your work for you. For a more complex selector, if you search the Web, there should be an easy solution that you can use. Let's start with extracting the title of the web page that is very generic for all web pages:
In [2] :sel.xpath('//title/text()')
Out[2]: [<Selector xpath='//title/text()' data=u' Google News'>]
Now, once you have selected any element, you also want to extract for more processing. Let's extract the selected content. This is a generic method that works with any selector:
In [3]: sel.xpath('//title/text()').extract()
Out[3]: [u' Google News']
The other very generic requirement is to look for all the elements in the given page. Let's achieve this with this selector:
In [4]: sel.xpath('//ul/li')
Out [4] : list of elements (divs and all)
We can extract all the titles in the page with this selector:
In [5]: sel.xpath('//ul/li/a/text()').extract()
Out [5]: [ u'India',
u'World',
u'Business',
u'Technology',
u'Entertainment',
u'More Top Stories']
With this selector, you can extract all the hyperlinks in the web page:
In [6]:sel.xpath('//ul/li/a/@href').extract()
Out [6] : List of urls
Let's select all the <td> and div elements:
In [7]:sel.xpath('td'')
In [8]:divs=sel.xpath("//div")
This will select all the divs elements and then, you can loop it:
In [9]: for d in divs:
    printd.extract()
This will print the entire content of each div in the entire page. So, in case you are not able to get the exact div name, you can also look at the regex-based search.
Now, let's select all div elements that contain the attribute class="topic":
In [10]:sel.xpath('/div[@class="topic"]').extract()
In [11]:  sel.xpath("//h1").extract()         # this includes the h1 tag
This will select all the <p> elements in the page and get the class of those elements:
In [12 ] for node in sel.xpath("//p"):
print node.xpath("@class").extract()
Out[12] print all the <p>

In [13]: sel.xpath("//li[contains(@class, 'topic')]")
Out[13]:
[<Selector xpath="//li[contains(@class, 'topic')]" data=u'<li class="nav-item nv-FRONTPAGE selecte'>,
<Selector xpath="//li[contains(@class, 'topic')]" data=u'<li class="nav-item nv-FRONTPAGE selecte'>]
Let's write some selector nuggets to get the data from a css file. If we just want to extract the title from the css file, typically, everything works the same, except you need to modify the syntax:
In [14] :sel.css('title::text').extract()
Out[14]: [u'Google News']
Use the following command to list the names of all the images used in the page:
In[15]: sel.xpath('//a[contains(@href, "image")]/img/@src').extract()
Out [15] : Will list all the images if the web developer has put the images in /img/src
Let's see a regex-based selector:
In [16 ]sel.xpath('//title').re('(\w+)')
Out[16]: [u'title', u'Google', u'News', u'title']
In some cases, removing the namespaces can help us get the right pattern. A selector has an inbuilt remove_namespaces() function to make sure that the entire document is scanned and all the namespaces are removed. Make sure before using it whether we want some of these namespaces to be part of the pattern or not. The following is example of remove_namespaces() function:
In [17] sel.remove_namespaces()
sel.xpath("//link")
Now that we have more understanding about the selectors, let's modify the same old news spider that we built previously:
>>>from scrapy.spider import BaseSpider
>>>class NewsSpider(BaseSpider):
>>>    name = "news"
>>>    allowed_domains = ["nytimes.com"]
>>>    start_URLss = [
>>>        'http://www.nytimes.com/'
>>>    ]
>>>def parse(self, response):
>>>    sel = Selector(response)
>>>        sites = sel.xpath('//ul/li')
>>>        for site in sites:
>>>            title = site.xpath('a/text()').extract()
>>>            link = site.xpath('a/@href').extract()
>>>            desc = site.xpath('text()').extract()
>>>            print title, link, desc
Here, we mainly modified the parse method, which is one of the core of our spider. This spider can now crawl through the entire page, but we do a more structured parsing of the title, description, and URLs.
Now, let's write a more robust crawler using all the capabilities of Scrapy.
Until now, we were just printing the crawled content on stdout or dumping it in a file. A better way to do this is to define items.py every time we write a crawler. The advantage of doing this is that we can consume these items in our parse method, and this can also give us output in any data format, such as XML, JSON, or CSV. So, if you go back to your old crawler, the items class will have a function like this:
>>>fromscrapy.item import Item, Field
>>>class NewsItem(scrapy.Item):
>>>    # define the fields for your item here like:
>>>    # name = scrapy.Field()
>>>    pass
Now, let's make it like the following by adding different fields:
>>>from scrapy.item import Item, Field
>>>class NewsItem(Item):
>>>    title = Field()
>>>    link = Field()
>>>    desc = Field()
Here, we added field() to title, link, and desc. Once we have a field in place, our spider parse method can be modified to parse_news_item, where instead dumping the parsed fields to a file now it can be consumed by an item object.
A Rule method is a way of specifying what kind of URL needs to be crawled after the current one. A Rule method provides SgmlLinkExtractor, which is a way of defining the URL pattern that needs to be extracted from the crawled page. A Rule method also provides a callback method, which is typically a pointer for a spider to look for the parsing method, which in this case is parse_news_item. In case we have a different way to parse, then we can have multiple rules and parse methods. A Rule method also has a Boolean parameter to follow, which specifies whether links should be followed by each response extracted with this rule. If the callback is None, follow defaults to True: otherwise, it default to False.
One important point to note is that the Rule method does not use parse. This is because the name of the default callback method is parse() and if we use it, we are actually overriding it, and that can stop the functionality of the crawl spider. Now, let's jump on to the following code to understand the preceding methods and parameters:
>>>from scrapy.contrib.spiders import CrawlSpider, Rule
>>>from scrapy.contrib.linkextractors.sgml import SgmlLinkExtractor
>>>from scrapy.selector import Selector
>>>from scrapy.item import NewsItem
>>>class NewsSpider(CrawlSpider):
>>>    name = 'news'
>>>    allowed_domains = ['news.google.com']
>>>    start_urls = ['https://news.google.com']
>>>    rules = (
>>>        # Extract links matching cnn.com
>>>        Rule(SgmlLinkExtractor(allow=('cnn.com', ), deny=(http://edition.cnn.com/', ))),
>>>       # Extract links matching 'news.google.com'
>>>       Rule(SgmlLinkExtractor(allow=('news.google.com', )), callback='parse_news_item'),
>>>    )
>>>    def parse_news_item(self, response):
>>>        sel = Selector(response)
>>>        item = NewsItem()
>>>        item['title'] = sel.xpath('//title/text()').extract()
>>>        item[topic] = sel.xpath('/div[@class="topic"]').extract()
>>>        item['desc'] = sel.xpath('//td//text()').extract()
>>>        return item
Items
Until now, we were just printing the crawled content on stdout or dumping it in a file. A better way to do this is to define items.py every time we write a crawler. The advantage of doing this is that we can consume these items in our parse method, and this can also give us output in any data format, such as XML, JSON, or CSV. So, if you go back to your old crawler, the items class will have a function like this:
>>>fromscrapy.item import Item, Field
>>>class NewsItem(scrapy.Item):
>>>    # define the fields for your item here like:
>>>    # name = scrapy.Field()
>>>    pass
Now, let's make it like the following by adding different fields:
>>>from scrapy.item import Item, Field
>>>class NewsItem(Item):
>>>    title = Field()
>>>    link = Field()
>>>    desc = Field()
Here, we added field() to title, link, and desc. Once we have a field in place, our spider parse method can be modified to parse_news_item, where instead dumping the parsed fields to a file now it can be consumed by an item object.
A Rule method is a way of specifying what kind of URL needs to be crawled after the current one. A Rule method provides SgmlLinkExtractor, which is a way of defining the URL pattern that needs to be extracted from the crawled page. A Rule method also provides a callback method, which is typically a pointer for a spider to look for the parsing method, which in this case is parse_news_item. In case we have a different way to parse, then we can have multiple rules and parse methods. A Rule method also has a Boolean parameter to follow, which specifies whether links should be followed by each response extracted with this rule. If the callback is None, follow defaults to True: otherwise, it default to False.
One important point to note is that the Rule method does not use parse. This is because the name of the default callback method is parse() and if we use it, we are actually overriding it, and that can stop the functionality of the crawl spider. Now, let's jump on to the following code to understand the preceding methods and parameters:
>>>from scrapy.contrib.spiders import CrawlSpider, Rule
>>>from scrapy.contrib.linkextractors.sgml import SgmlLinkExtractor
>>>from scrapy.selector import Selector
>>>from scrapy.item import NewsItem
>>>class NewsSpider(CrawlSpider):
>>>    name = 'news'
>>>    allowed_domains = ['news.google.com']
>>>    start_urls = ['https://news.google.com']
>>>    rules = (
>>>        # Extract links matching cnn.com
>>>        Rule(SgmlLinkExtractor(allow=('cnn.com', ), deny=(http://edition.cnn.com/', ))),
>>>       # Extract links matching 'news.google.com'
>>>       Rule(SgmlLinkExtractor(allow=('news.google.com', )), callback='parse_news_item'),
>>>    )
>>>    def parse_news_item(self, response):
>>>        sel = Selector(response)
>>>        item = NewsItem()
>>>        item['title'] = sel.xpath('//title/text()').extract()
>>>        item[topic] = sel.xpath('/div[@class="topic"]').extract()
>>>        item['desc'] = sel.xpath('//td//text()').extract()
>>>        return item
If the site provides sitemap.xml, then a better way to crawl the site is to use SiteMapSpider instead.
Here, given sitemap.xml, the spider parses the URLs provided by the site itself. This is a more polite way of crawling and good practice:
>>>from scrapy.contrib.spiders import SitemapSpider
>>>class MySpider(SitemapSpider):
>>>    sitemap_URLss = ['http://www.example.com/sitemap.xml']
>>>    sitemap_rules = [('/electronics/', 'parse_electronics'), ('/apparel/', 'parse_apparel'),]
>>>    def 'parse_electronics'(self, response):
>>>        # you need to create an item for electronics,
>>>        return
>>>    def 'parse_apparel'(self, response):
>>>        #you need to create an item for apparel
>>>        return
In the preceding code, we wrote one parse method for each product category. It's a great use case if you want to build a price aggregator/comparator. You might want to parse different attributes for different products, for example, for electronics, you might want to scrape the tech specification, accessory, and price; while for apparels, you are more concerned about the size and color of the item. Try your hand at using one of the retailer sites and use shell to get the patterns to scrape the size, color, and price of different items. If you do this, you should be in a good shape to write your first industry standard spider.
In some cases, you want to crawl a website that needs you to log in before you can enter some parts of the website. Now, Scrapy has a workaround that too. They implemented FormRequest, which is more of a POST call to the HTTP server and gets the response. Let's have a deeper look into the following spider code:
>>>class LoginSpider(BaseSpider):
>>>    name = 'example.com'
>>>    start_URLss = ['http://www.example.com/users/login.php']
>>>    def parse(self, response):
>>>        return [FormRequest.from_response(response, formdata={'username': 'john', 'password': 'secret'}, callback=self.after_login)]
>>>    def after_login(self, response):
>>>        # check login succeed before going on
>>>       if "authentication failed" in response.body:
>>>            self.log("Login failed", level=log.ERROR)
>>>          return
For a website that requires just the username and password without any captcha, the preceding code should work just by adding the specific login details. This is the part of the parse method since you need to log in the first page in the most of the cases. Once you log in, you can write your own after_login callback method with items and other details.
Let's talk about some more item postprocessing. Scrapy provides a way to define a pipeline for items as well, where you can define the kind of post processing an item has to go through. This is a very methodical and good program design.
We need to build our own item pipeline if we want to post process scraped items, such as removing noise and case conversion, and in other cases, where we want to derive some values from the object, for example, to calculate the age from DOB or to calculate the discount price from the original price. In the end, we might want to dump the item separately into a file.
The way to achieve this will be as follows:
- We need to define an item pipeline in
setting.py:ITEM_PIPELINES = { 'myproject.pipeline.CleanPipeline': 300, 'myproject.pipeline.AgePipeline': 500, 'myproject.pipeline.DuplicatesPipeline: 700, 'myproject.pipeline.JsonWriterPipeline': 800, }
- Let's write a class to clean the items:
>>>from scrapy.exceptions import Item
>>>import datetime
>>>import datetime
>>>class AgePipeline(object):
>>>    def process_item(self, item, spider):
>>>        if item['DOB']:
>>>            item['Age'] = (datetime.datetime.strptime(item['DOB'], '%d-%m-%y').date()-datetime.datetime.strptime('currentdate, '%d-%m-%y').date()).days/365
>>>            return item
- We need to derive the age from
DOB. We used Python's date functions to achieve this:>>>from scrapy import signals >>>from scrapy.exceptions import Item >>>class DuplicatesPipeline(object): >>> def __init__(self): >>> self.ids_seen = set() >>> def process_item(self, item, spider): >>> if item['id'] in self.ids_seen: >>> raise DropItem("Duplicate item found: %s" % item) >>> else: >>> self.ids_seen.add(item['id']) >>> return item
- We also need to remove the duplicates. Python has the
set()data structure that only contains unique values, we can create a piplineDuplicatesPipeline.pylike below using Scrapy :>>>from scrapy import signals >>>from scrapy.exceptions import Item >>>class DuplicatesPipeline(object): >>> def __init__(self): >>> self.ids_seen = set() >>> def process_item(self, item, spider): >>> if item['id'] in self.ids_seen: >>> raise DropItem("Duplicate item found: %s" % item) >>> else: >>> self.ids_seen.add(item['id']) >>> return item
- Let's finally write the item in the JSON file using
JsonWriterPipeline.pypipeline:>>>import json >>>class JsonWriterPipeline(object): >>> def __init__(self): >>> self.file = open('items.txt', 'wb') >>> def process_item(self, item, spider): >>> line = json.dumps(dict(item)) + "\n" >>> self.file.write(line) >>> return item
I encourage you to follow some simple spiders and try building some cool applications using these spiders. I would also like you to look at the following links for reference:
In this chapter, you learned about another great Python library and now, you don't need help from anybody for your data needs. You learned how you can write a very sophisticated crawling system, and now you know how to write a focused spider. In this chapter, we saw how to abstract the item logic from the main system and how to write some specific spider for the most common use cases. We know some of the most common settings that need to be taken care of in order to implement our own spider and we wrote some complex parse methods that can be reused. We understand selectors very well and know a hands-on way of figuring out what kind of elements we want for specific item attributes, and we also went through Firebug to get more of a practical understanding of selectors. Last but not least, very importantly, make sure that you follow the security guidelines of the websites you crawl.
In the next chapter, we will explore some essential Python libraries that can be used for natural language processing and machine learning.