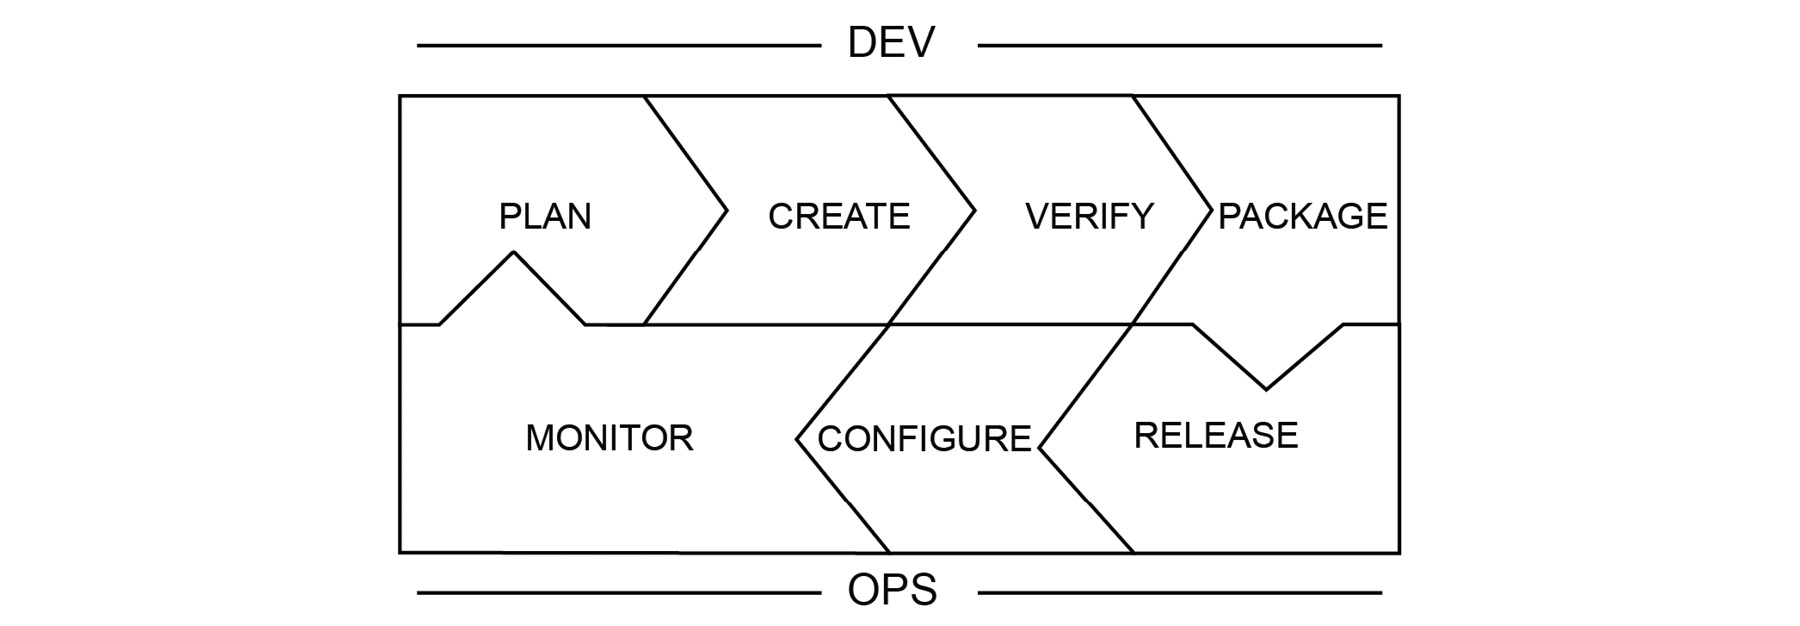
The DevOps toolchain consists of practices that connect development and operations teams, with the aim of creating a value chain. The stages of the DevOps chain and their interconnectivity is presented as follows:
Figure 1.1: The DevOps toolchain
The DevOps toolchain is a continuous chain of streamlined activities that can be grouped into two: development and operations. DevOps tries to remove the barriers between development and operations and its toolchain also emphasizes the association of activities and teams. For the successful implementation of a DevOps culture, it is crucial that each stage is executed and communicated transparently. In the following sections, each step is presented along with its interaction with other stages and modern real-life software application examples.
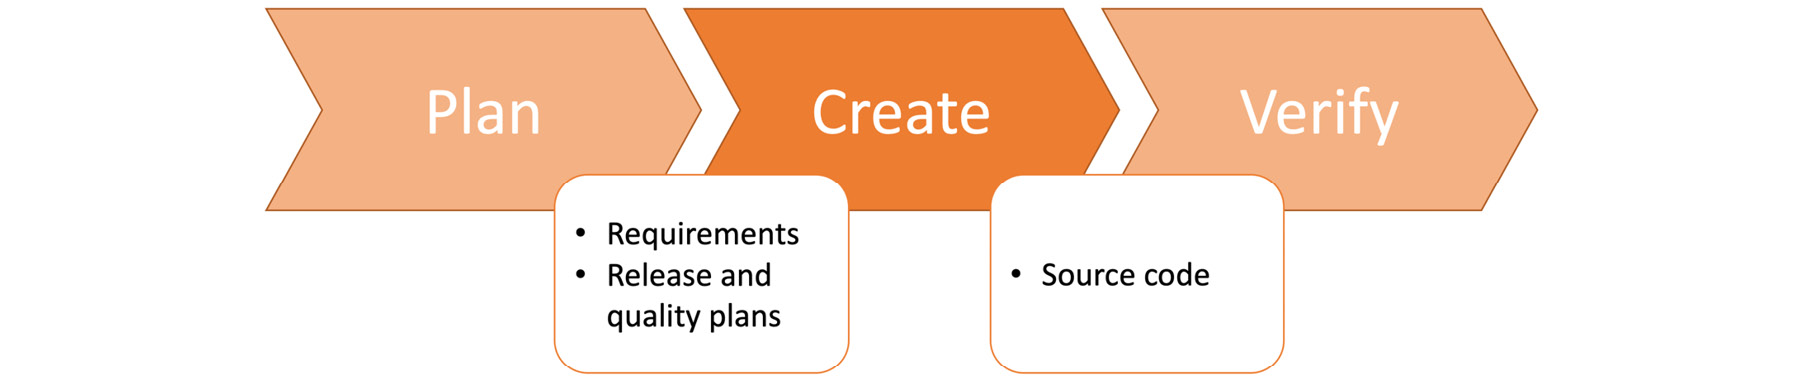
Plan
Planning is the first step in most software development projects and is also a critical step that should be revisited for long-term ongoing projects. Planning a modern, cloud-native software application requires more than calculating person-hour requirements, and it is a crucial step between the monitor and create stages. If planning is considered a black box, it should take production and busines metrics from the monitoring stage as inputs. As depicted in Figure 1.2, it should produce requirements, release schedules, and quality standards for the create stage:
Figure 1.2: The plan stage in the DevOps toolchain
With everchanging requirements, high-level configurations, and scalability, planning today's applications requires agility and visibility. The principal approach for planning is based on classifying, prioritizing, and tracking the execution of work on issue boards. Issue boards help to manage backlog and work-in-progress items by following statuses collaboratively. The overall state of all work items is available to anyone, following the main idea of DevOps: collaboration.
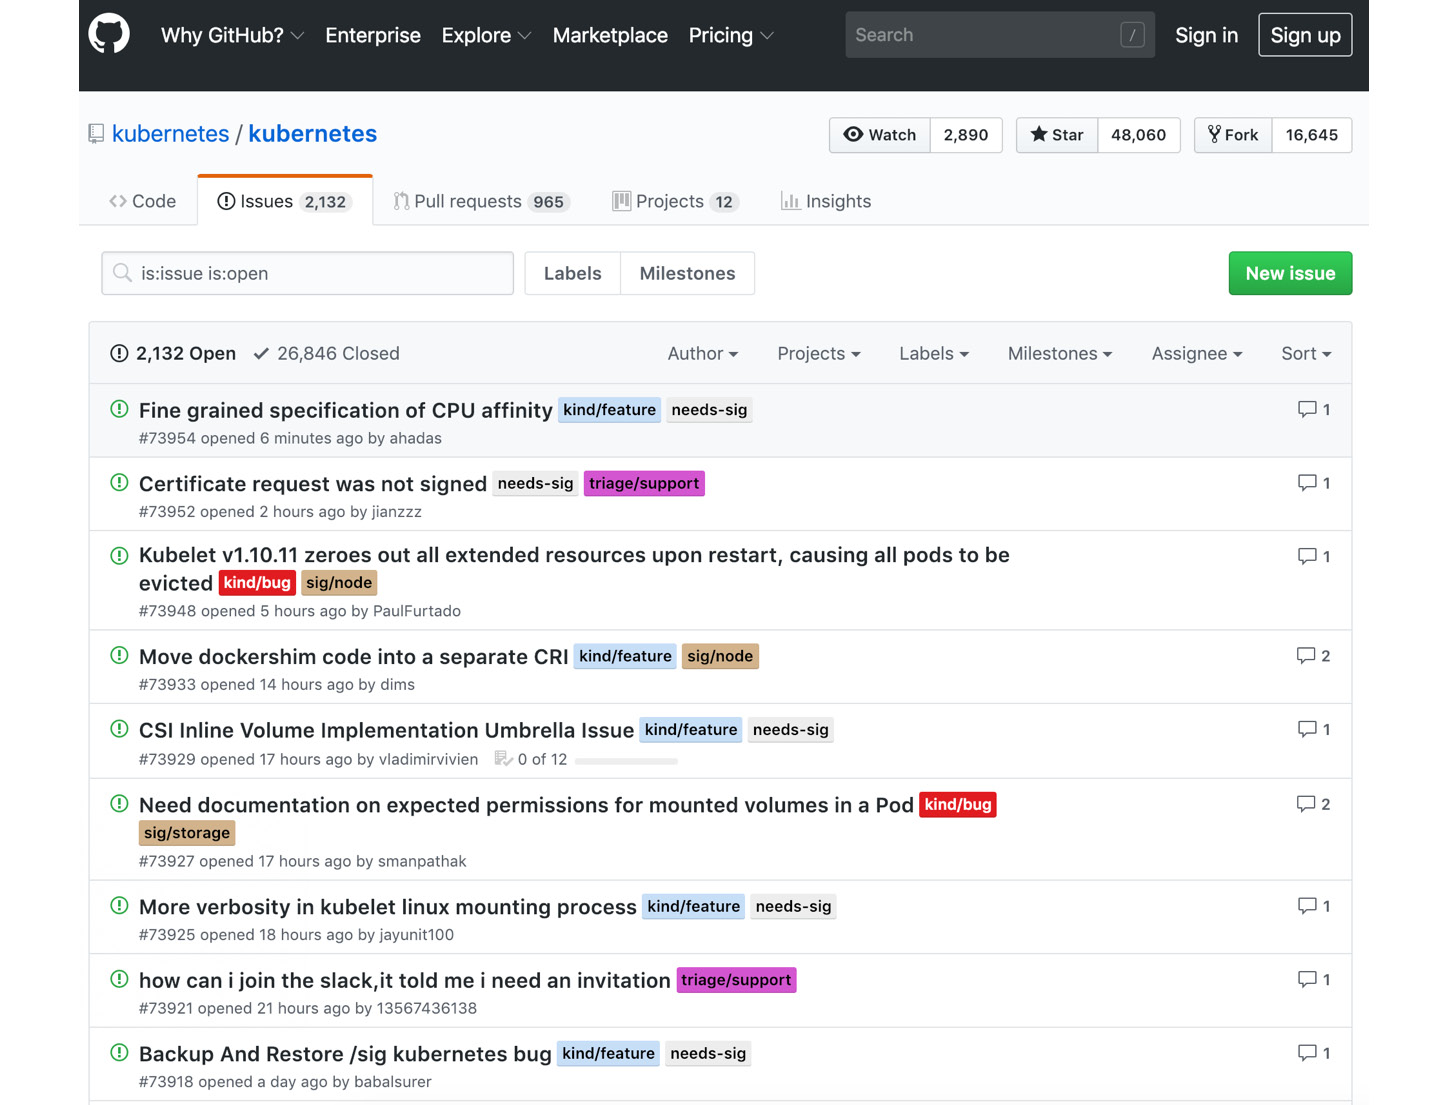
Work items are created in project management systems such as JIRA, GitHub Issues, or GitLab Issues and classified with labels such as bug, enhancement, or needs help based on the content and requirements of the issues. In Figure 1.3, the issue list of the Kubernetes project is shown with labels near to the issue names:
Figure 1.3: Kubernetes issues in GitHub
Being the most popular project in GitHub, there are more than 2,000 open issues in the Kubernetes repository and more than 26,000 closed ones. Besides, Kubernetes Special Interest Groups (SIGs) are used within issue labels to specify the main group responsible.
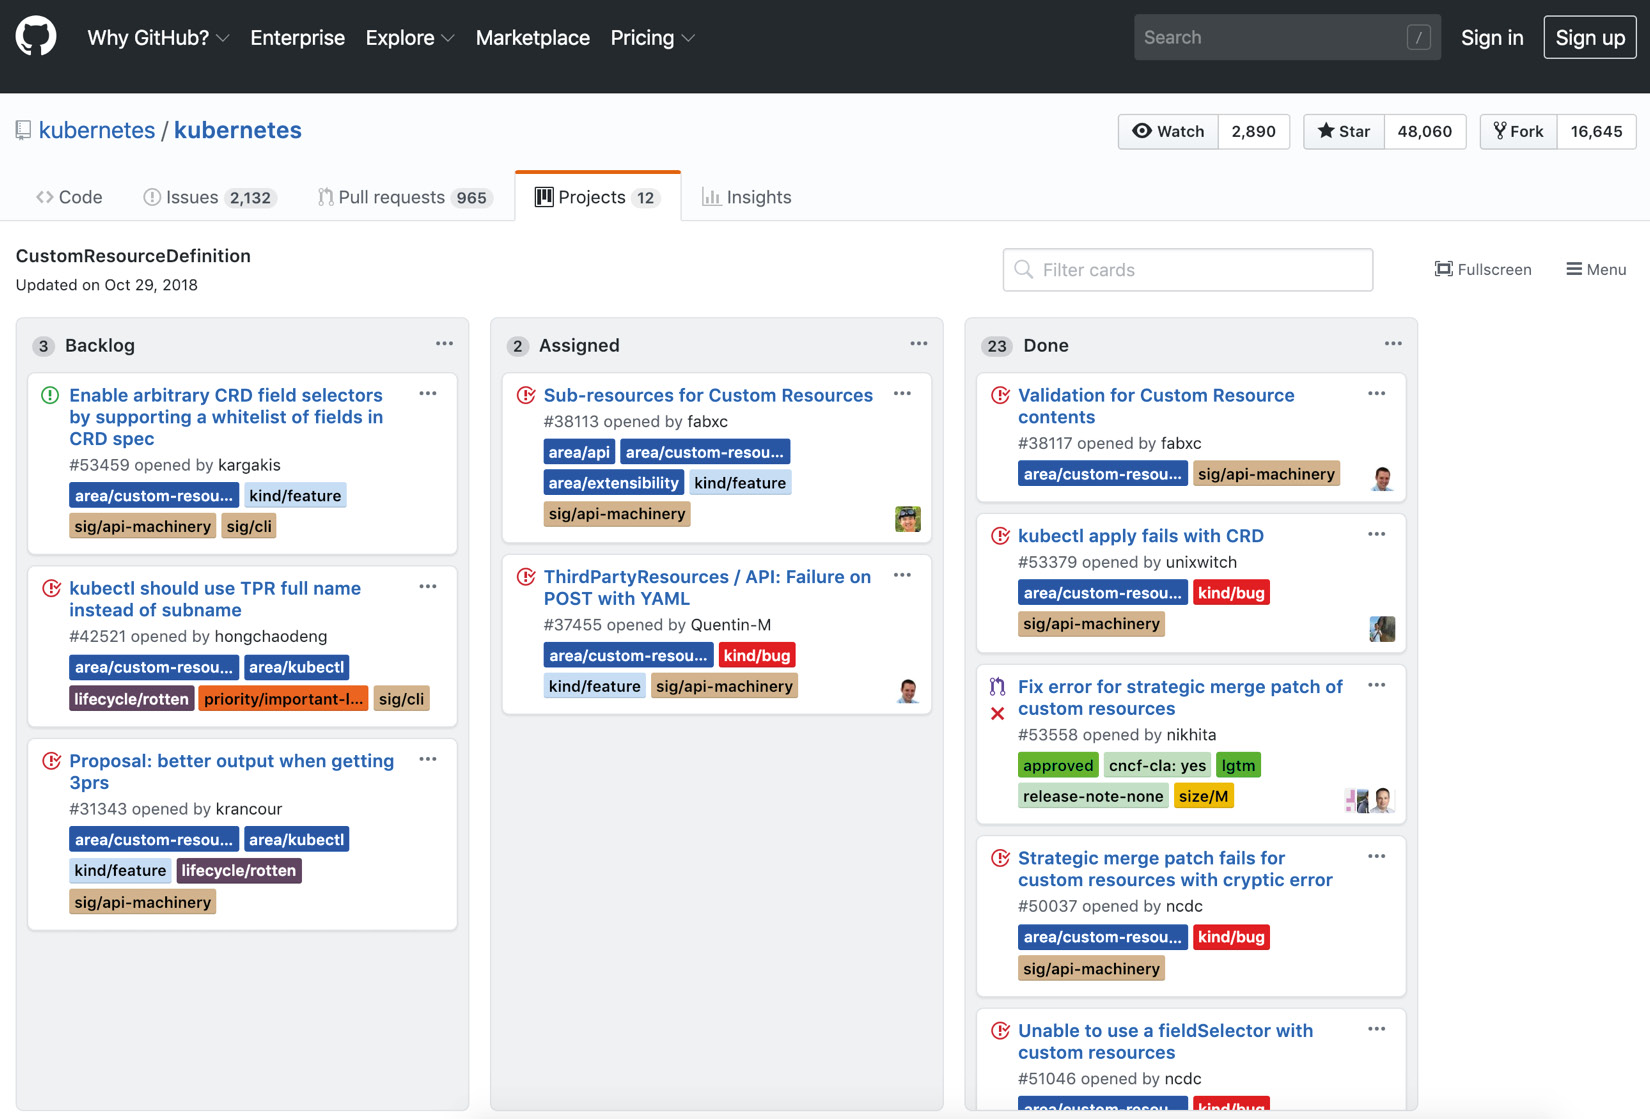
The second level of classifying is based on the planning timeframe of issues, and the most common groups are Backlog, WIP (Work in progress), and Done. For the Kubernetes repository, the CustomResourceDefinition project board can be checked:
Figure 1.4: CustomResourceDefinition board of Kubernetes on GitHub
This project board consists of issues related to the CustomResourceDefinition feature (formerly known as ThirdPartyResource) in Kubernetes. Compared to all issue lists, this provides a more focused and manageable list of topics. There are three blocks, named Backlog, Assigned, and Done. Backlog items consist of things that the team has not started working on yet, whereas Assigned items are in progress. As expected, this project aims to move all issues into the Done block eventually.
Project boards and issues are conventionally created and tracked using code repositories such as GitHub and GitLab. This makes it easier to mention bugs in code and failing test cases, and also increases the developers' contributions to boards, since they are already dealing with the code repository daily. However, the most critical input of planning using project boards, according to DevOps culture, is providing an overview of a project's status, which is created and followed collaboratively. In the following exercise, you will open and create a repository in GitHub and add your first item to a project board.
Note
If you do not have a GitHub account, you need to create one before starting the exercise. GitHub is a free service, and you can register with your email, choosing a username and password, at https://github.com/join.
Exercise 1: Creating a Repository and Project Board on GitHub
In this exercise, we'll create a new repository in GitHub and start the planning stage by adding our first backlog items to the project board.
Note
The code files for the exercises in this chapter can be found at https://github.com/TrainingByPackt/Introduction-to-DevOps-with-Kubernetes/tree/master/Lesson01.
To successfully complete the exercise, we need to ensure the following steps are executed:
- Click + in the header menu in GitHub and choose New Repository:
Figure 1.5: Header menu in GitHub
- Fill Repository name with devops-blog and ensure that Public is selected. Click Create Repository:
Figure 1.6: Creating a repository in GitHub
You will be redirected to the new repository:
Figure 1.7: DevOps blog repository in GitHub
- Click Projects in the repository view and then choose Create a Project:
Figure 1.8: Projects view in GitHub
- Fill Project board name with First Version and click Create Project:
Figure 1.9: Creating a new project in GitHub
You will be redirected to the new project board:
Figure 1.10: Project board in GitHub
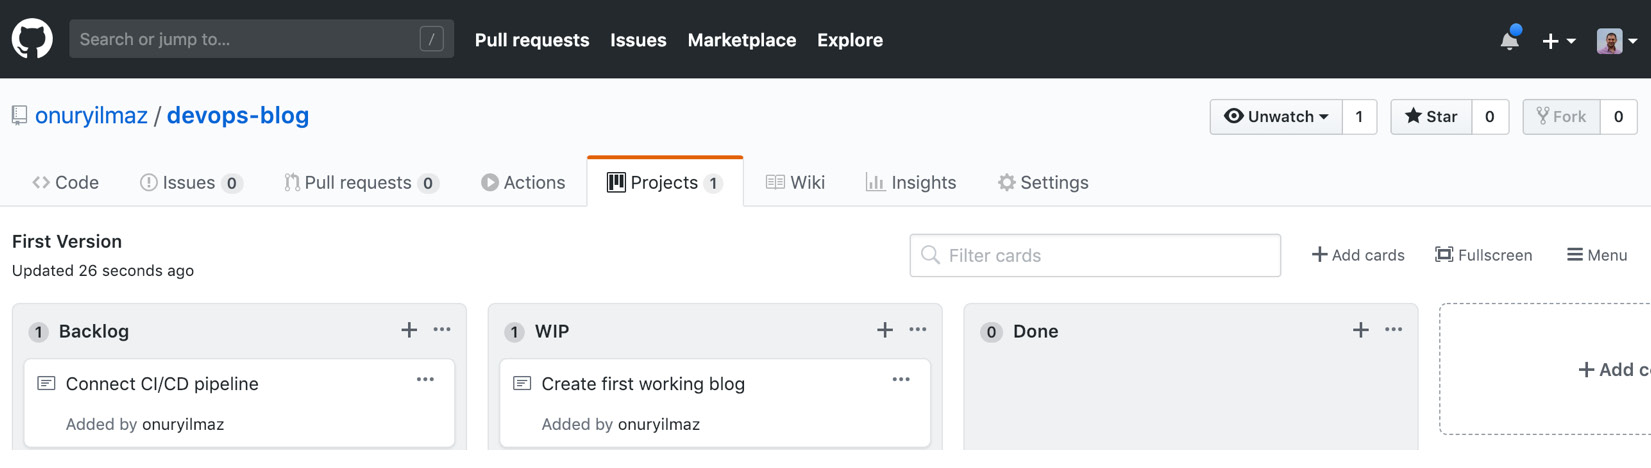
- Click Add a column and add these three columns: Backlog, WIP, and Done:
Figure 1.11: Project board with columns in GitHub
- Click the + icon in the Backlog column add two new items: Create the first working blog and Connect CI/CD pipeline:
Figure 1.12: Backlog items in GitHub
- Move Create the first working blog into the WIP column from the Backlog column since we have started working on it:
Figure 1.13: WIP items in GitHub
With the GitHub repository set up, now it is possible to add some backlog items to the project board and start planning. In the next section, planning requirements and issues will be utilized while creating the software according to DevOps practices.
Create
With a detailed planning stage carried out, there are items in Backlog ready to be assigned to teams so that the software creation can start. When this stage is modeled as a black box, as in Figure 1.14, it takes inputs from the plan stage as requirements and release dates, and creates the source code of the application, which should be verified in the next step:
Figure 1.14: Create stage in the DevOps toolchain
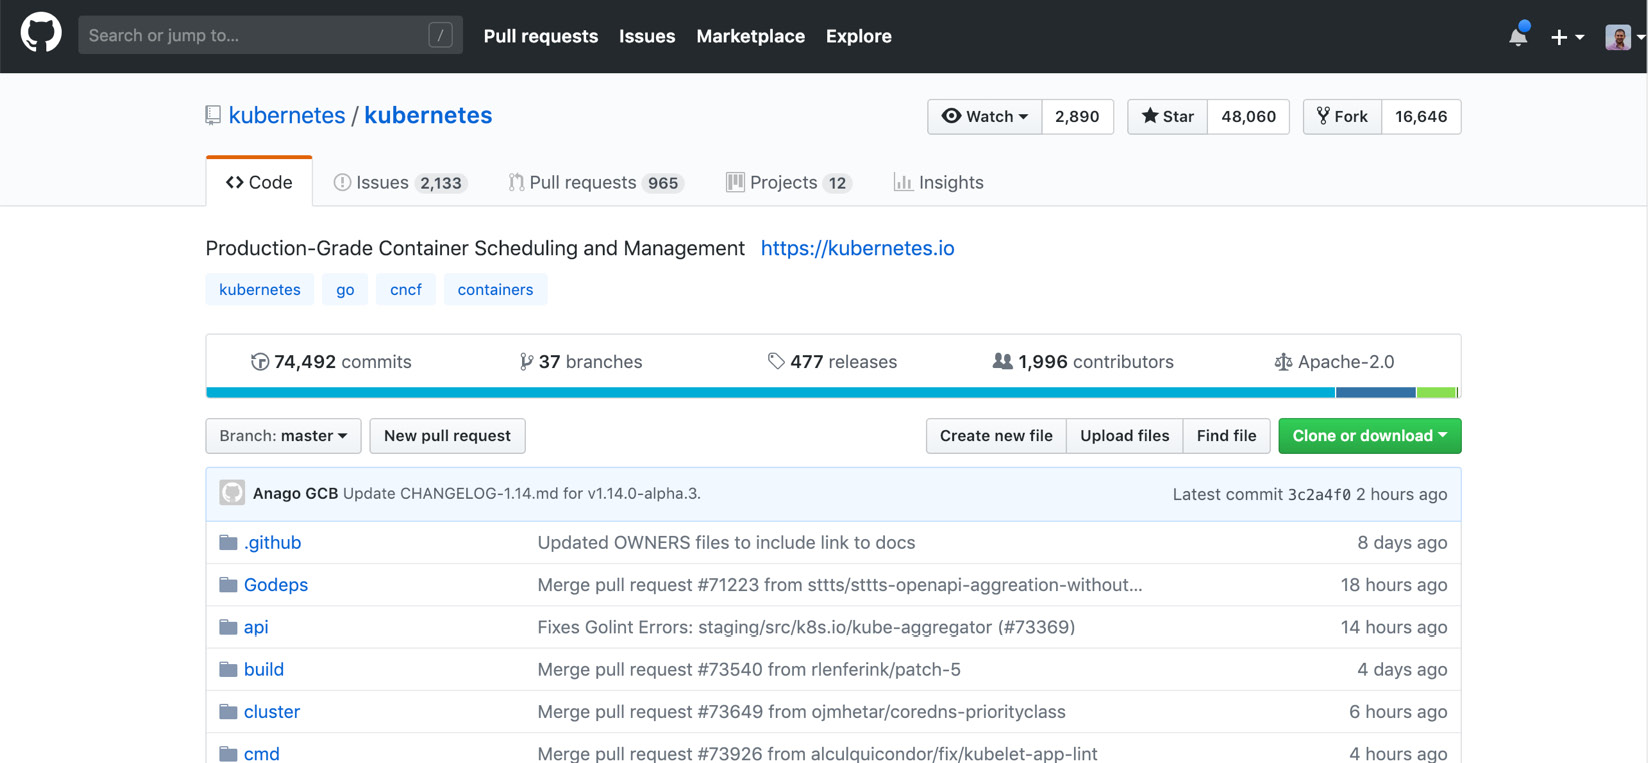
Modern software applications are developed by geographically distributed teams of developers collaboratively, with clear communication channels. Therefore, the de facto path is to keep all source code, configuration, and sensitive data in distributed version control systems as Git repositories. All popular tools, such as GitHub, GitLab, and Bitbucket, provide Git repositories to manage source code securely, and developers commit their changes to repositories as frequently as possible.
For an open source project such as Kubernetes, which is developed by different people from various organizations and in various time zones, there are more than 74,000 commits by almost 2,000 contributors in the repository:
Figure 1.15: Kubernetes code in GitHub
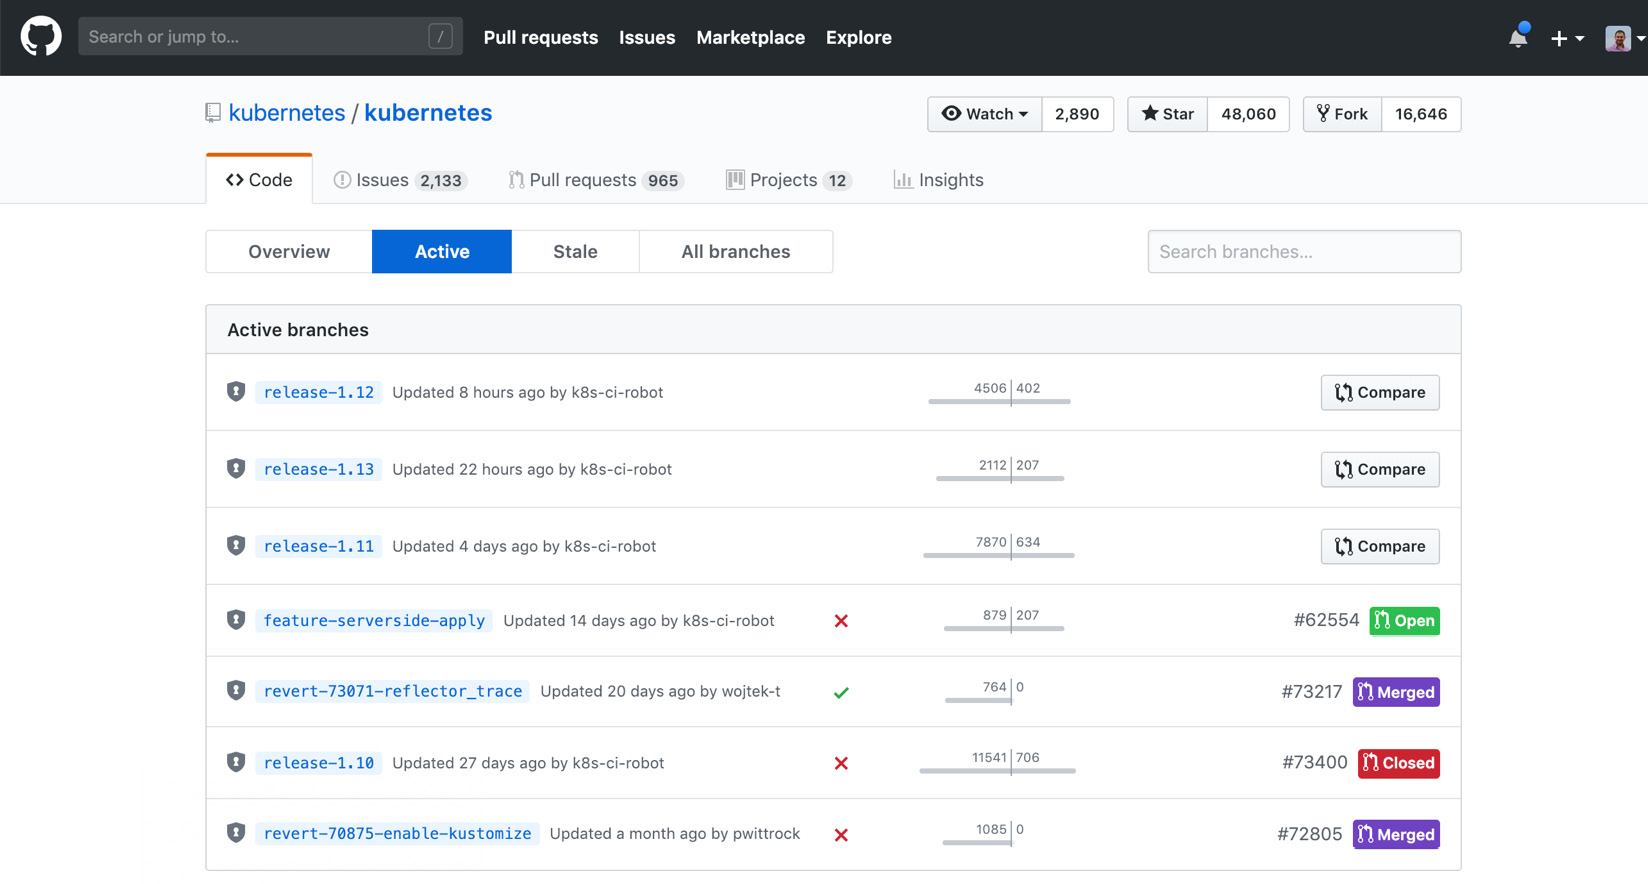
The create stage in DevOps culture is the stage at which collaborative work is converted into a single source code. It is important to have clear communication and transparency between teams, and the popular Git repositories facilitate these requirements. When the active branches are checked in Figure 1.16, there are seven active branches for the Kubernetes repository. This indicates that more than one copy of the primary source code is in progress and some future commits will be part of these branches:
Figure 1.16: Active branches for Kubernetes in GitHub
In the following exercise, the source code for a DevOps blog will be uploaded to the GitHub repository created in the previous section.
Exercise 2: Creating a DevOps Blog
In this exercise, we'll create the source code of a DevOps blog and maintain it in the GitHub repository created in Exercise 1, Creating a Project Board on GitHub.
Note
The code files for this exercise can be found at https://github.com/TrainingByPackt/Introduction-to-DevOps-with-Kubernetes/tree/master/Lesson01.
To successfully complete this exercise, we need to ensure the following steps are executed:
- Download the code for
Lesson01 to your local computer and open it in the terminal:$ ls Lesson01
Figure 1.17: Contents of the Lesson01 folder
- Go to the
master folder and commit the files in the master folder into GitHub with the following commands:$ cd Lesson01/master
$ git init && git add -A && git commit -m "first commit"
$ git remote add origin https://github.com/<USERNAME>/devops-blog.git
$ git push -u origin master
Figure 1.18: Committing the master branch into GitHub
- Go into the
gh-pages folder and commit the files in gh-pages folder into GitHub with the following commands, one by one:$ cd ../gh-pages
$ git init && git checkout --orphan gh-pages
$ git add -A && git commit -m "first commit" --quiet
$ git push https://GitHub.com/<USERNAME>/devops-blog.git gh-pages
Figure 1.19: Committing the gh-pages branch into GitHub
- Open the GitHub repository in the browser and ensure that there are two branches with code inside them:
Figure 1.20: GitHub repository for a DevOps blog
In this exercise, source code for a DevOps blog has been created and pushed to a Git repository. The next step, verification, focuses on the requirements for accepting and validating changes.
Verify
Verification in DevOps software development culture is based on the idea of manual and automated testing of changes for acceptance or rejection from the source code. Manual verification includes reviewing code changes by other developers, to comment on and discuss them in an open environment. Automated testing consists of multiple levels, starting from static code analysis to end-to-end scenario tests. Sets of commits, from development branches to active release branches, are accepted when a set of criteria is passed, and code reviews are marked as approved by other developers.
As a black-box model, verification processes potential changes to source code from the create stage and creates a confirmed source code, ready to be packaged in the next step:
Figure 1.21: Verify stage in the DevOps toolchain
Practically, sets of commits are grouped into pull-requests. When a developer opens a pull request (PR), it indicates that the included commits are ready to be reviewed by other developers and tests can be run including these new changes. For the Kubernetes repository, there are almost 1,000 open and 44,000 closed PRs. Open ones are still in discussion or waiting to be approved. On the other hand, closed PRs could be accepted and merged into active branches or entirely rejected by reviewers:
Figure 1.22: Pull requests for Kubernetes in GitHub
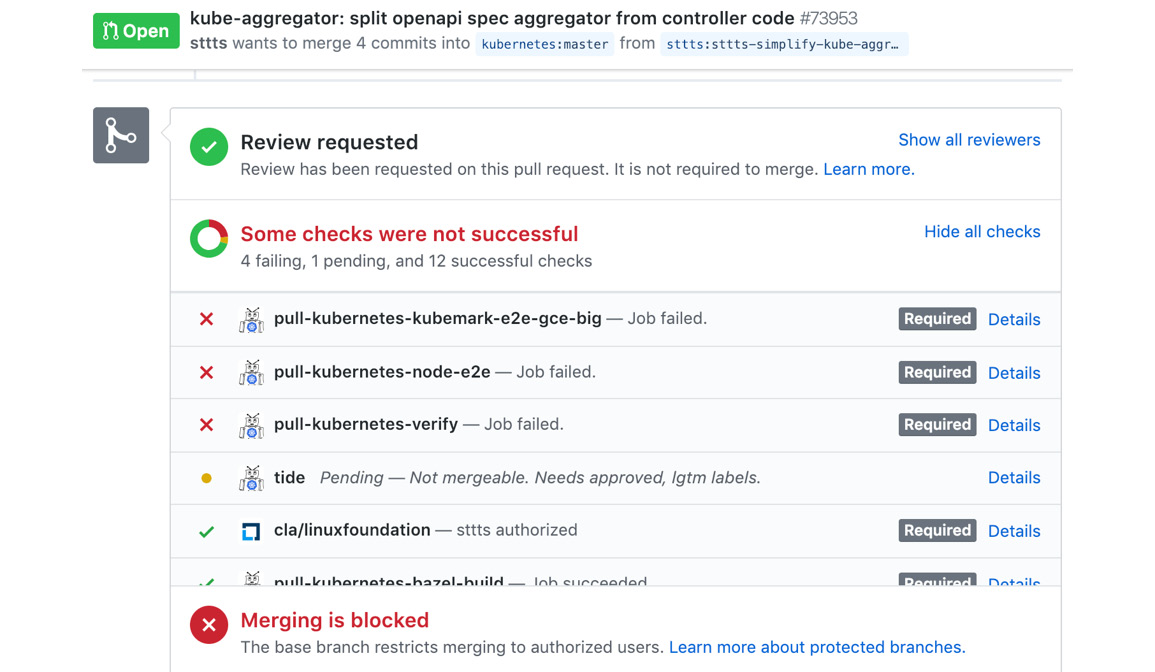
The automated testing of changes is handled by continuous integration and testing systems, such as Travis CI, Jenkins, and GitLab CI/CD. On these cloud systems, the source code of new PRs is retrieved, and test operations are undertaken. If any of these test steps fail, it returns the status to PR and does not allow it to be merged. For instance, PR #73854 has passed all 16 checks, as follows:
Figure 1.23: PR checks for Kubernetes in GitHub
Unfortunately, PR #73953 failed some tests and cannot be merged before they are solved:
Figure 1.24: PR checks for Kubernetes in GitHub
Verification by automated testing removes the burden of building and testing every PR locally and decreases the time taken to review them. Without automation and streamlined results, it would not be possible to merge 44,000 PRs in less than 5 years. In other words, extensive reviews and the automated verification of changes made it possible to create the de facto container orchestration tool, which enables running applications on the cloud. In the following exercise, a method for connecting a cloud CI/CD system, Travis CI, to the DevOps blog is presented.
Note
If you do not have a Travis-CI account, you need to create one before starting the exercise. Travis-CI is a free service, and you can register with your existing GitHub account at https://travis-ci.org/.
Exercise 3: Connecting the DevOps Blog to a CI/CD System
In this exercise, we'll connect the DevOps blog to a CI/CD system for automated testing and builds. We will use Travis-CI, which is a free cloud-service providing CI/CD capabilities.
To successfully complete the exercise, we need to ensure the following steps are executed:
- Open GitHub and click your profile picture and then Settings > Developer settings > Personal access tokens:
Figure 1.25: Personal access tokens in GitHub
- Click Generate new token, fill Token description with
travis-devops-blog and ensure that the repo scope is selected:Figure 1.26: Generating a personal access token in GitHub
- Click Generate token and you will be redirected to your new token page:
Figure 1.27: New personal access token in GitHub
- Copy the token highlighted in green to use in Travis-CI in the next steps.
- Open Travis-CI (https://travis-ci.org/) and click the + icon on the left-hand menu, next to My Repositories, and search for devops-blog:
Figure 1.28: Repository list in Travis-CI
- Enable devops-blog by checking the slider:
Figure 1.29: Enabling a new repository in Travis-CI
- Click on devops-blog and on the redirected page, click More Options > Settings in the menu:
Figure 1.30: Repository view in Travis-CI
- Ensure that Build pushed branches and Build pushed pull requests are checked at the top. In addition, Add a new environment variable below with the name GITHUB_TOKEN and the value you copied in step 4:
Figure 1.31: The settings view in Travis-CI
With this exercise, continuous integration is now possible for the DevOps blog. In the next section, verified changes in release branches will be packaged and delivered to end users.
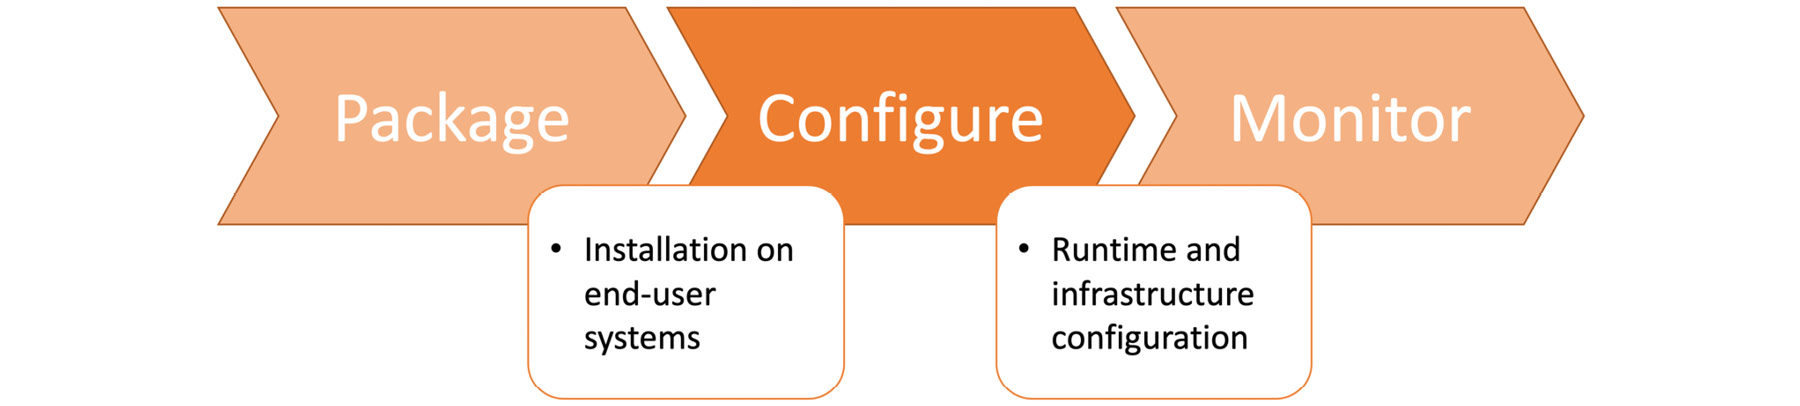
Package
Packaging is the last step in the development part of the DevOps toolchain. In this final step, the verified and accepted source code changes are gathered and end-user packages are created:
Figure 1.32: Package stage in the DevOps toolchain
For modern cloud-native applications, there are two main approaches to packaging and delivering end products. The first is for the client or on-premise applications to be installed on local systems. Executables of these applications are made available in GitHub releases or GitLab artifacts sections. The second is containerized applications that run on cloud systems such as Kubernetes. These applications are packaged as containers and managed inside container registries such as Docker Hub, Google Cloud Platform Container Registry, and GitLab Registry. For instance, Minikube is a local Kubernetes solution, and its releases are available on GitHub:
Figure 1.33: Minikube packages on GitHub
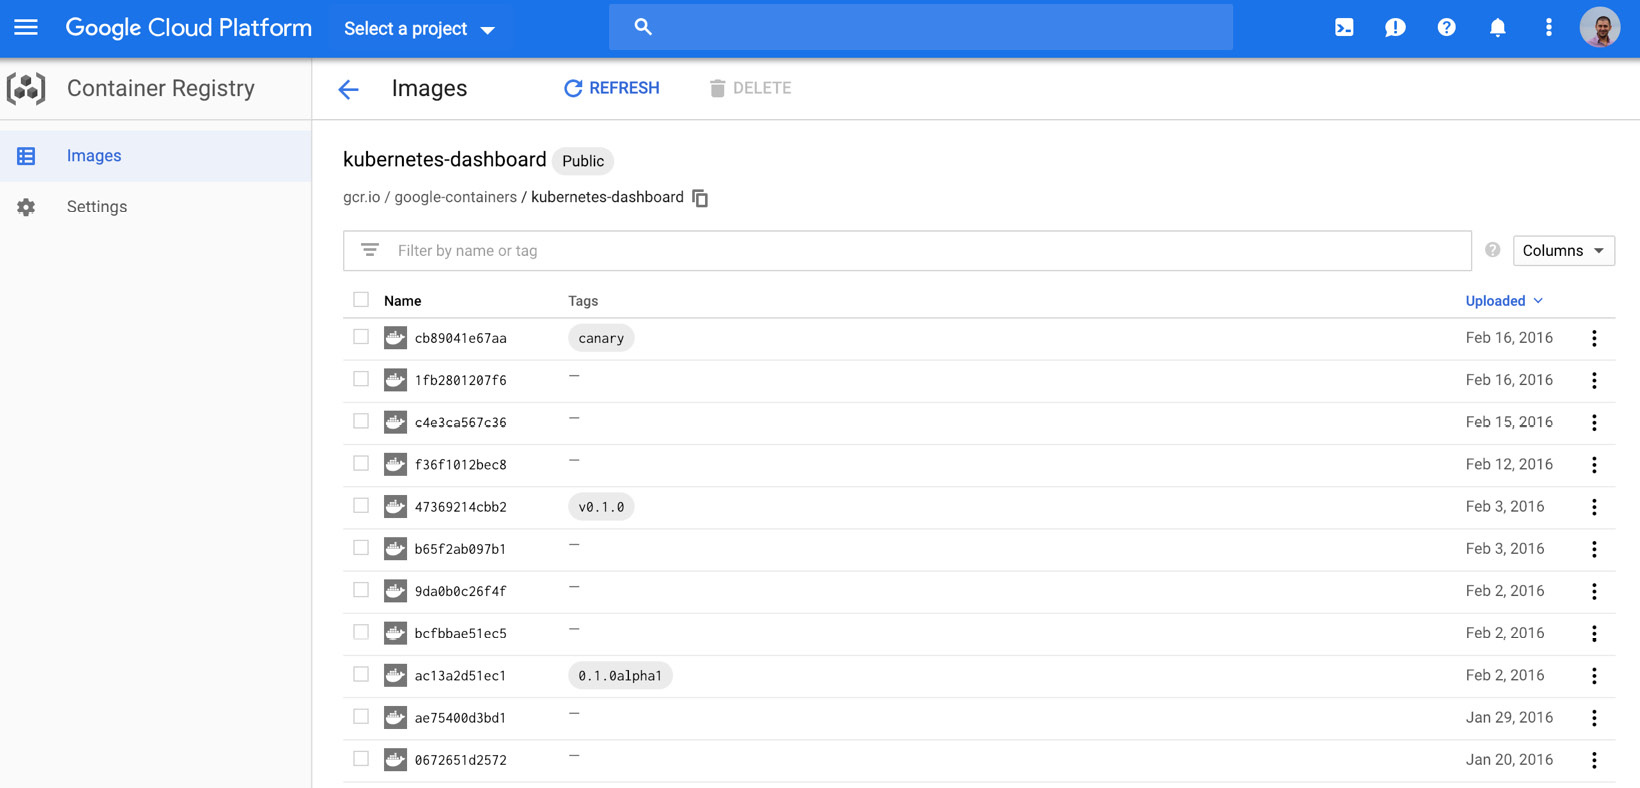
Since Minikube is expected to be downloaded and installed on local systems, it is acceptable to have a list of executables in the GitHub releases section. However, kubernetes-dashboard is the official dashboard for Kubernetes clusters, and it is expected to be installed on clusters. Therefore, it is a containerized application, and its versions are available on the Google Cloud Platform - Container Registry:
Figure 1.34: Kubernetes Dashboard releases on GCP
With these packaged artifacts available in different formats, operation team tasks start. In the next section, the first task – releasing artifacts – will be explained.
Release
Releasing is the first step in the operations part of the DevOps toolchain. In this step, packaged and versioned applications from the previous step are put into the end-user service:
Figure 1.35: Release stage in the DevOps toolchain
Modern cloud-native applications are delivered to end users or cloud systems by considering three essential characteristics – downtime, targeting, and infrastructure costs:
- Downtime: While offering applications, it is possible to have downtime, in which no instances of the application are serving user requests.
- Targeting: With an enormous user base, it is vital to differentiate between customers and target them with specific feature sets, such as geolocations and device models.
- Infrastructure costs: As applications scale to millions of users, the cost of infrastructure and investment is an inevitable characteristic to consider for the delivery of systems.
While some of these characteristics are given more importance, some sacrifices are made based on business requirements. For instance, for a banking application, downtime is not acceptable; however, high infrastructure cost is bearable. Likewise, it is critical for a marketing start-up to classify and target users without increasing infrastructure costs dramatically. With an appropriate deployment strategy and automation, it is possible to deploy and update cloud-native microservices in the cloud reliably. In the following exercise, the DevOps blog will be released for the first time, on GitHub Pages. GitHub Pages is a service provided by GitHub to host websites directly from a GitHub repository.
Exercise 4: Releasing the DevOps Blog
In this exercise, we'll release the DevOps blog to the entire world by using GitHub Pages. To successfully complete the exercise, we need to ensure the following steps are executed:
- Open the devops-blog repository in GitHub and click Settings:
Figure 1.36: Settings in the devops-blog repository in GitHub
- Scroll down to GitHub Pages, select
"gh-pages branch" in the Source section, and click "Save":Figure 1.37: Enabling GitHub Pages in GitHub
Note
It could take a couple of minutes to resolve the subdomain for your username. If you receive a 404 error from GitHub, please try again in a couple of minutes.
- Open
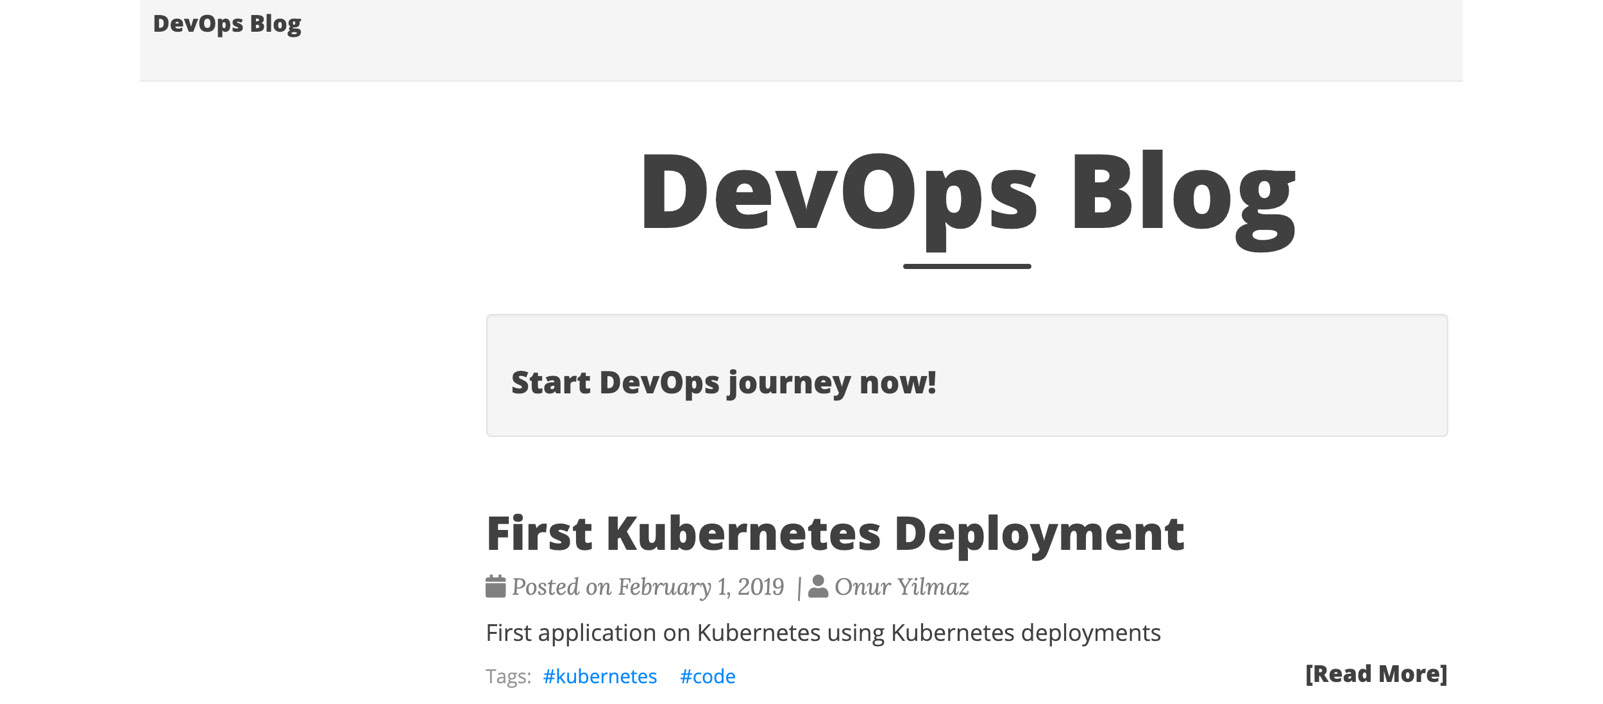
http://<USERNAME>.github.io/devops-blog in the browser:Figure 1.38: DevOps blog is up and running
- Open the project board created in Exercise 1 and move the "Create the first working blog" item to "Done," since the blog is up and running now:
Figure 1.39: Done items in GitHub
With this exercise, the very first version of the DevOps blog is released to the world.
Configure
The configuration step focuses on managing all the custom configuration required for the generic application released in the last step:
Figure 1.40: Configure stage in the DevOps toolchain
The configuration of modern cloud-native applications consists of two parts: runtime configuration for the application and infrastructure configuration definition. Both of these configurations are created, managed, and tracked as code in Git repositories. This approach increases the visibility of requirements to all teams while strengthening the DevOps culture. For instance, if there is a requirement for a replica of the PostgreSQL database, it should be declared in the respective configuration files in the repository. This makes it easy for not only the operations team but also developers to know about runtime requirements. It removes the barrier between teams and distributes knowledge democratically, while increasing the quality of the application. Development and testing teams can create their testing environment based on this requirement, resulting in more reliable software systems. In the next and final section, software applications that are configured based on customer requirements will be monitored, and metrics will be collected.
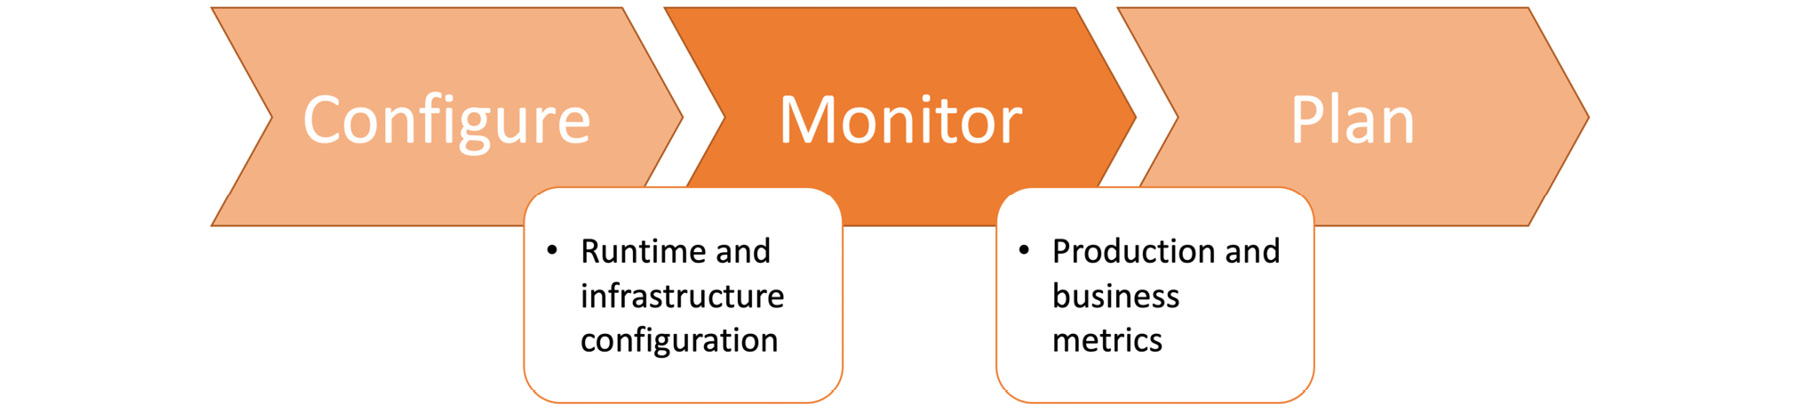
Monitor
Monitoring is the last step in the DevOps toolchain, but it is also a critical step to feed planning, the very first step in the toolchain. It takes released and configured applications and provides business-critical metrics for the planning stage:
Figure 1.41: Monitor stage in the DevOps toolchain
For cloud-native applications, monitoring enables the tracking of key performance indicators and indicates the status of applications compared to goals. Besides this, monitoring is critical for troubleshooting production systems to find problems and resolve them proactively.
Within the framework of the DevOps toolchain, monitoring is the only step that shows the impact of changes made in the previous steps. In other words, it is now possible to show how newly developed, verified, packaged, released, and configured changes will affect production systems. For current, cloud-native monitoring, there are three crucial aspects to consider:
- Logging: Collecting, storing, and making logs searchable to troubleshoot problems in the long run.
- Error tracking: Receiving and collecting key details about errors that have occurred in running systems. These errors could indicate misconfiguration, undesired user behavior, and malicious activities.
- Cluster monitoring: Tracking the health of clusters based on master and worker health statuses, applications running on them, and scalability.
With the monitoring stage, all seven steps in the DevOps toolchain are presented with real-life examples and exercises. In the following activity, an automated pipeline running in the cloud will be set up to show how DevOps culture is practically converted into a pipeline.
Activity 1: CI/CD Pipeline for the DevOps Blog
The aim of this activity to create an automated pipeline to verify, package, configure, and release the DevOps blog. Until now, the DevOps blog has been generated locally, and HTML files have been uploaded to the gh-pages branch. GitHub Pages hosts the pages in this branch and makes the blog available to the public. It should verify, generate, and configure the blog from the source code automatically, so that when a new blog post is added, the pipeline should update the running website.
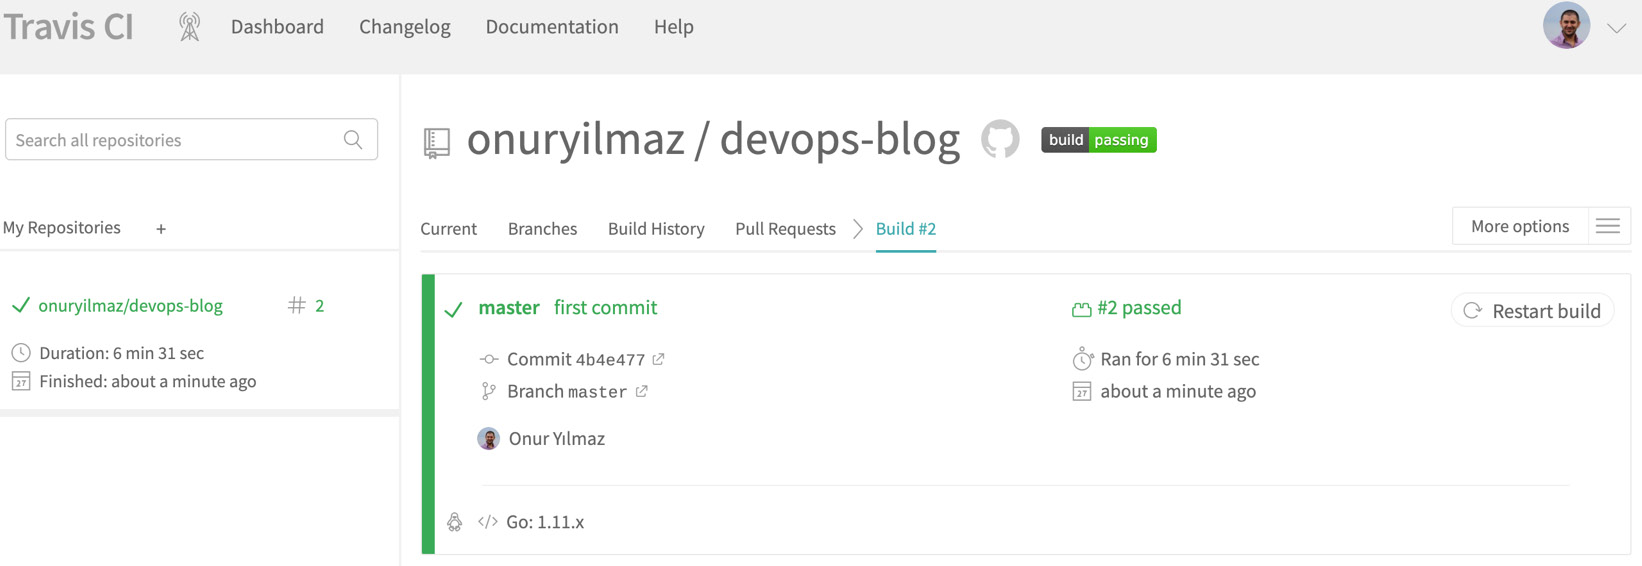
All previous exercises in this chapter will need to have been completed to complete this activity. The GitHub repository, the source code in the master branch, and Travis-CI should be utilized with a pipeline to achieve automation. Once completed, you should have a complete pipeline running in Travis-CI and successfully passing:
Figure 1.42: Successful run in Travis-CI
As expected, the blog should be up and running:
Figure 1.43: DevOps blog is up and running
When a new blog post is added to the content/post folder in the source code, the pipeline should run automatically and update the website with the new post:
Figure 1.44: Automated updates in the DevOps blog
Execute the following steps to complete this activity:
- Create a file with the name
.travis.yml in the master branch of the repository including the Travis-CI definition.
- Commit the
.travis.yml file into the master branch.
- Trigger a build in Travis-CI for the
master branch.
- Add a new blog post to the
content/post folder. An example of blog content could be as follows, in a file named 2019-02-02-kubernetes-scale.md.
- Wait for Travis-CI to trigger an automated build with the new material.
- Check for the blog on the browser for the new content once the build is completed.
- Move the Connect CI/CD pipeline item to Done in the project board created in Exercise 1, Creating a Project Board on GitHub.
Note
The solution of this activity can be found on page 298.


 Free Chapter