

Classifying images with a pre-trained network using TensorFlow Hub
TensorFlow Hub (TFHub) is a repository of hundreds of machine learning models contributed to by the big and rich community that surrounds TensorFlow. Here we can find models for a myriad of different tasks, not only for computer vision but for applications in many different domains, such as Natural Language Processing (NLP) and reinforcement learning.
In this recipe, we'll use a model trained on ImageNet, hosted on TFHub, to make predictions on a custom image. Let's begin!
Getting ready
We'll need the tensorflow-hub and Pillow packages, which can be easily installed using pip, as follows:
$> pip install tensorflow-hub Pillow
If you want to use the same image we use in this recipe, you can download it here: https://github.com/PacktPublishing/Tensorflow-2.0-Computer-Vision-Cookbook/tree/master/ch2/recipe6/beetle.jpg.
Here's the image we'll classify:

Figure 2.6 – Image to be classified
Let's head to the next section.
How to do it…
Let's proceed with the recipe steps:
- Import the necessary packages:
import matplotlib.pyplot as plt
import numpy as np
import tensorflow_hub as hub
from tensorflow.keras import Sequential
from tensorflow.keras.preprocessing.image import *
from tensorflow.keras.utils import get_file
- Define the URL of the pre-trained
ResNetV2152classifier in TFHub:classifier_url = ('https://tfhub.dev/google/imagenet/' 'resnet_v2_152/classification/4') - Download and instantiate the classifier hosted on TFHub:
model = Sequential([
    hub.KerasLayer(classifier_url, input_shape=(224,
                                              224, 3))])
- Load the image we'll classify, convert it to a
numpyarray, normalize it, and wrap it into a singleton batch:image = load_img('beetle.jpg', target_size=(224, 224)) image = img_to_array(image) image = image / 255.0 image = np.expand_dims(image, axis=0) - Use the pre-trained model to classify the image:
predictions = model.predict(image)
- Extract the index of the most probable prediction:
predicted_index = np.argmax(predictions[0], axis=-1)
- Download the ImageNet labels into a file named
ImageNetLabels.txt:file_name = 'ImageNetLabels.txt' file_url = ('https://storage.googleapis.com/' 'download.tensorflow.org/data/ImageNetLabels.txt') labels_path = get_file(file_name, file_url) - Read the labels into a
numpyarray:with open(labels_path) as f: imagenet_labels = np.array(f.read().splitlines())
- Extract the name of the class corresponding to the index of the most probable prediction:
predicted_class = imagenet_labels[predicted_index]
- Plot the original image with its most probable label:
plt.figure()
plt.title(f'Label: {predicted_class}.')
original = load_img('beetle.jpg')
original = img_to_array(original)
plt.imshow(original / 255.0)
plt.show()
This produces the following:
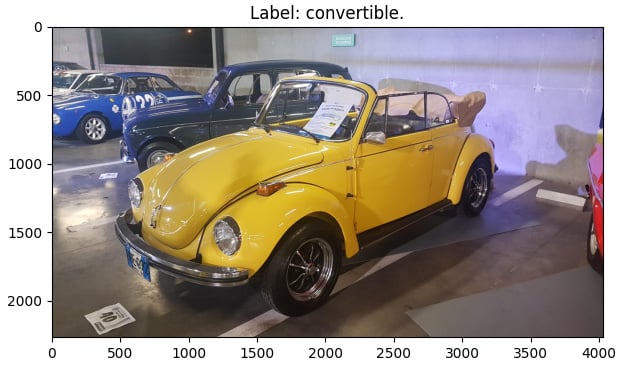
Figure 2.7 – Correctly classified image
Let's see how it all works.
How it works…
After importing the relevant packages, we proceeded to define the URL of the model we wanted to use to classify our input image. To download and convert such a network into a Keras model, we used the convenient hub.KerasLayer class in Step 3. Then, in Step 4, we loaded the image we wanted to classify into memory, making sure its dimensions match the ones the network expects: 224x224x3.
Steps 5 and 6 perform the classification and extract the most probable category, respectively. However, to make this prediction human-readable, we downloaded a plain text file with all ImageNet labels in Step 7, which we then parsed using numpy, allowing us to use the index of the most probable category to obtain the corresponding label, finally displayed in Step 10 along with the input image.
See also
You can learn more about the pre-trained model we used here: https://tfhub.dev/google/imagenet/resnet_v2_152/classification/4.