
Along the book, we will be building a game as a demo of the concepts we will be studying in each chapter. The game is going to be a classic Space Shooter arcade game. We'll call it YASS—Yet Another Space Shooter.
This means some decisions will be taken for this particular type of game, but other options will also be commented since the book is meant for generic video game development.
We are going to create a project with a single Activity and we will add fragments when necessary.
In the versions prior to Android 5.0 Lollipop, the transitions between activities could be modified, but only in a very limited way. The user can even disable them in a setting. All in all, this will make your game look clunky while transitioning from one Activity to another. You will need to save the state of the Activity in case it gets destroyed. Since each Activity is a separate instance, you will need to take care of communication among them, if required.
On the other hand, when you work with fragments, you never exit the Activity and you have complete control over the transition animations. In addition to these, you still have the code and layout of each section separated, so modularity and encapsulation are not compromised.
Finally, when it comes to handling third-party libraries such as In-App Billing or Google Play services, you have to take care if initialization and configuration only once, since those are linked at the Activity level.
One good practice is to have a base Fragment for our game (YassBaseFragment) from which all the other fragments will inherit. One good use of this fragment is to have a method to replace getActivity that returns our specific Activity, but there are other cases in which having a common base fragment is handy.
We are going to use Android Studio as the IDE. We are going to create the project with minSDK 15 (Ice Cream Sandwich—ICS). As a good practice, we don't want to move the minimum SDK, unless we are using some features that were not available before. By keeping the minSDK low, you make your game available to as many devices as possible.
The two main features we are going to use from ICS are Fragments, ValueAnimators, and ViewPropertyAnimators. All of these were already available in Honeycomb, but 3.x is considered little more than a test for ICS; it was not mature and has been replaced by ICS in almost all devices.
In the unlikely case that you want to support older versions such as Gingerbread, you can make use of the compatibility library and NineOldAndroids to add backwards-compatibility for the features we are using.
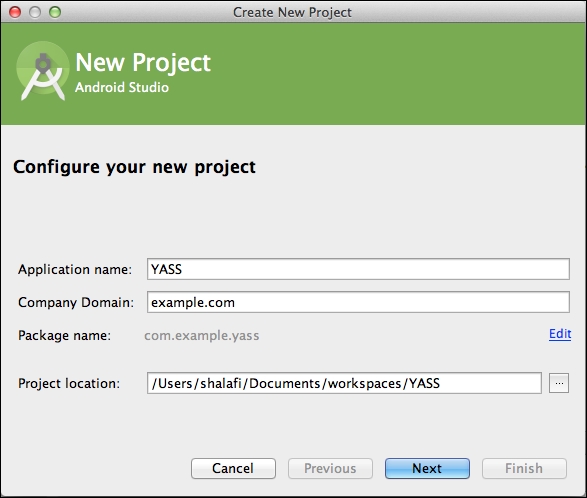
Let's go on and navigate to File > New Project. We are going to use YASS as the Application name and example.com as the Company Domain.
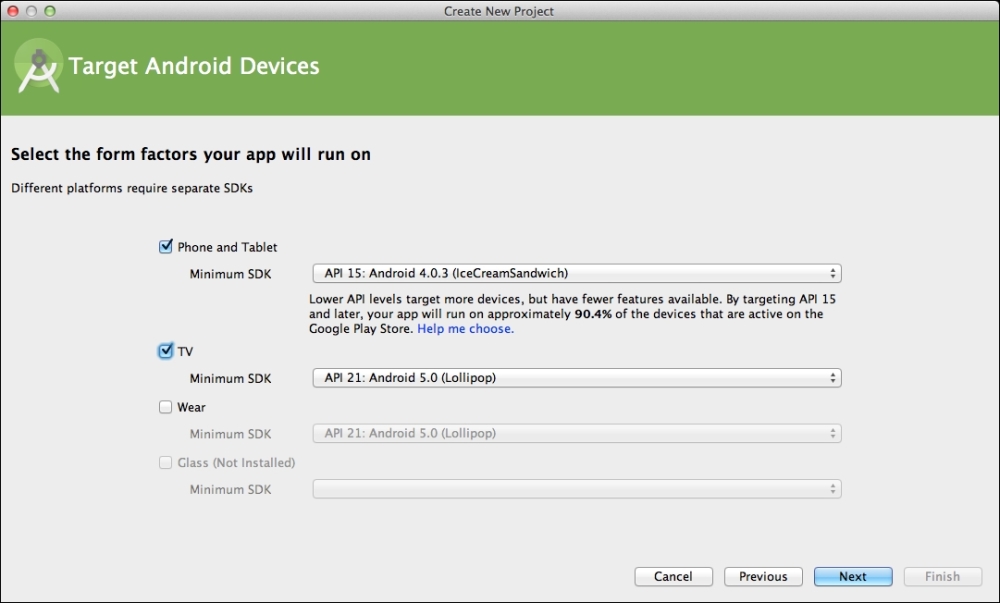
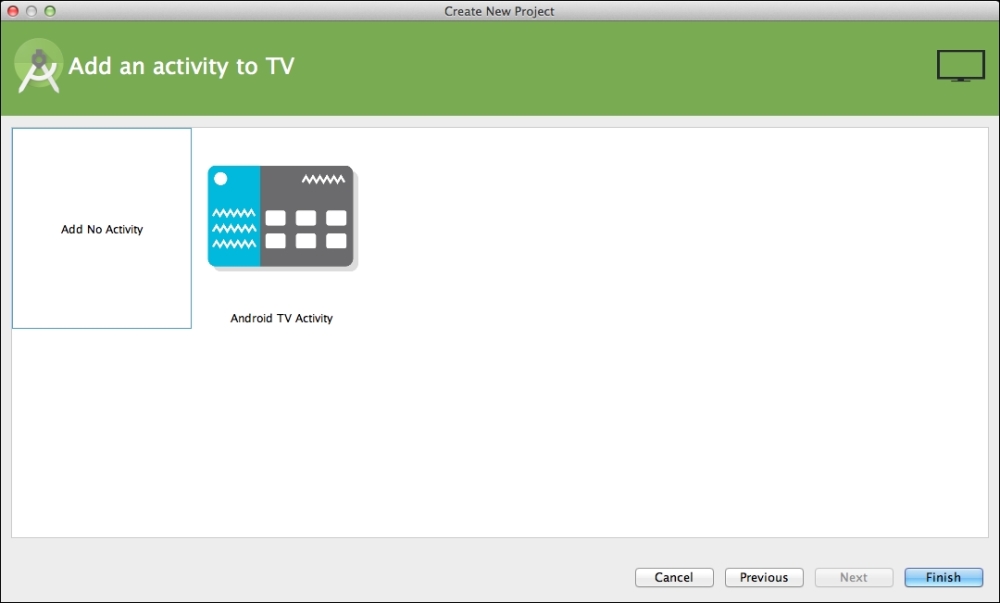
We include support for Android TV, since we want to be able to run our game on the big screen. This will create an extra module that we can compile for, but we are not going to touch this until the last chapter.
As explained before, we will use Minimum SDK version 15 for phones and 21 for Android TV, since this is when it was made available.
For the Package name of the application, we are going to use com.example.yass.
We are not going to use any of the default wizards, since all of them include the action bar/toolbar that is great for apps, but of no use for games. So, we'll go with the empty project options:
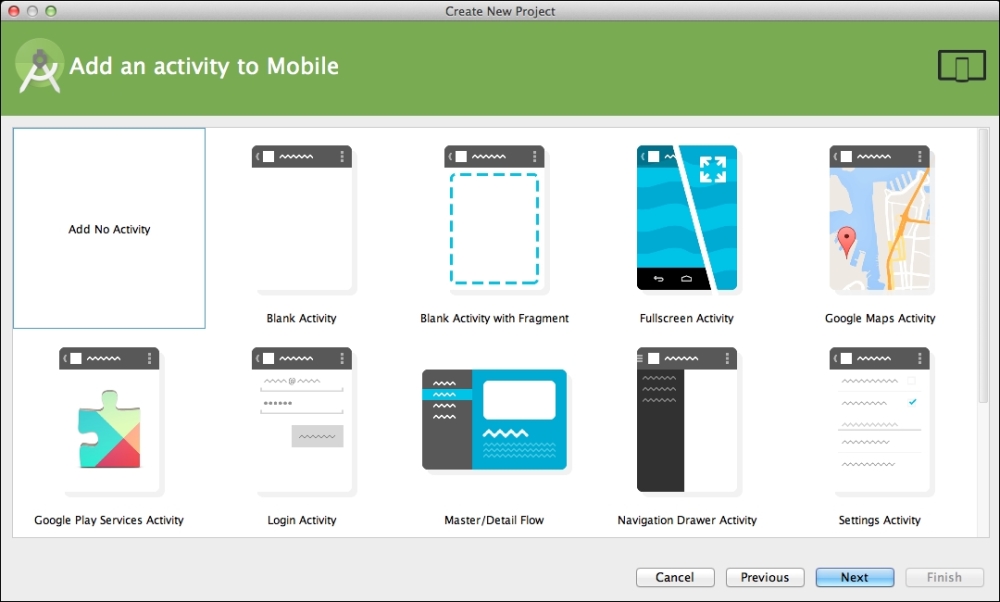
Similarly, we are not going to create any Activity for TV:
Once the project is created, we will create a single Activity with one Fragment. This is done via the menu option New > Activity > Blank Activity with Fragment.
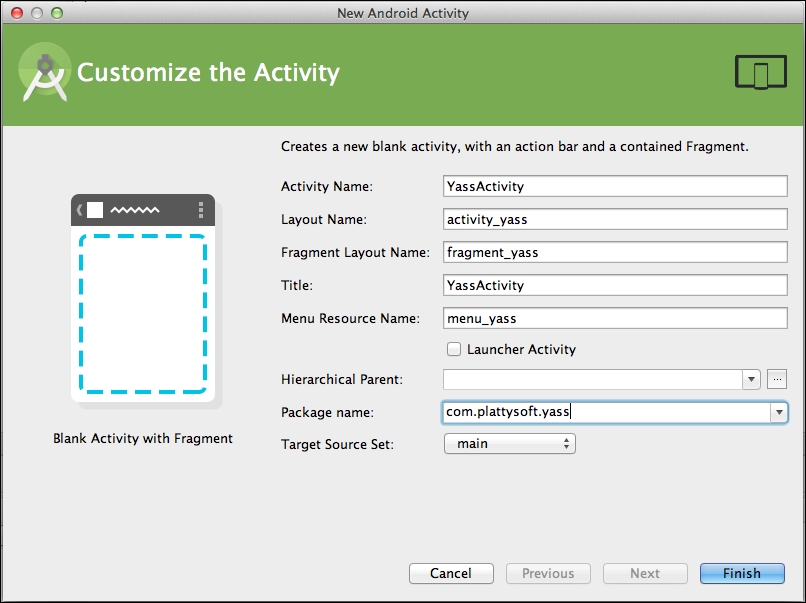
We are going to customize the
Activity by filling the dialog as follows:
Activity Name:
YassActivityLayout Name:
activity_yass(will be the default as soon as we change the Activity name)Fragment Layout Name:
fragment_yass(will be the default as soon as we change the Activity name)Title:
YassActivity
This will create the following files:
YassActivity.javawith the code forYassActivityandPlaceholderFragmentactivity_main.xml: AFrameLayoutwith@+id/container, which will be used to load the fragments intofragment_main.xml: A placeholder layout with the textHello World!
Since we did not tell Android Studio that this activity is going to be our launch activity, we need to edit the AndroidManifest.xml to configure it as such, by adding the proper intent filter:
<intent-filter>
  <action android:name="android.intent.action.MAIN" />
  <category android:name="android.intent.category.LAUNCHER" />
</intent-filter>
We are not going to use menus at all, so there are a few methods and files we will not need and we can delete them. You can leave all those methods there if you want, but it is better to have a clean environment, free of unused code.
So, we can remove the menu folder under resources and the files in it, which are meant to be the menu for the YassActivity.
The methods that handle menu-creation and menu-item-selection are also useless, so we can remove the following methods from YassActivity:
onCreateOptionsMenu: Invoked when the menu is createdOnOptionsItemSelected: Invoked when an option from the menu is selected
Deciding the orientation of a game is a very important point. Given the diversity of Android phones, the resolution and aspect ratio are a couple of things we have to deal with.
Gaming is traditionally done in landscape orientation: computers have monitors in landscape mode, and so do TV screens when you play with your gaming console. Almost all handheld consoles are designed with landscape orientation as well. Even more, most tablets consider landscape to be the default orientation.
YASS is going to be a landscape game. The key reason why we are doing it is to be able to port the game to Android consoles later on, both on Android TV and OUYA. This does not mean that the portrait mode is not a valid orientation for games, but it is a less familiar one for players.
We are going to use sensorLandscape instead of just landscape, so the device can rotate 180 degrees to adjust to whatever side is down. We have to update the AndroidManifest.xml to look like this:
<application
  android:icon="@mipmap/ic_launcher"
  android:label="@string/app_name"
  android:theme="@style/AppTheme" >
  <activity
    android:screenOrientation="sensorLandscape"
    android:name=".YassActivity"
    android:label="@string/title_activity_yass" >
    <intent-filter>
      <action android:name="android.intent.action.MAIN" />
      <category android:name="android.intent.category.LAUNCHER" />
    </intent-filter>
  </activity>
</application>
As you probably know, when an Activity changes orientation on Android, it is destroyed and recreated and so are all the fragments inside it. This means that, unless you explicitly save and restore information, the fragments will not remember the previous state.
Some good news here: while using sensorLandscape, the rotation does not kill the Activity, so no extra work is required. This happens because the layout is exactly the same and nothing needs to be recreated.
If you plan to make a game that can rotate, you must pay extra attention to saving and restoring the status of the game when the orientation changes. This in itself is another good reason to keep the game locked to a particular orientation, be it landscape or portrait.
Android devices come in a lot of different aspect ratios, form 4:3 to 16:9 at least. This is not counting the number of pixels.
While designing a game for multiple aspect ratios, there are basically two ways of doing it. For each of them, we design for the most extreme aspect ratio. We will be using the extra space for "smart letterboxes," which means that we can have more game view.
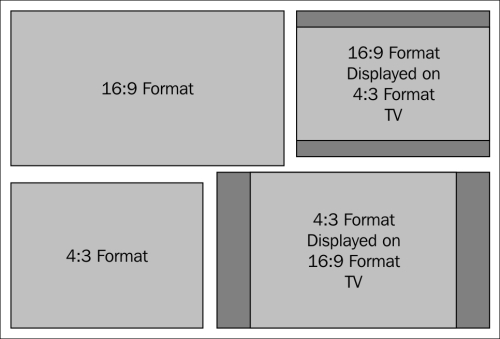
Several ways of designing for different aspect ratios
The most common option is to make the camera centered and fix the smallest size (the height for the landscape orientation). This allows for more view space on the sides, while making sure that the smallest screen will have enough display space. This is the equivalent of viewing 4:3 images on a 16:9 screen.
You can also fix the bigger size if the game design makes sense. This will add extra space on the top and bottom if the screen is square. This is the equivalent of viewing 16:9 images on a 4:3 screen.
There is an alternative approach: simply having "more camera space." We can, as well, make the game view a certain size and use the extra space for other controls such as scores, levels, and so on.
If you take this approach to the extreme, you can design the game area completely square and put the extra information in "smart letterboxes" for both landscape and portrait. One very good example of this approach is done by Candy Crush Saga. This is the best approach for versatility, but it is also the one that requires the most work.
For our game, we are going to use a "more camera space" approach with fixed size letterboxes to display scores and lives.
For the difference in resolution and pixel density, we will be designing for a low density screen. We will read the resolution of the device programmatically and apply a conversion factor. Some in-depth details of this approach are given in the chapters dedicated to low-level drawing, menus, and dialogs.