
GML scripts are made up of many different parts. The following section will go over these different parts and their syntax, formatting, and usage.
A program is a set of instructions that are followed in a specific order. One way to think of it is that every script written in GML is essentially a program. Programs in GML are usually enclosed within braces, { }, as shown in the following example:
{
    // Defines an instanced string variable.
   	str_text = "Hello Word";

    // Every frame, 10 units are added to x, a built-in variable.
    x += 10;

   	// If x is greater than 200 units, the string changes.
    if (x > 200)
    {
    str_text = "Hello Mars";
    }
}
The previous code example contains two assignment expressions followed by a conditional statement, followed by another program with an assignment expression.
Note
If the preceding script were an actual GML script, the initial set of braces enclosing the program would not be required.
Each instruction or line of code ends with a semicolon (;). This is not required as a line break or return is sufficient, but the semicolon is a common symbol used in many other programming languages to indicate the end of an instruction. Using it is a good habit to improve the overall readability of one's code.
Tip
Downloading the example code
You can download the example code files for all Packt books you have purchased from your account at http://www.packtpub.com. If you purchased this book elsewhere, you can visit http://www.packtpub.com/support and register to have the files e-mailed directly to you.
Before continuing with this overview of GML, it's very important to observe that the formatting used in GML programs is snake case. Though it is not necessary to use this formatting, the built-in methods and constants of GML use it; so, for the sake of readability and consistency, it is recommended that you use snake casing, which has the following requirements:
No capital letters are used
All words are separated by underscores
Variables are the main working units within GML scripts, which are used to represent values. Variables are unique in GML in that, unlike some programming languages, they are not strictly typed, which means that the variable does not have to represent a specific data structure. Instead, variables can represent either of the following types:
A number also known as
real, such as 100 or 2.0312. Integers can also correspond to the particular instance of an object, room, script, or another type of resource.A
stringwhich represents a collection of alphanumeric characters commonly used to display text, encased in either single or double quotation marks, for example,"Hello World".
As previously mentioned, the same variable can be assigned to any of the mentioned variable types, which can cause a variety of problems. To combat this, the prefixes of variable names usually identify the type of data stored within the variable, such as str_player_name (which represents a string). The following are the common prefixes that will be used throughout this book:
str: String
spr: Sprites
snd: Sounds
bg: Backgrounds
pth: Paths
scr: Scripts
fnt: Fonts
tml: Timeline
obj: Object
rm: Room
ps: Particle System
pe: Particle Emitter
pt: Particle Type
ev: Event
Within GML scripts, variables have different scopes. This means that the way in which the values of variables are accessed and set varies. The following are the different scopes:
Instance: These variables are unique to the instances or copies of each object. They can be accessed and set by themselves or by other game objects and are the most common variables in GML.
Local: Local variables are those that exist only within a function or script. They are declared using the
varkeyword and can be accessed only within the scripts in which they've been created.Global: A variable that is global can be accessed by any object through scripting. It belongs to the game and not an individual object instance. There cannot be multiple global variables of the same name.
Constants: Constants are variables whose values can only be read and not altered. They can be instanced or global variables. Instanced constants are, for example,
object_indexorsprite_width. Thetrueandfalsevariables are examples of global constants. Additionally, any created resource can be thought of as a global constant representing its ID and unable to be assigned a new value.
The following example demonstrates the assignment of different variable types:
// Local variable assignment.
var a = 1;

// Global variable declaration and assignment.
globalvar b;
b = 2;

// Alternate global variable declaration and assignment.
global.c = 10;

// Instanced variable assignment through the use of "self".
self.x = 10;

/* Instanced variable assignment without the use of "self".  Works identically to using "self". */
y = 10;
Some global variables and instanced variables are already provided by GameMaker: Studio for each game and object. Variables such as x, sprite_index, and image_speed are examples of built-in instanced variables. Meanwhile, some built-in variables are also global, such as health, score, and lives. The use of these in a game is really up to personal preference, but their appropriate names do make them easier to remember. When any type of built-in variable is used in scripting, it will appear in a different color, the default being a light, pinkish red. All built-in variables are documented in GameMaker: Studio's help contents, which can be accessed by navigating to Help | Contents... | Reference or by pressing F1.
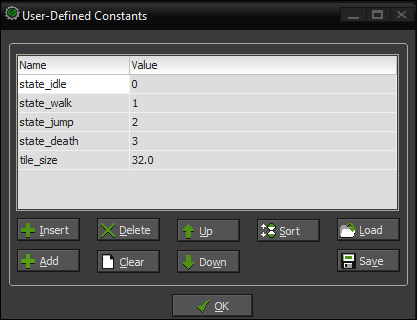
Custom constants can be defined by going to Resources | Define Constants... or by pressing Shift + Ctrl + N. In this dialog, first a variable name and then a correlating value are set. By default, constants will appear in the same color as built-in variables when written in the GML code. The following screenshot shows this interface with some custom constants created:
A function is a statement that executes a program; it is either built into GML or created as a script resource. Functions can either execute an action, such as changing the alignment of a font during a Draw event, return a value, or do both. Functions have to be followed by a set of parentheses—( )—to execute properly. Another important aspect of functions is arguments. These comma-separated sets of data—string, integers, objects, and so on—are accessible to functions when executed. If there are no arguments, the parentheses are left empty; however, when needed, arguments are placed in between them. The following are some examples of functions with and without arguments:
// Executes an action, in this case, drawing the instance.
draw_self();

/* Executes an action which requires arguments, in this case, drawing an arrow. */
draw_arrow(0,0,100,100,2);

// Obtains a random value between two provided values.
random_value = random(10, 23);
GameMaker: Studio provides a wide variety of functions. Many of these functions will be used throughout this book; however, to find information about all of GML's available functions, go to Help | Contents... | Reference or press F1.
Scripts created as resources can be accessed using two methods. Either the script's name can be referenced and used like a built-in GML function or the function script_execute can be used, as shown in the following code snippet:
// Executes the script directly like a built-in function.
scr_script_resource("argument", obj_button, 0.12, false);

/* Executes the same script as the previous line but through the use of "script_execute". */
script_execute(scr_script_resource, "argument", obj_button, 0.12, false);
The advantage of using script_execute is that it allows a script-assigned variable to be used as shown in the following code:
// Assigns an instanced variable with the script resource's index.
self.script = scr_script_resource;

// Executes the assigned script.
script_execute(self.script, "argument", obj_button, 0.12, false);
The script_execute function can only be used on scripts created as resources; additionally, variables cannot be assigned built-in functions. The following code demonstrates this problematic situation:
// Assigns an instanced variable with a script resource ID.
self.script = scr_script_resource;

// Calling the instanced variable will cause a compile error.
self.script("argument", obj_button, 0.12, false);Expressions represent values usually stored within variables or evaluated by a conditional statement, which will be explained later. They can be real numbers, such as 3.4; hexadecimal numbers starting with a $ sign, such as $00FFCC (usually used to represent a color); and strings, which are created by encasing them in single or double quotation marks, for example, 'hello' or "hello".
Expressions can be manipulated and evaluated using different symbols. The equals sign or assignment operator = sets the value of a variable as shown in the following code:
// Assigning a variable with a value.
a = 10;

/* Assigning a different variable with an expression, in this case, the sum of the previously declared variable and 7.5. */
b = (a + 7.5);
Expressions can also be combined with basic mathematical operations, as shown in the following code:
// Addition and subtraction, + and -
val = a + 20 - b;

// Multiplication and division, * and /
val = a * 20 / b;

/* Expressions encased in parenthesis, ( and ), will be evaluated first. */
val = (a + 20) * (b - 40);

// + can also be used to concatenate, or link, strings together.
str = "hello " + "world";
Mathematical operations can be combined with = to create a compound assignment operator and perform relative addition, subtraction, multiplication, or division, as shown in the following code:
// Relative addition, +=
x += y; // equivalent to x = x + y;

// Relative subtraction, -=
x -= y; // equivalent to x = x – y;

// Relative multiplication, *=
x *= y; // equivalent to x = x * y;

// Relative division, /=
x /= y; // equivalent to x = x / y;
The main advantage of this code is its extreme simplicity. In the previous examples, x is a simple variable to type out, but if a variable name is longer, the preceding code cuts down on having to unnecessarily retype that name on both sides of the assignment operator.
Variables can also be incremented by one value as shown in the following code:
var a, b, c, d, str_a, str_b, str_c, str_d;
a = 1;
b = 1;
c = 1;
d = 1;

// The return string will be "1" but a's value is now 2.
str_a = string(a++);

// The return string will be "2" and b's value is 2.
str_b = string(++b);

// The return string will be "1" but c's value is 0;
str_c = string(c--);

// The return string will be "0" and d's value is 0;
str_d = string(--d);
In summary, if ++ or -- is included after the variable, the variable's current value is returned and then is incremented. If ++ or -- is set before the variable, its current value is incremented and that new value is returned.
Boolean comparisons, as shown in the following code, compare expressions and return the values true or false, which are GML constants equal to 1 and 0 respectively:
// Less than, <
if (a < 20) { instance_create(a, 20, obj_ball); }

// Less than or equals to, <=
if (a <= 20) { instance_create(a, 20, obj_ball); }

// Equals to, ==
if (a == 20) { instance_create(a, 20, obj_ball); }

// Not equals to, !=
if (a != 20) { instance_create(a, 20, obj_ball); }

// Greater than, >
if (a > 20) { instance_create(a, 20, obj_ball); }

// Greater than or equals to, >=
if (a >= 20) { instance_create(a, 20, obj_ball); }
Booleans can also be combined for evaluation, as shown in the following code:
// And, &&, will return true if both booleans are also true.
if (a == 20 && b == 40) { val = "and"; }

/* Or, ||, will return true if at least one of the booleans is true. */
if (a == 20 || b == 40) { val = "or"; }

/* xor, ^^, will return true if one booleans is true and the other false. */
if (a == 20 ^^ b == 40) { val = "xor"; }
Conditional statements utilize a Boolean expression with a corresponding program. If the value returned is true, the program following the conditional statement will be executed; otherwise, it will be skipped. There are several types of conditional statements in GML, each of which has its own uses.
The if statement is probably the most common conditional statement that will be used while making these games. The if statements were introduced when discussing Booleans previously; the following is another example illustrating a simple if statement:
/* If the value of a is greater than the value of b, a is returned; otherwise, b is returned. */
if (a > b)
{
  return a;
}
else
{
  return b;
}
In the previous example, assuming both a and b are real numbers, if the value of a is greater than that of b, a is returned; otherwise, b is returned. One thing that should be noted is that b will be returned if it is less than or equal to a, since this is the opposite of greater than.
Now what if a variable needs to be compared against many different conditions? The following could be done:
/* Assigns the temperature of an object based on a color with multiple if-else-statements. */
if (color == c_green || color == c_purple || color == c_blue)
{
    temperature = "cool";
}
else if (color == c_red || color == c_orange || c == c_yellow)
{
    temperature ="warm";
}
else if (color == c_black || color == c_gray || color == c_white)
{
    temperature ="neutral";
}
else
{
    temperature ="other";
}
When there are a lot of objects, each with its own complex program that needs to be executed, the execution of these objects could become rather tedious and confusing. Instead of using long chains of if-else statements, a switch statement can be used. A switch statement is created with the keywords switch, case, break, and default, as shown in the following code:
/* Assigns the temperature of an object based on a color with a switch statement. */
switch (color)
{
  case c_red:
  case c_orange:
  case c_yellow:
    temperature = "warm";
    break;
  case c_green:
  case c_blue:
  case c_purple:
    temperature ="cool";
    break;
  case c_black:
  case c_white:
  case c_gray:
    temperature = "neutral";
    break;
  default:
    temperature = "other";
    break;
}
The previous switch statement is identical to the layered if-else statements created earlier. Each case statement is essentially testing whether or not the value of the variable supplied after switch is equal to its own. If the values are equal, the program is executed. If a default case is supplied, this program will be executed if none of the other cases satisfy the conditional statement. The keyword break, which will be discussed again in a later section, is used to end the program running within a case statement.
The repeat, while, do, and for statements are all examples of statements that execute a program multiple times and this is often referred to as a loop. The
Repeat statement is used to execute the same program for a specified number of times:
// Creates 10 buttons at random positions between 0 and 100.
repeat (10)
{
  instance_create(random(100), random(100), obj_button)
}
The previous code will create 10 instances of obj_button at random positions. The while statement will execute a program until a condition is no longer met:
// Reduces x by 10 until it is no longer greater than 100.
while (x > 100)
{
  x -= 10;
}
In the previous code, the value of x will be reduced until it is less than 100. The do statements are very similar to the while statements, except they require an additional keyword—until:
/* Initially reduces x by 10 but continues until x is less than or equal to 100. */
do
{
  x -= 10;
}
until (x <= 100);
The difference between do and while is subtle. In a do statement, the program is executed first and then the condition is checked; in a while statement, the condition is checked first before executing the program. The for statements or for loops have built-in conditions as shown in the following code:
// Declares a local variable.
var i;

/* 10 buttons are created, evenly spaced apart horizontally by 100 units with an initial offset of 25. */
for (i = 0; i < 10; i++)
{
    instance_create(i * 100 + 25, 25, obj_button)
}
The first statement after the keyword for sets the local variable i to 0. Then, there is the condition that if the value of i is less than 10, the block of code within the loop is executed. The value of the variable i is then incremented and checked again within the conditional statement, running the program if the statement is still valid. Now the previous for statement is very similar to the repeat statement. The important difference is that i is incremented by the statement, making this a good way to loop through values in a one- or two-dimensional array, which will be covered shortly. The following sample code demonstrates this functionality with a two-dimensional array:
// Creates two local variables.
var i,j;

/* This is an example of a nested for loop in which a 10 by 10 grid with values ranging from 0 to 99 will be created. */
for (i = 0; i < 10; i++)
{
  for (j = 0; j < 10; j++)
  {
    grid[i,j] = i + j * 10;
  }
}
The following code shows the same functionality as the one performed using the repeat statements:
// Creates local variable and then assigns their values to 0.
var i, j;
i = 0;
j = 0;

/* Repeat functionality is performed 10 times and 10 more times within each repeat-statement. */
repeat (10)
{
  repeat(10)
  {
    // assign the grid value
    grid[i,j] = i + j * 10;

    // increment after each inner repeat.
    j++;
  }
  // increment after each outer repeat.
  i++;
}
As demonstrated, a for statement is much clearer than a repeat statement in situations like these.
Before moving on, it must be noted that the repeat, while, do, and for statements can create a situation known as the infinite loop. Infinite loops are very dangerous and cause a game to freeze up, ignoring input from the user and forcing them to shut down the game. The following are some examples of statements that can cause this; do not use these in actual code as they are just examples of what not to do:
/* Since the condition in the while-statement is always true, it will never terminate. */
while (true)
{
  x += 1;
}

// Declares a local variable.
var i;

/* This for-statement will never end since i will never be less than 0. */
for (i = 0; i >= 0; i++)
{
  x += i;
}As previously mentioned, looping statements can sometimes cause a situation in which they do not terminate. There are two ways to resolve this issue. One is known as break, which was already demonstrated in the switch statements to break out of a case statement, but it can also be used to break out of a loop. The following is an example of a break statement:
// local variable used in the for loop
var i;

/* Iterates through 1000 enemies.  At the first undefined enemy, the loop is exited, otherwise, the enemy moves by a random value between 1 and 10 horizontally. */
for (i = 0; i < 1000; i++)
{
  if (enemies[i] == noone)
  {
    break;
  }
  enemies[i].x += random_range(1,10);
}
In the previous code sample, the for statement is broken out of and no longer continues running once the internal condition is met. Suppose break were to be replaced with continue, as shown in the following example:
// local variable for for loop
var i;

/* Iterates through 1000 enemies.  If an undefined enemy is encountered, the remaining enemies are still checked; otherwise, the enemy is moved by a random value between 1 and 10 horizontally. */
for (i = 0; i < 1000; i++)
{
  if (enemies[i] == noone)
  {
    continue;
  }
  enemies[i].x += random_range(1,10);
}
The for statement would proceed to checking the additional enemies, even if they are all undefined. The break and continue statements, however, are very useful because in both examples, an undefined enemy is to be encountered and the game will crash upon trying to add the value generated by random_range to its x value. The return statements are used most often in GML scripts that are created as resources. The return statement will not only end any script in its entirety, but also return whatever value follows it as demonstrated in the following code:
// This script will simply add and multiply two arguments
var result;
result = (argument0 + argument1) * (argument0 * argument1);
return result;
If you want to obtain a value using the previously shown function, it can be accessed through the following code, assuming that the function scr_add_multipy is a script resource:
// Execute the method and assign it to x.
x = scr_add_multiply(1, 2);
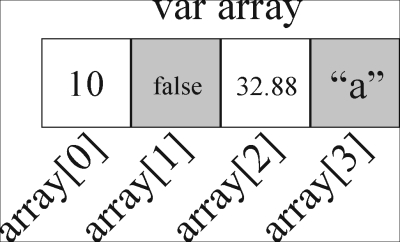
Now the one additional feature that variables have is that they can contain multiple values through the use of arrays. An array is a fundamental and useful programming tool. Instead of having to create a unique variable name to store dozens of values, such as those for a high-score list or a role-playing game's inventory system, all of these values can simply be stored in an array. The following code demonstrates the creation and assignment of an array in code:
// A local array is declared and assigned four values.
var array;
array[0] = 10;
array[1] = false;
array[2] = 32.88;
array[3] = "a";
The following figure illustrates the data contained within each portion of the newly created variable:
By enclosing an integer within brackets—[ ]—after a variable name, a one-dimensional array is created. This integer is then called an index.
Arrays are useful for storing data that is iterated, but they do have their limits. An array cannot contain more than 32,000 members as this will cause an error, and arrays with several thousand members can cause memory issues and their initialization can be rather slow, so it is best to avoid using them when possible.
A two-dimensional array is created by adding two comma-separated integers within the brackets after a variable name. They are great to use when creating a grid system: the first index represents a column and the second represents a row, as shown in the following code:
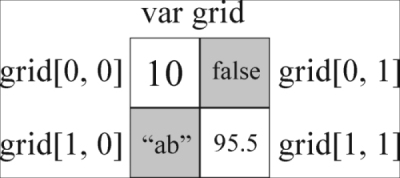
/* A 2-dimensional array is declared and assigned four different values. */
var grid;
grid[0,0] = 10;
grid[0,1] = false;
grid[1,0] = "ab";
grid[1,1] = 95.5;
The following figure illustrates the data within the two-dimensional array created in the previous code block:
Throughout the previous code samples, characters such as //, /*, or */ have been used. These create comments, which are lines and blocks of code that are not compiled or that will not show up in the results of the game. Comments are used mostly to document code so that when others are looking at that code, it is easier to understand it and appears much more professional. They can also help the original programmer by citing information that may not be obvious or when the code hasn't been looked at in quite some time. Comments can also be used to temporarily remove a section of code without having to delete it while debugging or testing new features.
Note
Up to this point, the comments in the provided code samples have been very verbose for demonstration purposes. In future sections, the comments will not be as verbose, but will still be provided so that the examples are clear and understandable.
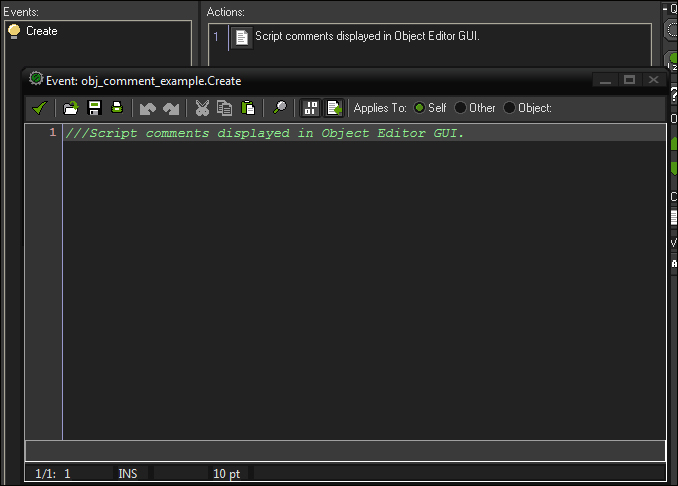
The // characters will comment just one line of code. Any number of lines encased within /* and then */ will be part of a comment block. Finally, using /// in the first line of a script used in an event will make the comment show up in the editor as shown in the following screenshot:
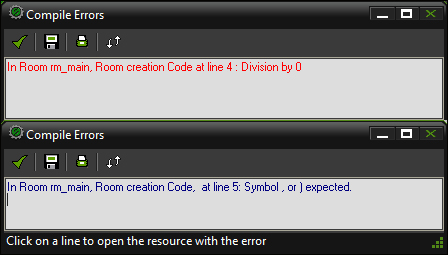
No one is perfect and mistakes are often made when writing scripts of any kind. There are two types of errors that are encountered when working in GameMaker: Studio—compile errors and runtime errors.
A compile error is one that prevents GameMaker: Studio from building the project. If a compile error occurs, the game cannot even start. The common reasons for compile errors are as follows:
Omitting a closing parenthesis, single quotation mark, double quotation mark, or bracket for every opened one
Misspelled variables, functions, or script names
Accessing an argument variable that has not been provided in a function call
Omitting commas between arguments in a function
A runtime error is one that causes a game to crash while it is active. Such errors can happen for any number of reasons. The following are a few examples:
Incorrect data provided as an argument in a function
Attempting to access instanced variables of an undefined object
Accessing an undefined member of an array
Division by 0
If either of these types of errors occur while working on a game in GameMaker: Studio, a window will pop up describing the error and where it is occurring. Though the name of the window in GameMaker: Studio will be titled Compile Errors, runtime errors will be displayed in red text and compile errors will be navy blue by default, as shown in the following screenshot: