
Inkscape comes with several useful path operations that enable us to assemble complex objects from simpler ones, thus speeding up the process of creating elaborate drawings.
The following steps outline some useful path operations:
1. Create a rectangle using the Rectangle tool (F4 or R) and a star using the Star tool (Shift + F9 or *). Position the star over the top rectangle edge so it partially overlaps the rectangle.
2. Select both objects (Ctrl + A) and perform a union on them using the Path | Union option
 or Ctrl + +. Notice how we now have only one object with the same outline as the previous objects combined:
3. Create a circle with the Ellipse tool (F5 or E) and position it over the object we got in the previous step.
4. Select both objects (Ctrl + A) and perform a difference using the Path | Difference option
 or Ctrl + -. Notice that we now have only one object that was made by subtracting the top from the bottom one:
5. Create an ellipse using the Ellipse tool (F5 or E) that is a bit wider than the object from the previous step and position it over the upper half of that object (I also lowered the opacity a bit so it's easier to see what we're doing.)
6. Select both objects (Ctrl + A) and perform an intersection using the Path | Intersection option
 or Ctrl + *. This option is the same as Clipping, only destructive, since we can't get the original shape back:
 7. Create a rectangle using the Rectangle tool (F4 or R) that is larger than the object from the previous step, and center it over that object (I also lowered the opacity a bit so it's easier to see what we're doing.)

8. Select both objects (Ctrl + A) and perform an exclusion using the Path | Exclusion option
 or Ctrl + ^. This operation is like a reverse Difference:
9. Create a rectangle using the Rectangle tool (F4 or R) that is approximately half the size of the object from the previous step, and position it over the bottom area of that object (I also lowered the opacity a bit so it's easier to see what we're doing.)
10. Select both objects (Ctrl + A), duplicate them (Ctrl + D), and move away the selection (duplicated objects). We will use them in a later step.
11. Select the original two objects using a rubber band selection or by clicking on one and using Shift while clicking on the other to add it to the selection. Then perform a division using the Path | Division
 option or Ctrl + /.
12. Deselect using the Esc key and then select each of the resulting objects and move them away so that each subpath of the original object is divided separately.

13. Select the objects we had previously duplicated and set aside, and cut the paths using the Path | Cut Path option
 or Ctrl + Alt + /.
14. Deselect using the Esc key and then select each of the resulting objects and move them away to see how all the sub-paths of the original object were cut independently. Paths that are generated with the Cut Path operation are open so their fill is removed to make it more clear.

We only used two objects at a time to demonstrate different path operations but more than two paths can be used to perform Union, Intersection, and Exclusion.
If we use Open Paths with path operations they will be closed in the process by connecting its end points with a straight line. If we use shape objects (rectangle, ellipse, or stars) they will automatically be converted to paths.
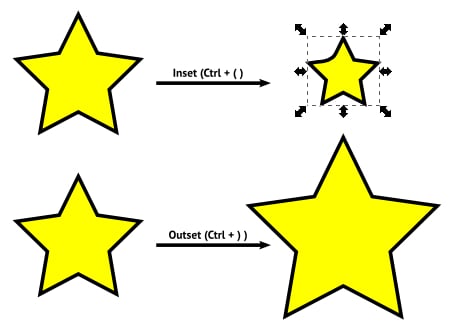
Inset and Outset aren't path operations but what they do is similar enough to include them in this recipe. Inset (Ctrl + ( ) and Outset (Ctrl + ) ) moves the path edge towards the center or away from the object center by an equal amount. Here are some examples:
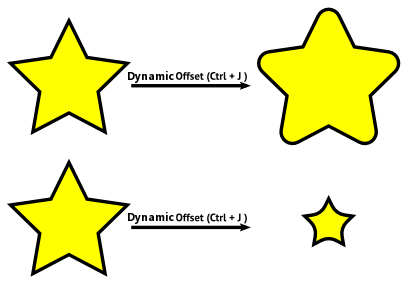
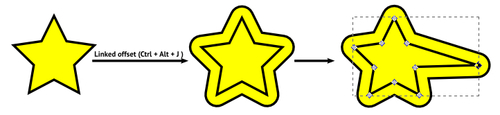
Dynamic Offset moves the path edge towards or away from the object center using a square handle that appears when this option is selected. The end result is not an editable path, and if we want to edit it further we have to convert it to a path (Shift + Ctrl + C). This effect isn't destructive like the Inset and Offset options. Here are some examples: