
This chapter will be devoted to the animation of a full sequence. We will begin our journey by discovering the 12 animation principles. Then, we will learn more about the preproduction stage that is all the things that we need in order to prepare the animation such as the writing of a script and the creation of a storyboard. After this, we will learn some important tools in order to animate in Blender such as the Timeline, Dope Sheet, Graph editor, and NLA. Next, we will create a layout that is a rough 3D visualization of the sequence without animation. After we've done all this, it will be time to start animating our shots. We will first learn how to animate a walk and use the NLA in order to mix actions together. We will then animate a close shot and a gunshot inspired by old western movies. The graph editor will be used extensively in order to animate a trap. Finally, we will learn how we can render a playblast of our shots. So let's dive into the wonderful world of animation where things start to move!
In this chapter, we will cover the following topics:
- Learning the principles of animation
- Preparing our animation with a script, storyboard, and layout
- Using the Blender animation tools
- Animate different shots
- Render a playblast
In order to start to animate with Blender in the best way, it is important to understand some basic principles defined in the 80's by Ollie Johnston and Frank Thomas. These principles are inherited from the 2D animation art called "traditional animation". Animation involves recreating the illusion of motion by a sequence of images. Most of these principles also work for 3D animation. Here, they have been developed for a cartoon style, quite far from realistic movements. So, we don't have to apply them to any situation, but they still contain the secrets of animation.
This is one of the common principles that applies to cartoon-style animation. The goal is to over-exaggerate the effect of inertia and elasticity on a particular object. From a 2D perspective, it's quite hard to manage because the object doesn't need to lose its volume, so we need to judge the shape by eye, but in 3D this is just a matter of a good rig.

The principle of Anticipation describes the anticipation before an action. For example, a character ready to jump is going to bend the knees, the back, and the arms before the actual jump. It is important in order to add realism to the action you want to depict through your animation. To better understand this principle, try punching with your hand, you'll see your hand going back first.

This principle is applied in cinema and theater to retain the attention of the spectator on specific elements and remove every useless detail from their view. This is useful to communicate a perfectly clear idea. This may include many areas of animation such as lighting, acting, or camera positions.

These are two different approaches while animating. The Straight Ahead Action method consists of making an animation gradually frame by frame from the beginning to the end. With 2D animation, this is especially useful to create special effects such as fire and water, and this allows improvisation.
The Pose to Pose method allows us a much better control of the timing and is easier to manage. This is often much more efficient when we animate characters. For this method, we start by adding the Key Poses. They are the main keys that indicate the action. Then comes the Extremes that we add to the extremities of motions that exaggerate the action between two key poses. Then, there are the Breakdowns that are the main intermediate keys of the action between the extremes. These add more fluidity to the action. A mix of the both methods is often used.

Follow Through and Overlapping Action techniques being very close consist of giving some inertia to an animated object and add a better sense of realism. Follow Through consists of continuing the movement of a part of an object after it has stopped moving. This can be applied to a tail, for instance. Overlapping Action consists of creating an offset between a movement of an object and a part of this object. For example, long hair moves at a different speed than the head.

These are two effects that consist of attenuating the speed of a moving object around the extreme keys. A Slow In effect is a deceleration at the beginning of an action, and a Slow Out effect is a deceleration at the end of an action. In Blender, these effects can be seen in the form of Bezier curves and are controlled by their handles in the Graph Editor.

This is a principle that consists of creating movements that follow an arc trajectory. Almost every motion follows this principle. For instance, when a character throws a ball, his or her hand follows an arc trajectory. If you take a pendulum and fix the ball, you will see that it follows an arc.

The Secondary Action principle is about how every little action adds dimension to the main action. For example, in the case of a facial expression, a blink of the eyes can add more expression to the character. Another example could be the ears of a dog that hangs when he turns his head.

The number of frames between the beginning and end of an action directly affects the speed of the action. Timing is related to a physical consistency respecting certain laws of physics. In order to animate a character, timing defines its personality and emotions. For example, if a character is sad, timing is going to be definitely slower.

The exaggeration principle is used when you want to accentuate the action that you are transmitting to the viewer. The action can be a pose, a gesture, or an expression. Sometimes it is better to slightly get away from realistic animation to get a better impact. For instance, if you want to accentuate a punch, you can exaggerate the proportions of the arm of a character.

This principle mostly applies to 2D animation. It consists of ensuring certain realism in drawing regarding volume, weight, and balance. This advocates paying attention to volume and perspective in order to avoid a flat render. A character must be possibly seen from any angle of view. In 3D animation, it is a bit different. Even for a 3D animator, drawing can be seen as a strength, because it allows to quickly put the poses you have in mind on paper, but this is not going to be your main tool.

Now that you understand a little bit more about what animation involves, we are going to dive into the different tools that we are going to use when animating our sequence. In order to test these tools, we are going to use the default cube of a new .blend file.
The timeline editor gives us a lot of information about the animations of our file. The timeline represents each frame as you can see in its lower part. You can navigate to any frame by dragging the green bar. Using the Left and Right arrows, we will move one frame at a time. Using Shift and Up or Down arrows, we will move by an increment of ten frames. In the header we have two sliders, Start and End, which respectively represent at which frame the animation starts and ends. As you can see, we have dark grey parts in the timeline that visually shows this range. If you want, you can set the start and end frame by placing the timeline bar where they need to be and by pressing S and E respectively. You can quickly move the timeline bar to the start and end frame by pressing Shift and left or right mouse buttons. You can also zoom in to the frame with the Mouse Wheel. You can use the well-known play, rewind, and pause buttons in order to play the animation. The shortcut to play the animation is Alt + A.

The timeline
Now it's time to learn how to set keyframes. But wait a minute, what is a keyframe? It is used to store the state of an object (or any other animatable thing) at a certain frame. Let's add a keyframe to our default cube:
- We will open a fresh new blend file, and we will select the default cube.
- We will then place the timeline bar at frame 0 and press I to open the Insert Keyframe Menu. We can now choose between many options, but we are going to choose the LocRotScale one because we are going to keyframe the location, rotation, and scale of our object.
- Now we will go to frame 20 (remember the Shift + Up arrow shortcut of the timeline), and we will move, scale, and rotate our cube. Now we can add a new key to store the current state of the cube, press I and select LocRotScale.
- If you move the timeline bar or play the animation, you can see that Blender automatically interpolates the motion for you! You can clearly see that you have two keyframes represented in yellow. Congratulations, this is your first animation in Blender.
The timeline is great but is not very useful when we want to manipulate our keys. To do so, we can use a more robust editor called Dope Sheet (as always you can split your view and select the editor type that you want on the left-hand side of the header). On the left-hand side, we can see every object that has keys on it. In the header, we have many important options such as the Show only selected button (a mouse pointer icon) that tells Blender to only show the keyframe of the selected objects. The keys are represented by a diamond shape and can be selected with by right-clicking on them or by using the B key for the box select tool. Of course, you can select all the keys by pressing A. You can move the keys with G. You can also scale a group of keys with S. In this case, the timeline bar will be the pivot point. The Dope Sheet Summary row enables us to select every key that is below the corresponding key.
For instance, if we select the dope sheet summary key at frame 0 by right-clicking on it, we will automatically select every key on frame 0.

The Dope Sheet editor
Now we will learn a little bit more about curves with the Graph editor. This is a really important editor to learn in order to become a good animator. It mainly allows us to control the interpolation between the keys. It looks like graph paper with the y axis corresponding to the value of the key and the x axis to the time. We can select the keys in the same way as the Dope Sheet. As you can see on the left-hand side, we still have the objects on which we added the keyframes. We can also see that we have the type of the keyframe that we've placed; LocRotScale in the case of our cube. If we open this with the white arrow, we can see each transformation and its corresponding curve on the right-hand side. Each frame has a handle type that you can change with the V key. It looks a little bit like the curve handles that we saw in the Haunted House project. We can set them as Vector to have a linear interpolation, for instance. We can also change the interpolation type of each frame by pressing the T key. This is a very useful menu that we are going to use in order to quickly animate the bounce of our trap. If you press the N key, you will see a bunch of options. You can even see modifiers that allow us to add procedural effect to our curves, for instance, noise. Note that you can use the Ctrl + MMB shortcut to squash the graph.
Note
Default interpolation setting
In User preferences, in the Editing tab, we have the ability to choose the default type of interpolation that we want between two keys. Many animators like to set it as constant so they don't have any interpolation. When the animation plays, it looks like stop motion. After they have the right poses, they select all their keys in the graph editor, and they press V to set the Bezier interpolation type back in order to polish the animation.

The Graph editor
The NLA or Non-Linear Action editor is a huge time-saver tool! It allows us to edit actions. Similar to doing video editing, you will edit tracks on which there are actions. You can see an action like a box of keyframes that represent a certain motion of an object. Actions are located in the Dope Sheet editor. In its header, we can see a drop-down menu. We can change it from Dope Sheet to Action Editor. Near this drop-down menu, we have a text field with the name of our action. We can create multiple actions by duplicating them with the + button. Each action has its own set of keyframes. So, for instance, you could animate the walk of a character in a specific action, its displacement in another action, and mix them back together in the NLA editor. Back to the NLA editor, we can press Shift + A in order to add a new action to a specific track. Tracks are represented on the left-hand side. We can add new tracks by going to the Add menu in the header and by choosing the Add Tracks option. We can open a hidden panel by pressing N. In this panel, you will have many options concerning the selected action.
For instance, we can repeat the selected action by changing the Repeat value under the Action Clip subpanel. We can also move actions by pressing G. This also allows us to move an action from one track to another.

The NLA editor
The timeline
The timeline editor gives us a lot of information about the animations of our file. The timeline represents each frame as you can see in its lower part. You can navigate to any frame by dragging the green bar. Using the Left and Right arrows, we will move one frame at a time. Using Shift and Up or Down arrows, we will move by an increment of ten frames. In the header we have two sliders, Start and End, which respectively represent at which frame the animation starts and ends. As you can see, we have dark grey parts in the timeline that visually shows this range. If you want, you can set the start and end frame by placing the timeline bar where they need to be and by pressing S and E respectively. You can quickly move the timeline bar to the start and end frame by pressing Shift and left or right mouse buttons. You can also zoom in to the frame with the Mouse Wheel. You can use the well-known play, rewind, and pause buttons in order to play the animation. The shortcut to play the animation is Alt + A.
The timeline
Now it's time to learn how to set keyframes. But wait a minute, what is a keyframe? It is used to store the state of an object (or any other animatable thing) at a certain frame. Let's add a keyframe to our default cube:
- We will open a fresh new blend file, and we will select the default cube.
- We will then place the timeline bar at frame 0 and press I to open the Insert Keyframe Menu. We can now choose between many options, but we are going to choose the LocRotScale one because we are going to keyframe the location, rotation, and scale of our object.
- Now we will go to frame 20 (remember the Shift + Up arrow shortcut of the timeline), and we will move, scale, and rotate our cube. Now we can add a new key to store the current state of the cube, press I and select LocRotScale.
- If you move the timeline bar or play the animation, you can see that Blender automatically interpolates the motion for you! You can clearly see that you have two keyframes represented in yellow. Congratulations, this is your first animation in Blender.
The timeline is great but is not very useful when we want to manipulate our keys. To do so, we can use a more robust editor called Dope Sheet (as always you can split your view and select the editor type that you want on the left-hand side of the header). On the left-hand side, we can see every object that has keys on it. In the header, we have many important options such as the Show only selected button (a mouse pointer icon) that tells Blender to only show the keyframe of the selected objects. The keys are represented by a diamond shape and can be selected with by right-clicking on them or by using the B key for the box select tool. Of course, you can select all the keys by pressing A. You can move the keys with G. You can also scale a group of keys with S. In this case, the timeline bar will be the pivot point. The Dope Sheet Summary row enables us to select every key that is below the corresponding key.
For instance, if we select the dope sheet summary key at frame 0 by right-clicking on it, we will automatically select every key on frame 0.
The Dope Sheet editor
Now we will learn a little bit more about curves with the Graph editor. This is a really important editor to learn in order to become a good animator. It mainly allows us to control the interpolation between the keys. It looks like graph paper with the y axis corresponding to the value of the key and the x axis to the time. We can select the keys in the same way as the Dope Sheet. As you can see on the left-hand side, we still have the objects on which we added the keyframes. We can also see that we have the type of the keyframe that we've placed; LocRotScale in the case of our cube. If we open this with the white arrow, we can see each transformation and its corresponding curve on the right-hand side. Each frame has a handle type that you can change with the V key. It looks a little bit like the curve handles that we saw in the Haunted House project. We can set them as Vector to have a linear interpolation, for instance. We can also change the interpolation type of each frame by pressing the T key. This is a very useful menu that we are going to use in order to quickly animate the bounce of our trap. If you press the N key, you will see a bunch of options. You can even see modifiers that allow us to add procedural effect to our curves, for instance, noise. Note that you can use the Ctrl + MMB shortcut to squash the graph.
Note
Default interpolation setting
In User preferences, in the Editing tab, we have the ability to choose the default type of interpolation that we want between two keys. Many animators like to set it as constant so they don't have any interpolation. When the animation plays, it looks like stop motion. After they have the right poses, they select all their keys in the graph editor, and they press V to set the Bezier interpolation type back in order to polish the animation.
The Graph editor
The NLA or Non-Linear Action editor is a huge time-saver tool! It allows us to edit actions. Similar to doing video editing, you will edit tracks on which there are actions. You can see an action like a box of keyframes that represent a certain motion of an object. Actions are located in the Dope Sheet editor. In its header, we can see a drop-down menu. We can change it from Dope Sheet to Action Editor. Near this drop-down menu, we have a text field with the name of our action. We can create multiple actions by duplicating them with the + button. Each action has its own set of keyframes. So, for instance, you could animate the walk of a character in a specific action, its displacement in another action, and mix them back together in the NLA editor. Back to the NLA editor, we can press Shift + A in order to add a new action to a specific track. Tracks are represented on the left-hand side. We can add new tracks by going to the Add menu in the header and by choosing the Add Tracks option. We can open a hidden panel by pressing N. In this panel, you will have many options concerning the selected action.
For instance, we can repeat the selected action by changing the Repeat value under the Action Clip subpanel. We can also move actions by pressing G. This also allows us to move an action from one track to another.
The NLA editor
What is a keyframe?
Now it's time to learn how to set keyframes. But wait a minute, what is a keyframe? It is used to store the state of an object (or any other animatable thing) at a certain frame. Let's add a keyframe to our default cube:
- We will open a fresh new blend file, and we will select the default cube.
- We will then place the timeline bar at frame 0 and press I to open the Insert Keyframe Menu. We can now choose between many options, but we are going to choose the LocRotScale one because we are going to keyframe the location, rotation, and scale of our object.
- Now we will go to frame 20 (remember the Shift + Up arrow shortcut of the timeline), and we will move, scale, and rotate our cube. Now we can add a new key to store the current state of the cube, press I and select LocRotScale.
- If you move the timeline bar or play the animation, you can see that Blender automatically interpolates the motion for you! You can clearly see that you have two keyframes represented in yellow. Congratulations, this is your first animation in Blender.
The timeline is great but is not very useful when we want to manipulate our keys. To do so, we can use a more robust editor called Dope Sheet (as always you can split your view and select the editor type that you want on the left-hand side of the header). On the left-hand side, we can see every object that has keys on it. In the header, we have many important options such as the Show only selected button (a mouse pointer icon) that tells Blender to only show the keyframe of the selected objects. The keys are represented by a diamond shape and can be selected with by right-clicking on them or by using the B key for the box select tool. Of course, you can select all the keys by pressing A. You can move the keys with G. You can also scale a group of keys with S. In this case, the timeline bar will be the pivot point. The Dope Sheet Summary row enables us to select every key that is below the corresponding key.
For instance, if we select the dope sheet summary key at frame 0 by right-clicking on it, we will automatically select every key on frame 0.
The Dope Sheet editor
Now we will learn a little bit more about curves with the Graph editor. This is a really important editor to learn in order to become a good animator. It mainly allows us to control the interpolation between the keys. It looks like graph paper with the y axis corresponding to the value of the key and the x axis to the time. We can select the keys in the same way as the Dope Sheet. As you can see on the left-hand side, we still have the objects on which we added the keyframes. We can also see that we have the type of the keyframe that we've placed; LocRotScale in the case of our cube. If we open this with the white arrow, we can see each transformation and its corresponding curve on the right-hand side. Each frame has a handle type that you can change with the V key. It looks a little bit like the curve handles that we saw in the Haunted House project. We can set them as Vector to have a linear interpolation, for instance. We can also change the interpolation type of each frame by pressing the T key. This is a very useful menu that we are going to use in order to quickly animate the bounce of our trap. If you press the N key, you will see a bunch of options. You can even see modifiers that allow us to add procedural effect to our curves, for instance, noise. Note that you can use the Ctrl + MMB shortcut to squash the graph.
Note
Default interpolation setting
In User preferences, in the Editing tab, we have the ability to choose the default type of interpolation that we want between two keys. Many animators like to set it as constant so they don't have any interpolation. When the animation plays, it looks like stop motion. After they have the right poses, they select all their keys in the graph editor, and they press V to set the Bezier interpolation type back in order to polish the animation.
The Graph editor
The NLA or Non-Linear Action editor is a huge time-saver tool! It allows us to edit actions. Similar to doing video editing, you will edit tracks on which there are actions. You can see an action like a box of keyframes that represent a certain motion of an object. Actions are located in the Dope Sheet editor. In its header, we can see a drop-down menu. We can change it from Dope Sheet to Action Editor. Near this drop-down menu, we have a text field with the name of our action. We can create multiple actions by duplicating them with the + button. Each action has its own set of keyframes. So, for instance, you could animate the walk of a character in a specific action, its displacement in another action, and mix them back together in the NLA editor. Back to the NLA editor, we can press Shift + A in order to add a new action to a specific track. Tracks are represented on the left-hand side. We can add new tracks by going to the Add menu in the header and by choosing the Add Tracks option. We can open a hidden panel by pressing N. In this panel, you will have many options concerning the selected action.
For instance, we can repeat the selected action by changing the Repeat value under the Action Clip subpanel. We can also move actions by pressing G. This also allows us to move an action from one track to another.
The NLA editor
The Dope Sheet
The timeline is great but is not very useful when we want to manipulate our keys. To do so, we can use a more robust editor called Dope Sheet (as always you can split your view and select the editor type that you want on the left-hand side of the header). On the left-hand side, we can see every object that has keys on it. In the header, we have many important options such as the Show only selected button (a mouse pointer icon) that tells Blender to only show the keyframe of the selected objects. The keys are represented by a diamond shape and can be selected with by right-clicking on them or by using the B key for the box select tool. Of course, you can select all the keys by pressing A. You can move the keys with G. You can also scale a group of keys with S. In this case, the timeline bar will be the pivot point. The Dope Sheet Summary row enables us to select every key that is below the corresponding key.
For instance, if we select the dope sheet summary key at frame 0 by right-clicking on it, we will automatically select every key on frame 0.
The Dope Sheet editor
Now we will learn a little bit more about curves with the Graph editor. This is a really important editor to learn in order to become a good animator. It mainly allows us to control the interpolation between the keys. It looks like graph paper with the y axis corresponding to the value of the key and the x axis to the time. We can select the keys in the same way as the Dope Sheet. As you can see on the left-hand side, we still have the objects on which we added the keyframes. We can also see that we have the type of the keyframe that we've placed; LocRotScale in the case of our cube. If we open this with the white arrow, we can see each transformation and its corresponding curve on the right-hand side. Each frame has a handle type that you can change with the V key. It looks a little bit like the curve handles that we saw in the Haunted House project. We can set them as Vector to have a linear interpolation, for instance. We can also change the interpolation type of each frame by pressing the T key. This is a very useful menu that we are going to use in order to quickly animate the bounce of our trap. If you press the N key, you will see a bunch of options. You can even see modifiers that allow us to add procedural effect to our curves, for instance, noise. Note that you can use the Ctrl + MMB shortcut to squash the graph.
Note
Default interpolation setting
In User preferences, in the Editing tab, we have the ability to choose the default type of interpolation that we want between two keys. Many animators like to set it as constant so they don't have any interpolation. When the animation plays, it looks like stop motion. After they have the right poses, they select all their keys in the graph editor, and they press V to set the Bezier interpolation type back in order to polish the animation.
The Graph editor
The NLA or Non-Linear Action editor is a huge time-saver tool! It allows us to edit actions. Similar to doing video editing, you will edit tracks on which there are actions. You can see an action like a box of keyframes that represent a certain motion of an object. Actions are located in the Dope Sheet editor. In its header, we can see a drop-down menu. We can change it from Dope Sheet to Action Editor. Near this drop-down menu, we have a text field with the name of our action. We can create multiple actions by duplicating them with the + button. Each action has its own set of keyframes. So, for instance, you could animate the walk of a character in a specific action, its displacement in another action, and mix them back together in the NLA editor. Back to the NLA editor, we can press Shift + A in order to add a new action to a specific track. Tracks are represented on the left-hand side. We can add new tracks by going to the Add menu in the header and by choosing the Add Tracks option. We can open a hidden panel by pressing N. In this panel, you will have many options concerning the selected action.
For instance, we can repeat the selected action by changing the Repeat value under the Action Clip subpanel. We can also move actions by pressing G. This also allows us to move an action from one track to another.
The NLA editor
The Graph editor
Now we will learn a little bit more about curves with the Graph editor. This is a really important editor to learn in order to become a good animator. It mainly allows us to control the interpolation between the keys. It looks like graph paper with the y axis corresponding to the value of the key and the x axis to the time. We can select the keys in the same way as the Dope Sheet. As you can see on the left-hand side, we still have the objects on which we added the keyframes. We can also see that we have the type of the keyframe that we've placed; LocRotScale in the case of our cube. If we open this with the white arrow, we can see each transformation and its corresponding curve on the right-hand side. Each frame has a handle type that you can change with the V key. It looks a little bit like the curve handles that we saw in the Haunted House project. We can set them as Vector to have a linear interpolation, for instance. We can also change the interpolation type of each frame by pressing the T key. This is a very useful menu that we are going to use in order to quickly animate the bounce of our trap. If you press the N key, you will see a bunch of options. You can even see modifiers that allow us to add procedural effect to our curves, for instance, noise. Note that you can use the Ctrl + MMB shortcut to squash the graph.
Note
Default interpolation setting
In User preferences, in the Editing tab, we have the ability to choose the default type of interpolation that we want between two keys. Many animators like to set it as constant so they don't have any interpolation. When the animation plays, it looks like stop motion. After they have the right poses, they select all their keys in the graph editor, and they press V to set the Bezier interpolation type back in order to polish the animation.
The Graph editor
The NLA or Non-Linear Action editor is a huge time-saver tool! It allows us to edit actions. Similar to doing video editing, you will edit tracks on which there are actions. You can see an action like a box of keyframes that represent a certain motion of an object. Actions are located in the Dope Sheet editor. In its header, we can see a drop-down menu. We can change it from Dope Sheet to Action Editor. Near this drop-down menu, we have a text field with the name of our action. We can create multiple actions by duplicating them with the + button. Each action has its own set of keyframes. So, for instance, you could animate the walk of a character in a specific action, its displacement in another action, and mix them back together in the NLA editor. Back to the NLA editor, we can press Shift + A in order to add a new action to a specific track. Tracks are represented on the left-hand side. We can add new tracks by going to the Add menu in the header and by choosing the Add Tracks option. We can open a hidden panel by pressing N. In this panel, you will have many options concerning the selected action.
For instance, we can repeat the selected action by changing the Repeat value under the Action Clip subpanel. We can also move actions by pressing G. This also allows us to move an action from one track to another.
The NLA editor
The Non-Linear Action editor
The NLA or Non-Linear Action editor is a huge time-saver tool! It allows us to edit actions. Similar to doing video editing, you will edit tracks on which there are actions. You can see an action like a box of keyframes that represent a certain motion of an object. Actions are located in the Dope Sheet editor. In its header, we can see a drop-down menu. We can change it from Dope Sheet to Action Editor. Near this drop-down menu, we have a text field with the name of our action. We can create multiple actions by duplicating them with the + button. Each action has its own set of keyframes. So, for instance, you could animate the walk of a character in a specific action, its displacement in another action, and mix them back together in the NLA editor. Back to the NLA editor, we can press Shift + A in order to add a new action to a specific track. Tracks are represented on the left-hand side. We can add new tracks by going to the Add menu in the header and by choosing the Add Tracks option. We can open a hidden panel by pressing N. In this panel, you will have many options concerning the selected action.
For instance, we can repeat the selected action by changing the Repeat value under the Action Clip subpanel. We can also move actions by pressing G. This also allows us to move an action from one track to another.
The NLA editor
Before starting the creation of the sequence, it is important to plan what we are going to do.
We start by organizing our ideas with some brief writing work. We must describe the scene to be animated shot by shot. We can be creative at this moment of the process and imagine any kind of place and situation.
In the first part, we will put some useful information such as the title, exposure (for instance, Out-Day in order to indicate that the action happens outdoors during the day), and the number of the sequence. In our case, there is only one sequence, so we call it Sequence 1. This kind of information is usual in a movie script.
The action of the sequence is in the desert. In a very warm and dangerous place, our rat sees a trap after a very long walk. This trap seems to be there for him.
We will follow a rather traditional script structure. There is an initial situation, a disruptive element that happens, and then the fall. In the case of a short animated film of one minute, there is no time to introduce and develop the characters and an enigma. We must go straight to the point.
For our short film, we will do a staging composed of different camera shots, which will require an editing step later. But we must conceive it now. Maybe you know that cinema has a visual grammar that is expressed by editing. It allows us to make sense of the different shots. It is something that you can learn, and there are certain rules to understand. Going deep in this area can only be a huge advantage for your 3D projects.
In order to write a script, we must describe our shots. There are different types of information. These are the field sizes of a shot:
- The extreme long shot: This is used for panoramas.
- The long shot (or establishing shot): This allows us to introduce a situation.
- The full shot: This frames the characters entirely. It is great for large movements.
- The medium shot: This frames the chest and the head of the character.
- The American shot (or ¾ shot): This frames a character from the thighs to the head. It is close enough to a medium shot.
- The close-up shot: This frames the face of the character, and it allows us to perceive emotions better.
- The Italian shot (or extreme close up): This frames the eyes of the character.
There are also the angles of a shot:
The camera can also rotate with a pan or be mobile. We often speak of a tracking shot. In cinema, the camera is often mounted on a camera dolly or a steady cam for a perfect smooth shot. There are other types of shots and framing, but these are the main types you should know in order to express yourself.

The storyboard
After this first reflection of writing the script, we can start making a storyboard. It is a technical document that the areas of animation films have been using since the 30's. A storyboard allows us to describe the action with drawings, but it also to goes further than the text in the design of the shots. In the case of teamwork, it is a very useful tool to communicate the work, and it gives a comprehensive view of a project.
Seeing that the storyboard allows us to save a huge amount of time and money, it is a practice that has gradually extended to the field of cinema (classical movies, but mostly special effects movies), theater, clips, and commercials. Even if we are very far from making a blockbuster, and have no team to communicate our work to, a storyboard is a very important step to make a good animated short film.
Don't worry if you are not very gifted in drawing. Many storyboards are very simple and schematic. The most important thing is to clarify your ideas of staging. It must be easy to understand with the indications of stage direction such as camera and character motion.
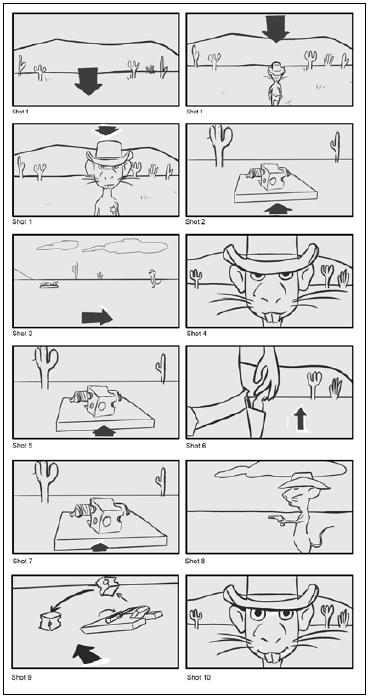
For our storyboard, we draw the different shots referring to the script that we have done previously. Continuity is from left to right like a comic. To describe a shot, we can make several drawings. For shot 1, three drawings are used to describe the movement of the camera and the character. In order to avoid getting lost, we mark the number of the matching shot at the bottom left of each thumbnail.
Storyboard
The layout is an animated version of the storyboard. It is sometimes called an "Animatic". We don't need to animate our character at this stage. We simply need to visualize the shots that we imagined previously with the script and the storyboard. We can then verify if this works and get a better idea of the time we need for each shot.
The process is as follows:
- We will import the character in Blender by simply copying it from the
RayCharacter.blendfile to a new file. - We will save the scene as
RatLayout.blend. - We will start outlining very simple scenery with a few low poly 3D models. We will use a plane for the floor and an extruded cube for the mountains beyond.
- We will model a simple cactus and duplicate it pretty much everywhere on the floor.
- We will also make a simple model of the trap and the cheese. We only need to get the basic shape.
- To be more comfortable with this, we will organize the environment by dividing it in several parts. It is much better to display the Dope Sheet, Graph Editor, and camera view in a little window (0 of the numeric keyboard).
- For each shot, we will create a new scene by clicking on the + button in the main menu bar, and we will select the Full Copy option.
- The placement of our character, the trap with the cheese and making a few tests with the camera are still remaining.
This is the step where we can still make a few changes and test movements and timings.

Screenshot of the layout shot 03 with the rough modeling
While animating, it is important to have as many references as you can so that you can have the perfect shot. Many computer animators have a folder with videos of themselves acting the shot. Recording yourself is one of the best ways to understand the gesture of a character. This way you will be able to catch many unconscious movements that you do when you look at the video. It is also a way to improvise different acts. Other reference materials such as character poses or animation cycle images are very interesting. Apart from this, paper and pencil are often useful in order to grasp some poses that you have in mind. You don't need to draw in detail, as a simple stick figure will suffice in order to put the poses ideas on paper.
Before starting to animate our shots, we will introduce to you how to organize yourself for the whole sequence. The different assets have been created in different .blend files. What's neat about this is that we are going to link them all in one final file for each shot. The benefit of this is that if we want to change the look of one of the assets, we can do it in the original file and it will replicate in the master file. For the rig of the rat cowboy, we are going to create a proxy.
In our case, we have ten shots, so we will create one .blend file for each of them. All these files will be placed in a Scene folder and will reference files that are placed one folder up in the folder hierarchy. Let's create our files:
- We will first create a new blank file in Blender and save it as
01.blendin a new folder namedScene. Note that you can create a new folder in the file browser with the I key. - Now let's open the terrain file and select everything that needs to be linked in the shot file. We are only selecting the mesh type objects here. We are going to group our selection with Ctrl + G and rename the group as
Terrainin the last tool option subpanel. - We will then repeat the same process with the other asset files. For the cactus file, you can create one group for each cactus.
- Now the different groups are ready to be linked in the shot file. In the
01.blendfile, select the Link option in the File menu or press Ctrl + Alt + O. We can now click on the Terrain file and navigate to the Group folder in order to select the Terrain group that we've created within this file. We can validate by pressing Link from Library.Note
The Link and Append file structures
The structure of a
.blendfile is composed of different sections that represent the file. Each section is related to the entity it contains. For instance, in the Group section, you will find every group that has been created in the file, and in the Nodes section, you will every node that has been created in the file, and so on. This file format is quite nice because it's open and very well organized.One very cool feature of Blender is the ability to mix files or parts of files together by linking or appending them. With the Link option, you keep a relation with the original file, so any modification will be replicated. The Append method creates a pure copy of what you want to mix.

The structure of a blend file
- The link should be done. You can test whether it works by saving the 01 file then tweaking the Terrain file, and going back to the 01 file to see whether the changes appear. Now we can repeat the same process with the other assets that need to be linked in the shot file. You can easily nest files by linking groups to files that are linked themselves as a group in another file.
- Cactus, bones, and bush are linked in the terrain file and they are part of the Terrain group (remember to add them to this group, as it will be linked in each shot file). The terrain is linked in each shot file. The Cheese group is linked to the Trap file, and the Trap group is linked to the 02, 03, 05, 07, and 08 files. We will not link the trap in the terrain file as it won't be needed for each shot. For the rat character, we will simply create a group with the Armature and Mesh object that we will link to the 01, 03, 04, 06, 08, and 10 files.
- In each file, we need to create a proxy for the rig of the rat. To do so, we will select the rig, and we will press Ctrl + Alt + P and click on the Armature object.
Note
Proxy
You may have already seen that when you use the link option, you can't do any modifications in the linked file. This is a security guard, so you only manage your art in one file. But in the case of a rigged character, this could be embarrassing. That's why we create a local access of the rig called a Proxy in the linked file with Ctrl + Alt + P.
You can have a look at the structure of our project as follows:

The architecture of our project
Writing a short script
We start by organizing our ideas with some brief writing work. We must describe the scene to be animated shot by shot. We can be creative at this moment of the process and imagine any kind of place and situation.
In the first part, we will put some useful information such as the title, exposure (for instance, Out-Day in order to indicate that the action happens outdoors during the day), and the number of the sequence. In our case, there is only one sequence, so we call it Sequence 1. This kind of information is usual in a movie script.
The action of the sequence is in the desert. In a very warm and dangerous place, our rat sees a trap after a very long walk. This trap seems to be there for him.
We will follow a rather traditional script structure. There is an initial situation, a disruptive element that happens, and then the fall. In the case of a short animated film of one minute, there is no time to introduce and develop the characters and an enigma. We must go straight to the point.
For our short film, we will do a staging composed of different camera shots, which will require an editing step later. But we must conceive it now. Maybe you know that cinema has a visual grammar that is expressed by editing. It allows us to make sense of the different shots. It is something that you can learn, and there are certain rules to understand. Going deep in this area can only be a huge advantage for your 3D projects.
In order to write a script, we must describe our shots. There are different types of information. These are the field sizes of a shot:
- The extreme long shot: This is used for panoramas.
- The long shot (or establishing shot): This allows us to introduce a situation.
- The full shot: This frames the characters entirely. It is great for large movements.
- The medium shot: This frames the chest and the head of the character.
- The American shot (or ¾ shot): This frames a character from the thighs to the head. It is close enough to a medium shot.
- The close-up shot: This frames the face of the character, and it allows us to perceive emotions better.
- The Italian shot (or extreme close up): This frames the eyes of the character.
There are also the angles of a shot:
The camera can also rotate with a pan or be mobile. We often speak of a tracking shot. In cinema, the camera is often mounted on a camera dolly or a steady cam for a perfect smooth shot. There are other types of shots and framing, but these are the main types you should know in order to express yourself.
The storyboard
After this first reflection of writing the script, we can start making a storyboard. It is a technical document that the areas of animation films have been using since the 30's. A storyboard allows us to describe the action with drawings, but it also to goes further than the text in the design of the shots. In the case of teamwork, it is a very useful tool to communicate the work, and it gives a comprehensive view of a project.
Seeing that the storyboard allows us to save a huge amount of time and money, it is a practice that has gradually extended to the field of cinema (classical movies, but mostly special effects movies), theater, clips, and commercials. Even if we are very far from making a blockbuster, and have no team to communicate our work to, a storyboard is a very important step to make a good animated short film.
Don't worry if you are not very gifted in drawing. Many storyboards are very simple and schematic. The most important thing is to clarify your ideas of staging. It must be easy to understand with the indications of stage direction such as camera and character motion.
For our storyboard, we draw the different shots referring to the script that we have done previously. Continuity is from left to right like a comic. To describe a shot, we can make several drawings. For shot 1, three drawings are used to describe the movement of the camera and the character. In order to avoid getting lost, we mark the number of the matching shot at the bottom left of each thumbnail.
Storyboard
The layout is an animated version of the storyboard. It is sometimes called an "Animatic". We don't need to animate our character at this stage. We simply need to visualize the shots that we imagined previously with the script and the storyboard. We can then verify if this works and get a better idea of the time we need for each shot.
The process is as follows:
- We will import the character in Blender by simply copying it from the
RayCharacter.blendfile to a new file. - We will save the scene as
RatLayout.blend. - We will start outlining very simple scenery with a few low poly 3D models. We will use a plane for the floor and an extruded cube for the mountains beyond.
- We will model a simple cactus and duplicate it pretty much everywhere on the floor.
- We will also make a simple model of the trap and the cheese. We only need to get the basic shape.
- To be more comfortable with this, we will organize the environment by dividing it in several parts. It is much better to display the Dope Sheet, Graph Editor, and camera view in a little window (0 of the numeric keyboard).
- For each shot, we will create a new scene by clicking on the + button in the main menu bar, and we will select the Full Copy option.
- The placement of our character, the trap with the cheese and making a few tests with the camera are still remaining.
This is the step where we can still make a few changes and test movements and timings.
Screenshot of the layout shot 03 with the rough modeling
While animating, it is important to have as many references as you can so that you can have the perfect shot. Many computer animators have a folder with videos of themselves acting the shot. Recording yourself is one of the best ways to understand the gesture of a character. This way you will be able to catch many unconscious movements that you do when you look at the video. It is also a way to improvise different acts. Other reference materials such as character poses or animation cycle images are very interesting. Apart from this, paper and pencil are often useful in order to grasp some poses that you have in mind. You don't need to draw in detail, as a simple stick figure will suffice in order to put the poses ideas on paper.
Before starting to animate our shots, we will introduce to you how to organize yourself for the whole sequence. The different assets have been created in different .blend files. What's neat about this is that we are going to link them all in one final file for each shot. The benefit of this is that if we want to change the look of one of the assets, we can do it in the original file and it will replicate in the master file. For the rig of the rat cowboy, we are going to create a proxy.
In our case, we have ten shots, so we will create one .blend file for each of them. All these files will be placed in a Scene folder and will reference files that are placed one folder up in the folder hierarchy. Let's create our files:
- We will first create a new blank file in Blender and save it as
01.blendin a new folder namedScene. Note that you can create a new folder in the file browser with the I key. - Now let's open the terrain file and select everything that needs to be linked in the shot file. We are only selecting the mesh type objects here. We are going to group our selection with Ctrl + G and rename the group as
Terrainin the last tool option subpanel. - We will then repeat the same process with the other asset files. For the cactus file, you can create one group for each cactus.
- Now the different groups are ready to be linked in the shot file. In the
01.blendfile, select the Link option in the File menu or press Ctrl + Alt + O. We can now click on the Terrain file and navigate to the Group folder in order to select the Terrain group that we've created within this file. We can validate by pressing Link from Library.Note
The Link and Append file structures
The structure of a
.blendfile is composed of different sections that represent the file. Each section is related to the entity it contains. For instance, in the Group section, you will find every group that has been created in the file, and in the Nodes section, you will every node that has been created in the file, and so on. This file format is quite nice because it's open and very well organized.One very cool feature of Blender is the ability to mix files or parts of files together by linking or appending them. With the Link option, you keep a relation with the original file, so any modification will be replicated. The Append method creates a pure copy of what you want to mix.
The structure of a blend file
- The link should be done. You can test whether it works by saving the 01 file then tweaking the Terrain file, and going back to the 01 file to see whether the changes appear. Now we can repeat the same process with the other assets that need to be linked in the shot file. You can easily nest files by linking groups to files that are linked themselves as a group in another file.
- Cactus, bones, and bush are linked in the terrain file and they are part of the Terrain group (remember to add them to this group, as it will be linked in each shot file). The terrain is linked in each shot file. The Cheese group is linked to the Trap file, and the Trap group is linked to the 02, 03, 05, 07, and 08 files. We will not link the trap in the terrain file as it won't be needed for each shot. For the rat character, we will simply create a group with the Armature and Mesh object that we will link to the 01, 03, 04, 06, 08, and 10 files.
- In each file, we need to create a proxy for the rig of the rat. To do so, we will select the rig, and we will press Ctrl + Alt + P and click on the Armature object.
Note
Proxy
You may have already seen that when you use the link option, you can't do any modifications in the linked file. This is a security guard, so you only manage your art in one file. But in the case of a rigged character, this could be embarrassing. That's why we create a local access of the rig called a Proxy in the linked file with Ctrl + Alt + P.
You can have a look at the structure of our project as follows:
The architecture of our project
Making a storyboard
After this first reflection of writing the script, we can start making a storyboard. It is a technical document that the areas of animation films have been using since the 30's. A storyboard allows us to describe the action with drawings, but it also to goes further than the text in the design of the shots. In the case of teamwork, it is a very useful tool to communicate the work, and it gives a comprehensive view of a project.
Seeing that the storyboard allows us to save a huge amount of time and money, it is a practice that has gradually extended to the field of cinema (classical movies, but mostly special effects movies), theater, clips, and commercials. Even if we are very far from making a blockbuster, and have no team to communicate our work to, a storyboard is a very important step to make a good animated short film.
Don't worry if you are not very gifted in drawing. Many storyboards are very simple and schematic. The most important thing is to clarify your ideas of staging. It must be easy to understand with the indications of stage direction such as camera and character motion.
For our storyboard, we draw the different shots referring to the script that we have done previously. Continuity is from left to right like a comic. To describe a shot, we can make several drawings. For shot 1, three drawings are used to describe the movement of the camera and the character. In order to avoid getting lost, we mark the number of the matching shot at the bottom left of each thumbnail.
Storyboard
The layout is an animated version of the storyboard. It is sometimes called an "Animatic". We don't need to animate our character at this stage. We simply need to visualize the shots that we imagined previously with the script and the storyboard. We can then verify if this works and get a better idea of the time we need for each shot.
The process is as follows:
- We will import the character in Blender by simply copying it from the
RayCharacter.blendfile to a new file. - We will save the scene as
RatLayout.blend. - We will start outlining very simple scenery with a few low poly 3D models. We will use a plane for the floor and an extruded cube for the mountains beyond.
- We will model a simple cactus and duplicate it pretty much everywhere on the floor.
- We will also make a simple model of the trap and the cheese. We only need to get the basic shape.
- To be more comfortable with this, we will organize the environment by dividing it in several parts. It is much better to display the Dope Sheet, Graph Editor, and camera view in a little window (0 of the numeric keyboard).
- For each shot, we will create a new scene by clicking on the + button in the main menu bar, and we will select the Full Copy option.
- The placement of our character, the trap with the cheese and making a few tests with the camera are still remaining.
This is the step where we can still make a few changes and test movements and timings.
Screenshot of the layout shot 03 with the rough modeling
While animating, it is important to have as many references as you can so that you can have the perfect shot. Many computer animators have a folder with videos of themselves acting the shot. Recording yourself is one of the best ways to understand the gesture of a character. This way you will be able to catch many unconscious movements that you do when you look at the video. It is also a way to improvise different acts. Other reference materials such as character poses or animation cycle images are very interesting. Apart from this, paper and pencil are often useful in order to grasp some poses that you have in mind. You don't need to draw in detail, as a simple stick figure will suffice in order to put the poses ideas on paper.
Before starting to animate our shots, we will introduce to you how to organize yourself for the whole sequence. The different assets have been created in different .blend files. What's neat about this is that we are going to link them all in one final file for each shot. The benefit of this is that if we want to change the look of one of the assets, we can do it in the original file and it will replicate in the master file. For the rig of the rat cowboy, we are going to create a proxy.
In our case, we have ten shots, so we will create one .blend file for each of them. All these files will be placed in a Scene folder and will reference files that are placed one folder up in the folder hierarchy. Let's create our files:
- We will first create a new blank file in Blender and save it as
01.blendin a new folder namedScene. Note that you can create a new folder in the file browser with the I key. - Now let's open the terrain file and select everything that needs to be linked in the shot file. We are only selecting the mesh type objects here. We are going to group our selection with Ctrl + G and rename the group as
Terrainin the last tool option subpanel. - We will then repeat the same process with the other asset files. For the cactus file, you can create one group for each cactus.
- Now the different groups are ready to be linked in the shot file. In the
01.blendfile, select the Link option in the File menu or press Ctrl + Alt + O. We can now click on the Terrain file and navigate to the Group folder in order to select the Terrain group that we've created within this file. We can validate by pressing Link from Library.Note
The Link and Append file structures
The structure of a
.blendfile is composed of different sections that represent the file. Each section is related to the entity it contains. For instance, in the Group section, you will find every group that has been created in the file, and in the Nodes section, you will every node that has been created in the file, and so on. This file format is quite nice because it's open and very well organized.One very cool feature of Blender is the ability to mix files or parts of files together by linking or appending them. With the Link option, you keep a relation with the original file, so any modification will be replicated. The Append method creates a pure copy of what you want to mix.
The structure of a blend file
- The link should be done. You can test whether it works by saving the 01 file then tweaking the Terrain file, and going back to the 01 file to see whether the changes appear. Now we can repeat the same process with the other assets that need to be linked in the shot file. You can easily nest files by linking groups to files that are linked themselves as a group in another file.
- Cactus, bones, and bush are linked in the terrain file and they are part of the Terrain group (remember to add them to this group, as it will be linked in each shot file). The terrain is linked in each shot file. The Cheese group is linked to the Trap file, and the Trap group is linked to the 02, 03, 05, 07, and 08 files. We will not link the trap in the terrain file as it won't be needed for each shot. For the rat character, we will simply create a group with the Armature and Mesh object that we will link to the 01, 03, 04, 06, 08, and 10 files.
- In each file, we need to create a proxy for the rig of the rat. To do so, we will select the rig, and we will press Ctrl + Alt + P and click on the Armature object.
Note
Proxy
You may have already seen that when you use the link option, you can't do any modifications in the linked file. This is a security guard, so you only manage your art in one file. But in the case of a rigged character, this could be embarrassing. That's why we create a local access of the rig called a Proxy in the linked file with Ctrl + Alt + P.
You can have a look at the structure of our project as follows:
The architecture of our project
Finding the final camera placements and the timing through a layout
The layout is an animated version of the storyboard. It is sometimes called an "Animatic". We don't need to animate our character at this stage. We simply need to visualize the shots that we imagined previously with the script and the storyboard. We can then verify if this works and get a better idea of the time we need for each shot.
The process is as follows:
- We will import the character in Blender by simply copying it from the
RayCharacter.blendfile to a new file. - We will save the scene as
RatLayout.blend. - We will start outlining very simple scenery with a few low poly 3D models. We will use a plane for the floor and an extruded cube for the mountains beyond.
- We will model a simple cactus and duplicate it pretty much everywhere on the floor.
- We will also make a simple model of the trap and the cheese. We only need to get the basic shape.
- To be more comfortable with this, we will organize the environment by dividing it in several parts. It is much better to display the Dope Sheet, Graph Editor, and camera view in a little window (0 of the numeric keyboard).
- For each shot, we will create a new scene by clicking on the + button in the main menu bar, and we will select the Full Copy option.
- The placement of our character, the trap with the cheese and making a few tests with the camera are still remaining.
This is the step where we can still make a few changes and test movements and timings.
Screenshot of the layout shot 03 with the rough modeling
While animating, it is important to have as many references as you can so that you can have the perfect shot. Many computer animators have a folder with videos of themselves acting the shot. Recording yourself is one of the best ways to understand the gesture of a character. This way you will be able to catch many unconscious movements that you do when you look at the video. It is also a way to improvise different acts. Other reference materials such as character poses or animation cycle images are very interesting. Apart from this, paper and pencil are often useful in order to grasp some poses that you have in mind. You don't need to draw in detail, as a simple stick figure will suffice in order to put the poses ideas on paper.
Before starting to animate our shots, we will introduce to you how to organize yourself for the whole sequence. The different assets have been created in different .blend files. What's neat about this is that we are going to link them all in one final file for each shot. The benefit of this is that if we want to change the look of one of the assets, we can do it in the original file and it will replicate in the master file. For the rig of the rat cowboy, we are going to create a proxy.
In our case, we have ten shots, so we will create one .blend file for each of them. All these files will be placed in a Scene folder and will reference files that are placed one folder up in the folder hierarchy. Let's create our files:
- We will first create a new blank file in Blender and save it as
01.blendin a new folder namedScene. Note that you can create a new folder in the file browser with the I key. - Now let's open the terrain file and select everything that needs to be linked in the shot file. We are only selecting the mesh type objects here. We are going to group our selection with Ctrl + G and rename the group as
Terrainin the last tool option subpanel. - We will then repeat the same process with the other asset files. For the cactus file, you can create one group for each cactus.
- Now the different groups are ready to be linked in the shot file. In the
01.blendfile, select the Link option in the File menu or press Ctrl + Alt + O. We can now click on the Terrain file and navigate to the Group folder in order to select the Terrain group that we've created within this file. We can validate by pressing Link from Library.Note
The Link and Append file structures
The structure of a
.blendfile is composed of different sections that represent the file. Each section is related to the entity it contains. For instance, in the Group section, you will find every group that has been created in the file, and in the Nodes section, you will every node that has been created in the file, and so on. This file format is quite nice because it's open and very well organized.One very cool feature of Blender is the ability to mix files or parts of files together by linking or appending them. With the Link option, you keep a relation with the original file, so any modification will be replicated. The Append method creates a pure copy of what you want to mix.
The structure of a blend file
- The link should be done. You can test whether it works by saving the 01 file then tweaking the Terrain file, and going back to the 01 file to see whether the changes appear. Now we can repeat the same process with the other assets that need to be linked in the shot file. You can easily nest files by linking groups to files that are linked themselves as a group in another file.
- Cactus, bones, and bush are linked in the terrain file and they are part of the Terrain group (remember to add them to this group, as it will be linked in each shot file). The terrain is linked in each shot file. The Cheese group is linked to the Trap file, and the Trap group is linked to the 02, 03, 05, 07, and 08 files. We will not link the trap in the terrain file as it won't be needed for each shot. For the rat character, we will simply create a group with the Armature and Mesh object that we will link to the 01, 03, 04, 06, 08, and 10 files.
- In each file, we need to create a proxy for the rig of the rat. To do so, we will select the rig, and we will press Ctrl + Alt + P and click on the Armature object.
Note
Proxy
You may have already seen that when you use the link option, you can't do any modifications in the linked file. This is a security guard, so you only manage your art in one file. But in the case of a rigged character, this could be embarrassing. That's why we create a local access of the rig called a Proxy in the linked file with Ctrl + Alt + P.
You can have a look at the structure of our project as follows:
The architecture of our project
Animation references
While animating, it is important to have as many references as you can so that you can have the perfect shot. Many computer animators have a folder with videos of themselves acting the shot. Recording yourself is one of the best ways to understand the gesture of a character. This way you will be able to catch many unconscious movements that you do when you look at the video. It is also a way to improvise different acts. Other reference materials such as character poses or animation cycle images are very interesting. Apart from this, paper and pencil are often useful in order to grasp some poses that you have in mind. You don't need to draw in detail, as a simple stick figure will suffice in order to put the poses ideas on paper.
Before starting to animate our shots, we will introduce to you how to organize yourself for the whole sequence. The different assets have been created in different .blend files. What's neat about this is that we are going to link them all in one final file for each shot. The benefit of this is that if we want to change the look of one of the assets, we can do it in the original file and it will replicate in the master file. For the rig of the rat cowboy, we are going to create a proxy.
In our case, we have ten shots, so we will create one .blend file for each of them. All these files will be placed in a Scene folder and will reference files that are placed one folder up in the folder hierarchy. Let's create our files:
- We will first create a new blank file in Blender and save it as
01.blendin a new folder namedScene. Note that you can create a new folder in the file browser with the I key. - Now let's open the terrain file and select everything that needs to be linked in the shot file. We are only selecting the mesh type objects here. We are going to group our selection with Ctrl + G and rename the group as
Terrainin the last tool option subpanel. - We will then repeat the same process with the other asset files. For the cactus file, you can create one group for each cactus.
- Now the different groups are ready to be linked in the shot file. In the
01.blendfile, select the Link option in the File menu or press Ctrl + Alt + O. We can now click on the Terrain file and navigate to the Group folder in order to select the Terrain group that we've created within this file. We can validate by pressing Link from Library.Note
The Link and Append file structures
The structure of a
.blendfile is composed of different sections that represent the file. Each section is related to the entity it contains. For instance, in the Group section, you will find every group that has been created in the file, and in the Nodes section, you will every node that has been created in the file, and so on. This file format is quite nice because it's open and very well organized.One very cool feature of Blender is the ability to mix files or parts of files together by linking or appending them. With the Link option, you keep a relation with the original file, so any modification will be replicated. The Append method creates a pure copy of what you want to mix.
The structure of a blend file
- The link should be done. You can test whether it works by saving the 01 file then tweaking the Terrain file, and going back to the 01 file to see whether the changes appear. Now we can repeat the same process with the other assets that need to be linked in the shot file. You can easily nest files by linking groups to files that are linked themselves as a group in another file.
- Cactus, bones, and bush are linked in the terrain file and they are part of the Terrain group (remember to add them to this group, as it will be linked in each shot file). The terrain is linked in each shot file. The Cheese group is linked to the Trap file, and the Trap group is linked to the 02, 03, 05, 07, and 08 files. We will not link the trap in the terrain file as it won't be needed for each shot. For the rat character, we will simply create a group with the Armature and Mesh object that we will link to the 01, 03, 04, 06, 08, and 10 files.
- In each file, we need to create a proxy for the rig of the rat. To do so, we will select the rig, and we will press Ctrl + Alt + P and click on the Armature object.
Note
Proxy
You may have already seen that when you use the link option, you can't do any modifications in the linked file. This is a security guard, so you only manage your art in one file. But in the case of a rigged character, this could be embarrassing. That's why we create a local access of the rig called a Proxy in the linked file with Ctrl + Alt + P.
You can have a look at the structure of our project as follows:
The architecture of our project
Organization
Before starting to animate our shots, we will introduce to you how to organize yourself for the whole sequence. The different assets have been created in different .blend files. What's neat about this is that we are going to link them all in one final file for each shot. The benefit of this is that if we want to change the look of one of the assets, we can do it in the original file and it will replicate in the master file. For the rig of the rat cowboy, we are going to create a proxy.
In our case, we have ten shots, so we will create one .blend file for each of them. All these files will be placed in a Scene folder and will reference files that are placed one folder up in the folder hierarchy. Let's create our files:
- We will first create a new blank file in Blender and save it as
01.blendin a new folder namedScene. Note that you can create a new folder in the file browser with the I key. - Now let's open the terrain file and select everything that needs to be linked in the shot file. We are only selecting the mesh type objects here. We are going to group our selection with Ctrl + G and rename the group as
Terrainin the last tool option subpanel. - We will then repeat the same process with the other asset files. For the cactus file, you can create one group for each cactus.
- Now the different groups are ready to be linked in the shot file. In the
01.blendfile, select the Link option in the File menu or press Ctrl + Alt + O. We can now click on the Terrain file and navigate to the Group folder in order to select the Terrain group that we've created within this file. We can validate by pressing Link from Library.Note
The Link and Append file structures
The structure of a
.blendfile is composed of different sections that represent the file. Each section is related to the entity it contains. For instance, in the Group section, you will find every group that has been created in the file, and in the Nodes section, you will every node that has been created in the file, and so on. This file format is quite nice because it's open and very well organized.One very cool feature of Blender is the ability to mix files or parts of files together by linking or appending them. With the Link option, you keep a relation with the original file, so any modification will be replicated. The Append method creates a pure copy of what you want to mix.
The structure of a blend file
- The link should be done. You can test whether it works by saving the 01 file then tweaking the Terrain file, and going back to the 01 file to see whether the changes appear. Now we can repeat the same process with the other assets that need to be linked in the shot file. You can easily nest files by linking groups to files that are linked themselves as a group in another file.
- Cactus, bones, and bush are linked in the terrain file and they are part of the Terrain group (remember to add them to this group, as it will be linked in each shot file). The terrain is linked in each shot file. The Cheese group is linked to the Trap file, and the Trap group is linked to the 02, 03, 05, 07, and 08 files. We will not link the trap in the terrain file as it won't be needed for each shot. For the rat character, we will simply create a group with the Armature and Mesh object that we will link to the 01, 03, 04, 06, 08, and 10 files.
- In each file, we need to create a proxy for the rig of the rat. To do so, we will select the rig, and we will press Ctrl + Alt + P and click on the Armature object.
Note
Proxy
You may have already seen that when you use the link option, you can't do any modifications in the linked file. This is a security guard, so you only manage your art in one file. But in the case of a rigged character, this could be embarrassing. That's why we create a local access of the rig called a Proxy in the linked file with Ctrl + Alt + P.
You can have a look at the structure of our project as follows:
The architecture of our project
Now that we have a story to tell, let's start to animate each shot using the tools that we saw previously.
We are now going to learn how to create a walk cycle for the first shot. Why a cycle? This is because we are simply going to repeat the walk actions automatically later in order to save time. There are different types of walk that can express the actual feeling of the character. In our case, we are going to animate a cowboy walk, so this means our character will need a certain assurance. In order to be efficient, we are first going to "key" the three main poses of a walk as follows:
- We will first open the 01.blend file and focus our view on the left-hand side view of the character. We will need to be sure that the Auto Key button is turned on, so any translation (grab, rotate, or scale) will create or override a key where the bar is located in the timeline. This button is located in the header of the Timeline editor and looks like a recording button.
- Before creating our poses, we will have to select our armature in pose mode. We can then hide the Master bone by selecting it and pressing H because our walk will be animated onsite. Also, be sure that your timeline bar is at frame 0.
- The first pose that we are going to create is usually called the "Contact pose" because both feet are touching the ground. From the side view, we will select the left foot bone, and we will move it in front of the character. We will then place the other foot bone in the opposite location. As you can see, because the legs are too far apart, the character isn't able to touch the ground (represented here by the Y world axis). So we have to select all the visible bones and move them down until the character is on the ground.
- Now we will lift the front leg toes up a little bit on the local x axis (press R and then X twice).
- We will then pose the back foot so that the rat stands on its toes.
- From a front view, we will orient both legs outwards a little bit.
- The arms need to follow the direction of their opposite leg. To move the arm, we will use the HandIK bone. We can also slightly bend the arms and rotate it, and then break the hand rotation a little bit.
- From a front view, we can slightly put the right arm inward. The left arm will not rotate as much inward because of the holster.
- In order to polish this pose, we will rotate the Hips bone down in the direction of the right leg and the Spine01 and the Neck bone in the opposite direction of the hips. We will also rotate the head down so that the character looks at the ground. We will also pose the fingers so that the index finger is straighter than the others. We will also rotate the tail outward.
- At this point it's a good idea to open a Dope Sheet editor. As you can see, we have small diamonds that represent the keys on each bone (described in the list on the left-hand side). For the main poses, it's always a good idea to have a key placed on every bone. To do so, we will select them all in the 3D view, and we will press I and choose the LocRotScale option.
- In order to have a perfect cycle motion, the first and the last key of the walk needs to be the same. So in the dope sheet, we will select all the keys of our first pose by right-clicking on the Dope Sheet Summary corresponding to the key, and we will press Shift + D to duplicate this. We can move this to frame 24. You can clearly see that the keys are the same because of the dark lines that link them.
- Now, we will copy this pose right between these two keys but in a mirror. To do so, we will select every bone in the 3D viewport, and we will store the pose with Ctrl + C. At frame 12, we can press Ctrl + Shift + V in order to copy the pose in the mirror, thanks to our bone naming convention with the .L and .R suffixes. If we scrub the timeline bar, we can see a preview of our walk. But there are still many things missing.
Congratulation, you have made the contact poses of the walk cycle! Now we will create the "Passing pose". This is done as follows:
- To create our passing pose, we will use the same process as before. We will first create our pose between the 1 key and the 12 key, and we will mirror it between the 12 and 24 keys.
- So we will place our timeline bar at frame 6. We will start creating our pose from the side view. The leg that was in the front of the character will be straight. So we will select the left foot controller, and we will align it horizontally with the rest of the body. As you can see, the leg can't be straight if the hips aren't moved up. We move the hips up. This is the key point of any walk: the body always moves up and down.
- The other foot is bent. It is also placed slightly behind the straight leg, and the toes point downward.
- At this point, the arms are almost straight and aligned with the rest of the body.
- From the front view, Hips, Spine01, and Neck need to be aligned with the ground.
- We can slightly rotate the head on the z axis to the left of the rat.
- Now we ensure that we have keys on every bone. After this, we will copy our pose in the mirror on frame 18 with the same method seen previously.
- A nice trick you can do is to change the visual look of your keys in the Dope Sheet by selecting them and by pressing R.
We now have the essential poses of a walk. The rest of our work will consist of exaggerating the motion by adding a "Down" and "Up" pose. This is done as follows:
- The "Down" pose will be placed before the "Passing" pose. To create this, we will clear the toe rotation of the front foot.
Then we will exaggerate the pose by slightly moving the pelvis down. The whole goal of this pose is to feel the weight of body on the ground.
- The "Up" pose is placed after the "Passing" pose. This consists of lifting the character on his straight leg and toes.
- After we have finished these poses, we can duplicate them in the mirror by following the same order according to the "Passing" pose.

Walk cycle poses
The walk cycles is completed now! We can view it by scrubbing on the timeline or simply by changing the end frame to the 23 frame in the timeline header and by playing the animation with Alt + A.

The Dope Sheet for our walk cycle
We are now going to create three new actions that we will blend in with the NLA editor. One will be in charge of moving the character from its current location to the front of the camera. One will represent the character lifting his head up, and the last one will contain a mix of the others. This is done as follows:
- The first thing to do is to copy the camera from the Layout blend file. To do so, we will simply copy the camera of the first scene in the corresponding file with Ctrl + C, and we will paste it with Ctrl + V in the 01.blend file. If you have any other cameras in the scene, remove them and be sure that the copied one is the active one by selecting it and pressing Ctrl + 0 numpad key.
- In order to create our new actions, we will need to open the Action Editor from the Dope Sheet editor. As you can see, our walk cycle has been already placed on the default action. By the way, we can rename it
Walk. - We can now click on the + button in order to create a new action. This new action will be a copy of the walk action, so we can delete all the present keys and rename the action
Move. - Now we can start to animate the character displacement on this action. To do this, we will simply use the Master bone of our rig. In our case, we have added two keys at frame 0 and 225.
- The problem now is that the rat seems to accelerate at the beginning and decelerate at the end. To solve this, we are going to use the graph editor and change the shape of the Y location curve. So in the graph editor, we select the keys for the Y location, and we press V and Vector. Now, as you can see, the curve is linear. Remember to save your file!
- Now we are going to mix the walk and the displacement together. To do this, we will create a new action that contains all the others. We rename it as
Finaland remove all the present keys. - In the NLA editor, we will ensure that we are editing on this action. We will then create a new track (Add | Add tracks) and press Shift + A to add the
Moveaction to it. - We can then press Shift + A in order to add the Walk action under the Move track. Now we just need to repeat our walk cycle with the Repeat option located in the right menu (N) under Animation Clip (be sure that the walk action is selected in your track). The important thing here is that the cycle stops just before the Move action because we are going to animate be hand the end of the walk and the head in a new action.
- We now need to copy the pose of the character when the walk cycle stops, so we can start with this pose in a new action. We will use Ctrl + C with all the bones selected.
- Now we are going to create the next action. To do this, we will click on the + button again, delete the keys, and rename the action
End. - We can now paste our pose (Ctrl + V) on the same frame where we copied it in the NLA in the End action. This is because of the camera motion.
- Now we need to complete a half walk and animate the character's head. In our case the animation starts at frame 216 and ends at frame 248. We ensure the character stands on his feet correctly, and we can animate the head pointing towards the camera. We can also add an eye blink in the middle. We will also rotate the head to the left of the camera.
- After finishing the animation of the action, we will need to reposition our keys so that they start at frame 0. In the Action Editor, we will press A in order to select all the keys, and with G, we will drag them until the first frame of our animation is on frame 0.
- Now we can go back to the Final action and open the NLA editor. We will then place our End when the walk cycle ends.

The NLA with our three actions mixed together in the Final action.
- That's all! We have now blended our three actions with the NLA. Note that you can also rename your tracks on the left-hand side of the NLA by clicking on their default name.

One frame of the End action
The close up of the face that we are going to do is directly inspired by Italian westerns of the 60's. A close up allows us to give a tension focusing on the eyes of our character. This is done as follows:
- We will start by opening the 04.blend scene.
- We will need to place our character at the same place as in the 01.blend scene, so we will also open the 01.blend scene.
- In the Right Panel (N) of scene 01, we must copy the location information of the Master bone (Root) on the three axes, X, Y, and Z. In our case, X: -1.19863, Y: 0,0, and Z: 12.29828, and we will paste them on the location parameters of the Master bone in scene 04. Our character is now in the right place.
- We need to be sure that the Auto Key button is turned on, and we add the first key at frame 1 on the camera and all the bones of the character.
This animation will be in 50 frames.
- We also need to place the camera in front of the face of the character.
- We will move to frame 50 of the timeline, and we will slightly move the camera on the local z axis.
- We can see a slow in and slow out effect of the camera, the keys are in Bezier interpolation mode. In order to change the interpolation mode, we must open the Graph Editor. We will select the keys of the camera and press V and select Vector. Now the camera is moving in a linear way.
Let's animate our character. He is watching the trap, so he doesn't move a lot. The animation is done as follows:
- We begin by animating the head. We will move the cursor of the Timeline at frame 50, and we make a little rotation on the local z axis, a new key frame is added.
- The Frown bone stays down to keep a serious look.
- We can now animate the eyes. At frame 50, we will move down the EyeTargetMaster a little bit. He is still looking straight toward the camera.
- We will now add a blink of the eyes to give more realism.
- We will select the both EyeTarget.L and EyeTarget.R, and we will add a key at frames 16 and 23 (press I and select Scale). We will move then at frame 19, and we will scale the bone controllers to close his eyes.

The close shot
This very short animation for shot 4 is finished. Shot 10 is almost the same but with a smile at the end. Let's start the animation of the gunshot!
The animation of shot 8 this time is a bit more complex. This will be done as follows:
- We will start by opening the 08.blend scene.
- We will place our character at the same location as the 01.blend file.
- With the Auto Key button turned on, we will start placing the camera on the left-hand side of the character.
It is an animation in 30 frames.
- We will put the camera on the left-hand side of the character, and then we will move it slightly to the left along the y axis to frame 30. We will change the keys of the camera in the Vector mode (V) in the Graph Editor.
- We can now animate our character. We will start animating the hand. The hand must go straight to the butt of the gun to hold it. The position and the inclination of the hand are very important. It doesn't matter if there is a little interpenetration of the thumb. The animation is fast, and the point of view of the camera can hide small mistakes. The forefinger must be close to the trigger when he holds the gun.

The gun shot
- To move the fingers, we must select the top bones and rotate them on the local x axis (press R and then press X twice). The Copy Rotation constraints will make the rest.
- When the gun is caught, we must change the influence of the Child Of constraint of the gun bone. The influence of child of controlled by the holster is now at 0.000, and the influence of child of controlled by the left hand is now at 1.000. The gun is now following the hand. We can keep animating the left hand.
- We will position the hand so that the gun gives the impression that it will shoot ahead. There is the recoil of the gun, so the hand makes a sudden rotational movement upwards.

Animation of the gun shot
When the animation of the left hand and the gun is done, the largest part of the animation of the sequence will be done too, but we still need to polish this shot a little bit. The rest of the body must be animated and can't stay inert. This will be done as follows:
- We need to make a rotation of the Spine01 bone on the z and y local axis when the left hand catches the butt of the gun. Likewise, the left shoulder must rotate towards the top (refer to 2 and 3 in the preceding screenshot) at this moment.
- As the rotation of the spine01 bone the head is inclined to the right, we will rotate it a little bit to adjust it. For the recoil of the gun, we will make a little rotation of the head.
- The HipsReverse bone also makes a rotation on the local z and y axes to gives a more realistic feeling.
- The right hand and the tail also make a little arc. In this case, they are quite important details.
So, the animation of the gunshot is now complete. Let's talk about the animation of the trap.
It's now time to animate one of the most technical shots of our sequence where the cheese gets shot on the trap. This will be done as follows:
- We will start by opening the 09.blend file. Then we can frame the trap with camera as done in the layout.
- The first thing to do is to add a key frame on each bone of the trap only for rotation, so we select them and press I and select Rotation. We won't use AutoKey for now. Remember that the trap is linked. If you can't access the rig, it's simply because you don't have a proxy in order to manipulate it.
- Now we can go to frame 13 and rotate the TopStick and the TrapPlank bone on the their x local axes as far as their can logically go.
- The Spring bone animation will be shorter, though. We will key its extreme rotation on frame 7.
- We can now test our animation to see what's wrong with it, but first we will hide the cheese with the H key. As you can see, the animation doesn't seem very natural. This is why we are going to tweak the curves in the graph editor.
- We will open the graph editor and click on the Show only selected button in the header.
- Now we can select the TopStick bone and unfold its Rotation values on the left-hand side of the Graph editor. We can even hide the other y and z rotations as we don't need them. To do so, we will use the Eye icon. As you can see, the curve has an ease in and ease out effect. We don't want this. We want a bounce effect. To do so, we can, of course, add more keys and waste time to animate it by hand, or we can use the power of the Dynamic effects of the interpolation menu. So we select our keys, and we press T and select Bounce. As you can see, the curve changes.
- We can do the same with the TrapPlank and the Spring bones. For this, a later bounce will be more subtle. Now if we play our animation, everything looks more natural.
- Now let's animate the cheese. First unhide it with Alt + H.
- We can now reactivate the AutoKey option, it will be easier. Let's start by adding a key on frame 0 with press I and select LocRotScale. Now, because of autokey, we can move to frame 16 and move the cheese to its final destination.
- We can now go to frame 5 and put the cheese in the air. This will change its Z location. We can also rotate it and scale it locally on its z axis (press S and then press Z twice).
- The animation at this point is not very convincing. In order to add more realism to it, we can open the graph editor and change the curve of the Z location of the cheese, so it is much more like a "dome" at the beginning. To do so, we can set frames 0 and 9 to a vector type (press V and select Vector). We will need to change the handles of frame 5 too.
- Next, we will change the end of the motion by adding two new keyframes on the Z location at frames 11 and 17. These keys will have a Bounce Dynamic effect. We will use the handles in order to smooth the curve as much as possible where it is needed. Remember that the animation process involves a lot of trial and error. You also need to constantly play your animation in order to know what you'll have to correct.
- We can now reset the scale of the cheese at frame 11 by pressing Alt + S.
- What we've done so far is the base of the cheese animation. Now we can polish the animation by changing its rotation here and there and by polishing the Y location curve.
- We can now animate the camera. Between keys 0 and 16, the camera doesn't move, so we simply duplicate frame 0 to frame 16.

The TopStick X rotation curve
- We can now place our timeline bar at frame 37 and focus on the cheese closely, so we can see the hole due to the gunshot. The key has been placed due to the AutoKey option.

The cheese Z location curve
The animation of the 09 shot is now completed, congratulations!

Frame 4 of the 09 shot.
The walk cycle
We are now going to learn how to create a walk cycle for the first shot. Why a cycle? This is because we are simply going to repeat the walk actions automatically later in order to save time. There are different types of walk that can express the actual feeling of the character. In our case, we are going to animate a cowboy walk, so this means our character will need a certain assurance. In order to be efficient, we are first going to "key" the three main poses of a walk as follows:
- We will first open the 01.blend file and focus our view on the left-hand side view of the character. We will need to be sure that the Auto Key button is turned on, so any translation (grab, rotate, or scale) will create or override a key where the bar is located in the timeline. This button is located in the header of the Timeline editor and looks like a recording button.
- Before creating our poses, we will have to select our armature in pose mode. We can then hide the Master bone by selecting it and pressing H because our walk will be animated onsite. Also, be sure that your timeline bar is at frame 0.
- The first pose that we are going to create is usually called the "Contact pose" because both feet are touching the ground. From the side view, we will select the left foot bone, and we will move it in front of the character. We will then place the other foot bone in the opposite location. As you can see, because the legs are too far apart, the character isn't able to touch the ground (represented here by the Y world axis). So we have to select all the visible bones and move them down until the character is on the ground.
- Now we will lift the front leg toes up a little bit on the local x axis (press R and then X twice).
- We will then pose the back foot so that the rat stands on its toes.
- From a front view, we will orient both legs outwards a little bit.
- The arms need to follow the direction of their opposite leg. To move the arm, we will use the HandIK bone. We can also slightly bend the arms and rotate it, and then break the hand rotation a little bit.
- From a front view, we can slightly put the right arm inward. The left arm will not rotate as much inward because of the holster.
- In order to polish this pose, we will rotate the Hips bone down in the direction of the right leg and the Spine01 and the Neck bone in the opposite direction of the hips. We will also rotate the head down so that the character looks at the ground. We will also pose the fingers so that the index finger is straighter than the others. We will also rotate the tail outward.
- At this point it's a good idea to open a Dope Sheet editor. As you can see, we have small diamonds that represent the keys on each bone (described in the list on the left-hand side). For the main poses, it's always a good idea to have a key placed on every bone. To do so, we will select them all in the 3D view, and we will press I and choose the LocRotScale option.
- In order to have a perfect cycle motion, the first and the last key of the walk needs to be the same. So in the dope sheet, we will select all the keys of our first pose by right-clicking on the Dope Sheet Summary corresponding to the key, and we will press Shift + D to duplicate this. We can move this to frame 24. You can clearly see that the keys are the same because of the dark lines that link them.
- Now, we will copy this pose right between these two keys but in a mirror. To do so, we will select every bone in the 3D viewport, and we will store the pose with Ctrl + C. At frame 12, we can press Ctrl + Shift + V in order to copy the pose in the mirror, thanks to our bone naming convention with the .L and .R suffixes. If we scrub the timeline bar, we can see a preview of our walk. But there are still many things missing.
Congratulation, you have made the contact poses of the walk cycle! Now we will create the "Passing pose". This is done as follows:
- To create our passing pose, we will use the same process as before. We will first create our pose between the 1 key and the 12 key, and we will mirror it between the 12 and 24 keys.
- So we will place our timeline bar at frame 6. We will start creating our pose from the side view. The leg that was in the front of the character will be straight. So we will select the left foot controller, and we will align it horizontally with the rest of the body. As you can see, the leg can't be straight if the hips aren't moved up. We move the hips up. This is the key point of any walk: the body always moves up and down.
- The other foot is bent. It is also placed slightly behind the straight leg, and the toes point downward.
- At this point, the arms are almost straight and aligned with the rest of the body.
- From the front view, Hips, Spine01, and Neck need to be aligned with the ground.
- We can slightly rotate the head on the z axis to the left of the rat.
- Now we ensure that we have keys on every bone. After this, we will copy our pose in the mirror on frame 18 with the same method seen previously.
- A nice trick you can do is to change the visual look of your keys in the Dope Sheet by selecting them and by pressing R.
We now have the essential poses of a walk. The rest of our work will consist of exaggerating the motion by adding a "Down" and "Up" pose. This is done as follows:
- The "Down" pose will be placed before the "Passing" pose. To create this, we will clear the toe rotation of the front foot.
Then we will exaggerate the pose by slightly moving the pelvis down. The whole goal of this pose is to feel the weight of body on the ground.
- The "Up" pose is placed after the "Passing" pose. This consists of lifting the character on his straight leg and toes.
- After we have finished these poses, we can duplicate them in the mirror by following the same order according to the "Passing" pose.
Walk cycle poses
The walk cycles is completed now! We can view it by scrubbing on the timeline or simply by changing the end frame to the 23 frame in the timeline header and by playing the animation with Alt + A.
The Dope Sheet for our walk cycle
We are now going to create three new actions that we will blend in with the NLA editor. One will be in charge of moving the character from its current location to the front of the camera. One will represent the character lifting his head up, and the last one will contain a mix of the others. This is done as follows:
- The first thing to do is to copy the camera from the Layout blend file. To do so, we will simply copy the camera of the first scene in the corresponding file with Ctrl + C, and we will paste it with Ctrl + V in the 01.blend file. If you have any other cameras in the scene, remove them and be sure that the copied one is the active one by selecting it and pressing Ctrl + 0 numpad key.
- In order to create our new actions, we will need to open the Action Editor from the Dope Sheet editor. As you can see, our walk cycle has been already placed on the default action. By the way, we can rename it
Walk. - We can now click on the + button in order to create a new action. This new action will be a copy of the walk action, so we can delete all the present keys and rename the action
Move. - Now we can start to animate the character displacement on this action. To do this, we will simply use the Master bone of our rig. In our case, we have added two keys at frame 0 and 225.
- The problem now is that the rat seems to accelerate at the beginning and decelerate at the end. To solve this, we are going to use the graph editor and change the shape of the Y location curve. So in the graph editor, we select the keys for the Y location, and we press V and Vector. Now, as you can see, the curve is linear. Remember to save your file!
- Now we are going to mix the walk and the displacement together. To do this, we will create a new action that contains all the others. We rename it as
Finaland remove all the present keys. - In the NLA editor, we will ensure that we are editing on this action. We will then create a new track (Add | Add tracks) and press Shift + A to add the
Moveaction to it. - We can then press Shift + A in order to add the Walk action under the Move track. Now we just need to repeat our walk cycle with the Repeat option located in the right menu (N) under Animation Clip (be sure that the walk action is selected in your track). The important thing here is that the cycle stops just before the Move action because we are going to animate be hand the end of the walk and the head in a new action.
- We now need to copy the pose of the character when the walk cycle stops, so we can start with this pose in a new action. We will use Ctrl + C with all the bones selected.
- Now we are going to create the next action. To do this, we will click on the + button again, delete the keys, and rename the action
End. - We can now paste our pose (Ctrl + V) on the same frame where we copied it in the NLA in the End action. This is because of the camera motion.
- Now we need to complete a half walk and animate the character's head. In our case the animation starts at frame 216 and ends at frame 248. We ensure the character stands on his feet correctly, and we can animate the head pointing towards the camera. We can also add an eye blink in the middle. We will also rotate the head to the left of the camera.
- After finishing the animation of the action, we will need to reposition our keys so that they start at frame 0. In the Action Editor, we will press A in order to select all the keys, and with G, we will drag them until the first frame of our animation is on frame 0.
- Now we can go back to the Final action and open the NLA editor. We will then place our End when the walk cycle ends.
The NLA with our three actions mixed together in the Final action.
- That's all! We have now blended our three actions with the NLA. Note that you can also rename your tracks on the left-hand side of the NLA by clicking on their default name.
One frame of the End action
The close up of the face that we are going to do is directly inspired by Italian westerns of the 60's. A close up allows us to give a tension focusing on the eyes of our character. This is done as follows:
- We will start by opening the 04.blend scene.
- We will need to place our character at the same place as in the 01.blend scene, so we will also open the 01.blend scene.
- In the Right Panel (N) of scene 01, we must copy the location information of the Master bone (Root) on the three axes, X, Y, and Z. In our case, X: -1.19863, Y: 0,0, and Z: 12.29828, and we will paste them on the location parameters of the Master bone in scene 04. Our character is now in the right place.
- We need to be sure that the Auto Key button is turned on, and we add the first key at frame 1 on the camera and all the bones of the character.
This animation will be in 50 frames.
- We also need to place the camera in front of the face of the character.
- We will move to frame 50 of the timeline, and we will slightly move the camera on the local z axis.
- We can see a slow in and slow out effect of the camera, the keys are in Bezier interpolation mode. In order to change the interpolation mode, we must open the Graph Editor. We will select the keys of the camera and press V and select Vector. Now the camera is moving in a linear way.
Let's animate our character. He is watching the trap, so he doesn't move a lot. The animation is done as follows:
- We begin by animating the head. We will move the cursor of the Timeline at frame 50, and we make a little rotation on the local z axis, a new key frame is added.
- The Frown bone stays down to keep a serious look.
- We can now animate the eyes. At frame 50, we will move down the EyeTargetMaster a little bit. He is still looking straight toward the camera.
- We will now add a blink of the eyes to give more realism.
- We will select the both EyeTarget.L and EyeTarget.R, and we will add a key at frames 16 and 23 (press I and select Scale). We will move then at frame 19, and we will scale the bone controllers to close his eyes.
The close shot
This very short animation for shot 4 is finished. Shot 10 is almost the same but with a smile at the end. Let's start the animation of the gunshot!
The animation of shot 8 this time is a bit more complex. This will be done as follows:
- We will start by opening the 08.blend scene.
- We will place our character at the same location as the 01.blend file.
- With the Auto Key button turned on, we will start placing the camera on the left-hand side of the character.
It is an animation in 30 frames.
- We will put the camera on the left-hand side of the character, and then we will move it slightly to the left along the y axis to frame 30. We will change the keys of the camera in the Vector mode (V) in the Graph Editor.
- We can now animate our character. We will start animating the hand. The hand must go straight to the butt of the gun to hold it. The position and the inclination of the hand are very important. It doesn't matter if there is a little interpenetration of the thumb. The animation is fast, and the point of view of the camera can hide small mistakes. The forefinger must be close to the trigger when he holds the gun.
The gun shot
- To move the fingers, we must select the top bones and rotate them on the local x axis (press R and then press X twice). The Copy Rotation constraints will make the rest.
- When the gun is caught, we must change the influence of the Child Of constraint of the gun bone. The influence of child of controlled by the holster is now at 0.000, and the influence of child of controlled by the left hand is now at 1.000. The gun is now following the hand. We can keep animating the left hand.
- We will position the hand so that the gun gives the impression that it will shoot ahead. There is the recoil of the gun, so the hand makes a sudden rotational movement upwards.
Animation of the gun shot
When the animation of the left hand and the gun is done, the largest part of the animation of the sequence will be done too, but we still need to polish this shot a little bit. The rest of the body must be animated and can't stay inert. This will be done as follows:
- We need to make a rotation of the Spine01 bone on the z and y local axis when the left hand catches the butt of the gun. Likewise, the left shoulder must rotate towards the top (refer to 2 and 3 in the preceding screenshot) at this moment.
- As the rotation of the spine01 bone the head is inclined to the right, we will rotate it a little bit to adjust it. For the recoil of the gun, we will make a little rotation of the head.
- The HipsReverse bone also makes a rotation on the local z and y axes to gives a more realistic feeling.
- The right hand and the tail also make a little arc. In this case, they are quite important details.
So, the animation of the gunshot is now complete. Let's talk about the animation of the trap.
It's now time to animate one of the most technical shots of our sequence where the cheese gets shot on the trap. This will be done as follows:
- We will start by opening the 09.blend file. Then we can frame the trap with camera as done in the layout.
- The first thing to do is to add a key frame on each bone of the trap only for rotation, so we select them and press I and select Rotation. We won't use AutoKey for now. Remember that the trap is linked. If you can't access the rig, it's simply because you don't have a proxy in order to manipulate it.
- Now we can go to frame 13 and rotate the TopStick and the TrapPlank bone on the their x local axes as far as their can logically go.
- The Spring bone animation will be shorter, though. We will key its extreme rotation on frame 7.
- We can now test our animation to see what's wrong with it, but first we will hide the cheese with the H key. As you can see, the animation doesn't seem very natural. This is why we are going to tweak the curves in the graph editor.
- We will open the graph editor and click on the Show only selected button in the header.
- Now we can select the TopStick bone and unfold its Rotation values on the left-hand side of the Graph editor. We can even hide the other y and z rotations as we don't need them. To do so, we will use the Eye icon. As you can see, the curve has an ease in and ease out effect. We don't want this. We want a bounce effect. To do so, we can, of course, add more keys and waste time to animate it by hand, or we can use the power of the Dynamic effects of the interpolation menu. So we select our keys, and we press T and select Bounce. As you can see, the curve changes.
- We can do the same with the TrapPlank and the Spring bones. For this, a later bounce will be more subtle. Now if we play our animation, everything looks more natural.
- Now let's animate the cheese. First unhide it with Alt + H.
- We can now reactivate the AutoKey option, it will be easier. Let's start by adding a key on frame 0 with press I and select LocRotScale. Now, because of autokey, we can move to frame 16 and move the cheese to its final destination.
- We can now go to frame 5 and put the cheese in the air. This will change its Z location. We can also rotate it and scale it locally on its z axis (press S and then press Z twice).
- The animation at this point is not very convincing. In order to add more realism to it, we can open the graph editor and change the curve of the Z location of the cheese, so it is much more like a "dome" at the beginning. To do so, we can set frames 0 and 9 to a vector type (press V and select Vector). We will need to change the handles of frame 5 too.
- Next, we will change the end of the motion by adding two new keyframes on the Z location at frames 11 and 17. These keys will have a Bounce Dynamic effect. We will use the handles in order to smooth the curve as much as possible where it is needed. Remember that the animation process involves a lot of trial and error. You also need to constantly play your animation in order to know what you'll have to correct.
- We can now reset the scale of the cheese at frame 11 by pressing Alt + S.
- What we've done so far is the base of the cheese animation. Now we can polish the animation by changing its rotation here and there and by polishing the Y location curve.
- We can now animate the camera. Between keys 0 and 16, the camera doesn't move, so we simply duplicate frame 0 to frame 16.
The TopStick X rotation curve
- We can now place our timeline bar at frame 37 and focus on the cheese closely, so we can see the hole due to the gunshot. The key has been placed due to the AutoKey option.
The cheese Z location curve
The animation of the 09 shot is now completed, congratulations!
Frame 4 of the 09 shot.
Mixing actions
We are now going to create three new actions that we will blend in with the NLA editor. One will be in charge of moving the character from its current location to the front of the camera. One will represent the character lifting his head up, and the last one will contain a mix of the others. This is done as follows:
- The first thing to do is to copy the camera from the Layout blend file. To do so, we will simply copy the camera of the first scene in the corresponding file with Ctrl + C, and we will paste it with Ctrl + V in the 01.blend file. If you have any other cameras in the scene, remove them and be sure that the copied one is the active one by selecting it and pressing Ctrl + 0 numpad key.
- In order to create our new actions, we will need to open the Action Editor from the Dope Sheet editor. As you can see, our walk cycle has been already placed on the default action. By the way, we can rename it
Walk. - We can now click on the + button in order to create a new action. This new action will be a copy of the walk action, so we can delete all the present keys and rename the action
Move. - Now we can start to animate the character displacement on this action. To do this, we will simply use the Master bone of our rig. In our case, we have added two keys at frame 0 and 225.
- The problem now is that the rat seems to accelerate at the beginning and decelerate at the end. To solve this, we are going to use the graph editor and change the shape of the Y location curve. So in the graph editor, we select the keys for the Y location, and we press V and Vector. Now, as you can see, the curve is linear. Remember to save your file!
- Now we are going to mix the walk and the displacement together. To do this, we will create a new action that contains all the others. We rename it as
Finaland remove all the present keys. - In the NLA editor, we will ensure that we are editing on this action. We will then create a new track (Add | Add tracks) and press Shift + A to add the
Moveaction to it. - We can then press Shift + A in order to add the Walk action under the Move track. Now we just need to repeat our walk cycle with the Repeat option located in the right menu (N) under Animation Clip (be sure that the walk action is selected in your track). The important thing here is that the cycle stops just before the Move action because we are going to animate be hand the end of the walk and the head in a new action.
- We now need to copy the pose of the character when the walk cycle stops, so we can start with this pose in a new action. We will use Ctrl + C with all the bones selected.
- Now we are going to create the next action. To do this, we will click on the + button again, delete the keys, and rename the action
End. - We can now paste our pose (Ctrl + V) on the same frame where we copied it in the NLA in the End action. This is because of the camera motion.
- Now we need to complete a half walk and animate the character's head. In our case the animation starts at frame 216 and ends at frame 248. We ensure the character stands on his feet correctly, and we can animate the head pointing towards the camera. We can also add an eye blink in the middle. We will also rotate the head to the left of the camera.
- After finishing the animation of the action, we will need to reposition our keys so that they start at frame 0. In the Action Editor, we will press A in order to select all the keys, and with G, we will drag them until the first frame of our animation is on frame 0.
- Now we can go back to the Final action and open the NLA editor. We will then place our End when the walk cycle ends.
The NLA with our three actions mixed together in the Final action.
- That's all! We have now blended our three actions with the NLA. Note that you can also rename your tracks on the left-hand side of the NLA by clicking on their default name.
One frame of the End action
The close up of the face that we are going to do is directly inspired by Italian westerns of the 60's. A close up allows us to give a tension focusing on the eyes of our character. This is done as follows:
- We will start by opening the 04.blend scene.
- We will need to place our character at the same place as in the 01.blend scene, so we will also open the 01.blend scene.
- In the Right Panel (N) of scene 01, we must copy the location information of the Master bone (Root) on the three axes, X, Y, and Z. In our case, X: -1.19863, Y: 0,0, and Z: 12.29828, and we will paste them on the location parameters of the Master bone in scene 04. Our character is now in the right place.
- We need to be sure that the Auto Key button is turned on, and we add the first key at frame 1 on the camera and all the bones of the character.
This animation will be in 50 frames.
- We also need to place the camera in front of the face of the character.
- We will move to frame 50 of the timeline, and we will slightly move the camera on the local z axis.
- We can see a slow in and slow out effect of the camera, the keys are in Bezier interpolation mode. In order to change the interpolation mode, we must open the Graph Editor. We will select the keys of the camera and press V and select Vector. Now the camera is moving in a linear way.
Let's animate our character. He is watching the trap, so he doesn't move a lot. The animation is done as follows:
- We begin by animating the head. We will move the cursor of the Timeline at frame 50, and we make a little rotation on the local z axis, a new key frame is added.
- The Frown bone stays down to keep a serious look.
- We can now animate the eyes. At frame 50, we will move down the EyeTargetMaster a little bit. He is still looking straight toward the camera.
- We will now add a blink of the eyes to give more realism.
- We will select the both EyeTarget.L and EyeTarget.R, and we will add a key at frames 16 and 23 (press I and select Scale). We will move then at frame 19, and we will scale the bone controllers to close his eyes.
The close shot
This very short animation for shot 4 is finished. Shot 10 is almost the same but with a smile at the end. Let's start the animation of the gunshot!
The animation of shot 8 this time is a bit more complex. This will be done as follows:
- We will start by opening the 08.blend scene.
- We will place our character at the same location as the 01.blend file.
- With the Auto Key button turned on, we will start placing the camera on the left-hand side of the character.
It is an animation in 30 frames.
- We will put the camera on the left-hand side of the character, and then we will move it slightly to the left along the y axis to frame 30. We will change the keys of the camera in the Vector mode (V) in the Graph Editor.
- We can now animate our character. We will start animating the hand. The hand must go straight to the butt of the gun to hold it. The position and the inclination of the hand are very important. It doesn't matter if there is a little interpenetration of the thumb. The animation is fast, and the point of view of the camera can hide small mistakes. The forefinger must be close to the trigger when he holds the gun.
The gun shot
- To move the fingers, we must select the top bones and rotate them on the local x axis (press R and then press X twice). The Copy Rotation constraints will make the rest.
- When the gun is caught, we must change the influence of the Child Of constraint of the gun bone. The influence of child of controlled by the holster is now at 0.000, and the influence of child of controlled by the left hand is now at 1.000. The gun is now following the hand. We can keep animating the left hand.
- We will position the hand so that the gun gives the impression that it will shoot ahead. There is the recoil of the gun, so the hand makes a sudden rotational movement upwards.
Animation of the gun shot
When the animation of the left hand and the gun is done, the largest part of the animation of the sequence will be done too, but we still need to polish this shot a little bit. The rest of the body must be animated and can't stay inert. This will be done as follows:
- We need to make a rotation of the Spine01 bone on the z and y local axis when the left hand catches the butt of the gun. Likewise, the left shoulder must rotate towards the top (refer to 2 and 3 in the preceding screenshot) at this moment.
- As the rotation of the spine01 bone the head is inclined to the right, we will rotate it a little bit to adjust it. For the recoil of the gun, we will make a little rotation of the head.
- The HipsReverse bone also makes a rotation on the local z and y axes to gives a more realistic feeling.
- The right hand and the tail also make a little arc. In this case, they are quite important details.
So, the animation of the gunshot is now complete. Let's talk about the animation of the trap.
It's now time to animate one of the most technical shots of our sequence where the cheese gets shot on the trap. This will be done as follows:
- We will start by opening the 09.blend file. Then we can frame the trap with camera as done in the layout.
- The first thing to do is to add a key frame on each bone of the trap only for rotation, so we select them and press I and select Rotation. We won't use AutoKey for now. Remember that the trap is linked. If you can't access the rig, it's simply because you don't have a proxy in order to manipulate it.
- Now we can go to frame 13 and rotate the TopStick and the TrapPlank bone on the their x local axes as far as their can logically go.
- The Spring bone animation will be shorter, though. We will key its extreme rotation on frame 7.
- We can now test our animation to see what's wrong with it, but first we will hide the cheese with the H key. As you can see, the animation doesn't seem very natural. This is why we are going to tweak the curves in the graph editor.
- We will open the graph editor and click on the Show only selected button in the header.
- Now we can select the TopStick bone and unfold its Rotation values on the left-hand side of the Graph editor. We can even hide the other y and z rotations as we don't need them. To do so, we will use the Eye icon. As you can see, the curve has an ease in and ease out effect. We don't want this. We want a bounce effect. To do so, we can, of course, add more keys and waste time to animate it by hand, or we can use the power of the Dynamic effects of the interpolation menu. So we select our keys, and we press T and select Bounce. As you can see, the curve changes.
- We can do the same with the TrapPlank and the Spring bones. For this, a later bounce will be more subtle. Now if we play our animation, everything looks more natural.
- Now let's animate the cheese. First unhide it with Alt + H.
- We can now reactivate the AutoKey option, it will be easier. Let's start by adding a key on frame 0 with press I and select LocRotScale. Now, because of autokey, we can move to frame 16 and move the cheese to its final destination.
- We can now go to frame 5 and put the cheese in the air. This will change its Z location. We can also rotate it and scale it locally on its z axis (press S and then press Z twice).
- The animation at this point is not very convincing. In order to add more realism to it, we can open the graph editor and change the curve of the Z location of the cheese, so it is much more like a "dome" at the beginning. To do so, we can set frames 0 and 9 to a vector type (press V and select Vector). We will need to change the handles of frame 5 too.
- Next, we will change the end of the motion by adding two new keyframes on the Z location at frames 11 and 17. These keys will have a Bounce Dynamic effect. We will use the handles in order to smooth the curve as much as possible where it is needed. Remember that the animation process involves a lot of trial and error. You also need to constantly play your animation in order to know what you'll have to correct.
- We can now reset the scale of the cheese at frame 11 by pressing Alt + S.
- What we've done so far is the base of the cheese animation. Now we can polish the animation by changing its rotation here and there and by polishing the Y location curve.
- We can now animate the camera. Between keys 0 and 16, the camera doesn't move, so we simply duplicate frame 0 to frame 16.
The TopStick X rotation curve
- We can now place our timeline bar at frame 37 and focus on the cheese closely, so we can see the hole due to the gunshot. The key has been placed due to the AutoKey option.
The cheese Z location curve
The animation of the 09 shot is now completed, congratulations!
Frame 4 of the 09 shot.
Animation of a close shot
The close up of the face that we are going to do is directly inspired by Italian westerns of the 60's. A close up allows us to give a tension focusing on the eyes of our character. This is done as follows:
- We will start by opening the 04.blend scene.
- We will need to place our character at the same place as in the 01.blend scene, so we will also open the 01.blend scene.
- In the Right Panel (N) of scene 01, we must copy the location information of the Master bone (Root) on the three axes, X, Y, and Z. In our case, X: -1.19863, Y: 0,0, and Z: 12.29828, and we will paste them on the location parameters of the Master bone in scene 04. Our character is now in the right place.
- We need to be sure that the Auto Key button is turned on, and we add the first key at frame 1 on the camera and all the bones of the character.
This animation will be in 50 frames.
- We also need to place the camera in front of the face of the character.
- We will move to frame 50 of the timeline, and we will slightly move the camera on the local z axis.
- We can see a slow in and slow out effect of the camera, the keys are in Bezier interpolation mode. In order to change the interpolation mode, we must open the Graph Editor. We will select the keys of the camera and press V and select Vector. Now the camera is moving in a linear way.
Let's animate our character. He is watching the trap, so he doesn't move a lot. The animation is done as follows:
- We begin by animating the head. We will move the cursor of the Timeline at frame 50, and we make a little rotation on the local z axis, a new key frame is added.
- The Frown bone stays down to keep a serious look.
- We can now animate the eyes. At frame 50, we will move down the EyeTargetMaster a little bit. He is still looking straight toward the camera.
- We will now add a blink of the eyes to give more realism.
- We will select the both EyeTarget.L and EyeTarget.R, and we will add a key at frames 16 and 23 (press I and select Scale). We will move then at frame 19, and we will scale the bone controllers to close his eyes.
The close shot
This very short animation for shot 4 is finished. Shot 10 is almost the same but with a smile at the end. Let's start the animation of the gunshot!
The animation of shot 8 this time is a bit more complex. This will be done as follows:
- We will start by opening the 08.blend scene.
- We will place our character at the same location as the 01.blend file.
- With the Auto Key button turned on, we will start placing the camera on the left-hand side of the character.
It is an animation in 30 frames.
- We will put the camera on the left-hand side of the character, and then we will move it slightly to the left along the y axis to frame 30. We will change the keys of the camera in the Vector mode (V) in the Graph Editor.
- We can now animate our character. We will start animating the hand. The hand must go straight to the butt of the gun to hold it. The position and the inclination of the hand are very important. It doesn't matter if there is a little interpenetration of the thumb. The animation is fast, and the point of view of the camera can hide small mistakes. The forefinger must be close to the trigger when he holds the gun.
The gun shot
- To move the fingers, we must select the top bones and rotate them on the local x axis (press R and then press X twice). The Copy Rotation constraints will make the rest.
- When the gun is caught, we must change the influence of the Child Of constraint of the gun bone. The influence of child of controlled by the holster is now at 0.000, and the influence of child of controlled by the left hand is now at 1.000. The gun is now following the hand. We can keep animating the left hand.
- We will position the hand so that the gun gives the impression that it will shoot ahead. There is the recoil of the gun, so the hand makes a sudden rotational movement upwards.
Animation of the gun shot
When the animation of the left hand and the gun is done, the largest part of the animation of the sequence will be done too, but we still need to polish this shot a little bit. The rest of the body must be animated and can't stay inert. This will be done as follows:
- We need to make a rotation of the Spine01 bone on the z and y local axis when the left hand catches the butt of the gun. Likewise, the left shoulder must rotate towards the top (refer to 2 and 3 in the preceding screenshot) at this moment.
- As the rotation of the spine01 bone the head is inclined to the right, we will rotate it a little bit to adjust it. For the recoil of the gun, we will make a little rotation of the head.
- The HipsReverse bone also makes a rotation on the local z and y axes to gives a more realistic feeling.
- The right hand and the tail also make a little arc. In this case, they are quite important details.
So, the animation of the gunshot is now complete. Let's talk about the animation of the trap.
It's now time to animate one of the most technical shots of our sequence where the cheese gets shot on the trap. This will be done as follows:
- We will start by opening the 09.blend file. Then we can frame the trap with camera as done in the layout.
- The first thing to do is to add a key frame on each bone of the trap only for rotation, so we select them and press I and select Rotation. We won't use AutoKey for now. Remember that the trap is linked. If you can't access the rig, it's simply because you don't have a proxy in order to manipulate it.
- Now we can go to frame 13 and rotate the TopStick and the TrapPlank bone on the their x local axes as far as their can logically go.
- The Spring bone animation will be shorter, though. We will key its extreme rotation on frame 7.
- We can now test our animation to see what's wrong with it, but first we will hide the cheese with the H key. As you can see, the animation doesn't seem very natural. This is why we are going to tweak the curves in the graph editor.
- We will open the graph editor and click on the Show only selected button in the header.
- Now we can select the TopStick bone and unfold its Rotation values on the left-hand side of the Graph editor. We can even hide the other y and z rotations as we don't need them. To do so, we will use the Eye icon. As you can see, the curve has an ease in and ease out effect. We don't want this. We want a bounce effect. To do so, we can, of course, add more keys and waste time to animate it by hand, or we can use the power of the Dynamic effects of the interpolation menu. So we select our keys, and we press T and select Bounce. As you can see, the curve changes.
- We can do the same with the TrapPlank and the Spring bones. For this, a later bounce will be more subtle. Now if we play our animation, everything looks more natural.
- Now let's animate the cheese. First unhide it with Alt + H.
- We can now reactivate the AutoKey option, it will be easier. Let's start by adding a key on frame 0 with press I and select LocRotScale. Now, because of autokey, we can move to frame 16 and move the cheese to its final destination.
- We can now go to frame 5 and put the cheese in the air. This will change its Z location. We can also rotate it and scale it locally on its z axis (press S and then press Z twice).
- The animation at this point is not very convincing. In order to add more realism to it, we can open the graph editor and change the curve of the Z location of the cheese, so it is much more like a "dome" at the beginning. To do so, we can set frames 0 and 9 to a vector type (press V and select Vector). We will need to change the handles of frame 5 too.
- Next, we will change the end of the motion by adding two new keyframes on the Z location at frames 11 and 17. These keys will have a Bounce Dynamic effect. We will use the handles in order to smooth the curve as much as possible where it is needed. Remember that the animation process involves a lot of trial and error. You also need to constantly play your animation in order to know what you'll have to correct.
- We can now reset the scale of the cheese at frame 11 by pressing Alt + S.
- What we've done so far is the base of the cheese animation. Now we can polish the animation by changing its rotation here and there and by polishing the Y location curve.
- We can now animate the camera. Between keys 0 and 16, the camera doesn't move, so we simply duplicate frame 0 to frame 16.
The TopStick X rotation curve
- We can now place our timeline bar at frame 37 and focus on the cheese closely, so we can see the hole due to the gunshot. The key has been placed due to the AutoKey option.
The cheese Z location curve
The animation of the 09 shot is now completed, congratulations!
Frame 4 of the 09 shot.
Animation of the gunshot
The animation of shot 8 this time is a bit more complex. This will be done as follows:
- We will start by opening the 08.blend scene.
- We will place our character at the same location as the 01.blend file.
- With the Auto Key button turned on, we will start placing the camera on the left-hand side of the character.
It is an animation in 30 frames.
- We will put the camera on the left-hand side of the character, and then we will move it slightly to the left along the y axis to frame 30. We will change the keys of the camera in the Vector mode (V) in the Graph Editor.
- We can now animate our character. We will start animating the hand. The hand must go straight to the butt of the gun to hold it. The position and the inclination of the hand are very important. It doesn't matter if there is a little interpenetration of the thumb. The animation is fast, and the point of view of the camera can hide small mistakes. The forefinger must be close to the trigger when he holds the gun.
The gun shot
- To move the fingers, we must select the top bones and rotate them on the local x axis (press R and then press X twice). The Copy Rotation constraints will make the rest.
- When the gun is caught, we must change the influence of the Child Of constraint of the gun bone. The influence of child of controlled by the holster is now at 0.000, and the influence of child of controlled by the left hand is now at 1.000. The gun is now following the hand. We can keep animating the left hand.
- We will position the hand so that the gun gives the impression that it will shoot ahead. There is the recoil of the gun, so the hand makes a sudden rotational movement upwards.
Animation of the gun shot
When the animation of the left hand and the gun is done, the largest part of the animation of the sequence will be done too, but we still need to polish this shot a little bit. The rest of the body must be animated and can't stay inert. This will be done as follows:
- We need to make a rotation of the Spine01 bone on the z and y local axis when the left hand catches the butt of the gun. Likewise, the left shoulder must rotate towards the top (refer to 2 and 3 in the preceding screenshot) at this moment.
- As the rotation of the spine01 bone the head is inclined to the right, we will rotate it a little bit to adjust it. For the recoil of the gun, we will make a little rotation of the head.
- The HipsReverse bone also makes a rotation on the local z and y axes to gives a more realistic feeling.
- The right hand and the tail also make a little arc. In this case, they are quite important details.
So, the animation of the gunshot is now complete. Let's talk about the animation of the trap.
It's now time to animate one of the most technical shots of our sequence where the cheese gets shot on the trap. This will be done as follows:
- We will start by opening the 09.blend file. Then we can frame the trap with camera as done in the layout.
- The first thing to do is to add a key frame on each bone of the trap only for rotation, so we select them and press I and select Rotation. We won't use AutoKey for now. Remember that the trap is linked. If you can't access the rig, it's simply because you don't have a proxy in order to manipulate it.
- Now we can go to frame 13 and rotate the TopStick and the TrapPlank bone on the their x local axes as far as their can logically go.
- The Spring bone animation will be shorter, though. We will key its extreme rotation on frame 7.
- We can now test our animation to see what's wrong with it, but first we will hide the cheese with the H key. As you can see, the animation doesn't seem very natural. This is why we are going to tweak the curves in the graph editor.
- We will open the graph editor and click on the Show only selected button in the header.
- Now we can select the TopStick bone and unfold its Rotation values on the left-hand side of the Graph editor. We can even hide the other y and z rotations as we don't need them. To do so, we will use the Eye icon. As you can see, the curve has an ease in and ease out effect. We don't want this. We want a bounce effect. To do so, we can, of course, add more keys and waste time to animate it by hand, or we can use the power of the Dynamic effects of the interpolation menu. So we select our keys, and we press T and select Bounce. As you can see, the curve changes.
- We can do the same with the TrapPlank and the Spring bones. For this, a later bounce will be more subtle. Now if we play our animation, everything looks more natural.
- Now let's animate the cheese. First unhide it with Alt + H.
- We can now reactivate the AutoKey option, it will be easier. Let's start by adding a key on frame 0 with press I and select LocRotScale. Now, because of autokey, we can move to frame 16 and move the cheese to its final destination.
- We can now go to frame 5 and put the cheese in the air. This will change its Z location. We can also rotate it and scale it locally on its z axis (press S and then press Z twice).
- The animation at this point is not very convincing. In order to add more realism to it, we can open the graph editor and change the curve of the Z location of the cheese, so it is much more like a "dome" at the beginning. To do so, we can set frames 0 and 9 to a vector type (press V and select Vector). We will need to change the handles of frame 5 too.
- Next, we will change the end of the motion by adding two new keyframes on the Z location at frames 11 and 17. These keys will have a Bounce Dynamic effect. We will use the handles in order to smooth the curve as much as possible where it is needed. Remember that the animation process involves a lot of trial and error. You also need to constantly play your animation in order to know what you'll have to correct.
- We can now reset the scale of the cheese at frame 11 by pressing Alt + S.
- What we've done so far is the base of the cheese animation. Now we can polish the animation by changing its rotation here and there and by polishing the Y location curve.
- We can now animate the camera. Between keys 0 and 16, the camera doesn't move, so we simply duplicate frame 0 to frame 16.
The TopStick X rotation curve
- We can now place our timeline bar at frame 37 and focus on the cheese closely, so we can see the hole due to the gunshot. The key has been placed due to the AutoKey option.
The cheese Z location curve
The animation of the 09 shot is now completed, congratulations!
Frame 4 of the 09 shot.
Animation of the trap
It's now time to animate one of the most technical shots of our sequence where the cheese gets shot on the trap. This will be done as follows:
- We will start by opening the 09.blend file. Then we can frame the trap with camera as done in the layout.
- The first thing to do is to add a key frame on each bone of the trap only for rotation, so we select them and press I and select Rotation. We won't use AutoKey for now. Remember that the trap is linked. If you can't access the rig, it's simply because you don't have a proxy in order to manipulate it.
- Now we can go to frame 13 and rotate the TopStick and the TrapPlank bone on the their x local axes as far as their can logically go.
- The Spring bone animation will be shorter, though. We will key its extreme rotation on frame 7.
- We can now test our animation to see what's wrong with it, but first we will hide the cheese with the H key. As you can see, the animation doesn't seem very natural. This is why we are going to tweak the curves in the graph editor.
- We will open the graph editor and click on the Show only selected button in the header.
- Now we can select the TopStick bone and unfold its Rotation values on the left-hand side of the Graph editor. We can even hide the other y and z rotations as we don't need them. To do so, we will use the Eye icon. As you can see, the curve has an ease in and ease out effect. We don't want this. We want a bounce effect. To do so, we can, of course, add more keys and waste time to animate it by hand, or we can use the power of the Dynamic effects of the interpolation menu. So we select our keys, and we press T and select Bounce. As you can see, the curve changes.
- We can do the same with the TrapPlank and the Spring bones. For this, a later bounce will be more subtle. Now if we play our animation, everything looks more natural.
- Now let's animate the cheese. First unhide it with Alt + H.
- We can now reactivate the AutoKey option, it will be easier. Let's start by adding a key on frame 0 with press I and select LocRotScale. Now, because of autokey, we can move to frame 16 and move the cheese to its final destination.
- We can now go to frame 5 and put the cheese in the air. This will change its Z location. We can also rotate it and scale it locally on its z axis (press S and then press Z twice).
- The animation at this point is not very convincing. In order to add more realism to it, we can open the graph editor and change the curve of the Z location of the cheese, so it is much more like a "dome" at the beginning. To do so, we can set frames 0 and 9 to a vector type (press V and select Vector). We will need to change the handles of frame 5 too.
- Next, we will change the end of the motion by adding two new keyframes on the Z location at frames 11 and 17. These keys will have a Bounce Dynamic effect. We will use the handles in order to smooth the curve as much as possible where it is needed. Remember that the animation process involves a lot of trial and error. You also need to constantly play your animation in order to know what you'll have to correct.
- We can now reset the scale of the cheese at frame 11 by pressing Alt + S.
- What we've done so far is the base of the cheese animation. Now we can polish the animation by changing its rotation here and there and by polishing the Y location curve.
- We can now animate the camera. Between keys 0 and 16, the camera doesn't move, so we simply duplicate frame 0 to frame 16.
The TopStick X rotation curve
- We can now place our timeline bar at frame 37 and focus on the cheese closely, so we can see the hole due to the gunshot. The key has been placed due to the AutoKey option.
The cheese Z location curve
The animation of the 09 shot is now completed, congratulations!
Frame 4 of the 09 shot.
The last thing we are going to do is render quick previews of each shot. This is often called a PlayBlast. This simply renders the animation of the viewport. In this section, we are only going to render the playblast of the first shot. So let's start:
- We will open the 01.blend file.
- In the Properties editor, in the Render tab, we will go to the Output subpanel. Here we can choose the path where the render will be. To be well organized, let's create a Playblast folder in our Scene folder and set it as the output path.
- Now we will need to choose the file format. By default, it will output a sequence of a PNG file. We change it to H.264 in order to have a movie type file.
- In the Encoding section, we can choose the extension of our movie, and we choose Quicktime to have a
.movfile. Later, you'll see how to render the shots frame by frame in a non-video format, but for now in order to quickly see the result, we will use .mov. - Be sure that you are viewing from the camera by pressing the 0 numpad key. In order to render the playblast, we can press the OpenGL Render active viewport button in the header of the 3D View (a clap icon).

The Output option for the Playblast rendering
This was a very tough chapter, but we hope you have found it interesting. We covered a lot of things here, such as the principles of animation, the majority of the Blender animation tools, and how to prepare ourselves with a script, storyboard, and layout. We also learned how to animate a walk cycle and mix it with other actions using the NLA. We applied many of the 12 principles of animation such as pose-to-pose, squash, and stretch overlapping. Now, you should have all the knowledge to start telling your own stories with Blender. In the next chapter, we are going to finalize our sequence by rendering it with cycles and editing it with the VSE.