Book Image

Working with OpenERP

By : Greg Moss
Book Image

Working with OpenERP

By: Greg Moss

Overview of this book

<p>OpenERP continues to gain momentum throughout the world in providing the best platform for open source ERP installations. This book covers all the essential modules and how to get the power of OpenERP to work for you.</p> <p>"Working with OpenERP" provides a real-world business solution approach to integrating OpenERP into your small or medium sized business. This book begins by walking you through how to install OpenERP on a Windows or Ubuntu server then takes you through all the essential modules you will need to get OpenERP up and running for your company.</p> <p>All through the book, "Working with OpenERP" provides real-world examples in sales, customer relationship management (CRM), purchasing, manufacturing, human resources, and financial accounting. After covering the basics, you will learn how to customize various methods to configure OpenERP for your business and even build your own custom modules.</p> <p>"Working with OpenERP" covers all the basics of installing and using OpenERP along with advanced real-world examples you will not find anywhere else.</p>
Table of Contents (21 chapters)
Working with OpenERP
Credits
About the Author
About the Reviewers
www.PacktPub.com
Preface
Index

Adding a field to an existing view


After adding our fields to the sale.order model and displaying them on the Sales Order form, it would be nice to include these fields in our sales order listing. This way users can see at a glance when orders are due and if they are a rush order.

We begin by going to the Sales Order list view and choosing Manage Views. Next, click on Edit to bring up the View Editor for the sales order list.

You will notice that this list is far less complex than the one for the Sales Order form view. This is simply because a list view has much fewer options and fields on it than a form which edits and manages the data for just one record at a time.

Click on the + to the right of the date_order field. This will pop the Properties window.
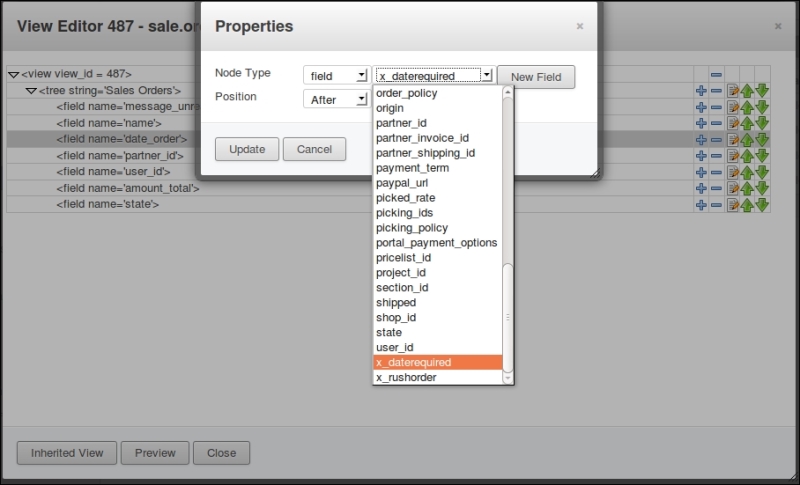
After selecting x_daterequired in the list, click on Update twice. Then you can follow the same process to add the x_rush field to the view. Finally click on Close twice to shut the View Editor and the Manage Views form.

The screen will refresh...