

Once you have created some static resources and web-based instructional pages, you should have enough initial material to start carrying out some assessment. Moodle has a detailed and sophisticated gradebook and all aspects of the site that have some method of grading can be used to build up a picture of your student's learning progress. The most basic type of assessment, however, will probably be the assignment.
There are various ways to assess your students, and even though this is an online learning system, you can still have assignments that are not necessarily uploaded and stored. Many elements in Design Technology will be such that they may not lend themselves to an online system. For example, you may have students create some basic recipe for homework to test their ability to follow instructions or to make base sauces. You can obviously take a picture of the result and include this as part of the assessment, but the assessment itself is an aesthetic one based on taste and smell. In this instance, you can set up an assignment that does not require an accompanying file upload called Offline activity, but still allows a mark to be recorded. The following screenshot shows this type of assignment choice:

For another assignment, there may be a requirement for multiple file uploads, such as in a product design, and some of these may require several drafts. Both of these instances (as well as many others), are well catered for in Moodle and we will go into these in some depth in Chapter 8, Assessing Student Progress, but for now, we need to add an assignment.
By choosing the Add an activity drop-down menu, seen in the following screenshot, you can see that there are four types of assignment that can be added:
Advanced uploading of files
Online text
Upload a single file
Offline activity

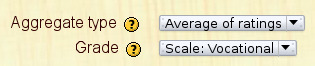
The interface for all assignments is broadly similar and requires, as a minimum, the naming of the assignment and the type of grading associated. If it is an informal piece of work, you can leave it so that no grade is required. You can also use some of the features in this setup interface to determine whether or not it is based on a deadline or even if they are allowed to re-submit based on any feedback improvements you suggested.
In this screenshot, there is a customized scale based on the vocational specifications of some exam boards in the UK, which is marked from pass to distinction. Scales will be discussed in more detail in Chapter 9. Once you add this type of custom scale to your course, students will be notified of its presence the next time they log in. Also, if the calendar is enabled, they will see any due dates. Once they submit some work (even by handing it to you) and you assign a grade, the grade will appear in the gradebook.

Much that is created in the world of design is often brought about through discussion and an interchange of ideas. With this in mind, it is useful to be able to create some areas for student discussion. These can be quite formal discussions where you present design ideas and get some feedback from students in order to assess their grasp of the principles, or they could be more informal discussions to let them test out some of their more esoteric ideas. The module to use for this type of activity is the forum, which we look at in detail in Chapter 3, Encouraging Reflective Practices Using Forums and Blogs as part of reflective practice.
As with the assignments explained before, forums are added from the Add an activity drop-down menu once editing has been enabled. The interface is similar to assignments we looked at previously and the basic requirements here are the name of the forum, a description of what it is for, and the basic layout. The layout, as listed, refers to the organization of the forum, such as how comments are displayed to the users. As with the assignment module, there are a few basic options to choose from:
A single simple discussion
Each person posts one discussion
Q and A forum
Standard forum for general use (the default)
In the forum description box, you can set the scene for what this discussion is about and possibly pose a question that will prompt the student's responses. The rest of the settings determine whether or not students are forced to subscribe and if they can use the "read tracking" feature to monitor their own participation. You may, for example, want to force all students to be subscribed in a discussion relating to health and safety, as it is so fundamental to all aspects of Design Technology because students are working with dangerous equipment such as lathes or making food for the public in Food Technology. In the following screenshot, we have chosen the option to not force everyone to be subscribed:

If the forum is something that you would like to use for formative assessment, by this we mean part of the student's publicly recognized qualification such as a GCSE in the UK, you can assign grading, which may be another way to assess how well students understand design principles. Much of what is created in Design Technology is peer assessed, so this acts as a good model for what they will encounter in the real world and may set some good habits. In the following screenshot, this marking is based on a Vocational scale, which in the UK would be: Pass, Merit, or Distinction.
This type of marking makes a useful starting point for other discussions. It may be that you attach a picture of an iconic chair design. You may then prompt a discussion to ask if students agree that it is well designed. If the bulk of them disagree and rate it as only so-so, perhaps it could be a generation thing. What is it about this design that makes it so unattractive to the group? How would they change it? The discussion can be limited to a number of posts to make sure it does not go too far off topic. Grading is discussed in depth in Chapter 9.
Once you have added some static resources and hopefully promoted some lively discussions, it might be useful to give some short tests to the students for you to gauge their current knowledge. For example, after a lesson on hydraulics, you may design a short quiz of the key words and functions in a model of a hydraulic pump. If all students miss a certain key term, you can then address this in more detail in a follow-up lesson. It also acts as a useful signpost for students to know where they are in terms of understanding key concepts. As with all activities on Moodle, quizzes can be somewhat informal and not use a rigid number scale. Alternatively, they may be limited to a time and a specific computer for more formal assessment that forms part of a recognized qualification. All of their attempts will be placed into their gradebook and can be set to measure a highest grade or an average, depending on what you are measuring. Quizzes will be dealt with in depth in Chapter 5.
The quiz interface is the same as other modules in Moodle in terms of naming the activity, describing what it is about, and then creating the content of it—the quiz questions in this case. Once you select Quiz from the activities drop-down menu, you will see the basic naming and description fields. The following table lists a series of presentational options available:
|
Option name |
Sub-options |
Description |
|---|---|---|
|
Timing |
Open the quiz Close the quiz Time limit Time between attempts |
A range of options here allow you to make the quiz appear to students in a set date range. You can also assign a time so that students can get practice of a 30 minute public exam. You can also make sure that they don't take the quiz quickly after the first attempt as they have memorized a few answers. |
|
Display |
Questions per page Shuffle |
How many questions should students see? Maybe one per page so that they can focus. You can make questions shuffle each time they retake so they don't learn the answer patterns only. |
|
Number of Attempts |
Attempts allowed Adaptive |
Maybe use one attempt for exam practice, but many attempts for practice drills. Students can see their mistakes and try again so that they learn from their errors. |
|
Grades |
Method Penalties |
Use the highest or average grade. Students' grade is marked down after each unsuccessful answer. |
|
Security |
Browser security Password Require network address |
The quiz will take over the desktop so they can't copy and paste. The quiz will require a password The quiz will only be available on a specific computer or set of computers. |
These options described briefly are hopefully self-explanatory and the help buttons associated with them are quite detailed if you are unsure. The main issue is what type of quiz you are creating: is it formal or informal? For example, are you asking a small number of yes/no questions to students in order to make sure that they followed today's lesson or will this form part of their certificated course? The security option allows you to specify a range of computer IP addresses, so that you could specify 10 computers in one part of your school. This would allow manual supervision at least.
Note
For a more detailed overview of some of the security issues discussed here, you might look at the corresponding Moodle docs at: http://docs.moodle.org/en/Adding/updating_a_quiz#Security_section.
Once you have chosen your options for the quiz such as the time and display as previously discussed, you can save it. You then need to return to the course and click on the newly-created link to the quiz in order to add the questions. The resulting window shows that you can create questions for this specific course, albeit they can be used on other courses if required or add them to a more general category to form a question bank. The edit tab displayed will open some sub-menus, one of which will be Questions where you can add your questions. The quiz module is dealt with in greater detail in Chapter 5. There are several question types to choose from:
Multiple Choice
Short Answer
Numerical
True/False
Matching
Embedded Answers
Random Short-Answer Matching
Random
Description
Calculated
Essay
The type of question chosen will be determined by what it is you are testing. In most cases, the multiple-choice type will be most commonly used due to familiarity. However, you may use the short answer type when you are testing for something very specific such as the properties of plastics are: x, y, z, or even to test for spelling skills. Short answer quiz questions can be used when students are expected to know and be able to write very specific pieces of information and where you are testing this recall ability. You may also use an essay type question like those that exist in a more formal exam situation such as showing a picture and asking students to write what the picture tells them about a certain recipe, or type of material, for example. Do bear in mind, however, that the essay type of a question will still need to be graded manually.
The most basic type of question, as indicated, is likely to be the multiple-choice style of question. Once you have chosen this from the drop-down option for a question, you will be presented with the usual box to enter a name for the question and a box for the actual question text. As this is an HTML box, it is easy enough to upload and embed an image here. The advantages to this in design are quite clear. You may also insert a table with multiple pictures if the question is trying to determine the differences or similarities between a certain number of items such as wood working joints or metal joins. If there is more than one possible answer, this can be specified in the interface, as long as you remember to add up the possible answers to make the requisite 100 percent for the total.
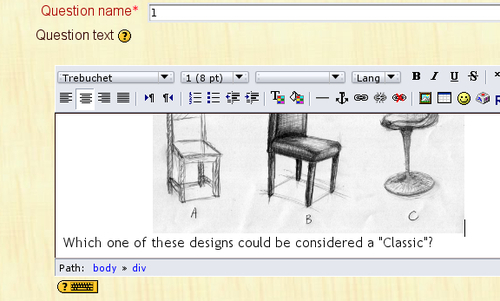
In the previous screenshot, you can see that a sketch has been scanned and uploaded to the quiz to create the question. This could be work carried out by you or some other image (always bear in mind the copyright issues). It might be likely in this case that all of the chairs are "Classics", in which case you would need to enable multiple answers and assign the appropriate marks to each correct choice, such as 25 percent each or 33.333 percent each, as shown in the following screenshot:
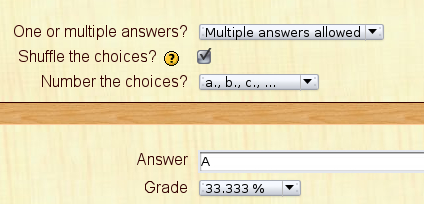
The previous screenshot shows that the quiz will allow three correct answers for this question and that each correct answer will carry a mark of 33.333 %. Students will need to get all three answers correct to get a full mark. Each wrong answer will reduce their score for the question.
Students taking the quiz, or any other assessed module, would then gain grades in their gradebook, which could then be used to assess their progress or achievement.
Note
Further guidance and suggestions on the use and creation of quizzes can be found at: http://docs.moodle.org/en/Effective_quiz_practices.