Book Image

Blender 2.5 HOTSHOT

By : John E. Herreño
Book Image

Blender 2.5 HOTSHOT

By: John E. Herreño

Overview of this book

<p>Blender 2.5 Hotshot will show you how powerful and capable Blender 3D is when you exploit its full potential. Move beyond basic tasks in Blender 3d and dive into more challenging territory. Ditch simple boring characters in favor of creating more detailed, visually rich, and polished results.</p> <p>We will start by covering all the steps involved in producing a complete image from scratch by working on a scene of a starship; then we'll go into working with blueprints by creating an aircraft scene and a car model. Next you will use the video editor by creating a professional looking demo-reel followed by the game engine to create an interactive first person architectural walkthrough.</p> <p>Since each chapter is a complete project you'll also learn to create very nice materials, including multi-layered textures and the usage of color ramps to achieve special effects. On the lighting part you'll be learning various tricks to control how each light behaves and affects the scene, along with some basic setups for common situations. On the modeling part you'll be working both on mechanical and organic objects, learning some key concepts along the way.</p> <p>Compositing is widely used to take normal renders to the next level and add some nice special effects like glare. You will even have the opportunity to write some Python code for the game engine. Finally, you'll work on creating a snail using some advanced texturing tricks and compositing it into real footage.</p>
Table of Contents (15 chapters)
Blender 2.5 HOTSHT
Credits
About the Author
About the Reviewers
www.PacktPub.com
Preface
Index

Object Setup


For this project, we are going to need a very simple scene—two objects, a camera, and a very basic lighting setup. The real magic will be done by using the compositor. To guide our steps, let's take a look at a screenshot showing the finished scene:

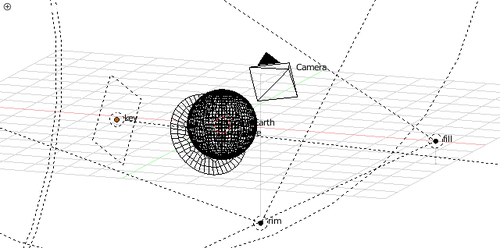
The previous screenshot clearly shows the two objects (a sphere and a disc), the camera, and the three lights used for the scene. In this task, we will work on setting up the two objects.

Prepare for Lift Off

Let's open Blender, select and delete the default cube and light (keep the camera), and then save the file as earth.blend in the project's working directory.

Engage Thrusters

  1. Start by making sure that the 3D Cursor is located at the origin of the 3D world by going to View → Align View → Center Cursor and View All (or by pressing Shift + C).

  2. Now let's add a UV Sphere (Add → Mesh → UV Sphere) and leave the settings at their default values. Now go to the Object tab of the Properties Editor and set some properties as follows:

    • Name: planetEarth...