

The process of creating a new document dialog box is given in the following steps:
Click on the New Document button on the toolbar. A dialog box will pop up. The one on the screen will have different values than the one here. Being the heroes we are, we will create a new template that we'll be using for some tasks as we wind our way though this book. The template shown in the New Document dialog box is used for a Webcomic.
The top line is File Name. We can give our new document a name here.
The next section is labeled Canvas size. This is where we set up the full size of our document (in printing this is called the Bleed size). For our example, it's 7.75 x 10.25 inches. The resolution (dots per inch) is set at 600. If our computer has limited memory or is a bit sluggish, set it to 300.
Enter in
7.75in the Width entry box.Enter in
10.25in the Height entry box.We see that the Preset drop-down menu now says Custom. That's just what we want.
There's a double-headed button to the left of the width and height entries. This button swaps out the width and height.
Unit is set to inches. There are options for metric and pixel-based measurement in the drop-down menu.
The Manga draft setting should be checked. If unchecked, our page will not have borders and the binding and default borders will be greyed out.
In the Binding (finish) size area, enter the following values:
7.25for the Width9.75for Height0.25for Bleed width
Be sure to include the leading zero. Manga Studio doesn't like entries that begin with a decimal point without that leading zero.
If for some reason, the numbers in the previously mentioned area change, just go back and change them again. Sometimes Manga Studio is too helpful and we need to be adamant about what we want by repeating the information once or twice. It's always good to double-check the values in all the entry boxes to make sure that they haven't been changed.
The default border (inner) is called the live area outside of Manga Studio. This is the area where we'll be doing most of our work inside of this soon-to-be-created document. And all lettering must be within this area. Set the values to:
Width is
7inchesHeight is
9.75inchesThe bottom two entries, X and Y offset, are for when you need to have your live area a bit higher or lower, or closer to one side or another. Just leave both of these at 0.
There's a checkbox next to the text Paper color. This is where we can change the default paper color from white to another color or get rid of it. If we are doing a story that needs to have a solid color up to the edges of the page, then we will click on the Color bar and choose a color. But right now, we don't need to get fancy, besides we want to hurry up with this and get to drawing!
Double check the values. If we mistyped a number, Manga Studio will automatically recalculate other values and we could end up with some pretty strange pages.
Once we've made sure all our values are correct, let's save this as a
Preset!Under the OK and Cancel button there's a button labeled Register to preset. Clicking on this button will give us a dialog box as shown in the following screenshot:
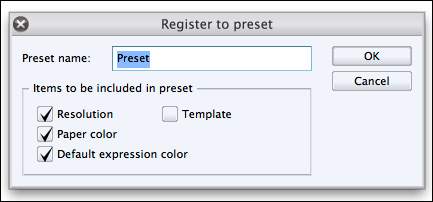
In the Preset name box, we can name it
Preset. Type inWebcomic w/Bleed.There are a number of checkboxes below where we named our preset:
Resolution: This will save the set resolution as part of the preset. Usually if we're working on a series, we want the resolution to be consistent.
Paper color: This is checked to be consistent.
Default expression color: This sets the default way any new layers will be, either color, grey, or monochrome.
Template: This will automatically load up any selected template. This is a bit advanced for us now, so leave it unchecked.
Click on OK.
We're back in the New document dialog box. Look closely at the Preset drop-down menu. It now lists the preset we just saved.
To the right of the drop-down menu is a trash can icon. If we create way too many presets and want to clear them up a bit, we can select the old templates one at a time, and click on the trash icon to delete them. We'll be given a dialog that asks us if we're really sure we want to delete the preset. We want to keep this preset, so click on Cancel if you pressed the trash icon.
Back in the New dialog box, click on the OK button and we're presented with a brand new document we can draw on.
Now take a few moments to mess around with the tools. What you do can be either undone or deleted. Go ahead, play around. You've earned it.
We went through, step-by-step, the creation of a new preset and made a new document based on that preset. We also encountered some odd things about Manga Studio, such as how it coined its own terminology for common print terminology. Here's a quick breakdown:
|
Manga Studio Term |
Print Term |
Description |
|---|---|---|
|
Canvas size |
Bleed size |
The full size of the sheet that's being printed on |
|
Binding (finish) size |
Trim area |
The size of sheet once it's been cut to this size |
|
Default border (inner) |
Active (or Live) area |
All important drawings and text must be within this area |
We will need to keep this translation table in mind, especially if we're going to talk to printers about printing our comic.
Artists know faces. We'll recognize faces before we remember names. When we've created our first new document, fill it with faces of all kinds. Human, animal, or alien. Get used to moving around in the canvas area. Like with most other graphic applications, holding down the space bar will make your cursor a hand icon so that you can grab the canvas and move it around. ALT/Command + = will zoom in your view, ALT/Command + - will zoom out your view. Use these keyboard commands to move the canvas and zoom in or out and draw the faces in each of the four corners of your document, then zoom in and add details. In the toolbar, there's an icon that looks like an old style floppy disc, that's the Save button. Click on it and save your file with the name practice_001.lip. Remember where this file is as it can be helpful in warm-up exercises in the future. Experiment with the various marking tools. Get used to how the various tools work.
Setting up the control panel for your tablet is one of those things that can seem like drudgery. It's worth doing because it can open up the full abilities of your tablet and make using aspects of Manga Studio 5 so much easier. We'll be covering how to set up a Wacom Tablet. These basic instructions are for an Intous 3 tablet, but can be adapted to a newer tablet model or to other manufacturers of tablets.
The Wacom control panel looks deceptively simple. There's a lot of functionality under those icons, buttons, and sliders. In my experience (and what Wacom recommends), the best results can be had by installing the drivers before plugging in your tablet. And this goes for installing updated control panel software. You should regularly save backups of your tablet settings.
When you first installed your tablet software, a folder named Wacom Tablet was created (on the Mac OS, it's in the Applications folder and in Windows, it's where applications are installed). Inside that folder is an application named Wacom Tablet Utility. This application is very simple: there's a button to remove, backup, and restore. First click on the backup button. Navigate to where you want to save your tablet settings. Save those settings. Remember where you have saved them. When it's time to update the tablet software, fire up Wacom Tablet Utility and click on the Remove button. This button does exactly what it says. Next, install the new tablet software. Once it's installed, run the Wacom Tablet Utility and click on the Restore... button. A dialog box will pop up and you need to navigate to where you saved your tablet settings when you clicked on the Backup... button. Select the backup file and click on the Open button. Now quit the Wacom Tablet Utility. We now return to the regularly scheduled instruction.
If you're using a Mac, open the System Preferences application. If you're on a Windows machine, go to your system and choose the Wacom tablet control panel option. The following screenshot appears:
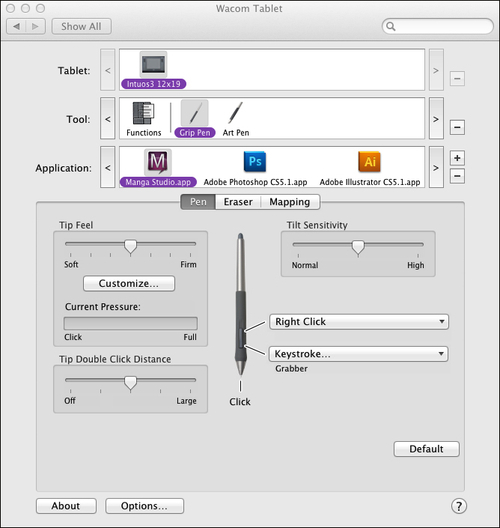
The control panel shown in the previous screenshot has four main areas:
Tablet
Tool
Application
Pen, Eraser, and Mapping
The tablet area is where you select your tablet. If there's only one tablet installed, we can move on. If there are two tablets installed, select the tablet you want to configure.
The tool settings have an icon for Functions and the pens you have (a grip pen, an art pen, or an airbrush pen). Select the pen you want to configure. You will have to go through the following set up for the Application area for each pen you have. We'll get to the Functions tool after the pen tool.
The previous image has Manga Studio already setup. To set it up on your system just click on the "+" button on the right side of the tier named Application. In the drop-down menu, there's a list of currently active applications and a Browse button. If Manga Studio 5 is running, select it from the list. If it's not, we'll just have to click on the Browse button and navigate to where Manga Studio 5 is installed.
In other graphic apps, we would need to change Tip Feel, but we can do that within Manga Studio 5. The grip pen has what Wacom calls a duo switch where there's a top and bottom part of the switch that can be pressed. Let's set it up so that when top part is pressed, it'll be like right-clicking a mouse by choosing, on the top drop-down menu, Click and then Right Click from the menu that pops up.
Tip
Just because something has a feature, it doesn't mean it has to be used. If you're constantly hitting the duo switch without meaning to, just go into the Wacom control panel and choose Manga Studio in the App scroller. Then in the Pen section, click on the drop-down menu for the switch. At the bottom of the menu is an entry named Disabled. Choose that and the duo switch will now have no effect in Manga Studio.
For the bottom switch, let's set it up for the Move tool (it looks like a cartoon hand). Click on the bottom drop-down menu, from the drop-down menu select Keystroke..., and then in the dialog box, press the space bar key and a space will appear in the top box. Don't press Tab (as that will add tab to the top box); just click in the textbox next to Name: and give your keystroke a name. I call this move tool the Grabber tool. Click on OK. We're now done here.
The eraser section usually doesn't need adjustment, so we'll skip it for now.
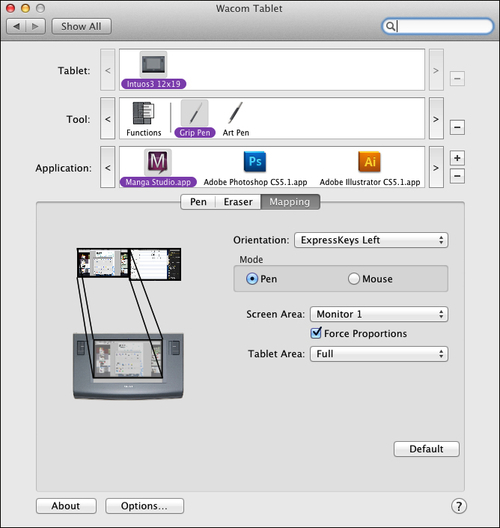
Now, click on the Mapping section button. If you have two monitors (like your author does), choose one to be the main drawing monitor. This is important so that it'll feel more natural. We can choose the monitor by clicking on the drop-down menu next to Screen area. Be sure to click on the Force Proportions checkbox. This is vital, in my opinion, because of muscle memory. We draw a circle on paper and we know it's a circle because of visual feedback. On a tablet (not a Cintiq or other display tablets), we don't have the single view of watching our hand draw a circle, we move our hand and watch it appear on our monitor. So if the tablet is stretched or squished in one direction or another, our hand draws an oval, but looks like a circle on the monitor. That's not good. Make things easy for yourself, click the Force Proportions checkbox.
Keep in mind that if things get out of control or you're a bit lost, don't fret. Just delete the application in the main control panel and start over again. It will make sense in no time. Just go slowly and make one adjustment at a time. Quit the control panel, open up Manga Studio 5, and test out the settings. This way, you can cement the new part of this a step at a time and learn it better.
After this final set of settings, we can get back to Manga Studio 5 and have a bit of fun. In the Tool settings click on the Functions icon. Notice how the bottom part of the control panel changes?
We'll be making a few changes. Let's start with the ExpressKeys. On my tablet, there's a Right and Left side. I'm left handed, which means that in addition to being in my right mind, these buttons reflect that. This means that the buttons I use with my non-drawing hand are modifiers. The buttons on the left-hand side are the ones that I can use with the pen off the tablet, such as zoom in and out and swap colors.
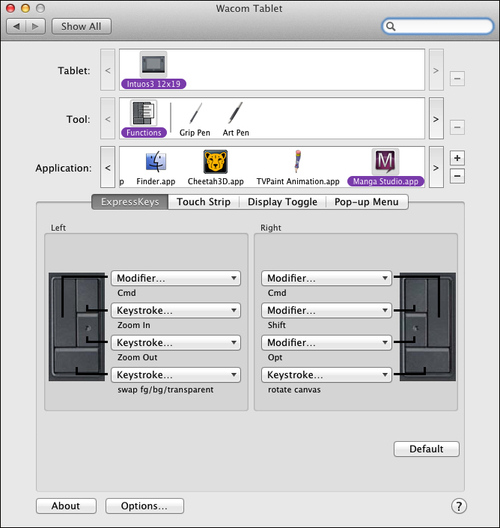
Assigning the keystrokes is exactly like what we did for the Grabber tool. Click on the drop-down menu and then choose the Keystroke... menu item. Here's a list of the names and the keyboard commands:
For
Swap fg/bg/transparentthe Keystroke is a lowercase zFor
rotate canvasthe Keystroke is a lowercase rFor
Zoom inthe Keystroke is +For
Zoom outthe Keystroke is - (dash)
The rest are default settings.
The last Wacom Tablet setting we'll deal with is the Touch Strip setting. In newer models it's a circle, but the principle is the same. On one side of Touch Strip, we want to be able to Undo and Redo. On the other side of Touch Strip, we want to swap colors.
Even though I've put swap colors in two places, it's sometimes good to have more than one way to do something. If you find something that works better for you, go do it. Probably by the time we get to coloring, my tablet settings will have changed.
The Touch Strip part of the Table Control panel looks like the following screenshot:
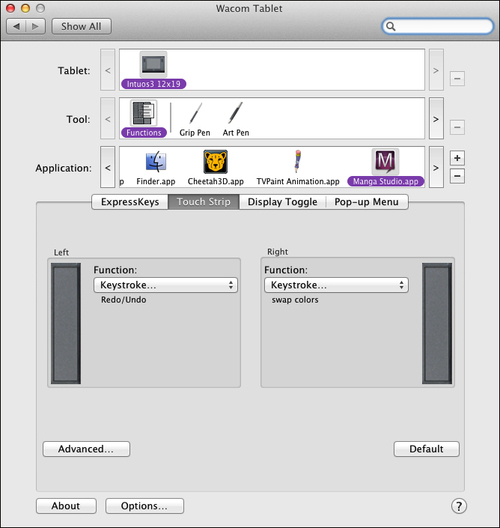
Each side can be set to have a top and bottom function. Usually, I try to make them related functions, such as zoom in and out, undo and redo, swap foreground and background colors. Click on the drop-down menu and follow the instructions carefully. Any or all keystrokes will be added to the command, so just press the keystrokes you want and use the mouse/pointing device to move to a different area.
The keystroke entry areas are shown in the following screenshot. There's one area for the up arrow and one area for the down arrow. The control panel can detect when you type a key in the number pad (if you have an extended keyboard), so be careful.
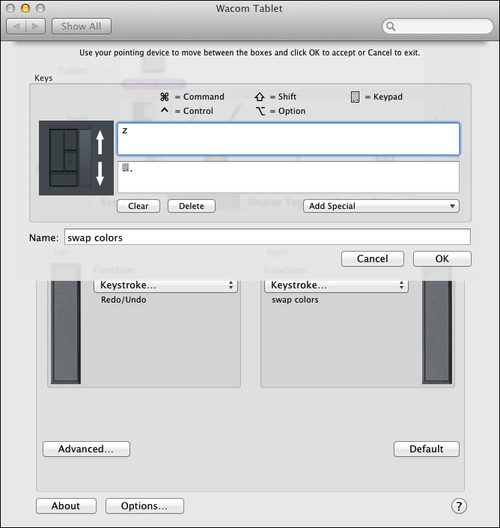
The settings we want are:
Undo: command + Z
Redo: command + Y
Swap Colors: z and (number pad) (dot)
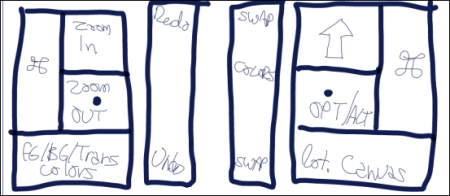
One thing that has helped me out is making a cheat sheet for the various buttons and keystrokes for the tablet's buttons. I made a drawing of the layout (left and right) of the tablet buttons and the Touch Strip and wrote down what the buttons do. I then wrote the name of the application it's for. So here's what it would look like for what we just did:
Finally, fire up Manga Studio 5 if it's not already running. Open a new document. From the Manga Studio menu, select the Adjust Pen Pressure Adjust settings... menu item.
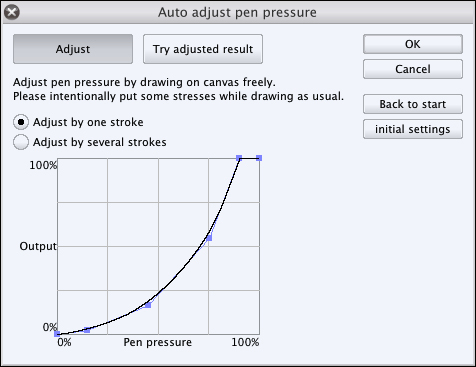
You can draw several strokes and the adjustment will be tailored to the way you draw. From experience, if the tablet has its pressure adjusted in the Control Panel and then in Manga Studio 5, the results are somewhat the same—the technical term is wacky. So it's best to adjust the pressure from within Manga Studio 5. The Wacom tablets I've used seem to be extremely sensitive on the light touch end, so you can see on the curve that it's very gradual at light pressure and then goes up and tops out at around 90 percent. This has worked well for me, but in your experience this may be different. So experiment. We can always go back to initial settings if we need to.
The rest of this book will be about how to use Manga Studio. In addition to learning about page sizes, pencils, brushes and such, we'll cover the process of making a comic right from an initial idea to getting it ready for print.
This is how we'll roll for the rest of this book:
Idea: The gem of a story. We'll tend to this seed and let it grow into a story.
Script: This is where we figure out what follows what and address things such as pacing, characterization, and learn basic script formats.
Layouts, Penciling, and Lettering: We'll layout pages, see how much text we have and make sure that the text and art work together.
Inking: This is where the pencil marks take form as we embellish our drawing so it can be reproduced.
Coloring: We'll look at the color wheel and brush up on some color theory to give our pages a nice complexion and make them interesting for our readers to look at.
Putting our work out: We'll cover some aspects of modern comics, such as Webcomics, print on demand, and digital comics.
In the course of covering all these aspects, we'll see just how Manga Studio 5 fits into every possible comic creation workflow and learn all we can about the specific features of Manga Studio 5 along the way. Even if we're seasoned pros who are new to Manga Studio but not comic creation, this is a good way to see how your workflow can fit with how Manga Studio operates.
Now for something unexpected, at the end of this section, we'll put away this book, put our backs to our computer screens, take some of the characters we created a few pages back and come up with a story for them. We'll have each character want something that they either don't have or someone else has. That's conflict and comics do that kind of story better than most other kinds of media. We want a short story, around three to eight pages of comics. Our story should have a setting, where it takes place, and the makings of a three act play: beginning, middle, and end.
This is where our internal critic has way too much fun. Don't listen to that part of us. We're just doing this story for pure fun and to learn Manga Studio 5 in the process. We have to start somewhere and we can do this one story just for ourselves. If it is a stinker, it'll be our secret, okay? And if you're really stalled, just find a public domain play and use that as your story. The thing here is to have something that we can work on. If you can't come up with a story, just follow the examples in the exercises. There's a sample story (with characters, script, and so on) included in the downloadable ZIP file.
Q1. A pencil can be found:
In the toolbar
In the Tool palette
The last place we used it
Q2. A Wacom Tablet is the only kind of tablet we can use with Manga Studio:
True
False
Q3. In Manga Studio, the Default border (inner) is what printers would refer to as the:
Trim area
Bleed amount
Active area
Slip region
Q4. A tablet is necessary to use Manga Studio.
True
False
Q5. The Command bar is where we can find:
A Save document button
A New document button
A Clear layer button
All of the above
None of the above