

In this chapter, we will cover the following recipes:
- Installing a test tool
- Modifying the kernel using RT-PREEMPT
- Modifying the kernel using Xenomai
- Programmable real-time units – an introduction
- A simple PRU test with an assembler
- Running an ultrasonic range sensor with the PRUs
- Using Python with the PRUs
Things are getting interesting: no more blinky LEDs from sysfs. It's real time...time to learn about how to make your BeagleBone Black perform real-time tricks.
This is not to say that the BeagleBone Black is pokey. The challenge is that, nowadays, innovators, developers, product designers, and engineers always demand faster, more predictable results, especially in scenarios where small latencies can make the difference between success or crash. Crash in this case meaning bang, crash goes the device, not just a software crash.
So, in this chapter, we will examine recipes that help boost the responsiveness of your BBB under certain conditions. To perform this, we will explore the following topics:
- Kernel modifications for the purpose of creating real-time environments using:
- RT_PREEMPT
- Xenomai
- Programmable real-time units
And now for something completely contradictory: Linux is not real time. It is fast and efficient, but it is not a real-time system.
Harummph! But isn't Linux supposed to be the sexy, better alternative to all those bloated, expensively closed systems out there? It depends.
To begin with, it's important to understand what Linux Mavens—particularly the embedded folks—mean when they refer to real time on their systems. First, it's not just about speedier performance. Although squeezing out faster response times is always a goal—and this can be one of the benefits of enabling a real-time environment—that's not an end in itself. Real time is also about ensuring rock-solid predictability on the system, for example, event-x must occur within a very strict time frame. No other event, thread, or interrupt can take priority or get in the way of a real-time event…no excuses!
You may ask why is this a problem anyway? After all, aren't Linux and our super duper BBB supposed to be super fast? Yes. But all systems experience delays in processing events. We have all seen evidence of this, even in mundane circumstances where not much was happening. For example, from time to time, your cursor doesn't quite move from point A to point B on the screen as quickly as you expect. Alternatively, when you clicked on a taskbar item and the pop-up window didn't appear as lightning fast as it did when you clicked on it five minutes ago.
This kind of latency is typical for all systems, and Linux is not immune to it. In our case, we will refer to this phenomenon as kernel jitter. Also, certain scenarios absolutely cannot abide by any kind of jitters. For example, a milling machine can't have "late" commands in its I/O; otherwise, the project could be ruined. Therefore, there has to be a solution that delivers real-time performance.
For the BeagleBone Black, there are in fact three (actually four) choices to make your system real time, sometimes referred to as an RTOS or real-time operating system. The recipes follow in order of least to most real timely:
- PREEMPT_RT
- XENOMAI
- PRUs
- PRU + Xenomai
Now, we will take a look at how to define real-time categories. There are shades of real time; not all scenarios require nanosecond management or response time. Further, engineers and developers often have their own spin on what they define as real time, which is once again determined by their own scenario requirements. However, for our purposes, we'll define real time using the following spectrum of categories:
- Soft: This is where use case requirements for real time are met most of the time. Consider the example of music playback on your system. It's mostly smooth, but hiccups happen sometimes on playback. This standard is typically adequate for most desktop use cases.
- Life-safety hard: This specifies that the system must deliver on real-time requirements 100 percent of the time. If it doesn't, it might result in death or injury. None of our recipes—and certainly not our lovely BBB—will deliver this standard of response or reliability. I repeat that our recipes and use cases do not cover these scenarios. Only custom, dedicated systems, and certainly the ones that cost more than USD $45.00 can perform this way.
- 100 percent hard: This indicates that the system delivers real-time performance 100 percent of the time. This may sound like Life-safety hard, but the only thing at stake is nonhuman. The worst thing that can happen is that a product gets botched in a milling machine, or your UAV fell down and went boom. But nobody got hurt, and nobody died.
- 95 percent hard: This denotes that our system is nearly perfect (with only 5 percent error margin). This is commonly acceptable, for example, when you're capturing data from sensors. There may be some gaps in the data stream, but nothing egregious that throws off your outcomes or analysis. You can just resample for another dataset.
Note
The preceding definitions are inspired by the paper How fast is fast enough? Choosing between Xenomai and Linux for real-time applications (https://www.osadl.org/fileadmin/dam/rtlws/12/Brown.pdf).
On the subject of real-time systems, embedded developers like to throw around the term "determinism". They aren't getting philosophical. In a real-time context, they're referring to event and temporally-driven outcomes that are precisely determined. That is, with an event, you have an input and a determined (locked) set of outputs, whereas in the temporal piece for a real time environment, the timing is determined as well.
So, why wouldn't you use real time all the time?
The answer is effort, money, time, and project requirements. And sometimes there are distinct trade-offs when using a real time variant in your kernel or system. For example, an event you mark for real time response may hum along perfectly; however, this can end up being a drag on overall system performance.
The following table is a latency table:
|
System |
Typical instruction/interrupt cycle latency |
|---|---|
|
Linux OS |
This specifies 1 second |
|
PREEMPT_RT |
This denotes 200 milliseconds |
|
Xenomai |
This denotes 20-50 milliseconds |
|
PRU |
This specifies 5-10 nanoseconds |
Source: Charles Steinkuehler and his MachineKit (LinuxCNC) milling machine use cases: Typical latency with a Xenomai-patched kernel for the BBB is about 25 uS, with worst case around 70-80 uS.
Note
For more information, refer to http://www.embedded.com/design/operating-systems/4204740/Getting-real--time--about-embedded-GNU-Linux
Before we can convert our BeagleBone Black to a blazing real-time wonder, we need a way to measure latency in the Linux kernel. A popular tool for this purpose is cyclictest. Cylictest measures the amount of time that passes between when a timer expires and when the thread that set the timer actually runs. It uses time snapshots, one just before a specific time interval (t1), then another one just after the timer finishes (t2). We can then compare these two snapshot values to pinpoint excessive latency sources within the kernel.
The usual minimal setup is all you need: a BBB powered over mini USB with Internet connectivity enabled.
Cyclictest isn't available as a prebuilt binary. So, we will have to compile it from source:
- Log in as root:
# sudo -i - Go get the source files for cyclictest:
# git clone git://git.kernel.org/pub/scm/linux/kernel/git/clrkwllms/rt-tests.git - Navigate to the new directory that
gitcreates:# cd rt-tests - Compile that baby:
# make all - Make a copy of the binary in the
/usr/bindirectory so you can typecyclictestfrom whatever directory you find yourself:# cp ./cyclictest /usr/bin/ - Bang on the tool's documentation to make sure it installed properly:
# cyclictest --help - Now, let's run a simple test to see what kind of data that
cyclictestcaptures:# cyclictest --smp -p95 -mThe sample output should look like the following:
# /dev/cpu_dma_latency set to 0us policy: fifo: loadavg: 0.00 0.01 0.05 1/221 4471 T: 0 ( 4464) P:95 I:1000 C: 31326 Min: 39 Act: 58 Avg: 69 Max: 785
This output tells us that our CPU had an average latency of
69microseconds, which is a decent value. Yet, we also had a maximum latency of785microseconds. Ouch! What's happening there? Let's debug (or trace) that.
Alas, we can't do a trace until we've customized the kernel to run a trace routine with cyclictest. So, that's what we'll do in the next section since we also need to modify the kernel to accommodate a new patch.
In the meantime, let's quit the program with Ctrl + C.
- FAQ on real time with PREEMPT-RT—https://rt.wiki.kernel.org/index.php/Frequently_Asked_Questions
- The home of the developers of cyclictest—https://rt.wiki.kernel.org/index.php/Cyclictest
- More details on how to set up and configure cyclictest—http://people.redhat.com/williams/latency-howto/rt-latency-howto.txt
- Long, but useful video explaining the deeper functionalities and virtues of cyclictest—https://www.youtube.com/watch?v=f_u4r6ehZKY
Getting ready
The usual minimal setup is all you need: a BBB powered over mini USB with Internet connectivity enabled.
Cyclictest isn't available as a prebuilt binary. So, we will have to compile it from source:
- Log in as root:
# sudo -i - Go get the source files for cyclictest:
# git clone git://git.kernel.org/pub/scm/linux/kernel/git/clrkwllms/rt-tests.git - Navigate to the new directory that
gitcreates:# cd rt-tests - Compile that baby:
# make all - Make a copy of the binary in the
/usr/bindirectory so you can typecyclictestfrom whatever directory you find yourself:# cp ./cyclictest /usr/bin/ - Bang on the tool's documentation to make sure it installed properly:
# cyclictest --help - Now, let's run a simple test to see what kind of data that
cyclictestcaptures:# cyclictest --smp -p95 -mThe sample output should look like the following:
# /dev/cpu_dma_latency set to 0us policy: fifo: loadavg: 0.00 0.01 0.05 1/221 4471 T: 0 ( 4464) P:95 I:1000 C: 31326 Min: 39 Act: 58 Avg: 69 Max: 785
This output tells us that our CPU had an average latency of
69microseconds, which is a decent value. Yet, we also had a maximum latency of785microseconds. Ouch! What's happening there? Let's debug (or trace) that.
Alas, we can't do a trace until we've customized the kernel to run a trace routine with cyclictest. So, that's what we'll do in the next section since we also need to modify the kernel to accommodate a new patch.
In the meantime, let's quit the program with Ctrl + C.
- FAQ on real time with PREEMPT-RT—https://rt.wiki.kernel.org/index.php/Frequently_Asked_Questions
- The home of the developers of cyclictest—https://rt.wiki.kernel.org/index.php/Cyclictest
- More details on how to set up and configure cyclictest—http://people.redhat.com/williams/latency-howto/rt-latency-howto.txt
- Long, but useful video explaining the deeper functionalities and virtues of cyclictest—https://www.youtube.com/watch?v=f_u4r6ehZKY
How to do it...
Cyclictest isn't available as a prebuilt binary. So, we will have to compile it from source:
- Log in as root:
# sudo -i - Go get the source files for cyclictest:
# git clone git://git.kernel.org/pub/scm/linux/kernel/git/clrkwllms/rt-tests.git - Navigate to the new directory that
gitcreates:# cd rt-tests - Compile that baby:
# make all - Make a copy of the binary in the
/usr/bindirectory so you can typecyclictestfrom whatever directory you find yourself:# cp ./cyclictest /usr/bin/ - Bang on the tool's documentation to make sure it installed properly:
# cyclictest --help - Now, let's run a simple test to see what kind of data that
cyclictestcaptures:# cyclictest --smp -p95 -mThe sample output should look like the following:
# /dev/cpu_dma_latency set to 0us policy: fifo: loadavg: 0.00 0.01 0.05 1/221 4471 T: 0 ( 4464) P:95 I:1000 C: 31326 Min: 39 Act: 58 Avg: 69 Max: 785
This output tells us that our CPU had an average latency of
69microseconds, which is a decent value. Yet, we also had a maximum latency of785microseconds. Ouch! What's happening there? Let's debug (or trace) that.
Alas, we can't do a trace until we've customized the kernel to run a trace routine with cyclictest. So, that's what we'll do in the next section since we also need to modify the kernel to accommodate a new patch.
In the meantime, let's quit the program with Ctrl + C.
- FAQ on real time with PREEMPT-RT—https://rt.wiki.kernel.org/index.php/Frequently_Asked_Questions
- The home of the developers of cyclictest—https://rt.wiki.kernel.org/index.php/Cyclictest
- More details on how to set up and configure cyclictest—http://people.redhat.com/williams/latency-howto/rt-latency-howto.txt
- Long, but useful video explaining the deeper functionalities and virtues of cyclictest—https://www.youtube.com/watch?v=f_u4r6ehZKY
See also
- FAQ on real time with PREEMPT-RT—https://rt.wiki.kernel.org/index.php/Frequently_Asked_Questions
- The home of the developers of cyclictest—https://rt.wiki.kernel.org/index.php/Cyclictest
- More details on how to set up and configure cyclictest—http://people.redhat.com/williams/latency-howto/rt-latency-howto.txt
- Long, but useful video explaining the deeper functionalities and virtues of cyclictest—https://www.youtube.com/watch?v=f_u4r6ehZKY
To dive into the real time realm, we'll begin by exploring a piece of code that you apply to the Linux kernel directly, one which is often considered the de facto standard for real-time applications, a patch called PREEMPT_RT.
First, nomenclature. In the literature, our patch can be found referred to as CONFIG_PREEMPT_RT, PREEMPT_RT, RT-Preempt, or simply Linux RT patch. Whew! Can't anyone decide? We'll default to calling it RT-PREEMPT since that is the most common usage.
The RT-PREEMPT patch forces onto our system what is known as native real time pre-emption. This means that the patch is applied directly—or natively—onto the kernel, and allows you to preempt the entire kernel's events and processes in favor of targeted events or tasks. It makes sections of the Linux kernel pre-emptible that are ordinarily blocking.
For example, let's say we have two processes. We assign a higher priority to the second process than the first one. The patch enables a time tick interrupt to preempt the first (or any other process) since the second one is given the highest priority. This way, the process fires and finishes exactly on schedule.
RT-PREEMPT also happens to enjoy the least "real timeliness" in this chapter's basket of tricks. Because the patch utilizes a pre-emption process, the kernel stops whatever it is doing and focuses on delivering the real time event. This is good for your real time requirement, but not so good holistically since it often results in an overall system slow down.
This is not to say that RT-PREEMPT is a duffer. Much outstanding work has gone into this code to optimize it, and make it as useful as possible for many scenarios. In fact, RT-PREEMPT is often considered a software standard precisely because it fulfills the majority of real time requirements for devices and systems.
The last thing we will say before moving on to the recipe is that we are only going to give you the method for applying RT-PREEMPT onto Debian Jessie, and intentionally ignore Debian Wheezy. Why? Because much hair-pulling has been occurring over the years to get RT-PREEMPT onto the 3.7-3.8 kernel. And for budding Linux and BBB users, the process could make you go bald. The great news, though, is once you are committed to using the Jessie kernel (3.14.x), it's an easy few steps to get up and running.
All you need is the usual minimal setup: a BBB powered over the USB tether with Internet connectivity enabled.
- Log in as root user:
$ sudo -i #
- Check the version of Jessie that you are running:
# uname -r 3.14.39-ti-r61
- Run a command that will do a custom search for available real-time Jessie kernels:
# sudo apt-cache search linux-image | grep ti-rtAlthough the version numbers may vary somewhat, your search should have pulled down something like the following into your screen output:
linux-image-3.14.38-ti-rt-r60 - Linux kernel, version 3.14.38-ti-rt-r60 linux-image-3.14.39-ti-rt-r61 - Linux kernel, version 3.14.39-ti-rt-r61 linux-image-3.14.40-ti-rt-r62 - Linux kernel, version 3.14.40-ti-rt-r62 ...
- Next, from the available list shown from step one, install the real time kernel version that matches your currently installed kernel:
# sudo apt-get install linux-image-3.14.XX-ti-rtXAnd…you are done! RT-PREEMPT is now baked into your kernel.
If you are feeling a bit masochistic and just have to try applying RT-PREEMPT onto your Debian Wheezy kernel, you can piece it together from the following resources:
Getting ready
All you need is the usual minimal setup: a BBB powered over the USB tether with Internet connectivity enabled.
- Log in as root user:
$ sudo -i #
- Check the version of Jessie that you are running:
# uname -r 3.14.39-ti-r61
- Run a command that will do a custom search for available real-time Jessie kernels:
# sudo apt-cache search linux-image | grep ti-rtAlthough the version numbers may vary somewhat, your search should have pulled down something like the following into your screen output:
linux-image-3.14.38-ti-rt-r60 - Linux kernel, version 3.14.38-ti-rt-r60 linux-image-3.14.39-ti-rt-r61 - Linux kernel, version 3.14.39-ti-rt-r61 linux-image-3.14.40-ti-rt-r62 - Linux kernel, version 3.14.40-ti-rt-r62 ...
- Next, from the available list shown from step one, install the real time kernel version that matches your currently installed kernel:
# sudo apt-get install linux-image-3.14.XX-ti-rtXAnd…you are done! RT-PREEMPT is now baked into your kernel.
If you are feeling a bit masochistic and just have to try applying RT-PREEMPT onto your Debian Wheezy kernel, you can piece it together from the following resources:
How to do it…
- Log in as root user:
$ sudo -i #
- Check the version of Jessie that you are running:
# uname -r 3.14.39-ti-r61
- Run a command that will do a custom search for available real-time Jessie kernels:
# sudo apt-cache search linux-image | grep ti-rtAlthough the version numbers may vary somewhat, your search should have pulled down something like the following into your screen output:
linux-image-3.14.38-ti-rt-r60 - Linux kernel, version 3.14.38-ti-rt-r60 linux-image-3.14.39-ti-rt-r61 - Linux kernel, version 3.14.39-ti-rt-r61 linux-image-3.14.40-ti-rt-r62 - Linux kernel, version 3.14.40-ti-rt-r62 ...
- Next, from the available list shown from step one, install the real time kernel version that matches your currently installed kernel:
# sudo apt-get install linux-image-3.14.XX-ti-rtXAnd…you are done! RT-PREEMPT is now baked into your kernel.
If you are feeling a bit masochistic and just have to try applying RT-PREEMPT onto your Debian Wheezy kernel, you can piece it together from the following resources:
There's more…
If you are feeling a bit masochistic and just have to try applying RT-PREEMPT onto your Debian Wheezy kernel, you can piece it together from the following resources:
Because it's a magic spell handed down from Gandalf the Grey, this recipe will only work by saying it aloud three times fast: Xenomai, Xenomai, Xenomai! All right. It sounds like an incantation. But, unfortunately, it's only a software layer on top of a kernel.
The good news, however, is that adding Xenomai to the kernel mix can magically bring real-time(ish) oomph to our BeagleBone Black. So, what is it exactly? It is a set of patches bringing several useful ingredients:
- Real-time support from the hardware interrupt level to user space applications.
- A dual-kernel mix composed of the primary Linux kernel and the secondary Xenomai kernel.
- A subsystem underneath Linux that does not rely on the kernel to pre-empt designated events (like our previous method).
But why should we use it instead of PREEMPT_RT? With its focus on embedded systems, Xenomai is useful for several reasons:
- Lowers system overheads.
- Legacy porting: Easier to port legacy real-time systems. As a budding BBBer and embedded Linux neophyte, you may not be porting legacy systems anytime soon. But if you were, then Xenomai would be an easier way to do it since you can lash your old system together to the Linux kernel by using Xenomai as a binding interface.
- Highly configurable: Xenomai can be configured to set thread priorities/timer IRQ, for example, to high or low based on your preference (99 is the highest in Xenomai) with the result that events never get interrupted.
- Works better with version 3.8 of the kernel and above.
The usual minimal setup is all you need: a BBB powered over mini USB with Internet connectivity enabled.
Although there are methods (noted later in this section) for installing Xenomai from source, our recipe will illustrate a simple method for getting your kernel modified:
- In order to run this recipe properly, you will need to start by appending your repositories. Begin by opening up your source list:
$ sudo nano /etc/apt/sources.listIn the open edit window, paste the following text into the end of the file. Choose the option based on the version of Debian you are using:
Wheezy
deb [arch=armhf] http://repos.rcn-ee.com/debian/ wheezy main #deb-src [arch=armhf] http://repos.rcn-ee.com/debian/ wheezy main
Jessie
deb [arch=armhf] http://repos.rcn-ee.com/debian/ jessie main #deb-src [arch=armhf] http://repos.rcn-ee.com/debian/ jessie main
- Save and close the edit window, then update your repositories:
$ sudo apt-get updateWith Debian Wheezy, you may encounter an error of the following ilk:
W: GPG error: http://repos.rcn-ee.com wheezy Release: The following signatures couldn't be verified because the public key is not available: NO_PUBKEY D284E608A4C46402 - So, run this command to fix it:
$ sudo apt-get install rcn-ee-archive-keyring - Update your repositories again and the error should be gone:
$ sudo apt-get update - Check the version of your installed kernel:
$ uname -r - Next, we will run a search command to find the version of Xenomai that is suitable for our kernel. Make sure you run the command appropriate to Wheezy or Jessie:
Wheezy
$ sudo apt-cache search linux-image | grep 3.8.xx-xenomai|Jessie
$ sudo apt-cache search linux-image | grep xenomaiAt the time of writing this chapter, your Debian output will look like the following. Jessie will vary slightly according to your installed version:
linux-image-3.8.13-xenomai-r67 - Linux kernel, version 3.8.13-xenomai-r67 linux-image-3.8.13-xenomai-r69 - Linux kernel, version 3.8.13-xenomai-r69 linux-image-3.8.13-xenomai-r70 - Linux kernel, version 3.8.13-xenomai-r70 linux-image-3.8.13-xenomai-r71 - Linux kernel, version 3.8.13-xenomai-r71 linux-image-3.8.13-xenomai-r72 - Linux kernel, version 3.8.13-xenomai-r72
- Now, we will install the Xenomai kernel. Replace the
xwith the version of the bone kernel that you have on your board (Take a look at step 6 if you do not remember):Wheezy
$ sudo apt-get install linux-image-3.8.XX-xenomai-rXJessie
$ sudo apt-get install linux-image-3.14.XX-ti-xenomai-rXX - Install the toolset for running basic Xenomai tests:
$ sudo apt-get install xenomai-runtime - Confirm that we installed Xenomai:
$ uname -rWheezy
3.8.XX-ti-xenomai-rXXJessie
3.14.XX-ti-xenomai-rXX - Check the version of Xenomai (you may have a later one):
$ cat /proc/xenomai/version 2.6.4
It's looking good! You now have a real time Xenomai environment set up on your BBB.
- To round out the recipe, we want to run a couple of tests to both check that the kernel layer is installed and determine latency. First, log in as root user:
$ sudo -i #
- Run the user-mode
latencytest:# xeno latencyYour output should look something like this:
RTT| 00:00:01 (periodic user-mode task, 1000 us period, priority 99) RTH|----lat min|----lat avg|----lat max|-overrun|---msw|---lat best|--lat worst RTD| 1.583| 1.999| 6.541| 0| 0| 1.583| 6.541 RTD| 1.583| 2.958| 35.916| 0| 0| 1.583| 35.916 RTD| 0.916| 2.083| 30.624| 0| 0| 0.916| 35.916 RTD| 0.958| 2.041| 15.749| 0| 0| 0.916| 35.916 RTD| 1.124| 2.083| 28.791| 0| 0| 0.916| 35.916 RTD| 1.583| 2.083| 31.541| 0| 0| 0.916| 35.916 RTD| -0.084| 2.916| 35.791| 0| 0| -0.084| 35.916 RTD| 0.916| 2.083| 28.041| 0| 0| -0.084| 35.916
- Finally, run a test to see how the board performs under load. This particular command—
xeno-test—requires several options to be included in order for it to run a useful test:# xeno-test -l "dohell -s 192.168.0.5 -m /mnt -l /ltp" -p 100 -g histoLet's take a closer look at the various parts of this script so we can understand what it does:
dohell [ -b <path> ] [ -s <server> ] [ -p <port> ] [ -m <path> ] [ -l <path> | <duration> ]
If the preceding easy recipe for getting the Xenomai kernel installed does not exactly suit your specific needs, you have a couple of other ways to attack it: Use a prebuilt, downloadable software image called MachineKit or you can install it from source.
MachineKit:
Developer and engineer Charles Steinkuehler has created an essentially turnkey real-time Debian image that requires not much more than downloading and flashing a pre-built kernel to a microSD card or the eMMC. As its name suggests, MachineKit targets machine users (CNCs, 3-D printers) and comes with LinuxCNC, Xenomai and other real time ingredients already loaded. The image can save end users an enormous amount of time in installing and setting up their machines.
- Download the software at http://elinux.org/Beagleboard:BeagleBoneBlack_Debian#BBW.2FBBB_.28All_Revs.29_Machinekit
- Instructions are at http://blog.machinekit.io/p/machinekit_16.html
At his site, you will also find an extensive list of capes designed specifically for controlling 3-D printers and CNCs—http://blog.machinekit.io/p/hardware-capes.html
Install from source
There are several excellent tutorials for doing a custom build:
- Professor Mark Yoder's top-notch lesson—http://elinux.org/EBC_Xenomai
- Installing Xenomai on Beaglebone using Debian distribution—https://randomlinuxhacks.wordpress.com/2015/02/22/installing-xenomai-on-beaglebone-using-debian-distribution/
- Xenomai on the Beaglebone Black in 14 easy steps—http://brunosmartins.info/xenomai-on-the-beaglebone-black-in-14-easy-steps/
To further explore the latency command and its numerous options, check out the guide written by the Xenomai.org team—http://www.xenomai.org/documentation/xenomai-head/html/latency/
Another useful tool for testing the Xenomai kernel is klatency, a test that requires either compiling Xenomai from source as outlined here, or making kernel configuration changes that are beyond the scope of this recipe. However, in the following There's more… section are several methods for installing Xenomai from source.
Getting ready
The usual minimal setup is all you need: a BBB powered over mini USB with Internet connectivity enabled.
Although there are methods (noted later in this section) for installing Xenomai from source, our recipe will illustrate a simple method for getting your kernel modified:
- In order to run this recipe properly, you will need to start by appending your repositories. Begin by opening up your source list:
$ sudo nano /etc/apt/sources.listIn the open edit window, paste the following text into the end of the file. Choose the option based on the version of Debian you are using:
Wheezy
deb [arch=armhf] http://repos.rcn-ee.com/debian/ wheezy main #deb-src [arch=armhf] http://repos.rcn-ee.com/debian/ wheezy main
Jessie
deb [arch=armhf] http://repos.rcn-ee.com/debian/ jessie main #deb-src [arch=armhf] http://repos.rcn-ee.com/debian/ jessie main
- Save and close the edit window, then update your repositories:
$ sudo apt-get updateWith Debian Wheezy, you may encounter an error of the following ilk:
W: GPG error: http://repos.rcn-ee.com wheezy Release: The following signatures couldn't be verified because the public key is not available: NO_PUBKEY D284E608A4C46402 - So, run this command to fix it:
$ sudo apt-get install rcn-ee-archive-keyring - Update your repositories again and the error should be gone:
$ sudo apt-get update - Check the version of your installed kernel:
$ uname -r - Next, we will run a search command to find the version of Xenomai that is suitable for our kernel. Make sure you run the command appropriate to Wheezy or Jessie:
Wheezy
$ sudo apt-cache search linux-image | grep 3.8.xx-xenomai|Jessie
$ sudo apt-cache search linux-image | grep xenomaiAt the time of writing this chapter, your Debian output will look like the following. Jessie will vary slightly according to your installed version:
linux-image-3.8.13-xenomai-r67 - Linux kernel, version 3.8.13-xenomai-r67 linux-image-3.8.13-xenomai-r69 - Linux kernel, version 3.8.13-xenomai-r69 linux-image-3.8.13-xenomai-r70 - Linux kernel, version 3.8.13-xenomai-r70 linux-image-3.8.13-xenomai-r71 - Linux kernel, version 3.8.13-xenomai-r71 linux-image-3.8.13-xenomai-r72 - Linux kernel, version 3.8.13-xenomai-r72
- Now, we will install the Xenomai kernel. Replace the
xwith the version of the bone kernel that you have on your board (Take a look at step 6 if you do not remember):Wheezy
$ sudo apt-get install linux-image-3.8.XX-xenomai-rXJessie
$ sudo apt-get install linux-image-3.14.XX-ti-xenomai-rXX - Install the toolset for running basic Xenomai tests:
$ sudo apt-get install xenomai-runtime - Confirm that we installed Xenomai:
$ uname -rWheezy
3.8.XX-ti-xenomai-rXXJessie
3.14.XX-ti-xenomai-rXX - Check the version of Xenomai (you may have a later one):
$ cat /proc/xenomai/version 2.6.4
It's looking good! You now have a real time Xenomai environment set up on your BBB.
- To round out the recipe, we want to run a couple of tests to both check that the kernel layer is installed and determine latency. First, log in as root user:
$ sudo -i #
- Run the user-mode
latencytest:# xeno latencyYour output should look something like this:
RTT| 00:00:01 (periodic user-mode task, 1000 us period, priority 99) RTH|----lat min|----lat avg|----lat max|-overrun|---msw|---lat best|--lat worst RTD| 1.583| 1.999| 6.541| 0| 0| 1.583| 6.541 RTD| 1.583| 2.958| 35.916| 0| 0| 1.583| 35.916 RTD| 0.916| 2.083| 30.624| 0| 0| 0.916| 35.916 RTD| 0.958| 2.041| 15.749| 0| 0| 0.916| 35.916 RTD| 1.124| 2.083| 28.791| 0| 0| 0.916| 35.916 RTD| 1.583| 2.083| 31.541| 0| 0| 0.916| 35.916 RTD| -0.084| 2.916| 35.791| 0| 0| -0.084| 35.916 RTD| 0.916| 2.083| 28.041| 0| 0| -0.084| 35.916
- Finally, run a test to see how the board performs under load. This particular command—
xeno-test—requires several options to be included in order for it to run a useful test:# xeno-test -l "dohell -s 192.168.0.5 -m /mnt -l /ltp" -p 100 -g histoLet's take a closer look at the various parts of this script so we can understand what it does:
dohell [ -b <path> ] [ -s <server> ] [ -p <port> ] [ -m <path> ] [ -l <path> | <duration> ]
If the preceding easy recipe for getting the Xenomai kernel installed does not exactly suit your specific needs, you have a couple of other ways to attack it: Use a prebuilt, downloadable software image called MachineKit or you can install it from source.
MachineKit:
Developer and engineer Charles Steinkuehler has created an essentially turnkey real-time Debian image that requires not much more than downloading and flashing a pre-built kernel to a microSD card or the eMMC. As its name suggests, MachineKit targets machine users (CNCs, 3-D printers) and comes with LinuxCNC, Xenomai and other real time ingredients already loaded. The image can save end users an enormous amount of time in installing and setting up their machines.
- Download the software at http://elinux.org/Beagleboard:BeagleBoneBlack_Debian#BBW.2FBBB_.28All_Revs.29_Machinekit
- Instructions are at http://blog.machinekit.io/p/machinekit_16.html
At his site, you will also find an extensive list of capes designed specifically for controlling 3-D printers and CNCs—http://blog.machinekit.io/p/hardware-capes.html
Install from source
There are several excellent tutorials for doing a custom build:
- Professor Mark Yoder's top-notch lesson—http://elinux.org/EBC_Xenomai
- Installing Xenomai on Beaglebone using Debian distribution—https://randomlinuxhacks.wordpress.com/2015/02/22/installing-xenomai-on-beaglebone-using-debian-distribution/
- Xenomai on the Beaglebone Black in 14 easy steps—http://brunosmartins.info/xenomai-on-the-beaglebone-black-in-14-easy-steps/
To further explore the latency command and its numerous options, check out the guide written by the Xenomai.org team—http://www.xenomai.org/documentation/xenomai-head/html/latency/
Another useful tool for testing the Xenomai kernel is klatency, a test that requires either compiling Xenomai from source as outlined here, or making kernel configuration changes that are beyond the scope of this recipe. However, in the following There's more… section are several methods for installing Xenomai from source.
How to do it...
Although there are methods (noted later in this section) for installing Xenomai from source, our recipe will illustrate a simple method for getting your kernel modified:
- In order to run this recipe properly, you will need to start by appending your repositories. Begin by opening up your source list:
$ sudo nano /etc/apt/sources.listIn the open edit window, paste the following text into the end of the file. Choose the option based on the version of Debian you are using:
Wheezy
deb [arch=armhf] http://repos.rcn-ee.com/debian/ wheezy main #deb-src [arch=armhf] http://repos.rcn-ee.com/debian/ wheezy main
Jessie
deb [arch=armhf] http://repos.rcn-ee.com/debian/ jessie main #deb-src [arch=armhf] http://repos.rcn-ee.com/debian/ jessie main
- Save and close the edit window, then update your repositories:
$ sudo apt-get updateWith Debian Wheezy, you may encounter an error of the following ilk:
W: GPG error: http://repos.rcn-ee.com wheezy Release: The following signatures couldn't be verified because the public key is not available: NO_PUBKEY D284E608A4C46402 - So, run this command to fix it:
$ sudo apt-get install rcn-ee-archive-keyring - Update your repositories again and the error should be gone:
$ sudo apt-get update - Check the version of your installed kernel:
$ uname -r - Next, we will run a search command to find the version of Xenomai that is suitable for our kernel. Make sure you run the command appropriate to Wheezy or Jessie:
Wheezy
$ sudo apt-cache search linux-image | grep 3.8.xx-xenomai|Jessie
$ sudo apt-cache search linux-image | grep xenomaiAt the time of writing this chapter, your Debian output will look like the following. Jessie will vary slightly according to your installed version:
linux-image-3.8.13-xenomai-r67 - Linux kernel, version 3.8.13-xenomai-r67 linux-image-3.8.13-xenomai-r69 - Linux kernel, version 3.8.13-xenomai-r69 linux-image-3.8.13-xenomai-r70 - Linux kernel, version 3.8.13-xenomai-r70 linux-image-3.8.13-xenomai-r71 - Linux kernel, version 3.8.13-xenomai-r71 linux-image-3.8.13-xenomai-r72 - Linux kernel, version 3.8.13-xenomai-r72
- Now, we will install the Xenomai kernel. Replace the
xwith the version of the bone kernel that you have on your board (Take a look at step 6 if you do not remember):Wheezy
$ sudo apt-get install linux-image-3.8.XX-xenomai-rXJessie
$ sudo apt-get install linux-image-3.14.XX-ti-xenomai-rXX - Install the toolset for running basic Xenomai tests:
$ sudo apt-get install xenomai-runtime - Confirm that we installed Xenomai:
$ uname -rWheezy
3.8.XX-ti-xenomai-rXXJessie
3.14.XX-ti-xenomai-rXX - Check the version of Xenomai (you may have a later one):
$ cat /proc/xenomai/version 2.6.4
It's looking good! You now have a real time Xenomai environment set up on your BBB.
- To round out the recipe, we want to run a couple of tests to both check that the kernel layer is installed and determine latency. First, log in as root user:
$ sudo -i #
- Run the user-mode
latencytest:# xeno latencyYour output should look something like this:
RTT| 00:00:01 (periodic user-mode task, 1000 us period, priority 99) RTH|----lat min|----lat avg|----lat max|-overrun|---msw|---lat best|--lat worst RTD| 1.583| 1.999| 6.541| 0| 0| 1.583| 6.541 RTD| 1.583| 2.958| 35.916| 0| 0| 1.583| 35.916 RTD| 0.916| 2.083| 30.624| 0| 0| 0.916| 35.916 RTD| 0.958| 2.041| 15.749| 0| 0| 0.916| 35.916 RTD| 1.124| 2.083| 28.791| 0| 0| 0.916| 35.916 RTD| 1.583| 2.083| 31.541| 0| 0| 0.916| 35.916 RTD| -0.084| 2.916| 35.791| 0| 0| -0.084| 35.916 RTD| 0.916| 2.083| 28.041| 0| 0| -0.084| 35.916
- Finally, run a test to see how the board performs under load. This particular command—
xeno-test—requires several options to be included in order for it to run a useful test:# xeno-test -l "dohell -s 192.168.0.5 -m /mnt -l /ltp" -p 100 -g histoLet's take a closer look at the various parts of this script so we can understand what it does:
dohell [ -b <path> ] [ -s <server> ] [ -p <port> ] [ -m <path> ] [ -l <path> | <duration> ]
If the preceding easy recipe for getting the Xenomai kernel installed does not exactly suit your specific needs, you have a couple of other ways to attack it: Use a prebuilt, downloadable software image called MachineKit or you can install it from source.
MachineKit:
Developer and engineer Charles Steinkuehler has created an essentially turnkey real-time Debian image that requires not much more than downloading and flashing a pre-built kernel to a microSD card or the eMMC. As its name suggests, MachineKit targets machine users (CNCs, 3-D printers) and comes with LinuxCNC, Xenomai and other real time ingredients already loaded. The image can save end users an enormous amount of time in installing and setting up their machines.
- Download the software at http://elinux.org/Beagleboard:BeagleBoneBlack_Debian#BBW.2FBBB_.28All_Revs.29_Machinekit
- Instructions are at http://blog.machinekit.io/p/machinekit_16.html
At his site, you will also find an extensive list of capes designed specifically for controlling 3-D printers and CNCs—http://blog.machinekit.io/p/hardware-capes.html
Install from source
There are several excellent tutorials for doing a custom build:
- Professor Mark Yoder's top-notch lesson—http://elinux.org/EBC_Xenomai
- Installing Xenomai on Beaglebone using Debian distribution—https://randomlinuxhacks.wordpress.com/2015/02/22/installing-xenomai-on-beaglebone-using-debian-distribution/
- Xenomai on the Beaglebone Black in 14 easy steps—http://brunosmartins.info/xenomai-on-the-beaglebone-black-in-14-easy-steps/
To further explore the latency command and its numerous options, check out the guide written by the Xenomai.org team—http://www.xenomai.org/documentation/xenomai-head/html/latency/
Another useful tool for testing the Xenomai kernel is klatency, a test that requires either compiling Xenomai from source as outlined here, or making kernel configuration changes that are beyond the scope of this recipe. However, in the following There's more… section are several methods for installing Xenomai from source.
There's more…
If the preceding easy recipe for getting the Xenomai kernel installed does not exactly suit your specific needs, you have a couple of other ways to attack it: Use a prebuilt, downloadable software image called MachineKit or you can install it from source.
MachineKit:
Developer and engineer Charles Steinkuehler has created an essentially turnkey real-time Debian image that requires not much more than downloading and flashing a pre-built kernel to a microSD card or the eMMC. As its name suggests, MachineKit targets machine users (CNCs, 3-D printers) and comes with LinuxCNC, Xenomai and other real time ingredients already loaded. The image can save end users an enormous amount of time in installing and setting up their machines.
- Download the software at http://elinux.org/Beagleboard:BeagleBoneBlack_Debian#BBW.2FBBB_.28All_Revs.29_Machinekit
- Instructions are at http://blog.machinekit.io/p/machinekit_16.html
At his site, you will also find an extensive list of capes designed specifically for controlling 3-D printers and CNCs—http://blog.machinekit.io/p/hardware-capes.html
Install from source
There are several excellent tutorials for doing a custom build:
- Professor Mark Yoder's top-notch lesson—http://elinux.org/EBC_Xenomai
- Installing Xenomai on Beaglebone using Debian distribution—https://randomlinuxhacks.wordpress.com/2015/02/22/installing-xenomai-on-beaglebone-using-debian-distribution/
- Xenomai on the Beaglebone Black in 14 easy steps—http://brunosmartins.info/xenomai-on-the-beaglebone-black-in-14-easy-steps/
To further explore the latency command and its numerous options, check out the guide written by the Xenomai.org team—http://www.xenomai.org/documentation/xenomai-head/html/latency/
Another useful tool for testing the Xenomai kernel is klatency, a test that requires either compiling Xenomai from source as outlined here, or making kernel configuration changes that are beyond the scope of this recipe. However, in the following There's more… section are several methods for installing Xenomai from source.
See also
To further explore the latency command and its numerous options, check out the guide written by the Xenomai.org team—http://www.xenomai.org/documentation/xenomai-head/html/latency/
Another useful tool for testing the Xenomai kernel is klatency, a test that requires either compiling Xenomai from source as outlined here, or making kernel configuration changes that are beyond the scope of this recipe. However, in the following There's more… section are several methods for installing Xenomai from source.
Now it's time for hardware magic, for serious real time, and a shift away from mere software mods on the kernel.
It's time for Programmable Real-Time Units And Industrial Controller Subsystem, also known as PRU-ICSS, or PRUs. How's that for a mouthful? More techno-acronyms are always so helpful and delicious. OK. Let's deconstruct it.
PRUs are specialized chips on the BeagleBone Black that give you real time task control over your system. These two 32-bit microcontrollers are actually separate CPUs from the main CPU and the operating system. That's right: PRUs are separate hardware. This means they are not reliant on the core kernel and are more efficient at accessing I/O pins and driving real time events.
Having onboard PRUs is one of the BBB's big differentiators in the microcomputer market. Real-time hardware control typically requires adding on daughterboards such as FPGAs (another big scary acronym) that boost your system's mojo. Using PRUs requires no overhead on the BBB's main processor, and the hardware can be managed without worrying about interrupts from the OS.
This is a huge distinction and advantage from our prior examples of RT-PREEMPT and Xenomai patches, both of them software solutions for real time challenges.

PRUs exist as parallel but distinct processors on the board
To further clarify, the PRU subsystem is not a hardware accelerator that speeds up algorithm computing. However, PRUS do:
- Reduce latency: Digital I/Os respond in nanoseconds, not milliseconds like we saw in our software RT scenarios.
- Extend connectivity and add-ons: Although the BBB is often positioned as a hobbyist or prototyping platform, PRU capability opens up use cases to professional embedded computing scenarios, unlike other players in the market such as the Raspberry Pi.
- Manage power: With the ability to reduce power consumption in real time, far better control over the system—and its uses—becomes possible. For the embedded dev crowd, that's a real boon.
- Deliver 100 percent hard real time.
Note
Texas Instruments—the inventor of the BBB—doesn't actually "support" your use of the board with the PRUs. They provide examples, and even encourage use of the PRUs, but still caveat the whole thing by saying that the code is "for DIYers to use at their own risk." Maybe they're afraid someone will use the PRUs to make a flux capacitor?
On one level, it only takes two things to make the PRUs fly: you enable them, and then you run a C program (or another wrapper with Python) to make use of them.
Easy, right? However, buried within those two seemingly straightforward tasks are some challenges. Because we are manipulating an entirely second set of hardware separate from the main processor, handling PRUs on the BBB is quite a different animal from nearly all the other recipes in this book.
It doesn't help that current documentation—though extensive—is scattered, sometimes useful, but more often poorly written. The good news, though, is that Beagleboard.org and the open source community have made considerable progress in simplifying the tasks ahead of us.
Now let's prep and enable the PRUs.
Earlier methods of interacting with the PRUs were a truckload of hurt. The process required many steps, including creating and compiling a device tree just to run a sample application.
However, cooking with PRUs has been simplified considerably with the recipe below. And happily, you can use everything for both Debian Wheezy and Jessie versions.
The usual minimal setup is all you need: a BBB powered over mini USB with Internet connectivity enabled.
- Log in as the root user:
$ sudo -i - Install driver Library and PRU toolset:
# apt-get install am335x-pru-package && ti-pru-cgt-installerNote
The installation includes a number of items required to operate the PRUs from user space:
- PASM assembler: Being rather unique in nature, the PRUs don't speak BoneScript or JavaScript or Python or C. Instead, they communicate using Assembly, and require the PASM assembler to compile and run its code. You may have little experience with Assembly; you may have none. Don't despair: after running the command above the tool comes ready to use.
- libprussdrv: This consists of the driver library and library headers.
- In a similar vein as we do with GPIO pins, to make use of the PRUs we have to enable them. And interaction with the PRUs requires the use of a Device Tree fragment. With the current Wheezy and Jessie distributions, the DT overlay comes pre-compiled and ready to use on your system, a huge time-saver over earlier versions of the software.
Before loading a fragment, let us first look at the system's Device Tree slots where it will appear so we can see understand the before-and-after output:
# cat /sys/devices/bone_capemgr.9/slots 0: 54:PF--- 1: 55:PF--- 2: 56:PF--- 3: 57:PF--- 4: ff:P-O-L Bone-LT-eMMC-2G,00A0,Texas Instrument,BB-BONE-EMMC-2G 5: ff:P-O-L Bone-Black-HDMI,00A0,Texas Instrument,BB-BONELT-HDMI 7: ff:P-O-L Override Board Name,00A0,Override Manuf,BB-UART4
Nothing shows, yet, in the output above that indicates PRU visibility or communication with the kernel. The next command changes that status.
- Using the
echocommand, load the device tree fragment. This enables the PRU:# echo BB-BONE-PRU-01 >/sys/devices/bone_capemgr.9/slotsThe command should return you to the prompt without any message or error:
# - With the
catcommand again, check to make sure that the fragment loaded:# cat /sys/devices/bone_capemgr.9/slots 0: 54:PF--- 1: 55:PF--- 2: 56:PF--- 3: 57:PF--- 4: ff:P-O-L Bone-LT-eMMC-2G,00A0,Texas Instrument,BB-BONE-EMMC-2G 5: ff:P-O-L Bone-Black-HDMI,00A0,Texas Instrument,BB-BONELT-HDMI 7: ff:P-O-L Override Board Name,00A0,Override Manuf,BB-UART4 8: ff:P-O-L Override Board Name,00A0,Override Manuf,BB-BONE-PRU-01
A new overlay should appear in the last slot, namely
BB-BONE-PRU-01. Your slot number for the PRU may differ according to other drivers and daughterboards you already have loaded. - Run an additional command,
lsmod, which shows all modules loaded into the kernel. We want to confirm that theuio_prussdriver connected properly, since it is the module that opens a gate between user space applications and the PRU, allowing them to speak to one another:# lsmod Module Size Used by uio_pruss 4066 0 g_multi 50407 2 libcomposite 15028 1 g_multi 8192cu 449033 0 omap_rng 4062 0 mt7601Usta 601404 0
- To be safe, we should also run
dmesgin order to peek at the kernel messages and see if any other errors occurred. Add the options pipe (|) and (less) so you don't get one big output dump on the screen.# dmesg | lessScroll through the output by tapping the spacebar at the bottom of the terminal screen until you start seeing output for
bone-capemgr bone_capemgr.9. Keep advancing to the next screen until you begin to see the following:[ 2268.218496] bone-capemgr bone_capemgr.9: part_number 'BB-BONE-PRU-01', version 'N/A' [ 2268.218670] bone-capemgr bone_capemgr.9: slot #8: generic override [ 2268.218713] bone-capemgr bone_capemgr.9: bone: Using override eeprom data at slot 8 [ 2268.218761] bone-capemgr bone_capemgr.9: slot #8: 'Override Board Name,00A0,Override Manuf,BB-BONE-PRU-01' [ 2268.219031] bone-capemgr bone_capemgr.9: slot #8: Requesting part number/version based 'BB-BONE-PRU-01-00A0.dtbo [ 2268.219079] bone-capemgr bone_capemgr.9: slot #8: Requesting firmware 'BB-BONE-PRU-01-00A0.dtbo' for board-name 'Override Board Name', version '00A0' [ 2268.219140] bone-capemgr bone_capemgr.9: slot #8: dtbo 'BB-BONE-PRU-01-00A0.dtbo' loaded; converting to live tree [ 2268.219821] bone-capemgr bone_capemgr.9: slot #8: #2 overlays [ 2268.241573] omap_hwmod: pruss: failed to hardreset [ 2268.248299] bone-capemgr bone_capemgr.9: slot #8: Applied #2 overlays.
- Before moving on to an actual test application, we should add an additional ingredient to make our preceding
echocommand stick. Although this step is optional, you should still go through the process of doing it so that when we reboot we will not lose the loaded DT fragment. So, let us set up our environment to load the fragment on boot:# nano /etc/default/capemgr - In the open edit window, you should see the following:
# Default settings for capemgr. This file is sourced by /bin/sh from # /etc/init.d/capemgr.sh # Options to pass to capemgr CAPE=
Append it to the following:
# Default settings for capemgr. This file is sourced by /bin/sh from # /etc/init.d/capemgr.sh # Options to pass to capemgr CAPE=BB-BONE-PRU-01
- Reboot your BBB, log in as root user, and check that the fragment loaded:
# cat /sys/devices/bone_capemgr.9/slots 0: 54:PF--- 1: 55:PF--- 2: 56:PF--- 3: 57:PF--- 4: ff:P-O-L Bone-LT-eMMC-2G,00A0,Texas Instrument,BB-BONE-EMMC-2G 5: ff:P-O-L Bone-Black-HDMI,00A0,Texas Instrument,BB-BONELT-HDMI 7: ff:P-O-L Override Board Name,00A0,Override Manuf,BB-UART4 8: ff:P-O-L Override Board Name,00A0,Override Manuf,BB-BONE-PRU-01
All right, now we can move on to an actual test of the PRU.
Getting ready
The usual minimal setup is all you need: a BBB powered over mini USB with Internet connectivity enabled.
- Log in as the root user:
$ sudo -i - Install driver Library and PRU toolset:
# apt-get install am335x-pru-package && ti-pru-cgt-installerNote
The installation includes a number of items required to operate the PRUs from user space:
- PASM assembler: Being rather unique in nature, the PRUs don't speak BoneScript or JavaScript or Python or C. Instead, they communicate using Assembly, and require the PASM assembler to compile and run its code. You may have little experience with Assembly; you may have none. Don't despair: after running the command above the tool comes ready to use.
- libprussdrv: This consists of the driver library and library headers.
- In a similar vein as we do with GPIO pins, to make use of the PRUs we have to enable them. And interaction with the PRUs requires the use of a Device Tree fragment. With the current Wheezy and Jessie distributions, the DT overlay comes pre-compiled and ready to use on your system, a huge time-saver over earlier versions of the software.
Before loading a fragment, let us first look at the system's Device Tree slots where it will appear so we can see understand the before-and-after output:
# cat /sys/devices/bone_capemgr.9/slots 0: 54:PF--- 1: 55:PF--- 2: 56:PF--- 3: 57:PF--- 4: ff:P-O-L Bone-LT-eMMC-2G,00A0,Texas Instrument,BB-BONE-EMMC-2G 5: ff:P-O-L Bone-Black-HDMI,00A0,Texas Instrument,BB-BONELT-HDMI 7: ff:P-O-L Override Board Name,00A0,Override Manuf,BB-UART4
Nothing shows, yet, in the output above that indicates PRU visibility or communication with the kernel. The next command changes that status.
- Using the
echocommand, load the device tree fragment. This enables the PRU:# echo BB-BONE-PRU-01 >/sys/devices/bone_capemgr.9/slotsThe command should return you to the prompt without any message or error:
# - With the
catcommand again, check to make sure that the fragment loaded:# cat /sys/devices/bone_capemgr.9/slots 0: 54:PF--- 1: 55:PF--- 2: 56:PF--- 3: 57:PF--- 4: ff:P-O-L Bone-LT-eMMC-2G,00A0,Texas Instrument,BB-BONE-EMMC-2G 5: ff:P-O-L Bone-Black-HDMI,00A0,Texas Instrument,BB-BONELT-HDMI 7: ff:P-O-L Override Board Name,00A0,Override Manuf,BB-UART4 8: ff:P-O-L Override Board Name,00A0,Override Manuf,BB-BONE-PRU-01
A new overlay should appear in the last slot, namely
BB-BONE-PRU-01. Your slot number for the PRU may differ according to other drivers and daughterboards you already have loaded. - Run an additional command,
lsmod, which shows all modules loaded into the kernel. We want to confirm that theuio_prussdriver connected properly, since it is the module that opens a gate between user space applications and the PRU, allowing them to speak to one another:# lsmod Module Size Used by uio_pruss 4066 0 g_multi 50407 2 libcomposite 15028 1 g_multi 8192cu 449033 0 omap_rng 4062 0 mt7601Usta 601404 0
- To be safe, we should also run
dmesgin order to peek at the kernel messages and see if any other errors occurred. Add the options pipe (|) and (less) so you don't get one big output dump on the screen.# dmesg | lessScroll through the output by tapping the spacebar at the bottom of the terminal screen until you start seeing output for
bone-capemgr bone_capemgr.9. Keep advancing to the next screen until you begin to see the following:[ 2268.218496] bone-capemgr bone_capemgr.9: part_number 'BB-BONE-PRU-01', version 'N/A' [ 2268.218670] bone-capemgr bone_capemgr.9: slot #8: generic override [ 2268.218713] bone-capemgr bone_capemgr.9: bone: Using override eeprom data at slot 8 [ 2268.218761] bone-capemgr bone_capemgr.9: slot #8: 'Override Board Name,00A0,Override Manuf,BB-BONE-PRU-01' [ 2268.219031] bone-capemgr bone_capemgr.9: slot #8: Requesting part number/version based 'BB-BONE-PRU-01-00A0.dtbo [ 2268.219079] bone-capemgr bone_capemgr.9: slot #8: Requesting firmware 'BB-BONE-PRU-01-00A0.dtbo' for board-name 'Override Board Name', version '00A0' [ 2268.219140] bone-capemgr bone_capemgr.9: slot #8: dtbo 'BB-BONE-PRU-01-00A0.dtbo' loaded; converting to live tree [ 2268.219821] bone-capemgr bone_capemgr.9: slot #8: #2 overlays [ 2268.241573] omap_hwmod: pruss: failed to hardreset [ 2268.248299] bone-capemgr bone_capemgr.9: slot #8: Applied #2 overlays.
- Before moving on to an actual test application, we should add an additional ingredient to make our preceding
echocommand stick. Although this step is optional, you should still go through the process of doing it so that when we reboot we will not lose the loaded DT fragment. So, let us set up our environment to load the fragment on boot:# nano /etc/default/capemgr - In the open edit window, you should see the following:
# Default settings for capemgr. This file is sourced by /bin/sh from # /etc/init.d/capemgr.sh # Options to pass to capemgr CAPE=
Append it to the following:
# Default settings for capemgr. This file is sourced by /bin/sh from # /etc/init.d/capemgr.sh # Options to pass to capemgr CAPE=BB-BONE-PRU-01
- Reboot your BBB, log in as root user, and check that the fragment loaded:
# cat /sys/devices/bone_capemgr.9/slots 0: 54:PF--- 1: 55:PF--- 2: 56:PF--- 3: 57:PF--- 4: ff:P-O-L Bone-LT-eMMC-2G,00A0,Texas Instrument,BB-BONE-EMMC-2G 5: ff:P-O-L Bone-Black-HDMI,00A0,Texas Instrument,BB-BONELT-HDMI 7: ff:P-O-L Override Board Name,00A0,Override Manuf,BB-UART4 8: ff:P-O-L Override Board Name,00A0,Override Manuf,BB-BONE-PRU-01
All right, now we can move on to an actual test of the PRU.
How to do it…
- Log in as the root user:
$ sudo -i - Install driver Library and PRU toolset:
# apt-get install am335x-pru-package && ti-pru-cgt-installerNote
The installation includes a number of items required to operate the PRUs from user space:
- PASM assembler: Being rather unique in nature, the PRUs don't speak BoneScript or JavaScript or Python or C. Instead, they communicate using Assembly, and require the PASM assembler to compile and run its code. You may have little experience with Assembly; you may have none. Don't despair: after running the command above the tool comes ready to use.
- libprussdrv: This consists of the driver library and library headers.
- In a similar vein as we do with GPIO pins, to make use of the PRUs we have to enable them. And interaction with the PRUs requires the use of a Device Tree fragment. With the current Wheezy and Jessie distributions, the DT overlay comes pre-compiled and ready to use on your system, a huge time-saver over earlier versions of the software.
Before loading a fragment, let us first look at the system's Device Tree slots where it will appear so we can see understand the before-and-after output:
# cat /sys/devices/bone_capemgr.9/slots 0: 54:PF--- 1: 55:PF--- 2: 56:PF--- 3: 57:PF--- 4: ff:P-O-L Bone-LT-eMMC-2G,00A0,Texas Instrument,BB-BONE-EMMC-2G 5: ff:P-O-L Bone-Black-HDMI,00A0,Texas Instrument,BB-BONELT-HDMI 7: ff:P-O-L Override Board Name,00A0,Override Manuf,BB-UART4
Nothing shows, yet, in the output above that indicates PRU visibility or communication with the kernel. The next command changes that status.
- Using the
echocommand, load the device tree fragment. This enables the PRU:# echo BB-BONE-PRU-01 >/sys/devices/bone_capemgr.9/slotsThe command should return you to the prompt without any message or error:
# - With the
catcommand again, check to make sure that the fragment loaded:# cat /sys/devices/bone_capemgr.9/slots 0: 54:PF--- 1: 55:PF--- 2: 56:PF--- 3: 57:PF--- 4: ff:P-O-L Bone-LT-eMMC-2G,00A0,Texas Instrument,BB-BONE-EMMC-2G 5: ff:P-O-L Bone-Black-HDMI,00A0,Texas Instrument,BB-BONELT-HDMI 7: ff:P-O-L Override Board Name,00A0,Override Manuf,BB-UART4 8: ff:P-O-L Override Board Name,00A0,Override Manuf,BB-BONE-PRU-01
A new overlay should appear in the last slot, namely
BB-BONE-PRU-01. Your slot number for the PRU may differ according to other drivers and daughterboards you already have loaded. - Run an additional command,
lsmod, which shows all modules loaded into the kernel. We want to confirm that theuio_prussdriver connected properly, since it is the module that opens a gate between user space applications and the PRU, allowing them to speak to one another:# lsmod Module Size Used by uio_pruss 4066 0 g_multi 50407 2 libcomposite 15028 1 g_multi 8192cu 449033 0 omap_rng 4062 0 mt7601Usta 601404 0
- To be safe, we should also run
dmesgin order to peek at the kernel messages and see if any other errors occurred. Add the options pipe (|) and (less) so you don't get one big output dump on the screen.# dmesg | lessScroll through the output by tapping the spacebar at the bottom of the terminal screen until you start seeing output for
bone-capemgr bone_capemgr.9. Keep advancing to the next screen until you begin to see the following:[ 2268.218496] bone-capemgr bone_capemgr.9: part_number 'BB-BONE-PRU-01', version 'N/A' [ 2268.218670] bone-capemgr bone_capemgr.9: slot #8: generic override [ 2268.218713] bone-capemgr bone_capemgr.9: bone: Using override eeprom data at slot 8 [ 2268.218761] bone-capemgr bone_capemgr.9: slot #8: 'Override Board Name,00A0,Override Manuf,BB-BONE-PRU-01' [ 2268.219031] bone-capemgr bone_capemgr.9: slot #8: Requesting part number/version based 'BB-BONE-PRU-01-00A0.dtbo [ 2268.219079] bone-capemgr bone_capemgr.9: slot #8: Requesting firmware 'BB-BONE-PRU-01-00A0.dtbo' for board-name 'Override Board Name', version '00A0' [ 2268.219140] bone-capemgr bone_capemgr.9: slot #8: dtbo 'BB-BONE-PRU-01-00A0.dtbo' loaded; converting to live tree [ 2268.219821] bone-capemgr bone_capemgr.9: slot #8: #2 overlays [ 2268.241573] omap_hwmod: pruss: failed to hardreset [ 2268.248299] bone-capemgr bone_capemgr.9: slot #8: Applied #2 overlays.
- Before moving on to an actual test application, we should add an additional ingredient to make our preceding
echocommand stick. Although this step is optional, you should still go through the process of doing it so that when we reboot we will not lose the loaded DT fragment. So, let us set up our environment to load the fragment on boot:# nano /etc/default/capemgr - In the open edit window, you should see the following:
# Default settings for capemgr. This file is sourced by /bin/sh from # /etc/init.d/capemgr.sh # Options to pass to capemgr CAPE=
Append it to the following:
# Default settings for capemgr. This file is sourced by /bin/sh from # /etc/init.d/capemgr.sh # Options to pass to capemgr CAPE=BB-BONE-PRU-01
- Reboot your BBB, log in as root user, and check that the fragment loaded:
# cat /sys/devices/bone_capemgr.9/slots 0: 54:PF--- 1: 55:PF--- 2: 56:PF--- 3: 57:PF--- 4: ff:P-O-L Bone-LT-eMMC-2G,00A0,Texas Instrument,BB-BONE-EMMC-2G 5: ff:P-O-L Bone-Black-HDMI,00A0,Texas Instrument,BB-BONELT-HDMI 7: ff:P-O-L Override Board Name,00A0,Override Manuf,BB-UART4 8: ff:P-O-L Override Board Name,00A0,Override Manuf,BB-BONE-PRU-01
All right, now we can move on to an actual test of the PRU.
Although there are many complex and far more sophisticated tests for the PRUs, our intention is to create a very minimal test recipe that you can observe from user space.
To do this, we will use a C program that runs directly on our BBB's ARM processor. From Linux user space, it will give a big hug to the PRU, upload an assembler code binary, run it, then pass and fetch information between the ARM and the PRU.
The basic steps are:
- Create a program in assembly language for the dedicated hardware (the PRU)
- Create a program in C for the main CPU (BBB's ARM)
- Run a PRU test with the combined (compiled) magic of the first two steps.
The usual minimal setup is all you need: a BBB powered over mini USB with Internet connectivity. You will also need to have executed the preceding recipe on prepping and enabling the PRUs.
- We begin by logging in as root and cloning a repository on Github containing the files:
$ sudo -i # git clone https://github.com/HudsonWerks/bbb-pru.git
Note
The example files in the repo are based on code from developer Douglas G. Henke (http://mythopoeic.org/bbb-pru-minimal/).
- Browse to the sample files directory:
# cd /bbb-pru/simple-tests - The
Makefilewill run the PRU assembler application and generate a binary from the combination of the.pfile and the.c:# makeThe output should look as follows:
pasm -b major-tom-pru.p PRU Assembler Version 0.86 Copyright (C) 2005-2013 by Texas Instruments Inc. Pass 2 : 0 Error(s), 0 Warning(s) Writing Code Image of 6 word(s) cc -Wall -Werror -c -o major-tom-pru.o major-tom-pru.c cc major-tom-pru.o -lpthread -lprussdrv -o major-tom-pru
- The compiled binary created by assembler is what we now use to run a test program on the PRU (be sure you include the sudo):
# sudo ./major-tom-pruYour output should look like the following:
waiting for interrupt from PRU0... PRU test program completed. Major Tom's blast off event number 1
It should take approximately 3 seconds between the first line and the second. The blast off (event) number will increase each time you run it.
In the
major-tom-pru.pfile, try changing theDELAYCOUNTdefault number (currently set to 3 seconds) to another number. Then, runmakeagain, and run the newmajor-tom-prubinary again. You should be able to see differences in the duration according to any new values that you set.
Hooray! You have now finished tackling one of the more arcane and advanced features of the BeagleBone Black. Now, let's do it again in the next section...
At the beginning of this recipe, we also installed a command line version of Texas Instrument's PRU Code Generation Tools (ti-pru-cgt-installer). The install comes not only with the assembler package, but C code compile tools, as well. This toolset makes it possible to more easily develop PRU programs in C instead of assembly code. You can download the extensive manual at http://software-dl.ti.com/codegen/non-esd/downloads/download.htm.
Getting ready
The usual minimal setup is all you need: a BBB powered over mini USB with Internet connectivity. You will also need to have executed the preceding recipe on prepping and enabling the PRUs.
- We begin by logging in as root and cloning a repository on Github containing the files:
$ sudo -i # git clone https://github.com/HudsonWerks/bbb-pru.git
Note
The example files in the repo are based on code from developer Douglas G. Henke (http://mythopoeic.org/bbb-pru-minimal/).
- Browse to the sample files directory:
# cd /bbb-pru/simple-tests - The
Makefilewill run the PRU assembler application and generate a binary from the combination of the.pfile and the.c:# makeThe output should look as follows:
pasm -b major-tom-pru.p PRU Assembler Version 0.86 Copyright (C) 2005-2013 by Texas Instruments Inc. Pass 2 : 0 Error(s), 0 Warning(s) Writing Code Image of 6 word(s) cc -Wall -Werror -c -o major-tom-pru.o major-tom-pru.c cc major-tom-pru.o -lpthread -lprussdrv -o major-tom-pru
- The compiled binary created by assembler is what we now use to run a test program on the PRU (be sure you include the sudo):
# sudo ./major-tom-pruYour output should look like the following:
waiting for interrupt from PRU0... PRU test program completed. Major Tom's blast off event number 1
It should take approximately 3 seconds between the first line and the second. The blast off (event) number will increase each time you run it.
In the
major-tom-pru.pfile, try changing theDELAYCOUNTdefault number (currently set to 3 seconds) to another number. Then, runmakeagain, and run the newmajor-tom-prubinary again. You should be able to see differences in the duration according to any new values that you set.
Hooray! You have now finished tackling one of the more arcane and advanced features of the BeagleBone Black. Now, let's do it again in the next section...
At the beginning of this recipe, we also installed a command line version of Texas Instrument's PRU Code Generation Tools (ti-pru-cgt-installer). The install comes not only with the assembler package, but C code compile tools, as well. This toolset makes it possible to more easily develop PRU programs in C instead of assembly code. You can download the extensive manual at http://software-dl.ti.com/codegen/non-esd/downloads/download.htm.
How to do it…
- We begin by logging in as root and cloning a repository on Github containing the files:
$ sudo -i # git clone https://github.com/HudsonWerks/bbb-pru.git
Note
The example files in the repo are based on code from developer Douglas G. Henke (http://mythopoeic.org/bbb-pru-minimal/).
- Browse to the sample files directory:
# cd /bbb-pru/simple-tests - The
Makefilewill run the PRU assembler application and generate a binary from the combination of the.pfile and the.c:# makeThe output should look as follows:
pasm -b major-tom-pru.p PRU Assembler Version 0.86 Copyright (C) 2005-2013 by Texas Instruments Inc. Pass 2 : 0 Error(s), 0 Warning(s) Writing Code Image of 6 word(s) cc -Wall -Werror -c -o major-tom-pru.o major-tom-pru.c cc major-tom-pru.o -lpthread -lprussdrv -o major-tom-pru
- The compiled binary created by assembler is what we now use to run a test program on the PRU (be sure you include the sudo):
# sudo ./major-tom-pruYour output should look like the following:
waiting for interrupt from PRU0... PRU test program completed. Major Tom's blast off event number 1
It should take approximately 3 seconds between the first line and the second. The blast off (event) number will increase each time you run it.
In the
major-tom-pru.pfile, try changing theDELAYCOUNTdefault number (currently set to 3 seconds) to another number. Then, runmakeagain, and run the newmajor-tom-prubinary again. You should be able to see differences in the duration according to any new values that you set.
Hooray! You have now finished tackling one of the more arcane and advanced features of the BeagleBone Black. Now, let's do it again in the next section...
At the beginning of this recipe, we also installed a command line version of Texas Instrument's PRU Code Generation Tools (ti-pru-cgt-installer). The install comes not only with the assembler package, but C code compile tools, as well. This toolset makes it possible to more easily develop PRU programs in C instead of assembly code. You can download the extensive manual at http://software-dl.ti.com/codegen/non-esd/downloads/download.htm.
See also
At the beginning of this recipe, we also installed a command line version of Texas Instrument's PRU Code Generation Tools (ti-pru-cgt-installer). The install comes not only with the assembler package, but C code compile tools, as well. This toolset makes it possible to more easily develop PRU programs in C instead of assembly code. You can download the extensive manual at http://software-dl.ti.com/codegen/non-esd/downloads/download.htm.
The fast twitch eye muscle on a robot is only as good as its processor. And with many robotic projects where mobility and motion is part of the design, the speed and reliability of the twitch can be the difference between a successful foray or a smash and crash.
Which is where nanosecond response time and reliability—a PRU specialty—is crucial. To that end, let us look at a more ambitious recipe that cooks up a way to use the PRUs with one of those cheap and ubiquitous ultrasonic range sensors, the kind that are commonly found on basic robotic devices. The sensor uses sound to send a ping, similar to what a submarine does to measure the time between sending and receiving a signal for determining distance from an object.
The requirements are as follows:
- BBB powered over 5V power supply. If you only power the board via the USB tether, you will deliver very unreliable power to the sensor, so be sure you maintain a 5V supply.
- Internet connectivity.
- HC-SR04 sensor.
- Breadboard.
- Jumper pins.
- Resistors—1x 1k and 1x 2k.
Perform the following steps to run an ultrasonic range center:
- Hook up your breadboard and BBB according to the diagram below. Make note of two crucial items:
- Resistors: As you should recall, the BBB can only accept a maximum of 3.3V on its pins. Therefore, the wiring design requires two resistors, a 1k and a 2k. In tandem, they serve to step down the voltage from the sensor's Echo pin (5V) being sent back to the BBB.
- Confirm that you have both resistors in place; otherwise, you may damage your beloved BBB!
- Power: The range sensor needs a 5V supply. Anything less will yield unpredictable results.
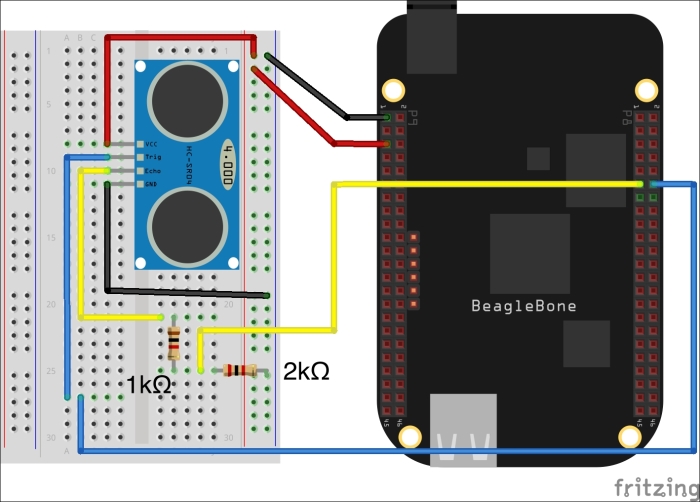
The following table displays the wiring configuration:
Pin purpose
Pin number
GND
P9_1
Or P9_2
VCC/VDD_5V
P9_5
Or P9_6
Trigger
P8_12
Echo
P8_11
With 1k and 2k ohm resistors
Be sure to double and triple-check your work. Otherwise, you could end up frying your board.
- Log in as root:
$ sudo -i #
- Clone the files that we will be using from GitHub:
# git clone https://github.com/HudsonWerks/Range-Sensor-PRU.git - Browse to the new directory:
# cd Range-Sensor-PRUTake a look inside the directory to get a sense of what kind of files we will be using:
rangepru.dts: Device Tree source file from which we will build a Device Tree overlay, or driver for our test applicationrangepru.c: Contains the application code written in Crangepru.p: Contains the assembly code which will be run against our C file to build the binaryMakefile: Builds a binary that we will ultimately use to run our range sensor test with the PRUs - We need to add a custom device tree overlay to the mix. The overlay serves as a driver for the sensor and maps to the GPIOs we are using. In the current directory, we will modify the
.dtsfile to include the target GPIOs seen in our fritzing diagram:# sudo nano rangepru.dts - In the open edit window, scroll down to the following section:
exclusive-use = "<TRIGGER PIN HERE>", "<ECHO PIN HERE>", "GPIO44", "GPIO45";
Change it to the following:
exclusive-use = "P8_12", "P8_11", "GPIO44", "GPIO45";
Save your changes and close the
nanowindow (Ctrl + X, then typeyfor yes, and press Return (Enter) key). - Next, we need to compile a Device Tree overlay file (
dtbo) with the DT compiler, adding all appropriate flags:dtc -O dtb -o rangepru-00A0.dtbo -b 0 -@ rangepru.dtsNote
See Chapter 4, Exploring GNU/Linux Recipes Using Bash, Autotools, Debugger, and systemd, for a refresher on Device Tree, the compiler and its options.
- Now we need to copy the compiled output file—
rangepru-00A0.dtbo—to the directory where the overlays are referenced:# cp rangepru-00A0.dtbo /lib/firmware - Although we put the overlay in its proper directory, we have to load it, just like a driver has to load in order to recognize a new piece of attached hardware. So, run the following:
# echo rangepru > /sys/devices/bone_capemgr.*/slots - Take a look at the slots and see that the overlay is ready for action:
# cat /sys/devices/bone_capemgr.9/slotsYour output should look similar to this:
0: 54:PF--- 1: 55:PF--- 2: 56:PF--- 3: 57:PF--- 4: ff:P-O-L Bone-LT-eMMC-2G,00A0,Texas Instrument,BB-BONE-EMMC-2G 5: ff:P-O-L Bone-Black-HDMI,00A0,Texas Instrument,BB-BONELT-HDMI 7: ff:P-O-L Override Board Name,00A0,Override Manuf,rangepru
- Confirm the overlay took hold:
# dmesgYour output should look similar to this:
[ 1462.225670] bone-capemgr bone_capemgr.9: part_number 'rangepru', version 'N/A' [ 1462.225742] bone-capemgr bone_capemgr.9: slot #7: generic override [ 1462.225758] bone-capemgr bone_capemgr.9: bone: Using override eeprom data at slot 7 [ 1462.225773] bone-capemgr bone_capemgr.9: slot #7: 'Override Board Name,00A0,Override Manuf,rangepru' [ 1462.225856] bone-capemgr bone_capemgr.9: slot #7: Requesting part number/version based 'rangepru-00A0.dtbo [ 1462.225870] bone-capemgr bone_capemgr.9: slot #7: Requesting firmware 'rangepru-00A0.dtbo' for board-name 'Override Board Name', version '00A0' [ 1462.230469] bone-capemgr bone_capemgr.9: slot #7: dtbo 'rangepru-00A0.dtbo' loaded; converting to live tree
- We should also check that the PRU module is loaded as expected:
# lsmodYour output should look similar to this. You should see the
uio-prussdrvdriver:Module Size Used by uio_pruss 4058 0 g_multi 50519 2 libcomposite 15032 1 g_multi 8192cu 449177 0 cpufreq_userspace 2013 0 evdev 7244 2 omap_rng 4054 0
Whew! That was the first part of the recipe completed. Okay, let us now move right along to creating the actual file we will use to capture data from the ultrasonic range sensor.
- Using the
Makefilescript, we will run two actions: one will create an Assembly code binary to interact with the PRUs from the filerangepru.p; the other will generate a compiled C program from the filerangepru.cthat serves as both an interface to the assembly binary while taking the sensor data and displaying it in a human-readable fashion.# make - The magical
makecommand creates a new executable file—rangepru—in our directory. We will now run it to monitor and output data being captured by our ultrasonic range sensor:# ./rangepruIf all is well in BBB-land, you should be getting screen output that looks akin to this. Carefully move the sensor around to watch the distance change (note, your numbers will vary according to the distance your sensor is from an object:
>> Initializing PRU >> Executing range-sensor code 1: Distance = 70.21 cm 2: Distance = 71.95 cm 3: Distance = 71.95 cm 4: Distance = 7.68 cm 5: Distance = 64.27 cm 6: Distance = 4.09 cm 7: Distance = 5.20 cm 8: Distance = 53.25 cm 9: Distance = 6.62 cm 10: Distance = 2.28 cm 11: Distance = 2.34 cm 12: Distance = 10.13 cm >> PRU Disabled.
Outstanding! You have now successfully hooked up a sensor that is ubiquitous in robot building, and taught it how to dance with your BBB and its fancy PRUs.
Getting ready
The requirements are as follows:
- BBB powered over 5V power supply. If you only power the board via the USB tether, you will deliver very unreliable power to the sensor, so be sure you maintain a 5V supply.
- Internet connectivity.
- HC-SR04 sensor.
- Breadboard.
- Jumper pins.
- Resistors—1x 1k and 1x 2k.
Perform the following steps to run an ultrasonic range center:
- Hook up your breadboard and BBB according to the diagram below. Make note of two crucial items:
- Resistors: As you should recall, the BBB can only accept a maximum of 3.3V on its pins. Therefore, the wiring design requires two resistors, a 1k and a 2k. In tandem, they serve to step down the voltage from the sensor's Echo pin (5V) being sent back to the BBB.
- Confirm that you have both resistors in place; otherwise, you may damage your beloved BBB!
- Power: The range sensor needs a 5V supply. Anything less will yield unpredictable results.
The following table displays the wiring configuration:
Pin purpose
Pin number
GND
P9_1
Or P9_2
VCC/VDD_5V
P9_5
Or P9_6
Trigger
P8_12
Echo
P8_11
With 1k and 2k ohm resistors
Be sure to double and triple-check your work. Otherwise, you could end up frying your board.
- Log in as root:
$ sudo -i #
- Clone the files that we will be using from GitHub:
# git clone https://github.com/HudsonWerks/Range-Sensor-PRU.git - Browse to the new directory:
# cd Range-Sensor-PRUTake a look inside the directory to get a sense of what kind of files we will be using:
rangepru.dts: Device Tree source file from which we will build a Device Tree overlay, or driver for our test applicationrangepru.c: Contains the application code written in Crangepru.p: Contains the assembly code which will be run against our C file to build the binaryMakefile: Builds a binary that we will ultimately use to run our range sensor test with the PRUs - We need to add a custom device tree overlay to the mix. The overlay serves as a driver for the sensor and maps to the GPIOs we are using. In the current directory, we will modify the
.dtsfile to include the target GPIOs seen in our fritzing diagram:# sudo nano rangepru.dts - In the open edit window, scroll down to the following section:
exclusive-use = "<TRIGGER PIN HERE>", "<ECHO PIN HERE>", "GPIO44", "GPIO45";
Change it to the following:
exclusive-use = "P8_12", "P8_11", "GPIO44", "GPIO45";
Save your changes and close the
nanowindow (Ctrl + X, then typeyfor yes, and press Return (Enter) key). - Next, we need to compile a Device Tree overlay file (
dtbo) with the DT compiler, adding all appropriate flags:dtc -O dtb -o rangepru-00A0.dtbo -b 0 -@ rangepru.dtsNote
See Chapter 4, Exploring GNU/Linux Recipes Using Bash, Autotools, Debugger, and systemd, for a refresher on Device Tree, the compiler and its options.
- Now we need to copy the compiled output file—
rangepru-00A0.dtbo—to the directory where the overlays are referenced:# cp rangepru-00A0.dtbo /lib/firmware - Although we put the overlay in its proper directory, we have to load it, just like a driver has to load in order to recognize a new piece of attached hardware. So, run the following:
# echo rangepru > /sys/devices/bone_capemgr.*/slots - Take a look at the slots and see that the overlay is ready for action:
# cat /sys/devices/bone_capemgr.9/slotsYour output should look similar to this:
0: 54:PF--- 1: 55:PF--- 2: 56:PF--- 3: 57:PF--- 4: ff:P-O-L Bone-LT-eMMC-2G,00A0,Texas Instrument,BB-BONE-EMMC-2G 5: ff:P-O-L Bone-Black-HDMI,00A0,Texas Instrument,BB-BONELT-HDMI 7: ff:P-O-L Override Board Name,00A0,Override Manuf,rangepru
- Confirm the overlay took hold:
# dmesgYour output should look similar to this:
[ 1462.225670] bone-capemgr bone_capemgr.9: part_number 'rangepru', version 'N/A' [ 1462.225742] bone-capemgr bone_capemgr.9: slot #7: generic override [ 1462.225758] bone-capemgr bone_capemgr.9: bone: Using override eeprom data at slot 7 [ 1462.225773] bone-capemgr bone_capemgr.9: slot #7: 'Override Board Name,00A0,Override Manuf,rangepru' [ 1462.225856] bone-capemgr bone_capemgr.9: slot #7: Requesting part number/version based 'rangepru-00A0.dtbo [ 1462.225870] bone-capemgr bone_capemgr.9: slot #7: Requesting firmware 'rangepru-00A0.dtbo' for board-name 'Override Board Name', version '00A0' [ 1462.230469] bone-capemgr bone_capemgr.9: slot #7: dtbo 'rangepru-00A0.dtbo' loaded; converting to live tree
- We should also check that the PRU module is loaded as expected:
# lsmodYour output should look similar to this. You should see the
uio-prussdrvdriver:Module Size Used by uio_pruss 4058 0 g_multi 50519 2 libcomposite 15032 1 g_multi 8192cu 449177 0 cpufreq_userspace 2013 0 evdev 7244 2 omap_rng 4054 0
Whew! That was the first part of the recipe completed. Okay, let us now move right along to creating the actual file we will use to capture data from the ultrasonic range sensor.
- Using the
Makefilescript, we will run two actions: one will create an Assembly code binary to interact with the PRUs from the filerangepru.p; the other will generate a compiled C program from the filerangepru.cthat serves as both an interface to the assembly binary while taking the sensor data and displaying it in a human-readable fashion.# make - The magical
makecommand creates a new executable file—rangepru—in our directory. We will now run it to monitor and output data being captured by our ultrasonic range sensor:# ./rangepruIf all is well in BBB-land, you should be getting screen output that looks akin to this. Carefully move the sensor around to watch the distance change (note, your numbers will vary according to the distance your sensor is from an object:
>> Initializing PRU >> Executing range-sensor code 1: Distance = 70.21 cm 2: Distance = 71.95 cm 3: Distance = 71.95 cm 4: Distance = 7.68 cm 5: Distance = 64.27 cm 6: Distance = 4.09 cm 7: Distance = 5.20 cm 8: Distance = 53.25 cm 9: Distance = 6.62 cm 10: Distance = 2.28 cm 11: Distance = 2.34 cm 12: Distance = 10.13 cm >> PRU Disabled.
Outstanding! You have now successfully hooked up a sensor that is ubiquitous in robot building, and taught it how to dance with your BBB and its fancy PRUs.
How to do it…
Perform the following steps to run an ultrasonic range center:
- Hook up your breadboard and BBB according to the diagram below. Make note of two crucial items:
- Resistors: As you should recall, the BBB can only accept a maximum of 3.3V on its pins. Therefore, the wiring design requires two resistors, a 1k and a 2k. In tandem, they serve to step down the voltage from the sensor's Echo pin (5V) being sent back to the BBB.
- Confirm that you have both resistors in place; otherwise, you may damage your beloved BBB!
- Power: The range sensor needs a 5V supply. Anything less will yield unpredictable results.
The following table displays the wiring configuration:
Pin purpose
Pin number
GND
P9_1
Or P9_2
VCC/VDD_5V
P9_5
Or P9_6
Trigger
P8_12
Echo
P8_11
With 1k and 2k ohm resistors
Be sure to double and triple-check your work. Otherwise, you could end up frying your board.
- Log in as root:
$ sudo -i #
- Clone the files that we will be using from GitHub:
# git clone https://github.com/HudsonWerks/Range-Sensor-PRU.git - Browse to the new directory:
# cd Range-Sensor-PRUTake a look inside the directory to get a sense of what kind of files we will be using:
rangepru.dts: Device Tree source file from which we will build a Device Tree overlay, or driver for our test applicationrangepru.c: Contains the application code written in Crangepru.p: Contains the assembly code which will be run against our C file to build the binaryMakefile: Builds a binary that we will ultimately use to run our range sensor test with the PRUs - We need to add a custom device tree overlay to the mix. The overlay serves as a driver for the sensor and maps to the GPIOs we are using. In the current directory, we will modify the
.dtsfile to include the target GPIOs seen in our fritzing diagram:# sudo nano rangepru.dts - In the open edit window, scroll down to the following section:
exclusive-use = "<TRIGGER PIN HERE>", "<ECHO PIN HERE>", "GPIO44", "GPIO45";
Change it to the following:
exclusive-use = "P8_12", "P8_11", "GPIO44", "GPIO45";
Save your changes and close the
nanowindow (Ctrl + X, then typeyfor yes, and press Return (Enter) key). - Next, we need to compile a Device Tree overlay file (
dtbo) with the DT compiler, adding all appropriate flags:dtc -O dtb -o rangepru-00A0.dtbo -b 0 -@ rangepru.dtsNote
See Chapter 4, Exploring GNU/Linux Recipes Using Bash, Autotools, Debugger, and systemd, for a refresher on Device Tree, the compiler and its options.
- Now we need to copy the compiled output file—
rangepru-00A0.dtbo—to the directory where the overlays are referenced:# cp rangepru-00A0.dtbo /lib/firmware - Although we put the overlay in its proper directory, we have to load it, just like a driver has to load in order to recognize a new piece of attached hardware. So, run the following:
# echo rangepru > /sys/devices/bone_capemgr.*/slots - Take a look at the slots and see that the overlay is ready for action:
# cat /sys/devices/bone_capemgr.9/slotsYour output should look similar to this:
0: 54:PF--- 1: 55:PF--- 2: 56:PF--- 3: 57:PF--- 4: ff:P-O-L Bone-LT-eMMC-2G,00A0,Texas Instrument,BB-BONE-EMMC-2G 5: ff:P-O-L Bone-Black-HDMI,00A0,Texas Instrument,BB-BONELT-HDMI 7: ff:P-O-L Override Board Name,00A0,Override Manuf,rangepru
- Confirm the overlay took hold:
# dmesgYour output should look similar to this:
[ 1462.225670] bone-capemgr bone_capemgr.9: part_number 'rangepru', version 'N/A' [ 1462.225742] bone-capemgr bone_capemgr.9: slot #7: generic override [ 1462.225758] bone-capemgr bone_capemgr.9: bone: Using override eeprom data at slot 7 [ 1462.225773] bone-capemgr bone_capemgr.9: slot #7: 'Override Board Name,00A0,Override Manuf,rangepru' [ 1462.225856] bone-capemgr bone_capemgr.9: slot #7: Requesting part number/version based 'rangepru-00A0.dtbo [ 1462.225870] bone-capemgr bone_capemgr.9: slot #7: Requesting firmware 'rangepru-00A0.dtbo' for board-name 'Override Board Name', version '00A0' [ 1462.230469] bone-capemgr bone_capemgr.9: slot #7: dtbo 'rangepru-00A0.dtbo' loaded; converting to live tree
- We should also check that the PRU module is loaded as expected:
# lsmodYour output should look similar to this. You should see the
uio-prussdrvdriver:Module Size Used by uio_pruss 4058 0 g_multi 50519 2 libcomposite 15032 1 g_multi 8192cu 449177 0 cpufreq_userspace 2013 0 evdev 7244 2 omap_rng 4054 0
Whew! That was the first part of the recipe completed. Okay, let us now move right along to creating the actual file we will use to capture data from the ultrasonic range sensor.
- Using the
Makefilescript, we will run two actions: one will create an Assembly code binary to interact with the PRUs from the filerangepru.p; the other will generate a compiled C program from the filerangepru.cthat serves as both an interface to the assembly binary while taking the sensor data and displaying it in a human-readable fashion.# make - The magical
makecommand creates a new executable file—rangepru—in our directory. We will now run it to monitor and output data being captured by our ultrasonic range sensor:# ./rangepruIf all is well in BBB-land, you should be getting screen output that looks akin to this. Carefully move the sensor around to watch the distance change (note, your numbers will vary according to the distance your sensor is from an object:
>> Initializing PRU >> Executing range-sensor code 1: Distance = 70.21 cm 2: Distance = 71.95 cm 3: Distance = 71.95 cm 4: Distance = 7.68 cm 5: Distance = 64.27 cm 6: Distance = 4.09 cm 7: Distance = 5.20 cm 8: Distance = 53.25 cm 9: Distance = 6.62 cm 10: Distance = 2.28 cm 11: Distance = 2.34 cm 12: Distance = 10.13 cm >> PRU Disabled.
Outstanding! You have now successfully hooked up a sensor that is ubiquitous in robot building, and taught it how to dance with your BBB and its fancy PRUs.
Contrary to popular geek belief, ancient Egyptians did not write on PyPRUSS. But if they'd known Python, they might have.
Actually, the oldest thing about PyPRUSS— a Python library for the PRUs—is that it was primarily focused on the earlier Angstrom firmware for the BBB, a distribution now looking increasingly mummified. Which is not to say that PyPRUSS does not still remain a great userland touchstone for Pythonistas and PRU-ophiles.
In fact, even though there is no pre-compiled binary in the Debian repositories for PyPRUSS, it takes all of 90 seconds to compile and install from source, and begin running Python on the PRUs quickly.
The usual minimal setup is all you need: a BBB powered over mini USB with Internet connectivity. You will also need to have done the first recipe in this section on prepping and enabling the PRUs.
- Log in as root:
$ sudo -i - Grab the source files:
# git clone https://github.com/HudsonWerks/pypruss.git - Navigate to the directory we just created:
# cd pypruss - Run the script for installing the PyPRUSS library:
# python setup.py install - Make sure your library is mapped properly:
# export LD_LIBRARY_PATH=/usr/local/lib - Browse the example directory:
# cd examples - Take a look at what is available in that directory:
# ls - Now, we will run some examples. We begin with everyone's favorite blinky thing:
# cd blinkled - Next, compile an assembly binary file:
# make - Run the Python file:
# python blinkled.pyOops! You may have gotten an error. If you didn't, just skip the next step. But if you did, then it probably looked like this:
ERROR: could not insert 'uio_pruss': Numerical result out of range modprobe failed : No such file or directory Traceback (most recent call last): File "blinkled.py", line 7, in <module> pypruss.modprobe() # This only has to be called once pr boot SystemError: error return without exception set
Errors always shows us something important: that
uio_prusshas to be loaded before the PRUs can be pinged, just like we saw in our previous recipe. - Thus, we will load that fragment:
# echo BB-BONE-PRU-01 >/sys/devices/bone_capemgr.9/slots - Now, try running the python script again:
# python blinkled.py
Assuming all goes well now, you should then see three of the user LEDs blink 10 times in rapid, seizure-inducing succession.
There are various resources for learning more about PRUs. There is quite a bit to learn about how to use the PRUs on the BBB, most of it well beyond the scope of this book. However, we have compiled a list of useful background information, tutorials, and projects to further your exploration of these unique real time subsystems.
- PRU wiki with the most up-to-date information—http://elinux.org/Ti_AM33XX_PRUSSv2
- Beagleboard's official overview of PRUs. More detail than you'll likely need, but good context, and a helpful table of commands for PASM—https://github.com/beagleboard/am335x_pru_package/blob/master/Documentation/01-AM335x_PRU_ICSS_Overview.pdf
- Texas Instruments' official overview of PRUs—http://processors.wiki.ti.com/index.php/Programmable_Realtime_Unit_Software_Development
- PRU C project—from device tree to program execution, an extensive and useful thread on PRU usage—https://groups.google.com/forum/#!category-topic/beagleboard/pru/VW361VUkCcI
- An assortment of PRU-centric projects—http://processors.wiki.ti.com/index.php/PRU_Projects
- Another take on setting up and running PRUs—http://www.embeddedrelated.com/showarticle/586.php
- An early, some consider seminal post on using PRUs with the BB White, not the Black—http://boxysean.com/blog/2012/08/12/first-steps-with-the-beaglebone-pru/
- Debuggers and editors:
- VisualPRU, a sexy, browser-based editor and debugger for the PRUs—https://github.com/mmcdan/visualpru
- PRUdebug, a functional CLI-centric app for debugging your PRU code—http://sourceforge.net/projects/prudebug/
- BeagleRT: Most projects on the subject of using RT on the BBB focus on driving motors for machine tools or other industrial applications. BeagleRT, however, is a fascinating project that uses Xenomai and PRUs on the BBB in the service of creating hackable Digital Musical Instruments (DMIs). This novel use case for an ultra-low-latency sensor/audio platform requires a high level of machine responsiveness to fulfill a performer's expectations and performance techniques, thus the need for predictable timing from the board:
- Project overview—http://www.eecs.qmul.ac.uk/~andrewm/hackable.html
- Open source code—https://code.soundsoftware.ac.uk/projects/beaglert
- PRU speak: An implementation of the BotSpeak robotics language for the PRU. This project enables dynamic control of the BeagleBone Black's PRU from the Linux user space on ARM:
- PRUCAPE: Texas Instruments designed a low-cost cape to facilitate usage of the PRUs
- Good verbiage on its purpose and usage—http://linuxgizmos.com/beaglebone-cape-eases-access-to-the-sitara-socs-pru/
- You can purchase it here—http://www.ti.com/tool/PRUCAPE#buy
Getting ready
The usual minimal setup is all you need: a BBB powered over mini USB with Internet connectivity. You will also need to have done the first recipe in this section on prepping and enabling the PRUs.
- Log in as root:
$ sudo -i - Grab the source files:
# git clone https://github.com/HudsonWerks/pypruss.git - Navigate to the directory we just created:
# cd pypruss - Run the script for installing the PyPRUSS library:
# python setup.py install - Make sure your library is mapped properly:
# export LD_LIBRARY_PATH=/usr/local/lib - Browse the example directory:
# cd examples - Take a look at what is available in that directory:
# ls - Now, we will run some examples. We begin with everyone's favorite blinky thing:
# cd blinkled - Next, compile an assembly binary file:
# make - Run the Python file:
# python blinkled.pyOops! You may have gotten an error. If you didn't, just skip the next step. But if you did, then it probably looked like this:
ERROR: could not insert 'uio_pruss': Numerical result out of range modprobe failed : No such file or directory Traceback (most recent call last): File "blinkled.py", line 7, in <module> pypruss.modprobe() # This only has to be called once pr boot SystemError: error return without exception set
Errors always shows us something important: that
uio_prusshas to be loaded before the PRUs can be pinged, just like we saw in our previous recipe. - Thus, we will load that fragment:
# echo BB-BONE-PRU-01 >/sys/devices/bone_capemgr.9/slots - Now, try running the python script again:
# python blinkled.py
Assuming all goes well now, you should then see three of the user LEDs blink 10 times in rapid, seizure-inducing succession.
There are various resources for learning more about PRUs. There is quite a bit to learn about how to use the PRUs on the BBB, most of it well beyond the scope of this book. However, we have compiled a list of useful background information, tutorials, and projects to further your exploration of these unique real time subsystems.
- PRU wiki with the most up-to-date information—http://elinux.org/Ti_AM33XX_PRUSSv2
- Beagleboard's official overview of PRUs. More detail than you'll likely need, but good context, and a helpful table of commands for PASM—https://github.com/beagleboard/am335x_pru_package/blob/master/Documentation/01-AM335x_PRU_ICSS_Overview.pdf
- Texas Instruments' official overview of PRUs—http://processors.wiki.ti.com/index.php/Programmable_Realtime_Unit_Software_Development
- PRU C project—from device tree to program execution, an extensive and useful thread on PRU usage—https://groups.google.com/forum/#!category-topic/beagleboard/pru/VW361VUkCcI
- An assortment of PRU-centric projects—http://processors.wiki.ti.com/index.php/PRU_Projects
- Another take on setting up and running PRUs—http://www.embeddedrelated.com/showarticle/586.php
- An early, some consider seminal post on using PRUs with the BB White, not the Black—http://boxysean.com/blog/2012/08/12/first-steps-with-the-beaglebone-pru/
- Debuggers and editors:
- VisualPRU, a sexy, browser-based editor and debugger for the PRUs—https://github.com/mmcdan/visualpru
- PRUdebug, a functional CLI-centric app for debugging your PRU code—http://sourceforge.net/projects/prudebug/
- BeagleRT: Most projects on the subject of using RT on the BBB focus on driving motors for machine tools or other industrial applications. BeagleRT, however, is a fascinating project that uses Xenomai and PRUs on the BBB in the service of creating hackable Digital Musical Instruments (DMIs). This novel use case for an ultra-low-latency sensor/audio platform requires a high level of machine responsiveness to fulfill a performer's expectations and performance techniques, thus the need for predictable timing from the board:
- Project overview—http://www.eecs.qmul.ac.uk/~andrewm/hackable.html
- Open source code—https://code.soundsoftware.ac.uk/projects/beaglert
- PRU speak: An implementation of the BotSpeak robotics language for the PRU. This project enables dynamic control of the BeagleBone Black's PRU from the Linux user space on ARM:
- PRUCAPE: Texas Instruments designed a low-cost cape to facilitate usage of the PRUs
- Good verbiage on its purpose and usage—http://linuxgizmos.com/beaglebone-cape-eases-access-to-the-sitara-socs-pru/
- You can purchase it here—http://www.ti.com/tool/PRUCAPE#buy
How to do it…
- Log in as root:
$ sudo -i - Grab the source files:
# git clone https://github.com/HudsonWerks/pypruss.git - Navigate to the directory we just created:
# cd pypruss - Run the script for installing the PyPRUSS library:
# python setup.py install - Make sure your library is mapped properly:
# export LD_LIBRARY_PATH=/usr/local/lib - Browse the example directory:
# cd examples - Take a look at what is available in that directory:
# ls - Now, we will run some examples. We begin with everyone's favorite blinky thing:
# cd blinkled - Next, compile an assembly binary file:
# make - Run the Python file:
# python blinkled.pyOops! You may have gotten an error. If you didn't, just skip the next step. But if you did, then it probably looked like this:
ERROR: could not insert 'uio_pruss': Numerical result out of range modprobe failed : No such file or directory Traceback (most recent call last): File "blinkled.py", line 7, in <module> pypruss.modprobe() # This only has to be called once pr boot SystemError: error return without exception set
Errors always shows us something important: that
uio_prusshas to be loaded before the PRUs can be pinged, just like we saw in our previous recipe. - Thus, we will load that fragment:
# echo BB-BONE-PRU-01 >/sys/devices/bone_capemgr.9/slots - Now, try running the python script again:
# python blinkled.py
Assuming all goes well now, you should then see three of the user LEDs blink 10 times in rapid, seizure-inducing succession.
There are various resources for learning more about PRUs. There is quite a bit to learn about how to use the PRUs on the BBB, most of it well beyond the scope of this book. However, we have compiled a list of useful background information, tutorials, and projects to further your exploration of these unique real time subsystems.
- PRU wiki with the most up-to-date information—http://elinux.org/Ti_AM33XX_PRUSSv2
- Beagleboard's official overview of PRUs. More detail than you'll likely need, but good context, and a helpful table of commands for PASM—https://github.com/beagleboard/am335x_pru_package/blob/master/Documentation/01-AM335x_PRU_ICSS_Overview.pdf
- Texas Instruments' official overview of PRUs—http://processors.wiki.ti.com/index.php/Programmable_Realtime_Unit_Software_Development
- PRU C project—from device tree to program execution, an extensive and useful thread on PRU usage—https://groups.google.com/forum/#!category-topic/beagleboard/pru/VW361VUkCcI
- An assortment of PRU-centric projects—http://processors.wiki.ti.com/index.php/PRU_Projects
- Another take on setting up and running PRUs—http://www.embeddedrelated.com/showarticle/586.php
- An early, some consider seminal post on using PRUs with the BB White, not the Black—http://boxysean.com/blog/2012/08/12/first-steps-with-the-beaglebone-pru/
- Debuggers and editors:
- VisualPRU, a sexy, browser-based editor and debugger for the PRUs—https://github.com/mmcdan/visualpru
- PRUdebug, a functional CLI-centric app for debugging your PRU code—http://sourceforge.net/projects/prudebug/
- BeagleRT: Most projects on the subject of using RT on the BBB focus on driving motors for machine tools or other industrial applications. BeagleRT, however, is a fascinating project that uses Xenomai and PRUs on the BBB in the service of creating hackable Digital Musical Instruments (DMIs). This novel use case for an ultra-low-latency sensor/audio platform requires a high level of machine responsiveness to fulfill a performer's expectations and performance techniques, thus the need for predictable timing from the board:
- Project overview—http://www.eecs.qmul.ac.uk/~andrewm/hackable.html
- Open source code—https://code.soundsoftware.ac.uk/projects/beaglert
- PRU speak: An implementation of the BotSpeak robotics language for the PRU. This project enables dynamic control of the BeagleBone Black's PRU from the Linux user space on ARM:
- PRUCAPE: Texas Instruments designed a low-cost cape to facilitate usage of the PRUs
- Good verbiage on its purpose and usage—http://linuxgizmos.com/beaglebone-cape-eases-access-to-the-sitara-socs-pru/
- You can purchase it here—http://www.ti.com/tool/PRUCAPE#buy
See also
There are various resources for learning more about PRUs. There is quite a bit to learn about how to use the PRUs on the BBB, most of it well beyond the scope of this book. However, we have compiled a list of useful background information, tutorials, and projects to further your exploration of these unique real time subsystems.
- PRU wiki with the most up-to-date information—http://elinux.org/Ti_AM33XX_PRUSSv2
- Beagleboard's official overview of PRUs. More detail than you'll likely need, but good context, and a helpful table of commands for PASM—https://github.com/beagleboard/am335x_pru_package/blob/master/Documentation/01-AM335x_PRU_ICSS_Overview.pdf
- Texas Instruments' official overview of PRUs—http://processors.wiki.ti.com/index.php/Programmable_Realtime_Unit_Software_Development
- PRU C project—from device tree to program execution, an extensive and useful thread on PRU usage—https://groups.google.com/forum/#!category-topic/beagleboard/pru/VW361VUkCcI
- An assortment of PRU-centric projects—http://processors.wiki.ti.com/index.php/PRU_Projects
- Another take on setting up and running PRUs—http://www.embeddedrelated.com/showarticle/586.php
- An early, some consider seminal post on using PRUs with the BB White, not the Black—http://boxysean.com/blog/2012/08/12/first-steps-with-the-beaglebone-pru/
- Debuggers and editors:
- VisualPRU, a sexy, browser-based editor and debugger for the PRUs—https://github.com/mmcdan/visualpru
- PRUdebug, a functional CLI-centric app for debugging your PRU code—http://sourceforge.net/projects/prudebug/
- BeagleRT: Most projects on the subject of using RT on the BBB focus on driving motors for machine tools or other industrial applications. BeagleRT, however, is a fascinating project that uses Xenomai and PRUs on the BBB in the service of creating hackable Digital Musical Instruments (DMIs). This novel use case for an ultra-low-latency sensor/audio platform requires a high level of machine responsiveness to fulfill a performer's expectations and performance techniques, thus the need for predictable timing from the board:
- Project overview—http://www.eecs.qmul.ac.uk/~andrewm/hackable.html
- Open source code—https://code.soundsoftware.ac.uk/projects/beaglert
- PRU speak: An implementation of the BotSpeak robotics language for the PRU. This project enables dynamic control of the BeagleBone Black's PRU from the Linux user space on ARM:
- PRUCAPE: Texas Instruments designed a low-cost cape to facilitate usage of the PRUs
- Good verbiage on its purpose and usage—http://linuxgizmos.com/beaglebone-cape-eases-access-to-the-sitara-socs-pru/
- You can purchase it here—http://www.ti.com/tool/PRUCAPE#buy