
Overview of the kit
This kit comes with 949 elements to build, design, and bring your ideas to life. When you open the box, you will find that the inside of the box has outlines to organize your elements. However, I don't think that many will use this grid unless you are crafty and install some cardboard walls to make it usable. Additionally, to have both box pieces on a table occupies a lot of space. While a nice feature, it is better if you use a leftover Mindstorms storage container or any other sorting trays you have sitting around. Or you could be like most people and just dump all the elements and spend time trying to find that one piece.
Coming from the space of education, I miss the plastic tub with sorting trays. The latest tub from SPIKE Prime has two trays that come together, which is super nice. I really wish we had this with this kit.
The kit does not have a manual to build robots, but the software comes with five robot builds to help a builder learn some new build techniques and to get started with building robots. The software provides the builder with the build instructions, then you connect the Intelligent Hub, download the software, test to make sure it works, and then modify to make the build and/or the code to your own style. It is quite nice once you get started with the software to see what it all provides.
Here is what the kit provides:
- One micro USB cable
- One Intelligent Hub
- A sticker sheet
- One base
- 14 bags of building elements
- External sensors (one distance sensor, one color sensor)
- Motors (four small motors)
- A booklet
We will explore these parts in greater detail throughout this chapter to understand them better.
The cables for motors and sensors
One of the biggest changes that the builder will notice right away is the cable connections. If you have not used SPIKE Prime and this is your first transition to the new Intelligent Hub, then you will notice that the cables are different. They are flat and smooth:
_B16699.jpg)
Figure 2.2 – Flat wires and wire clips
The kit comes with clips to help with wire organization and building, which is an excellent new upgrade to the building kits. No more rubber bands and looping cables. These clips are really nice to hide cables and manage them to allow your builds to look much more polished. The downside to these new cables is that these cables, sensors, and motors are no longer compatible with previous kits. If you are like me, then you'll have a lot of NXT and EV3 parts that you love that are no longer compatible with these new features. Another downside at this time is the cables are of fixed length. In previous kits, the cables were separate from the elements, so you had a wide range of wire sizes to fit your build. I am sure it won't be long before third-party companies create extensions, but in terms of the actual kit, all your wire lengths are the same, so plan your builds accordingly.
One other change to the kit from previous models is the lack of a remote. In previous models, you had an IR sensor and remote. In this kit, you use your phone or another Bluetooth-enabled controller. I don't think many will have any issues with this and will be excited to pair their Xbox or PlayStation controllers to their robots. The possibilities with Bluetooth are going to really open up some exciting features.
Let's dive into some specific parts and pieces worth exploring.
The Intelligent Hub
Another upgrade to this kit from previous versions is the size of the Intelligent Hub. The Hub is much smaller, which allows for more unique builds especially when combined with some of the new elements. The bulkiness of the EV3 and NXT is no longer going to be an issue. The way the Intelligent Hub is designed allows the builder to position the Intelligent Hub in a variety of ways to allow more easily building designs:
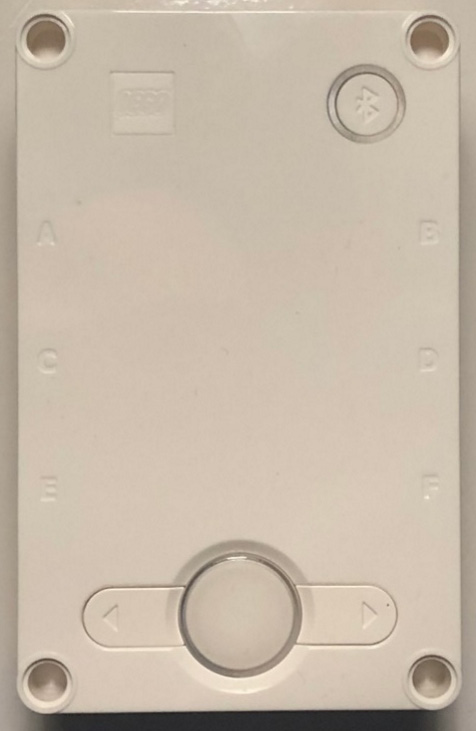
Figure 2.3 – The new Intelligent Hub that comes with the kit
The LED screen is one of the most noticeable changes to the Intelligent Hub. In previous models, we had a screen where the programmer could program on the Intelligent Hub and have various elements of text, data, and graphical images displayed on the screen. On this Intelligent Hub, we are given a 5x5 LED screen. The days of programming on the Intelligent Hub are gone with this new design. However, keep in mind that it is now so much easier to get your programs to the Intelligent Hub. Once your Intelligent Hub is paired to your software, you can make changes instantly, so this feature is no longer needed.
The new Intelligent Hub has an LED design that reminds me of my 8-bit glory days of playing Tetris. These LED blocks allow you to gather some basic data on your sensors, then switch programs, and you are able to write out words that scroll across the screen. Additionally, you use the arrow buttons to scroll through your programs and you are able to store 10 programs.
Using the large button on the Intelligent Hub, you can gather some quick data and test your sensors and motors by plugging them in and gaining some quick information.
The Intelligent Hub has the gyro sensor built in. In the EV3, the gyro was a sensor we had to attach much like the touch, color, and ultrasonic sensors. This is a nice touch to the Intelligent Hub especially now that the Intelligent Hub has been reduced from eight ports to six. While at first you might be sad to only have six ports, remember this could prove to be helpful as these six ports can be both input and output. Looking back at the EV3, it had four ports for motors and four ports for sensors. The new Intelligent Hub allows the user to use any port for any motor or sensor. If you have been using EV3 for as long as I have, then you'll realize that this means you could potentially have six motors running off the hub or six sensors, whereas in the previous models, we were limited to four or fewer.
The Intelligent Hub also contains an accelerometer, an internal speaker, and a rechargeable lithium-ion battery. These functions expand the Intelligent Hub to allow the builder to do some really exciting projects. We will explore some of these features later, but it is a great reminder that the Intelligent Hub now serves as more than just the brains of the operation. It has several new features to expand what we can do with our robots without having to use ports. For example, you can now run your program tethered to your device or connect via Bluetooth for a wireless experience, as well as using your phone/tablet as a controller.
Elements
Depending on what previous LEGO Mindstorms kits you have used in the past and whether you have any experience with SPIKE Prime or some Power-Up kits, these elements might look familiar.
For the sake of exploring the kit, I would like to highlight a few key elements that I believe are great to have that the previous EV3 kit did not provide.
A quick note about the elements is that while many of the pieces are not necessarily new, there are several that come in the kit that are in a very nice-looking teal color. This will be a huge bonus for many builders looking to expand and coordinate their builds to have a more polished look. Teal is a great color choice, allowing the build designs to look really sharp. It is a great added color compared to the white, gray, and black of EV3 while not feeling too colorful like the SPIKE Prime. I like the colors of both kits, but I really like having choices in how my robots look.
Let's examine a few specific elements that come in the kit that are worth exploring a bit more deeply.
Panel plate
I fell in love with this piece when I purchased the SPIKE Prime kit. That kit provided two of these. The Robot Inventor provides one of these in that wonderful teal color, which is a very beautiful color scheme with this kit:
Figure 2.4 – The 11x19x1 panel plate
This plate allows the builder to build right upon it for stationary robots as well as a starting point for other robot builds, such as a vehicle or another mechanism. The possibilities this element provides the builder are huge. It is the piece I wish I always had.
Wheels
The kit provides six of these tires. These tires are great. They are all the same 56 mm size and are all black. They are one piece that is nice compared to the previous wheels. They are easy to clean for smooth driving and having six of these wheels to build with will allow the builder to build some excellent designs:
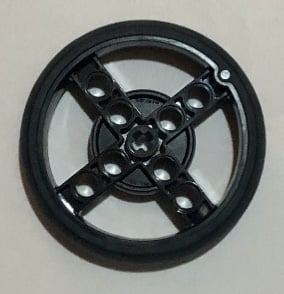
Figure 2.5 – This is the standard tire that comes with the kit
If you are looking for larger wheels that are built similar to these, there are a pair of larger wheels featured in the SPIKE Prime expansion kit.
Black frames
There are three sizes of these elements that come in the kit. These black frames provide a nice way to build some larger robots and to build more secure structures. You don't realize how much you need these elements until you build with them. Once you have them in your collection, you come to depend on them quite a bit:

Figure 2.6 – The three open frame sizes – from the top, 11x15, 7x11, and 5x7 – that come with the kit
Now that you have explored a few of the larger key elements, let's dive into some specific parts that are included in the kit.
Gear differential
The kit comes with a new gear differential that I know many builders will love. I do not have an extensive history with this aspect of building, but from what I have read and discussed, this piece will prove to be quite useful as builds on vehicles and robots are designed and built:

Figure 2.7 – Gear differential elements
Some of you will love the gear differential, but not everyone builds with these parts. However, there are some parts that almost everyone will love having in the kit. Let's check some of these out.
Mudguards
I love that this kit comes with two mudguard elements. What I love about these elements, and all elements of LEGO, is that while the pieces were designed for a purpose, they can be remixed for all sorts of new ideas. As you explore the kit, consider how you can use pieces in new ways. For example, these elements could prove to be helpful in designing a moving mouth, handles to carry, the frame of a face, and so on:
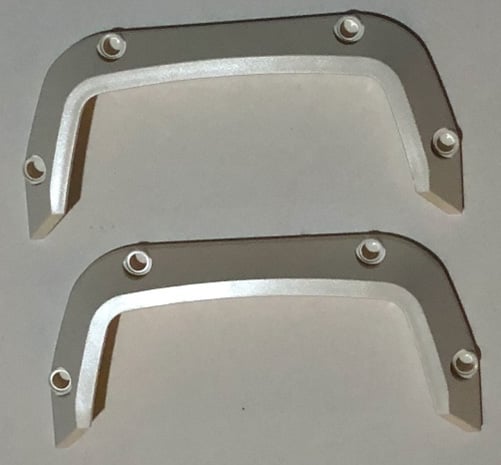
Figure 2.8 – Mudguards
While these are great pieces, here is another element in the kit that is even cooler!
Projectile launcher
This piece might be my favorite, but as an educator, it would easily be a headache! I know this kit does not come with a touch/force sensor, but the fact that it comes with two of these is great for coming up with new ideas. While there is fun in creating robots that shoot projectiles, such as Blast, which is one of the five builds, these can prove to be helpful in some other build ideas. And who doesn't love to launch projectiles?! This is a great addition to this kit to increase engagement and excitement:

Figure 2.9 – Projectile launchers
Next, let's look at sensors!
Sensors
This kit is limited when it comes to external sensors. In previous kits, the builder was given a variety of sensors to use. Keep in mind that while this kit only provides two external sensors, there are sensors built into the Intelligent Hub. Overall, you are given the following sensors:
- Inbuilt sensors:
Gyro
Accelerometer
Timer
- External sensors:
Color sensor
Distance sensor
The Intelligent Hub itself contains an accelerometer and gyroscope, which is great as you can use the data they collect to write some quality code with your robots. Another neat feature of the Intelligent Hub and these sensors are the gesture controls that allow the builder to create code based on tap, free fall, and shake using these sensors:
_B16699.jpg)
Figure 2.10 – The distance sensor on the left and the color sensor on the right that come with the kit
There are a few more details worth mentioning. The color sensor has been upgraded compared to previous versions. The color sensor is able to identify a small dose of color to make decisions. The sensor can also detect eight colors. Finally, it can identify these colors in both dark and bright light, which is very helpful. The sensor allows the coder to use color and reflection light.
The distance sensor is relatively similar to previous models except for a few changes. First, it has lights around the eye parts of the sensor that can be activated. The builder can program these lights, which is a cool feature.
The sensor is more accurate than previous models, but the range has been reduced from 250 cm to 200 cm. This will not impact many builders but is worth noting. You can choose distance settings of inches, centimeters, or percent.
Overall, the kit provides the builder with four motors and two sensors along with the sensors built into the Intelligent Hub itself, providing countless opportunities for building and coding.
Motors
This kit provides the builder with four motors. These motors have a top speed of 185 RPM along with a max torque of 18 Ncm. Additionally, the motors have sensors that allow you to gather data on both speed and position when using the app. One thing you will notice is that these medium motors are smaller than the medium motors of previous kits, but are much easier to build within your designs. This is a nice feature to allow the builder to create more fluid and precise builds. The shape also allows for easier builds than previous models where the motors had some unique shapes that could challenge how the builder created their creations:
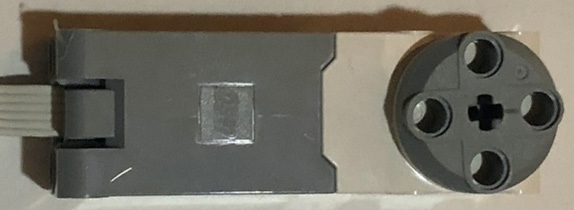
Figure 2.11 – The design of the medium motors in the kit
The new motors are different from the NXT and EV3 motors. In the previous kits, you were able to put an axle all the way through the motor. These new motors do not allow the builder to do this build. At first, I did not like this, but I realized quickly that it did not prevent any builds from being successful.
One key advantage to these motors is their absolute positioning. This helps with the alignment of motors and to have more precise positioning when using robots that require motors to be synced.
Now that we have a better understanding of the elements of the kit, it is time to explore the software to bring the builds to life.
Hub connection
Using the Mindstorms software, you can adjust the sensor settings by clicking on the sensor icon and adjusting as needed. The following screenshots show how you can use the software to gather data on your motors and sensors and make the necessary adjustments to the needs of your build:
- In order to access the Hub connection, you will need to open up a new program or any existing program you have already started.
- In the upper right-hand corner, there is an Intelligent Hub icon that you will click on to open up the interface:

Figure 2.12 – The Hub connection icon in the upper right-hand corner.
You will notice a green dot on the upper right corner of the brick icon which means the Hub is connected. If the color dot is pink then that means your Intelligent Hub is disconnected.
- You will see this screen that will showcase all the motors and sensors currently plugged in and activated on the Intelligent Hub:

Figure 2.13 – The software interface allowing you to see the data from inputs and outputs
- Select a motor or sensor and click the white triangle below the icon to choose the various types of data readings that you can use for your projects:

Figure 2.14 – The white triangle next to a data reading opens up a sub-menu of options
- For the inbuilt sensors, click on the sensor you want to see the information for, and then move your Intelligent Hub around to see the data readings change:
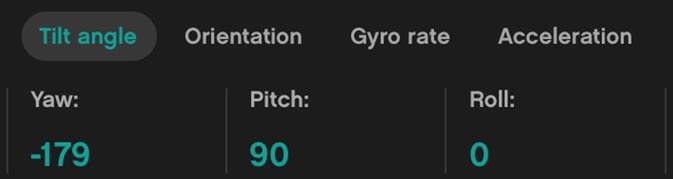
Figure 2.15 – The four inbuilt sensor data readings for the Intelligent Hub
Now that the Hub connection is done, let's move on to the coding!