
Let's create our very first .NET Core 2.0 application. We will create it using Visual Studio Code as well as Visual Studio 2017 in Windows, and with Visual Studio Code in Ubuntu.
The .NET Core 2.0 SDK installs the templates for creating the class library, console, web, MVC, razor, web API, and so on, for applications based on .NET Core 2.0. As our first application, we will create a simple MVC application on .NET Core 2.0, and get familiar with the application code and the .NET Core 2.0 command-line integration.
Let's start by creating this application in Windows using Visual Studio 2017, and then we will create the same application from Visual Studio Code, first in Windows and then in Linux.
For this, we need to perform the following steps:
- Open Visual Studio 2017.
- Go to
File|New|Project. In theNew Projectdialog, you should see the.NET Coretemplate insideVisual C#:
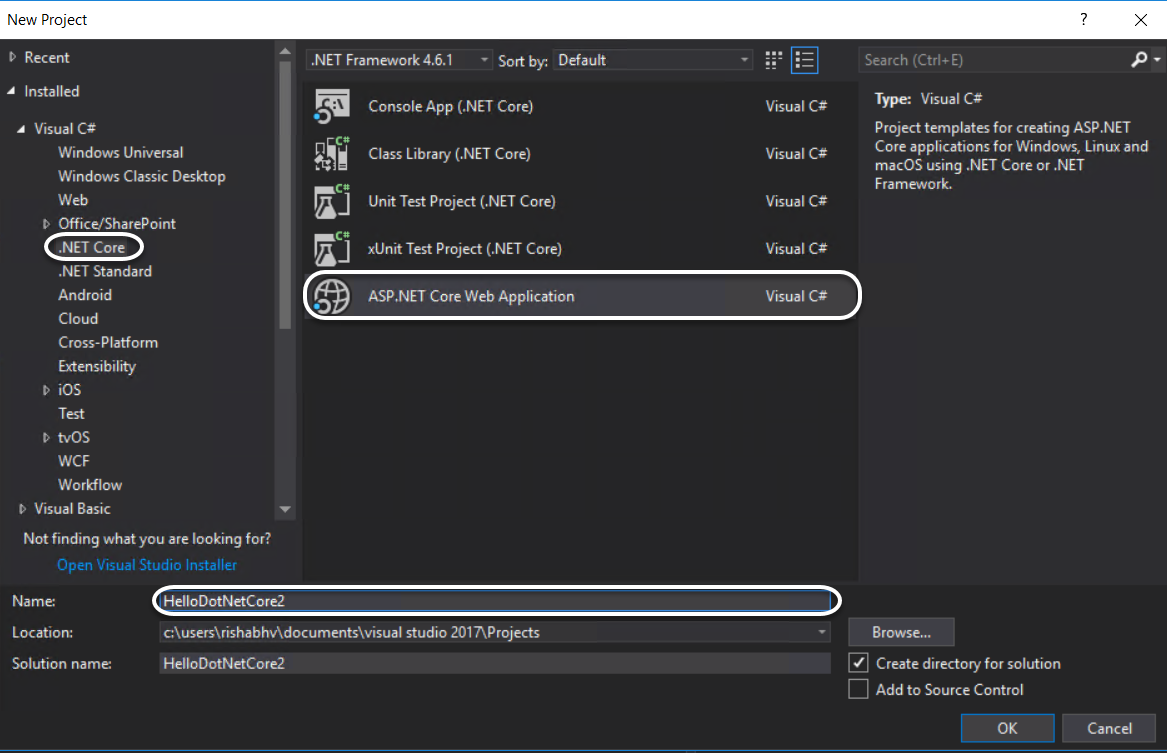
- Click on
.NET Coreand selectASP.NET Core Web Application. - Name the project
HelloDotNetCore2and clickOK.
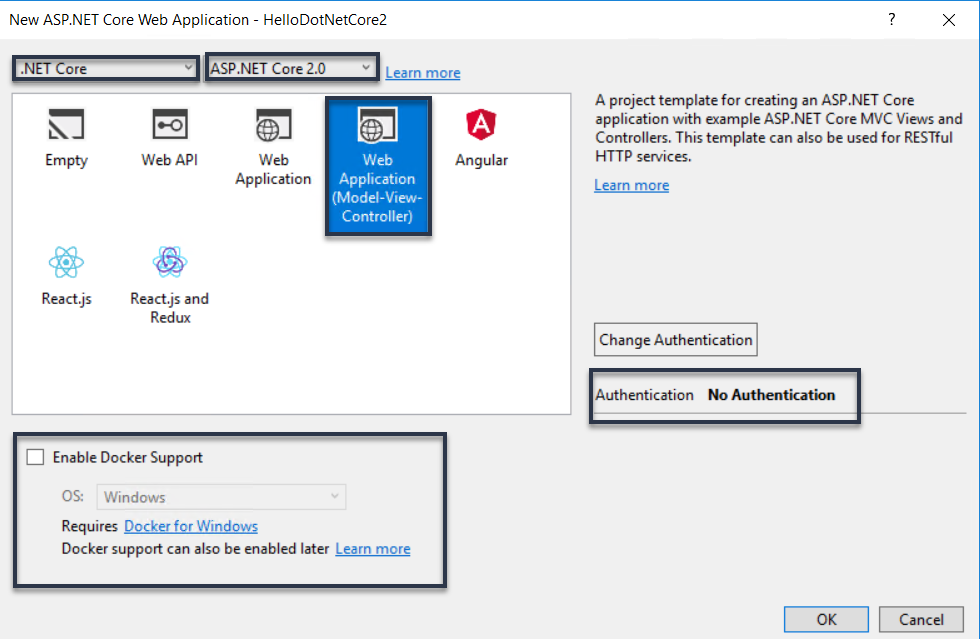
- It will show a
New ASP.NET Core Web Applicationdialog. Ensure.NET CoreandASP.NET Core 2.0are selected in the two dropdowns displayed in this dialog, as we are discussing .NET Core 2.0 here. The first dropdown signifies the target framework of the application and the second dropdown is the version of ASP.NET Core that we are using. You have the option to choose.NET Frameworkas the target framework in the first dropdown, but then the resulting application would not be cross-platform. If the application has to be cross-platform, it should target .NET Core. The second dropdown has the different versions of ASP.NET Core that have been released so far, such as 1.0, 1.1, and 2.0. We will keep it asASP.NET Core 2.0. You will also notice that with ASP.NET Core 2.0, the number of templates has increased from the previous version. Apart fromEmpty,Web API, andWeb Application, which were present in ASP.NET 1.1, we also have templates forWeb Application (Model-View-Controller),Angular,React.js, andReact.js and Redux. We will chooseWeb Application (Model-View-Controller)as our template. There is support for a Docker container but let's keep it unchecked for the time being. We will discuss Docker in detail in a later chapter. Also, keep theAuthenticationasNo Authentication. We will explore authentication options in detail in a later chapter. ClickOK:
- And voila! Visual Studio creates the
HelloDotNetCore2project for us and restores the required packages to build in the background. You can check this by inspecting thePackage Manager Consoleoutput. Your very first ASP.NET Core 2.0 is ready to be run:

- Click
Debugor press F5 to run the application. We will see a detailed walk- through of all the project artifacts in the next chapter.
Visual Studio is the IDE and is aware of projects and templates. As stated earlier, Visual Studio Code is a file and folder-based editor and hence it is not aware of projects and templates. So to create the same application through Visual Studio Code, we will make use of the .NET command line. Let's get going!
Open Visual Studio Code, go to View, and click on TERMINAL. It will open Command Prompt/the PowerShell terminal in the bottom section of Visual Studio Code. If you see the PowerShell terminal, type cmd so that it turns into Command Prompt. This is an optional step if you are comfortable with PowerShell.
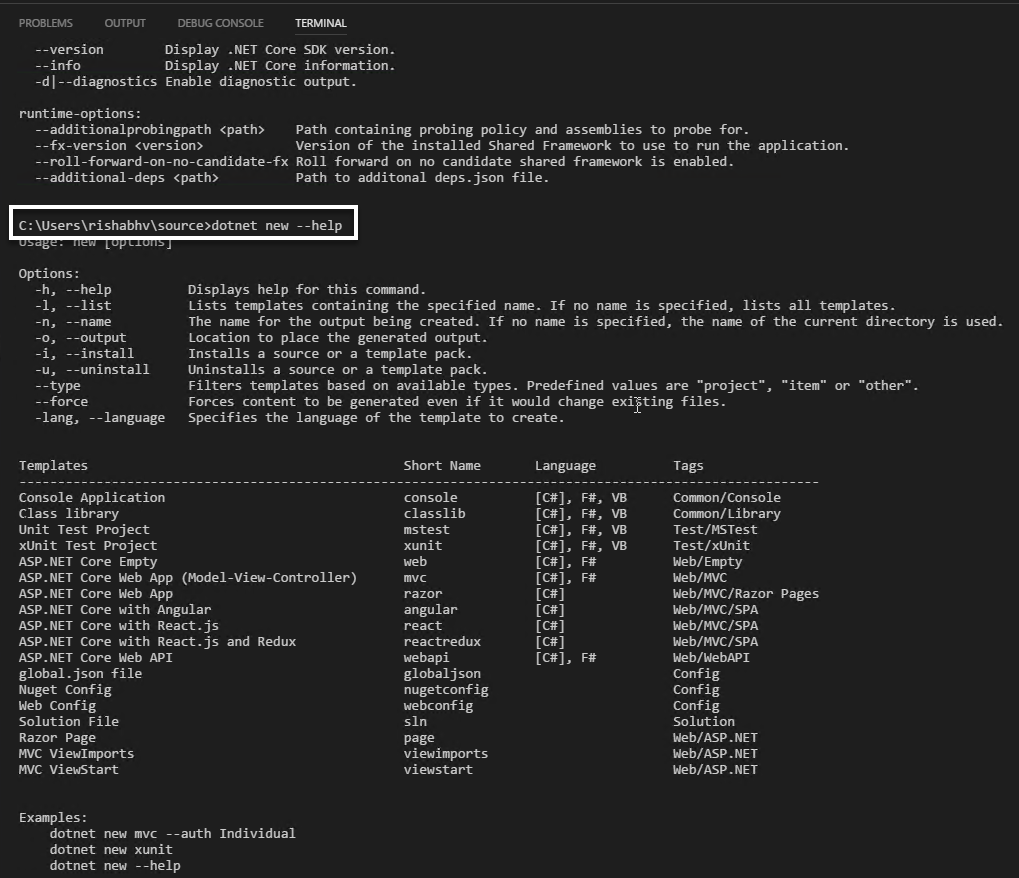
Let's try and explore the commands available to create a new project, so let's type dotnet --help . This is the help command for dotnet and will let us know about the options that we have available for creating a .NET Core 2.0 MVC application as shown in the following screenshot:
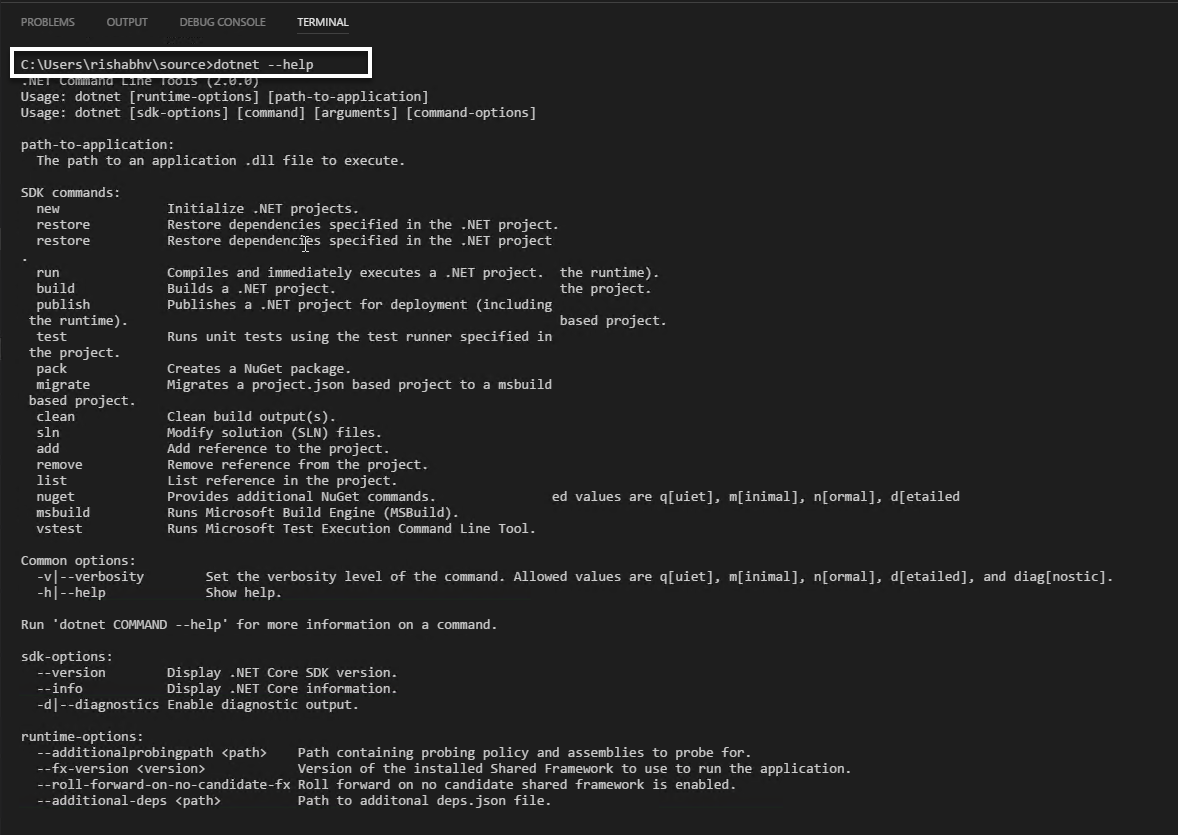
The SDK lists all the possible commands and options that can be used with explanations. So keep in mind, any time you need any help with .NET commands, SDK is there to help us. Just ask for help by typing dotnet --help in the terminal.
From the command list, it looks like the command of interest to us is the new command, as its description reads that this command initializes .NET projects.
So, let's ask SDK how to use the new command by typing dotnet new --help. This will let us know the command that we need to run to create a new MVC application:
Based on the preceding help text, let's enter the following command:
dotnet new mvc -lang C# -n HelloDotNETCore2This will create a new MVC project named HelloDotNetCore2 in the C# language, in the folder named HelloDotNetCore2 at the location of the terminal. Now let's build and run the application by typing the following commands:
cd HelloDotNetCore2
dotnet build
dotnet run
The first command navigates to the newly created folder, HelloDotNetCore2. Then, we build the application with the second command and run it through the third command. The dotnet build command is just to show that we have a build command as well. The dotnet run command actually builds and runs the application. Now, go to the browser of your choice and navigate to http://localhost:5000 to see the application running in your browser:
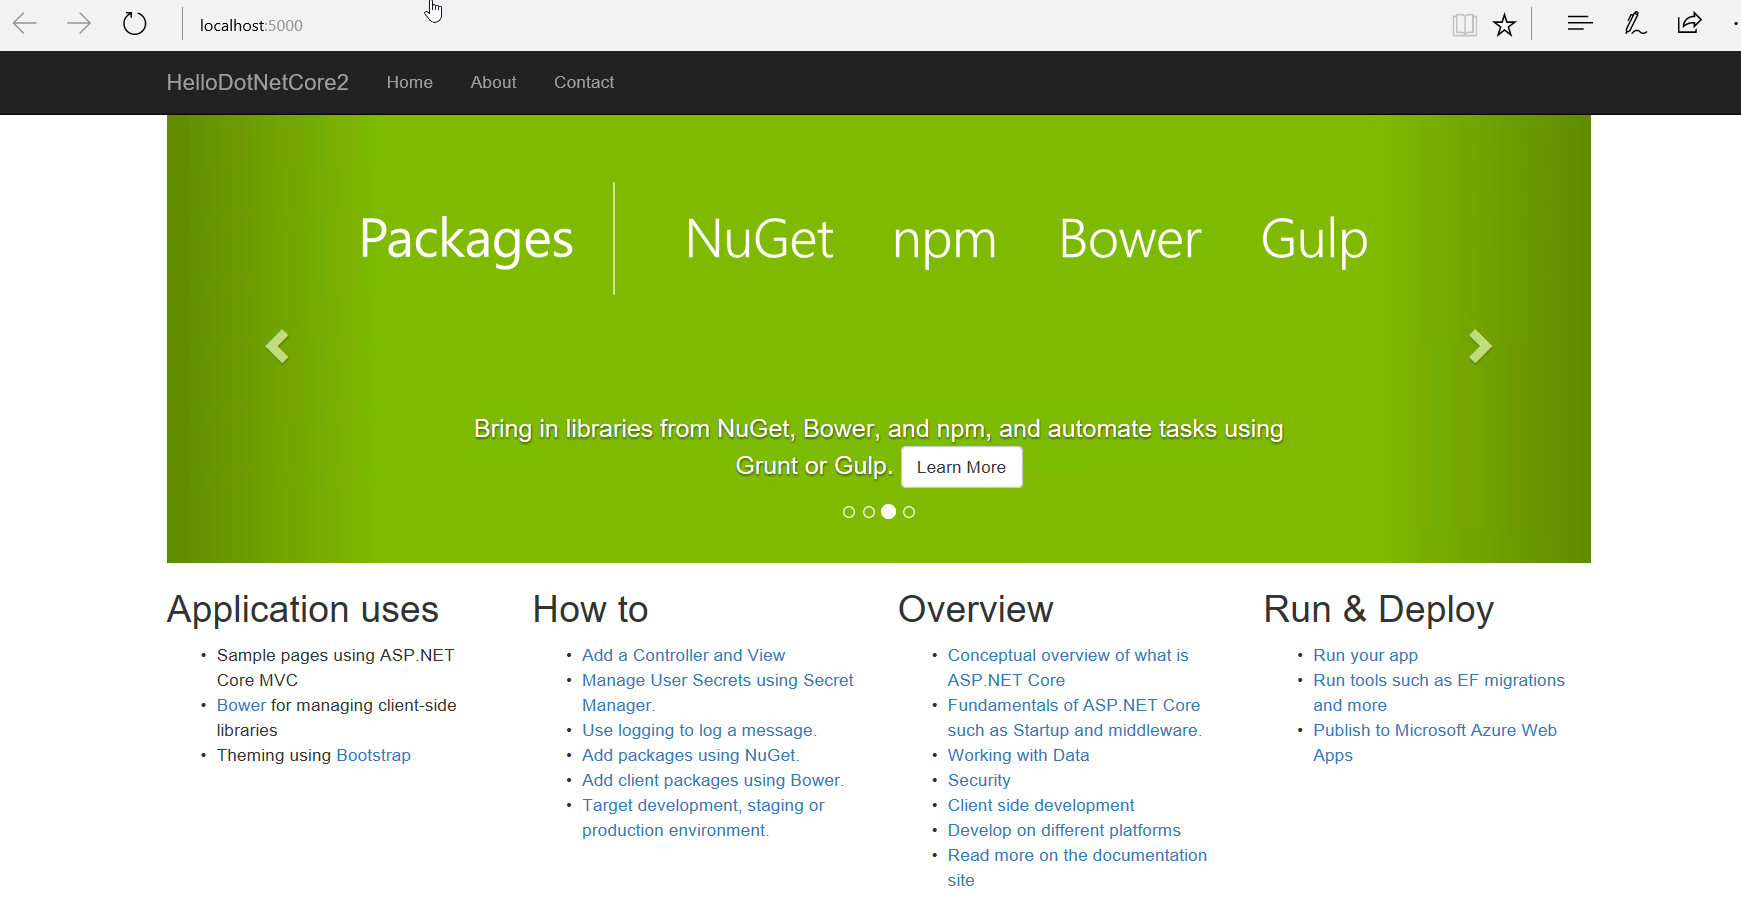
Alternatively, you can go to the Explorer view in the activity bar, open the HelloDotNetCore2 folder, and press F5. This will also build the application and launch it in the browser.