

Once we have finished installing the operating system and configuring the basic network infrastructure, we are ready to install the packages that will provide the clustering functionality to each node. Let's emphasize here that without these core components, our two nodes would become simple standalone servers that would not be able to support each other in the event of a system crash or another major issue in one of them.
Each node will need the following software components in order to work as a member of the cluster. These packages are fully supported in CentOS 7 as part of a cluster setup, as opposed to other alternatives that have been deprecated:
Pacemaker: This is a cluster resource manager that runs scripts at boot time, when individual nodes go up or down or when related resources fail. In addition, it can be configured to periodically check the health status of each cluster member. In other words, pacemaker will be in charge of starting and stopping services (such as a web or database server, to name a classic example) and will implement the logic to ensure that all of the necessary services are running in only one location at the same time in order to avoid data failure or corruption.
Corosync: This is a messaging service that will provide a communication channel between nodes. As you can guess, corosync is essential for pacemaker to perform its job.
PCS: This is a corosync and pacemaker configuration tool that will allow you to easily view, modify, and create pacemaker-based clusters. This is not strictly necessary but rather optional. We choose to install it because it will come in handy at a later stage.
To install the three preceding software packages, run the following command:
$ yum update && yum install pacemaker corosync pcs
Yum will update all the installed packages to their most recent version in order to better satisfy dependencies, and it will then proceed with the actual installation.
In addition to installing the preceding packages, we also need to enable iptables, as the default firewall for CentOS 7 is firewalld. We choose iptables over firewalld because its use is far more extended, and there is a chance that you will be familiar with it compared with the relatively new firewalld. We will install the necessary packages here and leave the configuration for the next chapter.
In order to manage iptables via systemd utilities, you will need to install (if it is not already installed) the iptables-services package using the following command:
yum update && yum install iptables-services
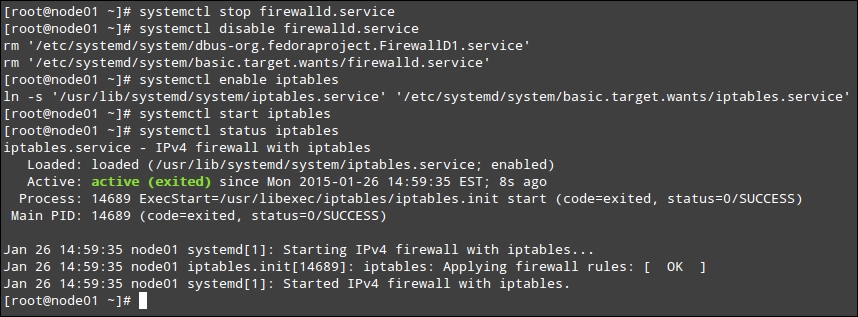
Now, you can stop and disable firewalld using the following commands:
systemctl stop firewalld.service
systemctl disable firewalld.service
Next, enable iptables to both initialize on boot and start during the current session:
systemctl enable iptables.service
systemctl start iptables.service
You can refer to the following screenshot for a step-by-step example of this process:
Once the installation of the first node (node01) has been completed successfully, clone the first node following the outline in section 1.13 of Virtualbox manual (Cloning virtual machines). Once you're done cloning the virtual machine, add the following minor changes to the second virtual machine:
Name the machine
node02. When you start this newly created virtual machine, its hostname will still be set tonode01. To change it, issue the following command and then reboot the machine to apply it:$ hostnamectl set-hostname node02 $ systemctl reboot
In the configuration file for
enp0s3innode02, enter192.168.0.3as the IP address and the rightHWADDRaddress.Ensure that both the virtual machines are running and that each node can ping the other and the gateway, as shown in the next two screenshots.
First, we will ping node02 and gateway from node01, and we will see the following output:

Then, we will ping node01 and gateway from node02:
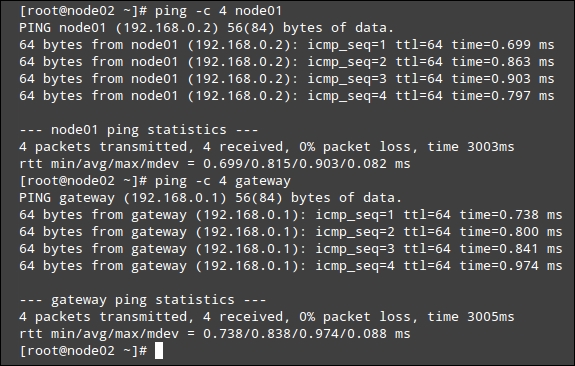
If any of the pings do not return the expected result, as shown in the preceding screenshot, check the network interface configuration in both Virtualbox and in the configuration files, as outlined earlier in this chapter.
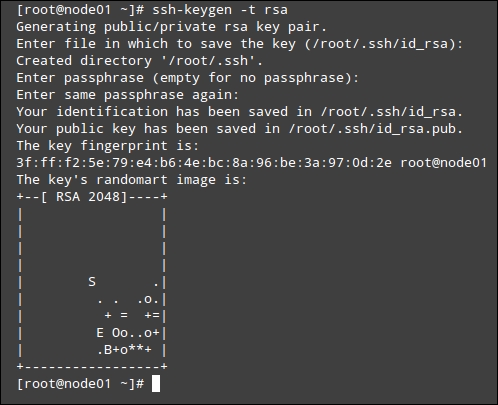
While not strictly required, we will also set up a public key-based authentication for SSH so that we can access each host from the other without entering the accounts password every time we want to access a different node. This feature will come in handy in case, for some reason, we need to perform some system administration task on one of the nodes. Note that you will need to repeat this operation on both nodes.
In order to increase security, we may also enter a passphrase while creating the RSA key, which is shown in the following screenshot. This step is optional and you can omit it if you want. In fact, I advise you to leave it empty in order to make things easier down the road, but it's up to you.
Run the following command in order to create a RSA key:
$ ssh-keygen -t rsa
To enable passwordless login, we will copy the newly created key to node02, and vice versa, as shown in the next two figures, respectively.
$ cat .ssh/id_rsa.pub | ssh root@node02 'cat' >> .ssh/authorized_keys'
Copy the key from node01 to node02:

Copy the key from node02 to node01:

Next, we need to verify that we can connect from each cluster member to the other without a password but with the passphrase we entered previously:

Finally, if passwordless login is not successful, you may want to ensure that the SSH daemon is running on both hosts:
$ systemctl status sshd
If it is not running, start it using the following command:
$ systemctl start sshd
You may want to check the status of the service again after attempting to restart it. If there have been any errors, the output of systemctl status sshd will give you indications as to what is wrong with the service and why it is refusing to start properly. Following those directions, you will be able to troubleshoot the problem without much hassle.