

For all of us working under a Microsoft Windows operating system on a daily basis for the past fifteen years, the idea of going back to a good old command-line interface may seem somewhat primitive, but it is nevertheless a reality—even a necessity for most server administrators. The first step of your preparatory work will consist of downloading and installing an SSH client. Secure SHell (SSH) is a network protocol that allows two devices to communicate securely by encrypting exchanged data. It is notably used for connecting to a system shell remotely. In other words, you will be able to take control of your server without compromising its security.
PuTTY is by far the most widely used terminal emulator for SSH access under Windows. As such, you may find a large amount of articles and other documents on the web explaining the various features offered by this program. We will only be covering the aspects that directly concern our subject—configuring PuTTY to connect to your server, entering text, and using the copy and paste commands. But you should know that there is much more that this free and open source tool can do—creating SSH tunnels, connecting to a Telnet, rlogin, even raw TCP communication, and so on.
PuTTY can be downloaded directly from its author's website:
http://www.chiark.greenend.org.uk/~sgtatham/putty/
It comes as a standalone .EXE program and does not require any external files. All its data is saved in the Windows registry, so it will not be filling up your system with configuration files.
Before reading on, make sure you are in possession of the following elements:
The host name or the IP address of the server you will connect to.
The port on which the SSH daemon is running. Unless you were told otherwise, the service should be running on port 22.
A user account on the system.
A password for your account.
Let us take a quick peek at the main PuTTY window.
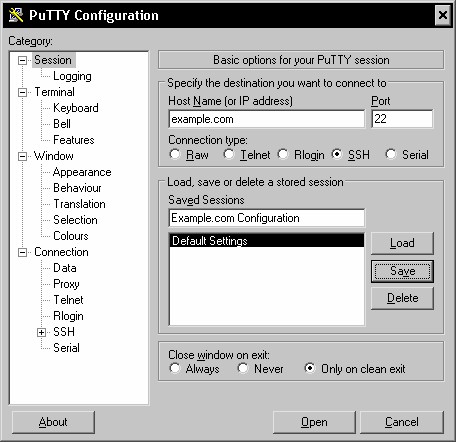
PuTTY saves your settings in sessions. So when you finish configuring the assortment of parameters, make sure to give a name to your session and click on the Save button, as highlighted in the preceding screenshot.
On the default PuTTY screen, you will need to enter a Host Name (or IP address) for the server you want to connect to. Then configure the port on which the SSH service is running on the remote server, 22 being the default port for SSHD. Here are a couple of additional settings that are optional but may be useful to you:
In the Window setting group, you may adjust a few parameters such as the size of the terminal window and scroll back behavior.
In the Window | Appearance setting group, you can change the font size in the terminal window as well as cursor options.
In the Window | Translation setting group, you are given the possibility to enable a different character set. This is particularly useful if you work with servers that make use of the
UTF-8character set.In the Connection setting group, you may want to enable the TCP keepalives feature, which allows you to prevent disconnections due to TCP timeouts.
In the Connection | Data setting group, you can enter your system account username. However, PuTTY will not allow you to store passwords for obvious security reasons.
Once you have finished configuring your session, remember to save it, and then initiate the connection by clicking on the Open button on the main window. When you connect to a server for the first time, you are required to validate its authenticity by accepting the server fingerprint. If you connect to the same server in the future, you shouldn't be seeing the confirmation again, unless the server settings such as hostname or port have been changed or security has been compromised and you are connecting to an intermediate server (man-in-the-middle attack). Eventually, you should be prompted for a login (unless you enabled the auto-login option) and a password. Please note that when typing the password, it will not appear on the screen at all—not even as asterisks, so make sure to enter it carefully, then press the Return key.
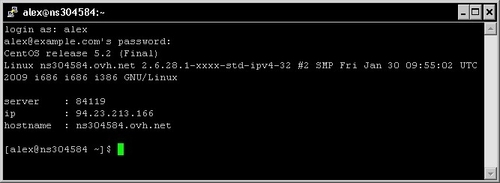
If you have never worked with PuTTY or with a system shell before, there are a couple of details you may want to know regarding the behavior of the main terminal emulator window.
Text that you select with the mouse cursor in the terminal window will automatically be copied to the clipboard when you release the left button.
Pasting text to the terminal is done by a simple right-click anywhere on the window area.
Pressing Ctrl+C does not copy text to clipboard. It is instead a shortcut used for interrupting the execution of a program. If you accidentally run a command that takes longer to execute than you imagined, then this shortcut will allow you to take control of the shell again.
In case of a disconnection from the server, a right-click on the title bar of the terminal window will open a menu and allow you to restart the session.
When typing a filename in the command line, pressing the Tab key will attempt to auto-complete the filename. If you hear a beep noise when doing so, it may be due to two reasons—either the segment you entered does not correspond to any file on the system, or there are multiple files found. In the last case, quickly press Tab twice to see the list of files matching your input. Note that this feature may be unavailable on your shell, depending on the operating system that your server is running.