

Linux-based operating systems have their files organized in a very specific way that follows more or less closely the long-established Filesystem Hierarchy Standard (FHS). According to the official FHS documentation, this standard enables:
Software to predict the location of installed files and directories
Users to predict the location of installed files and directories
Although the original standard specification was published in 1993, it is still used by modern distributions, but in a slightly revised version.
Unlike Microsoft Windows operating systems where all file paths begin with a drive letter (what happens if you have over twenty-six drives on your system?), FHS-based filesystems have a common parent. This parent is called the root directory, also known as / (the slash character). All files and directories (regardless of the device, drive, or partition, they are located on) are children of the root directory. Consequently, all absolute paths that you will find in this book start with a slash.
Let us now run cd /, followed by ls in order to discover the many subdirectories defined by the FHS. Please note that this directory structure is purely conventional; nothing actually prevents you from placing your own files in any of these folders or creating more directories at the root.
As you may have noticed in the directory structure, Linux operating systems have a reserved directory for "device files" (/dev). As a matter of fact, this folder contains elements referred to as
nodes, each node representing a different device on the system. They can be actual hardware devices or pseudo devices; either way, the purpose of having them listed as part of the filesystem is to facilitate input and output interactions with programs and services—software developers can access devices as simply as they would read or write to a file. You will learn that device files are used in a number of situations and you should sooner or later have a use for them.
There may be a large variety of devices available in the /dev directory, unfortunately all of them usually bear an obscure name making it nearly impossible for you to understand their purpose. Device files are named according to conventions in use in Linux operating systems. Since there is a potentially infinite amount of devices, we will only identify the most common ones. A device filename is composed of a prefix, conventionally defined according to the driver type, and optionally a number (or letter) if there is more than one device of that type present on the system.

Device file conventional prefixes for the most common types:
Some of the devices listed in the /dev directory do not correspond to actual hardware devices. Instead, they are here for the sake of providing administrators and developers with simple input and output access to specific resources. For that reason, we call them "pseudo devices". Here is a brief description of the most commonly-used pseudo devices:
|
Pseudo Device |
Description |
|---|---|
|
This pseudo device is often nicknamed black hole as its purpose is to disregard all data that is being sent to it. When written to, it always reports the write operation as successful. When read from, the device returns no data. This is particularly useful if you want to redirect the output of a program to nowhere; in other words, if you want to make sure a command executes but outputs no text on the screen.
[[email protected] ~]$ cat shopping.txt > /dev/null
| |
|
Random number generators | |
|
Streams that generate flows of random numbers. Since they generate binary data, numbers coming from | |
|
Full device This pseudo device is a stream that returns an error when written to as it is always considered full. When read from, it returns an infinite stream of null characters. The purpose of
[[email protected] ~]$ echo Hello! > /dev/full~bash: echo: write error: No space left on device
| |
|
Zero data Much like There is a variety of cases where reading from |
As you may have noticed in the previous sections, some of the devices available in the /dev directory are storage devices, such as hard disk drives, solid-state drives (SSD), floppies, or CD-ROMs. However, accessing the content that they serve is not as simple as browsing them with the cd command. Storage devices need to be mounted to the filesystem. In other words, devices need to be attached to a fixed directory.
[[email protected] ~]$ cd /dev/md1
~bash: cd: /dev/md1: is not a directory.
[[email protected] ~]$ mount /dev/md1 /mnt/alexdrive
[[email protected] ~]$ cd /mnt/alexdrive
[[email protected] alexdrive]$ ls
Documents Music Photos Videos boot.ini
The mount command allows you to attach a device (first argument, /dev/md1 in the previous example) to an existing directory on your system (second argument). Once the drive is mounted, you are able to access the drive like you would access any other directory of the filesystem.
Note
In modern Linux distributions, CD-ROMs and other common devices are automatically mounted by the system.
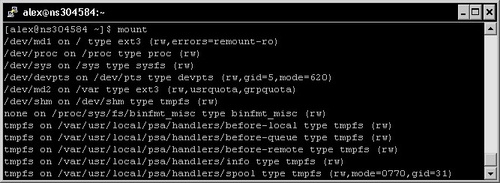
If you want to obtain information about currently mounted devices, a simple call to mount does the job—it tells you where each device is mounted, as well as the filesystem in use:
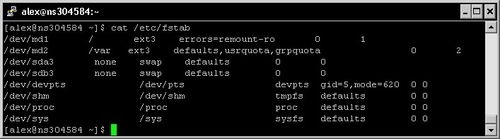
If you wish to have a drive automatically mounted on system startup, or to simply set a directory to be used as the default mount point for a device, you will need to edit the /etc/fstab file logged with administrator privileges. It is a simple text file and thus can be opened with a text editor such as
nano. The file, however, respects a specific syntax, and making some changes unknowingly could cause a lot of damage to your system. More details on the fstab syntax can be found online on websites such as tuxfiles.org.
Eventually, if you need to remove a device while the computer is in use (for instance, remove a USB storage drive) you should always unmount it first. Unmounting a device is done using the umount command:
[[email protected] ~]$ umount /dev/usb1Note that the first argument of the command may either be the device filename or the mount point, producing the same result.
There is a common misconception of the notion of "filesystem" when it comes to Unix-based operating systems in general. Since those systems respect the FHS, they use a common directory hierarchy regrouping all files and devices. However, storage devices may have their independent disk filesystem. A disk filesystem is designed for the organization of files on a mass storage device (hard disk drives, CD-ROMs, and so on). Microsoft Windows operating systems favor the FAT, FAT32, and NTFS specifications; whereas the default and most recommended one for working under Linux is the EXT3 filesystem. EXT3 comes with a number of characteristics, and it is essential for administrators to master them in order to fully understand the operating system they work with.
Unlike Microsoft's antique FAT32 file system that only allows files up to 4 gigabytes, the size restriction with EXT32 is 16 terabytes (depending on the block size). Moreover, the maximum storage space that can be used by EXT3 on a device is 32 terabytes, so you should have no trouble using it for a number of years, unless storage drive capacities suddenly skyrocket. One of the interesting features of EXT3 is that it lays out the data on the storage device in a way that file fragmentation is kept to a minimum and does not affect system performance. As a result there is no need to defragment your drives.
The EXT3 filesystem accepts filenames up to 256 characters. Filename extensions are not required, although they are usually present and correspond to the content offered by the file—a .txt file should contain text, a .mp3 file for music, and so on. An important fact, however, is that filenames are case-sensitive—you may find, in the same directory, files named "SHOPPPING.TXT", "Shopping.txt", or "shopping.txt"; all three are different files.
With Linux disk filesystems such as EXT3, a large variety of information is stored for each and every file. This information is separated both logically and physically from the actual file data and is stored in a specific structure called inode (index node). Some of the data contained in the inode indicates to the OS how to retrieve the contents of the file on the device. But that is not all—to the inode includes file permissions, user and group ownership, file size, access and modification times, and much more. Note that it does not contain the actual filename.
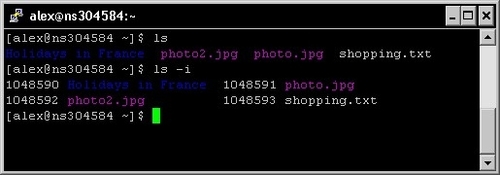
Inodes each have an identifier that is unique to the device. This identifier is called inode number or i-number and can be used in various situations. It can be retrieved by using the ls -i command:
Among the metadata contained in an inode, you will find three different timestamps concerning the file. They are referred to as atime, ctime, and mtime.
|
Timestamp |
Description |
|---|---|
|
Access time The date and time the file was last accessed. Every time an application or service reads from the file using a system call, the file access time is updated. | |
|
Modification time The date and time the file was last modified. When a change in the file content occurs, the file modification time is updated. | |
|
Change time The date and time the file was last changed. This timestamp concerns changes on both the file attributes (in other words, alteration of the file's inode) and the file data. |
Make sure to understand the difference between modification time and change time. The first one concerns the file data only, whereas the latter tracks modifications of both file attributes and data. Here are some common examples illustrating all three mechanisms:
File access time (atime):
[[email protected] ~]$ nano shopping.txtThe file is opened in a text editor; its content is accessed. The file access time is updated.
File change time (ctime):
[[email protected] ~]$ chmod 0755 script.shThe file permissions are updated (chmod command detailed in a later section); consequently, the inode is altered and the file change time updated.
File modification time (mtime):
[[email protected] ~]$ echo "- a pair of socks" >> shopping.txtThe file data is modified; as a result, both file modification time and file change time are updated.
As you may have noticed, there is no creation time recorded in the inode, so it is impossible to find out when a file was first created. It remains unclear as to why such an important element was left out. Either way if you want to know all the timestamps associated with a file, you may use the stat command:
[[email protected] ~]$ stat shopping.txtTip
Important information for SSD (Solid-State Drive) users
It is proven that enabling the access time feature of the filesystem can cause dramatic performance drops on your drive. Every time a file is read, its inode needs to be updated. As a result, frequent write operations are performed and that is obviously a major problem when using this kind of storage device. Be reassured that a simple solution exists for this problem as you have the possibility to completely disable file access time updates. This can be done via one of the options of the mount command, noatime. The option can be specified in the /etc/fstab file if you want to enable it permanently. More documentation can be found online with a simple noatime ssd search. Credit goes to Kevin Burton for this important finding.
Symbolic links in Linux are the equivalent of shortcuts in Microsoft Windows operating systems. There are a number of differences that need to be explained though, the most important one being that read or write accesses to the file performed by applications actually affect the target of the link and not the link itself. However, commands such as cp or rm affect the link, not its target.
Creating a link is done via the ln -s command. Here is an example that will help you understand the particularities of symbolic links:
[[email protected] ~]$ ln –s shoppinglist.txt link_to_list
[[email protected] ~]$ ls
link_to_list photo.jpg photo2.jpg shoppinglist.txt
[[email protected] ~]$ cat link_to_list
- toothpaste- a pair of socks
[[email protected] ~]$ rm link_to_list
[[email protected] ~]$ ls
photo.jpg photo2.jpg shoppinglist.txt
As you can see, reading the file content can be done via the symbolic link. If you delete the link, the target file is not affected; the same can be said for a copy operation (the link itself would be copied, but not the target file).
Another difference that makes symbolic links stand apart from Microsoft Windows shortcuts is that they can be connected to files using relative paths. This becomes particularly useful for embedding links within archives—deploying a shortcut using an absolute path would make no sense, as users may extract files to any location on the system.
Finally, Microsoft Windows shortcuts have the ability to include additional metadata. This allows the user to select an icon, assign a keyboard shortcut, and more. However, symbolic links are simple connections to the target file path, and as such, they do not offer the same possibilities.
Another type of link that is not available under Windows is hard links. They function a little differently, in the extent that they represent actual connections to file data. Two or more links may connect to the same data on the storage device; when one of those links is deleted, the data itself is unaffected and the other links still point to the data. Only when the last link gets deleted will the data be removed from the storage device.
To illustrate this example, let's create a hard link to that shopping list of ours—same command, but without the -s switch.
[[email protected] ~]$ ln shoppinglist.txt hard_link_to_listIf you decide to delete shoppinglist.txt, hard_link_to_list will remain here and the data it points to is still available. Additionally, the newly created link is considered as an actual file by some commands such as ls. If you run ls to calculate the total size occupied by files in this directory, you will notice that link file sizes add up. If the shopping list file itself takes up 5 kilobytes of storage space, the total size reported by ls for the directory will be 10 kilobytes—five for the shopping list file itself, and five for its link. However, some tools such as du (for Disk Usage, evoked further below) are able to dig deeper and report the actual occupied storage.
The next step towards your discovery of the Linux shell is to learn how to manipulate files with a command-line interface. There are many operations that you can perform with simple tools—editing text, compressing files and folders, modifying file attributes, and so on, but let's begin with a more elementary topic—displaying a file.
Before all, you should understand that we are working with a terminal here, in other words, there is no possibility to work with graphical data; only text can be displayed on the screen. In that extent, this section deals with text files only; no binary files such as graphics, videos, or any other form of binary data may be displayed on the screen.
The most used and simplest way to display a text file on the terminal is to use the
cat command, as you may have noticed in examples from previous sections.
Although the cat command can be used to perform more complex operations (such as concatenation from multiple input sources), its simplest form consists of using the syntax—cat filename. The content of filename will be displayed to the standard output—in other words, the terminal screen.
If you reuse the grep mechanism that we approached in the process management section, you can achieve interesting results for filtering the output:
[[email protected] ~]$ cat /etc/fstab | grep sys
/dev/sys     /sys      /sysfs      defaults     0  0
As you can see, piping the output to grep allows you to specify a text string; all lines that do not contain the specified string will not be displayed.
You can pipe the output to other programs as well, in order to have your text displayed in a different manner. For example, if your file happens to be a large text document, it will probably not fit in the terminal window. The solution to this problem is to pipe the output to
more:
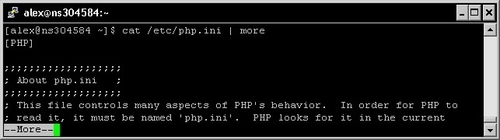
More allows you to control the document flow—it displays as many lines of text as your terminal can contain and waits until you push the Return key to display more. Pressing Q or Ctrl+C will let you return to the prompt.
Even better—the less command allows you to scroll up and down in the document flow. It is used as a standalone program, no need to pipe its output from cat:
[[email protected] ~]$ less /etc/php.iniIf you are a long time Microsoft Windows or Mac OS user, you might be surprised to learn that there are actually advanced command-line text editors. Several of them come with most Linux distributions—vim, emacs, nano, and so on. The question here is—which one should you use? Since you are reading this, the best choice for you should be nano, which has already been mentioned in previous sections.
Nano is a user-friendly text editor that comes with a lot of interesting features such as syntax highlighting, text search and replace, and keyboard shortcuts. Unlike its competitors that usually require a lengthy learning process, nano's interface is intuitive.
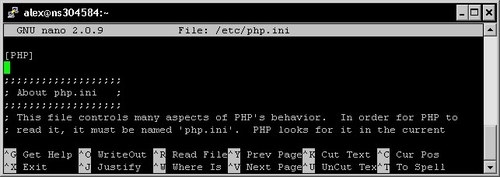
Since there is no mouse cursor, the interface is controlled via keyboard shortcuts; available operations are displayed at the bottom in the command bar. Once you finished editing your document, save (Ctrl+O) and exit (Ctrl+X). Note that the list of available shortcuts is displayed in the bottom bar, the ^ character indicating a Control key combination (^G stands for Ctrl+G, ^O stands for Ctrl+O, and so on).
There are other ways to write in a file though, using commands that do not require any form of interface at all. One of the possible ways is to use the mechanism of redirection. This allows you to specify a location for the input and output streams interacting with a shell command. In other words, by default, the text shows up on the screen; but you do have the option to specify other locations. The most common usage for redirections is writing the output of a command to a file. Here is an example demonstrating the syntax:
[[email protected] ~]$ ls /etc > files_in_etc.txtThe command executes normally but does not output any text to the screen; instead, the text is saved to the file you specified. The > character allows you to write the text to the file, and if the specified file already exists on the system, the original is deleted and replaced. In this example, we list the files located in the /etc directory and save the results in a text file. Using >>, you have the possibility to append the output to an eventual existing file (if the file does not exist, it is created):
[[email protected] ~]$ ls /etc/init.d >> files_in_etc.txtThe list of files found in /etc/init.d is appended to the text file. There is much more you can do with redirections including replacing standard input, but covering it all would be unnecessary to your understanding of Nginx.
Finally, the touch command allows you to update the access and modification date of a file without having to actually edit its content.
[[email protected] ~]$ touch shopping.txtAlthough the ZIP and RAR formats are popular and wide-spread across the Internet, they are both proprietary software technologies. As a result, they are not mainstream choices in the Linux world; other formats such as Gzip and bzip2 are favored. Of course, solutions exist for both ZIP and RAR under Linux; the point being that most projects and downloadable archives that you will find will come as .tar.gz or .tar.bz2 files.
You read correctly, there are two extensions—tar, and gz or bz2. The first part indicates the method with which files have been gathered together and the second part shows the algorithm used to compress the result. Tar (for Tape archive) is a tool that concatenates multiple files into a single one called tarball. It also gives you the option to compress the tarball once it is created, offering various compression alternatives. The tool is available under most distributions, though in some of the most minimal ones, you may have to install it manually with your system package manager (read the section further below).
The syntax for creating a tarball using Gzip and bz2 compressions respectively is as follows:
tar czvf archive.tar.gz [file1 file2…]
tar cjvf archive.tar.bz2 [file1 file2…]
Conventionally, Linux users do not archive multiple files together; instead they first gather files into a unique folder and then archive the folder. As a result, when users extract the archive, only a single item is appended to their directory listing. Imagine extracting a ZIP file onto your Windows desktop. Would you rather have all files appearing individually on your desktop, or collected neatly in a single directory? Either way, the syntax remains the same whether you want to archive files or directories.
Tar can, of course, perform the opposite operation—extracting files. However, you need to enter a slightly different command depending on the compression algorithm at use:
tar xzvf archive.tar.gz
tar xjvf archive.tar.bz2
Note that tar.gz files are also found as .tgz, and tar.bz2 files as .tbz. Other compression formats handled by tar are: LZMA (.tar.lzma) and compress (.tar.z), but they are now obsolete and there is a good chance you will never have to use them.
If you stumble upon RAR or ZIP files, you may still extract the files they contain by downloading and installing the unrar or unzip tools for Linux. The syntax that they offer is rather simple:
unrar x file.rar
unzip file.zip