
In the last two chapters, we learned about bundling code into scripts and functions. In this chapter, we will learn about using modules to bundle multiple functions or script files that are full of functions into a single container. There's more to modules than simply grouping things together. Altogether, we will learn the following:
- What is a module?
- Where do modules live?
- Loading and unloading a module
- PowerShell module autoloading
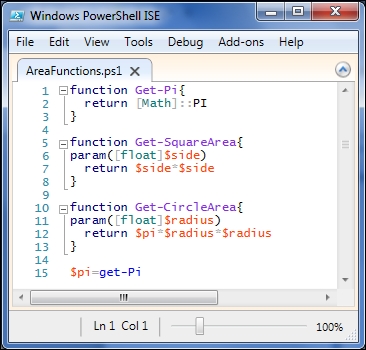
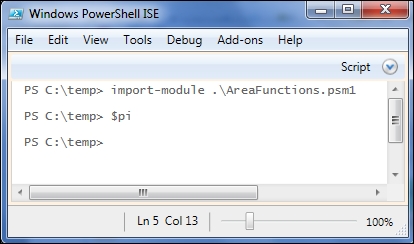
We learned in the last two chapters that you can put a bunch of functions in a script file, and then dot-source this file to get these functions into a session. Consider the following script, called AreaFunctions.ps1:
After dot-sourcing the script file, we can use the functions and access the $pi variable as well. If we use get-command, we will find the functions but they are no longer connected in any way. That is, it is difficult to see that these functions are part of a unit. There is no data retained in the function definitions that tells us where they came from. Since one of the important points of PowerShell is that it is discoverable, this situation isn't ideal. PowerShell 2.0 introduced the concept of
modules to help tie these functions (among other things) together.
To turn this into a module in the simplest way, we can just change the file extension to .psm1. Once we have done this, we can import the module by pointing directly to the .psm1 file, as follows:
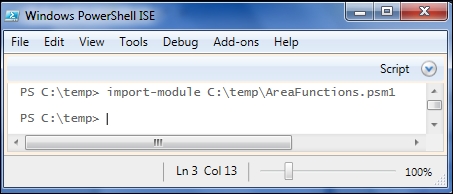
Similar to when we dot-sourced the script file, here we also don't see any real indication that the import-module cmdlet did anything. If we look at the output of get-command now, we can see that these functions are now listed as part of a module. We can, also, use the –Module parameter for get-command to show all the functions that were exported from the module:
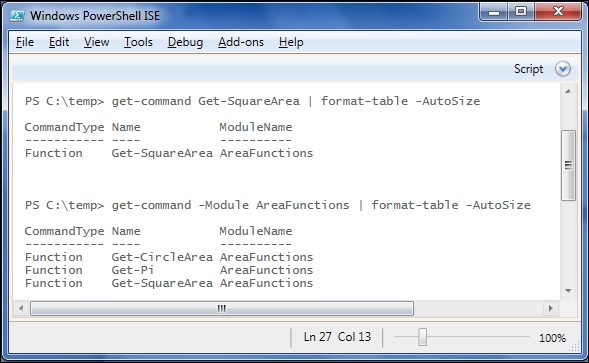
Now, these functions are much easier to discover, since we can see that they fit together somehow.
Module files with a .psm1 extension are called script modules, for obvious reasons. One huge benefit of using script modules is that they are simple to create. Another reason for using script modules is that they provide the opportunity to hide elements that you don't want to be public.
In our module, the Get-Pi function is really just a helper function that is used to set the $pi variable (also, not super useful), which the Get-CircleArea function uses to perform its calculations. If we try to access $pi, we will find that the variable doesn't even exist. The reason is that by default, modules don't expose variables defined in them:
We'll see in the next section how to remedy this, but first, let's see how we can keep the Get-Pi function from being exposed as well.
The key to controlling which parts of a module are visible is to know the default visibility and how to use the Export-ModuleMember cmdlet.
By default, a module does the following:
- Exports all the functions
- Hides all the variables
- Hides all the aliases
If you don't like one of these, you can override it using the Export-ModuleMember cmdlet. This cmdlet has three parameters called -Function, -Variable, and –Alias, which let you list specifically which members (functions, variables, and aliases) you want to be exported. Since we are fine with the variable not being exported, and only want the two area functions exported, we can add this command at the end of the module to get the required configuration:
Export-ModuleMember –Function Get-SquareArea,Get-CircleArea
Tip
Warning!
If you include any Export-ModuleMember commands in your module, you need to specify all the members you want to export. For instance, if we wanted to export the Pi variable, we would have added the following:
Export-ModuleMember –variable Pi
If this was the only Export-ModuleMember command in the module, none of the functions would be exported. Also, note that we don't include $ when listing variable names in Export-ModuleMember.
The Export-ModuleMember cmdlet
The key to controlling which parts of a module are visible is to know the default visibility and how to use the Export-ModuleMember cmdlet.
By default, a module does the following:
- Exports all the functions
- Hides all the variables
- Hides all the aliases
If you don't like one of these, you can override it using the Export-ModuleMember cmdlet. This cmdlet has three parameters called -Function, -Variable, and –Alias, which let you list specifically which members (functions, variables, and aliases) you want to be exported. Since we are fine with the variable not being exported, and only want the two area functions exported, we can add this command at the end of the module to get the required configuration:
Export-ModuleMember –Function Get-SquareArea,Get-CircleArea
Tip
Warning!
If you include any Export-ModuleMember commands in your module, you need to specify all the members you want to export. For instance, if we wanted to export the Pi variable, we would have added the following:
Export-ModuleMember –variable Pi
If this was the only Export-ModuleMember command in the module, none of the functions would be exported. Also, note that we don't include $ when listing variable names in Export-ModuleMember.
PowerShell defines an environment variable called PSMODULEPATH, which contains a list of folders that it checks for modules. Viewing PSMODULEPATH is simplified by the –split operator to split the path wherever it sees a semicolon:
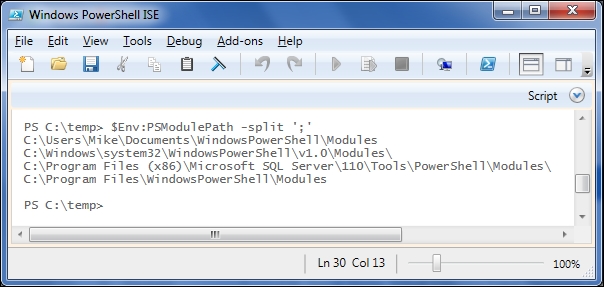
Here, you can see that there are four folders where PowerShell is looking for modules in this session. For it to find our AreaFunctions module, there needs to be a AreaFunctions subfolder in one of these locations with our psm1 file in it.
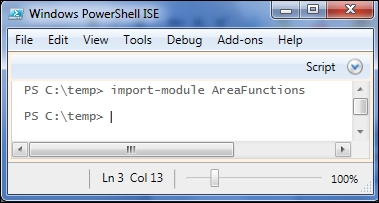
Once we have created a folder and placed the AreaFunctions.psm1 file in it, we can import the module by name rather than by path:
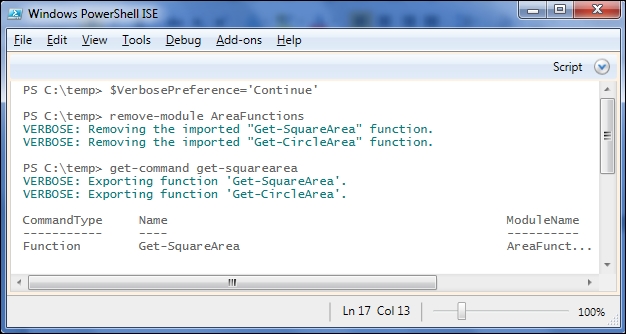
If you decide that you don't want the functions in a module included in your session for some reason, you can remove it using the Remove-Module cmdlet. Once the module is removed, you can try to check whether it was removed using the Get-Command cmdlet to look for one of the exported functions:
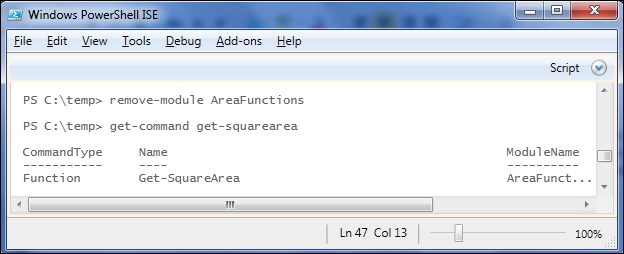
Wait a minute! We removed the module and it didn't give us an error, but then both the area functions are in the session and they have been reported as being in the AreaFunctions module. To understand what's going on, we need to understand module autoloading.
In PowerShell 2.0 on Windows 2008 or Windows 7, there were only a handful of modules installed by the operating system, so knowing what modules were present and what commands were included in each module made sense. In PowerShell 3.0 with the CIM modules, the number of commands available jumped over 2,000, and it became unrealistic for users to be able to remember which of the scores of the modules contained in the commands were needed. To overcome this issue, PowerShell 3.0 introduced the concept of autoloading the modules. In PowerShell 3.0, if you reference a command that is not present in your session, PowerShell will look through the available modules (and in PSMODULEPATH), find the module that contains the missing command, and import it silently for you. This means that if your modules are installed in the correct directories, you don't have to use the Import-Module statements anymore.
When I first heard about module autoloading, I didn't like it. I thought I wanted to have a control over which modules were loaded and when they were loaded. I still use the Import-Module statements in scripts and modules to indicate dependencies, but I often rely on the autoloading behavior.
If you really don't want to use this feature, you can set the $PSModuleAutoloadingPreference variable to None. This will suppress the autoloading of modules, and force you to explicitly load modules using Import-Module.
Besides explicitly importing modules into a script, you can annotate the script with a special comment that tells the PowerShell engine that certain modules are required for the script to run. This is done using the #Requires statement. As #Requires starts with a number sign, it is a comment. However, this special comment has arguments like a cmdlet has. To indicate that a list of modules are required, simply list the module names, as shown in the following screenshot:
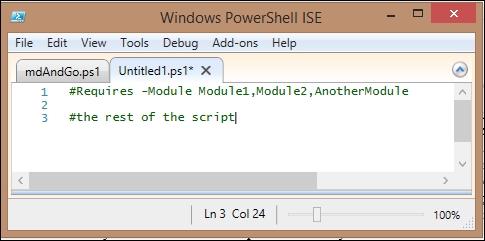
There are several other useful options possible with the #Requires statement. To see them, see the about_Requires help topic.
We can adjust the $VerbosePreference, so that we can see what is going on behind the scenes when we remove and (silently) import a module:
While script modules are an improvement over dot-sourcing script files, manifest modules take modules to a new level entirely. A module manifest is a configuration file for a module that lets you provide information about the module and gives you control over what happens when the module is loaded. The information you can provide includes things such as the author, company, copyright date, and a GUID identifier for the module. You can specify requirements for the module, such as the minimum PowerShell version or CLR version required. You also can list the functions, aliases, and variables to be exported from your module.
A benefit of using module manifests is that it is much easier for PowerShell to scan a manifest than to parse a script module file. With PowerShell 3.0, and the recent versions of Windows and Windows Server, the number of delivered modules is very large, and being able to see the contents of a module without parsing hundreds of files is a tremendous time-saver. Manifests also allow you to specify any dependencies for your module, including files that should be executed or loaded when the module is imported.
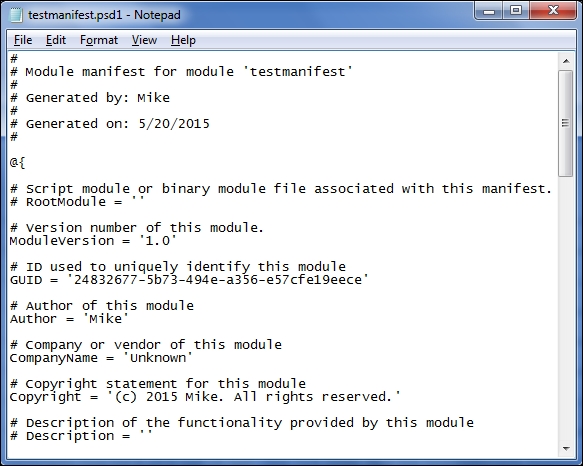
PowerShell includes a cmdlet called New-ModuleManifest, which creates a .psd1 file for you. Here is the file created by New-ModuleManifest testmanifest.psd1:
Manifest modules
While script modules are an improvement over dot-sourcing script files, manifest modules take modules to a new level entirely. A module manifest is a configuration file for a module that lets you provide information about the module and gives you control over what happens when the module is loaded. The information you can provide includes things such as the author, company, copyright date, and a GUID identifier for the module. You can specify requirements for the module, such as the minimum PowerShell version or CLR version required. You also can list the functions, aliases, and variables to be exported from your module.
A benefit of using module manifests is that it is much easier for PowerShell to scan a manifest than to parse a script module file. With PowerShell 3.0, and the recent versions of Windows and Windows Server, the number of delivered modules is very large, and being able to see the contents of a module without parsing hundreds of files is a tremendous time-saver. Manifests also allow you to specify any dependencies for your module, including files that should be executed or loaded when the module is imported.
PowerShell includes a cmdlet called New-ModuleManifest, which creates a .psd1 file for you. Here is the file created by New-ModuleManifest testmanifest.psd1:
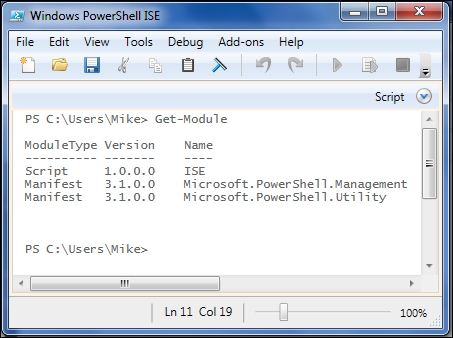
A module is simply PowerShell's term for a self-contained library or package. PowerShell modules were introduced in Version 2.0. Your operating system is delivered with a number of built-in modules. To see them, you need to use the Get-Module cmdlet. If you don't supply any arguments, Get-Module outputs a list of all the modules that have been loaded into the current session. To see the list of all the modules that PowerShell can find, you can use the –ListAvailable switch.
On my Windows 7 laptop, in a new ISE session, I have only three modules loaded, two "core" modules, and an ISE-specific module, all of which are automatically loaded:
If we use the –ListAvailable switch, we can see that there are several modules in several places that I could import into this session:

The first column of the output shows the type of the module. In the –ListAvailable output, we can see the Script, Binary, and Manifest modules. Other types of modules that I don't have on my laptop are CIM and Workflow. These types of modules are described in the following table:
Binary, CIM, and Workflow modules are beyond the scope of Module 1, please see Module 2 for more on PowerShell modules. As a scripter, you will spend most of your time writing scripts and manifest modules.
In this chapter, we introduced the concept of modules as containers for multiple functions. We showed how to place the modules so that they can be imported easily and how to control the visibility of items contained in a module.
In the next chapter, we will look at how to interact with files in PowerShell.
For Further Reading
Get-Help about_ModulesGet-Help Export-ModuleMemberGet-Help about_Requires