
As you know, in Windows Server 2008 or Windows Server 2008 R2, an export file was a requirement before it can be imported onto a new Hyper-V server. I am sure you are all familiar with the following error message in Windows Server 2008/R2 if the export file is not available:

In Windows Server 2012, Microsoft supports importing virtual machines (VM) into a Hyper-V host without an export (.exp) file. In other words, you can use raw Hyper-V files from the source server. The import and export feature is also available.
Installation and configuration of Windows Server 2012 Hyper-V is beyond the scope of this book. So for this migration scenario, the assumption is that the target Windows Server 2012 Hyper-V servers are in place and running. Before you begin the export and import process, you need to make sure that the local or network share has enough storage space to accommodate these virtual machines. Another common issue related to virtual machine migration is the permission issues. The export/import folder must have full permission for the user and computer account.
The following diagram provides high level task details:
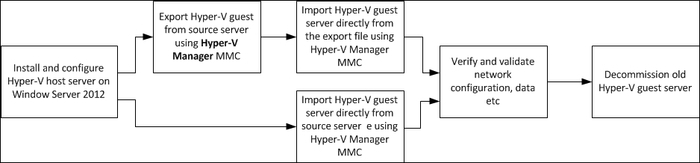
We will start the migration process without an export file.
Shutdown the source Hyper-V guest machine.
Log on to the target Windows Server 2012 Hyper-V server and open Hyper-V Manager from the Start screen.
Right-click on the Hyper-V host server node and click on the Import Virtual Machine option.

In the Before You Begin window click on Next.
In the Locate Folder window, specify the location of the existing virtual machine from the source server. Click on Next.

On the Select Virtual Machine window, select the correct server name. Click on Next.
You will see the following options on the Choose Import Type window:
Register the virtual machine in-place (use the existing unique ID)
Restore the virtual machine (use the existing unique ID)
Copy the virtual machine (create a new unique ID)
Click on Next.

In the Choose Folders for Virtual Machine files window, you can change the default location of the Configuration, Snapshot store, and Smart Paging folders. Click on Next.
In the Choose Folders to Store Virtual Hard Disks window, select the location of the hard disks. Click on Next.
Review the configuration details on the Summary window. Click on Finish. The import process will start and you will see the progress in the Hyper-V manager console.
For some reason, you cannot directly import the Virtual Machines from the source server, the export and import method is also available in Hyper-V 3.0. The following steps explain the procedure of exporting a virtual machine from an existing Hyper-V server:
Log on to the source Hyper-V server. Open Hyper-V Manager console.
Shutdown the Hyper-V guest server.
From the Virtual Machines column, select the virtual server you want to export.
From the Action pane, select Export.

In the Export path window, enter the location for the export file. Click on Export.
This process will generate an export (
.exp) file which can be used to import virtual machines into the target Windows Server 2012 Hyper-V server.The import process is the same as mentioned previously in this recipe.
Turn on the target guest machine and verify the settings.
Depending on the network configuration, you may need to reconfigure the network settings for the new virtual server. Repeat the same procedure for the other virtual machines on the network to complete the migration.
If you are using VMWare, the Microsoft Virtual Machine Converter can be used to convert VMware servers into Hyper-V format. It is a standalone application and can convert the entire virtual machine, which includes the following:
Disk
Network
Configuration
Memory
Processor details, and so on