Book Image

Instant StyleCop Code Analysis How-to

By : Franck Leveque
Book Image

Instant StyleCop Code Analysis How-to

By: Franck Leveque

Overview of this book

In medium-sized and big projects, coding conventions are defined in order to improve readability and maintainability for all the developers of the team. Stylecop analyzes your code and detects coding rule violations during all the phases of your project lifecycle. Instant StyleCop Code Analysis How-to allows you to take advantage of the features of Stylecop by guiding you through how to configure it, how to integrate it in your project environment, and finally how to personalize it in order to fit your needs. Instant StyleCop Code Analysis How-to teaches you how to configure and integrate Stylecop in your programming environment. The book will do this by showing you how to configure Stylecop on the developers IDE to the continuous integration server. 
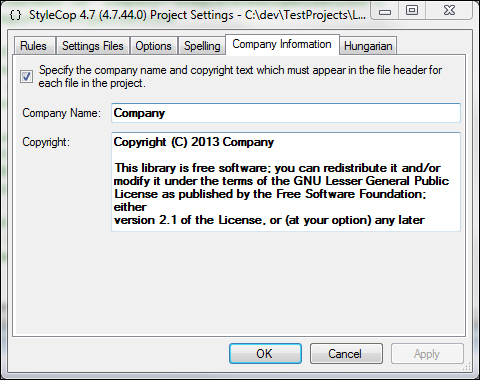
You will also learn how to customize Stylecop to fit your coding style by creating new rules as well as learning how to personalize your headers file. You will also see how to embed it in your own tools, using as an example the creation of a real time analysis add-on for Monodevelop. With Instant StyleCop Code Analysis How-to, you will have an overview of all the required steps to successfully integrate your programming team and enforce your own coding rules.
Table of Contents (7 chapters)

Customizing file headers (Simple)


In this recipe, we will see how to customize file headers to avoid StyleCop violations, and how we can use Visual Studio templates and snippets to make our life easier while developing.

Getting ready

For this recipe, you will need to have:

  • StyleCop 4.7 installed

  • Visual Studio 2008 or higher

How to do it...

Note

StyleCop doesn't use a lot of rules for headers. Basically, it requires the following things: the file name, a copyright, a company name, and a summary.

Let's try to make a LGPL header compliant with StyleCop. As there's no advice on how to integrate the Version 3.0, we will stick with the header proposed in Version 2.1 and which can be viewed at http://www.gnu.org/licenses/old-licenses/lgpl-2.1.html.

  1. The only requirements of the LGPL license header is to give one line to describe the project, the year of the project, and the author that wrote it (I will use the company name as the author). So the file header should look something like the following:

    // <summary>
    // {one line to give the library's name and an idea of what it does.}
    // </summary>
    // <copyright file="{File}" company="{Company}">
    // Copyright (C) {year} {Company}
    //
    // This library is free software; you can redistribute it and/or
    // modify it under the terms of the GNU Lesser General Public
    // License as published by the Free Software Foundation; either
    // version 2.1 of the License, or (at your option) any later version.
    //
    // This library is distributed in the hope that it will be useful,
    // but WITHOUT ANY WARRANTY; without even the implied warranty of
    // MERCHANTABILITY or FITNESS FOR A PARTICULAR PURPOSE.  See the GNU
    // Lesser General Public License for more details.
    //
    // You should have received a copy of the GNU Lesser General Public
    // License along with this library; if not, write to the Free Software
    // Foundation, Inc., 51 Franklin Street, Fifth Floor, Boston, MA  02110-1301  USA
    // </copyright>
    

    Note

    As you can see, I have separated the summary of the project from the main license part. I also enclosed in brackets the variables part of the license. Some people also like to add some contact information. To do so, I would add an author element at the end of the file.

  2. Having this license is great in itself; however it will be quite boring to add it manually in each file we create. In order to automate it, we will create a Visual Studio template. This will help you to have consistent file headers during your project at a minimal cost. To begin with, we will create a new library project, and modify Class1.cs by adding the previous LGPL header we made. Now, we have to modify the line of the summary section to comply with our project description; then we will modify the first copyright lines to enable visual studio to change text automatically. The first two lines of the copyright section have to be changed like this:

    // <copyright file="$safeitemname$.cs" company="$registeredorganization$">
    // Copyright (C) $year$ $registeredorganization$
    
  3. In this code, we just introduce some Visual Studio template parameters:

    • safeitemname: This is the name you provide when you add a new item to your project.

    • year: This is the year you added the file.

    • registeredorganization: This is the name of the company you provided during your Windows installation. It can be found in the registry under the HKLM\Software\Microsoft\Windows NT\CurrentVersion\RegisteredOrganization key.

  4. Now that we have our model for the template ready, we have to export it.

  5. Click on the File menu and select Export Template.

  6. Select the Class1.cs item, and then click on Next.

  7. Add the default assemblies you want to include in the template, and then click on Next.

  8. Modify the template name and template description to suit your taste and click on Finish.

The template is now available in the My templates section when you create a new file.

How it works...

In this recipe, we see a way to include your own licensing section in headers. If your needs are not so specific that they include a particular license, you can have a look at this site http://vstemplates.codeplex.com/, which provides some basic templates for visual studio compatible with StyleCop.

There's more...

In the following paragraph we will see two others topics meant to help you manage the headers of your code files.

Other ways to handle the headers

While templates are ideal for new files, you might need to apply your templates to old work. Visual Studio provides numerous ways to do so. You can at least rely on snippets or macro.

Snippets are quite easy to create. They are in fact a simple XML file with a piece of code containing parameters. Let's create it for the LGPL license:

<?xml version="1.0" encoding="utf-8"?>
<CodeSnippets xmlns="http://schemas.microsoft.com/VisualStudio/2005/CodeSnippet">
  <CodeSnippet Format="1.0.0">
    <Header>
      <Title>Add LGPL License</Title>
      <Author>Franck LEVEQUE</Author>
      <Description>Add LGPL License to a file</Description>
      <Shortcut>copyright</Shortcut>
    </Header>
    <Snippet>
      <Declarations>
        <Literal Editable="true">
          <ID>Description</ID>
          <ToolTip>Insert here your project description </ToolTip>
          <Default>Project description</Default>
        </Literal>
        <Literal Editable="true">
          <ID>ClassName</ID>
          <Default>ClassNamePlaceHolder</Default>
        </Literal>
        <Literal Editable="true">
          <ID>Company</ID>
          <Default>Company</Default>
        </Literal>
        <Literal Editable="true">
          <ID>year</ID>
          <Default>Year</Default>
        </Literal>
      </Declarations>
      <Code Language="csharp" Kind="" Delimiter="$"><![CDATA[// <summary>
// $Description$
// </summary>
// <copyright file="$ClassName$.cs" company="$Company$">
// Copyright (C) $year$ $Company$
//
// This library is free software; you can redistribute it and/or
// modify it under the terms of the GNU Lesser General Public
// License as published by the Free Software Foundation; either
// version 2.1 of the License, or (at your option) any later version.
//
// This library is distributed in the hope that it will be useful,
// but WITHOUT ANY WARRANTY; without even the implied warranty of
// MERCHANTABILITY or FITNESS FOR A PARTICULAR PURPOSE.  See the GNU
// Lesser General Public License for more details.
//
// You should have received a copy of the GNU Lesser General Public
// License along with this library; if not, write to the Free Software
// Foundation, Inc., 51 Franklin Street, Fifth Floor, Boston, MA  02110-1301  USA  
// </copyright>]]></Code>
    </Snippet>
  </CodeSnippet>
</CodeSnippets>

The first part of the snippet named Header describes what will be displayed in the snippet menu; I added a Shortcut element to be able to use it by typing copyright followed by two tabulations. The two really important sections are the Declarations section and the Code section. As you can see the Code section is simply the code of the LGPL we created in the first part. We just replaced each variable name with a parameter name surrounded by $. The Declarations section contains a definition of all the parameters you use in your snippet code. Each Literal element contains an Editable attribute specifying that you can edit the parameter, an ID element that is the variable name surrounded by $ in the code and a default value.

Your snippets usable in C# are generally located in Documents\Visual Studio 2008\Code Snippets\Visual C#\My Code Snippets.

Note

To edit snippets more easily, you can use Snippet Editor. It can be downloaded at http://snippeteditor.codeplex.com/.

Company configuration

StyleCop can enforce a specific company name and a copyright text in the copyright section. This might be useful if you want to be sure all the files of your project have the same copyright information. To do so, you need to go in the StyleCop settings in the Company Information tab.

The Company Name field corresponds to the company attribute of your copyright tag, whereas the Copyright field refers to the content of the copyright tag.