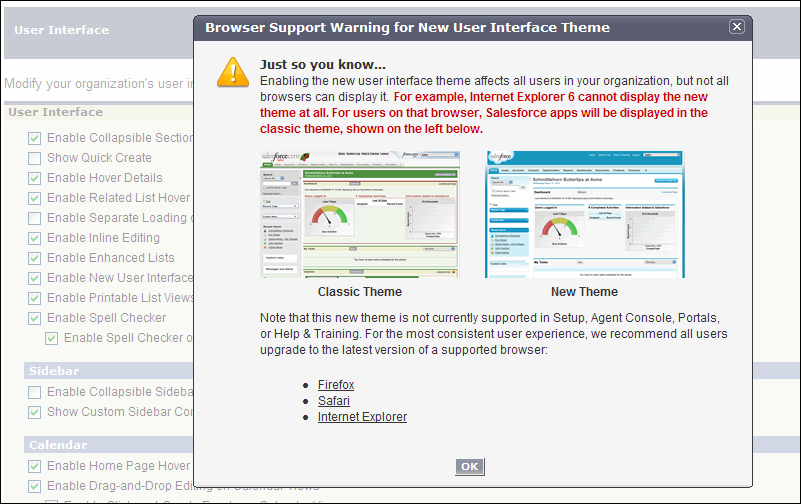
All screen image capture and setup in this book has been undertaken using the new user interface theme. The difference in themes can be seen in the following screenshot, which appears when you attempt to change from the Classic to New theme:
Not only does the new user interface theme change the look and feel of Salesforce, but it also positions some key links such as Setup and Logout under the user name for each user in your organization.
Note
The new user interface theme is seen only by users with supported browsers. Supported browsers include Microsoft Internet Explorer (IE) 7, 8, 9, and 10, Firefox (the most recent stable version), Apple Safari Version 5.1.x for Mac OS X, and Google Chrome (the most recent stable version).
Neither IE 6 nor the Metro Version of IE 10 is supported. Safari on iOS is not supported.
Some newer functional areas are dependent on the New Theme and cannot be provided when the Classic Theme is activated, such as Chatter (a collaboration application suite). Therefore, to enable Chatter, you must first activate the New Theme.
Along with the user interface theme, there are many other aspects of the user interface that can be set up in Salesforce to present the optimum user experience for the users in your organization.
There are also some administrator-specific settings that can improve your experience with the application located under the Setup settings. It also includes the Enhanced Page Layout Editor and Enhanced Profile List Views settings.
In the following sections, we will look through the various
User Interface settings. Let's look at the various User Interface settings one by one:
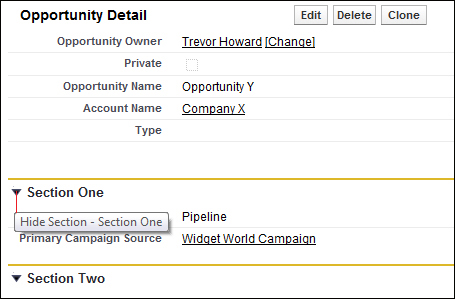
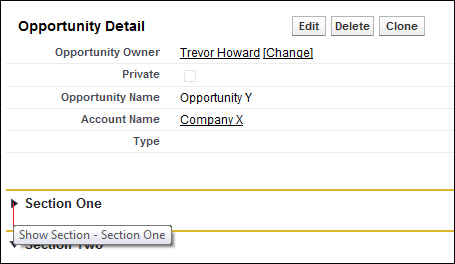
Enable Collapsible Sections
Collapsible Sections enables your users to collapse or expand sections on record detail pages using the arrow icon next to the section heading. Sections remain expanded or collapsed until the user changes their settings for that section. Salesforce will store a different setting for each record type if the record types have been set up as follows:
Note
When enabling collapsible sections, you need to ensure that the section headings have been entered on the page layouts.
Clicking on the triangle icon toggles between showing and hiding the section, as shown in the following screenshot:
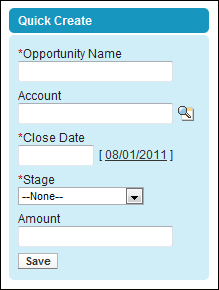
The Show Quick Create option adds the Quick Create fields section to the sidebar on a Record tab page to enable users to create a new record using minimal data fields as follows:
The
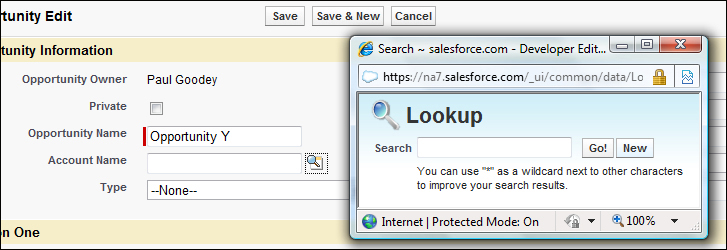
Show Quick Create option also controls whether users can create new records from within the lookup dialogs. With the setting enabled, users see a New button in the lookup dialog screen. The following example shows the creation of a new account within the account lookup dialog while working with an opportunity record:
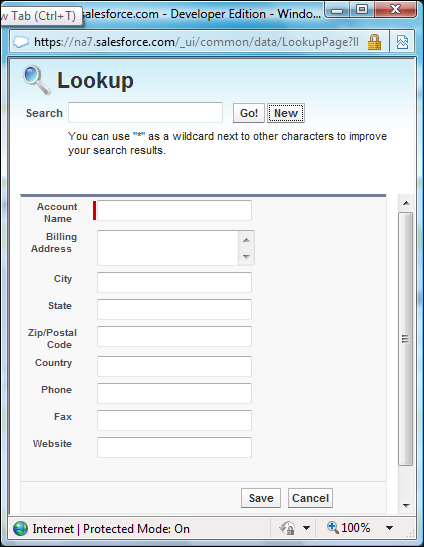
Clicking on the New button reveals the fields that are available for creating the new record:
The option to create new records and the display of the New button in the lookup dialog is only available for accounts and contacts. Also, users still need the appropriate Create user profile permission to enter data with Quick Create in spite of whether the entry fields are displayed.
The
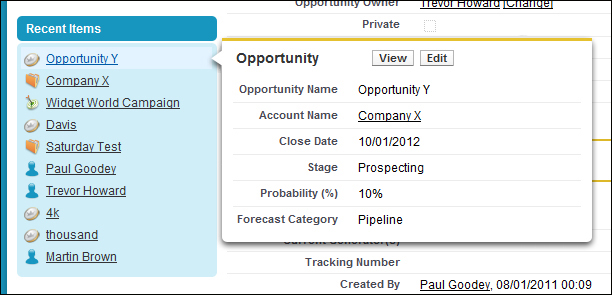
Enable Hover Details option allows users to view interactive information for a record by hovering the mouse pointer over a link to that record in the Recent Items list on the sidebar or in a lookup field on the record detail page. The fields displayed in the hover details are determined by the record's mini page layout which is set at the page layout edit screen.
Note
The Enable Hover Details option is selected by default.
In the following screenshot, we are hovering the mouse pointer over a link to a record in the Recent Items list on the sidebar:
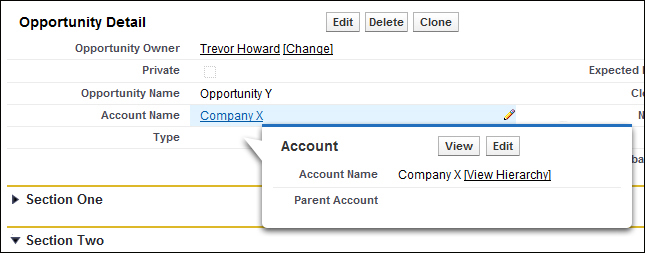
In the following screenshot, we are hovering the mouse pointer over a lookup field on the record detail page:
Note
To view the hover details for a record, users require the appropriate sharing access to the record and field level security to the fields in the mini page layout, which is set at the page layout edit screen (see Chapter 3, Configuration in Salesforce CRM).
Enable Related List Hover Links
This option enables related list hover links to be displayed at the top of standard and custom object record detail pages. It allows users to view the related list and its records by hovering the mouse pointer over the related list link. Users can also click on the related list hover link to jump down directly to the Related List section without having to scroll down the page.
Note
The Enable Related List
Hover Links option is selected by default.
Enable Separate Loading of Related Lists
This option enables a separate loading of record detail pages. First, the primary record detail data loads, and then the related list data. This option serves to improve the display performance for organizations with a large number of related lists on record detail pages. When the page is loaded, the record details are displayed immediately and afterwards, the related list data loads during which the users see a progress indicator for the related list.
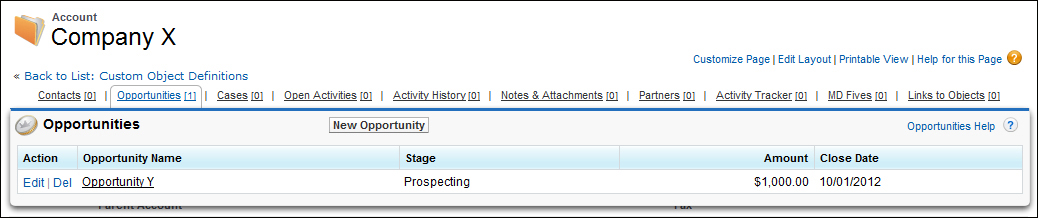
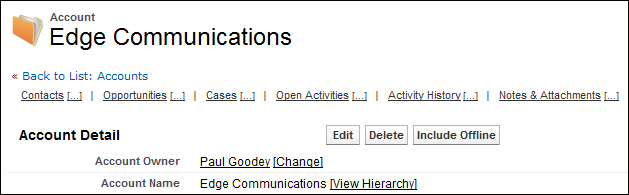
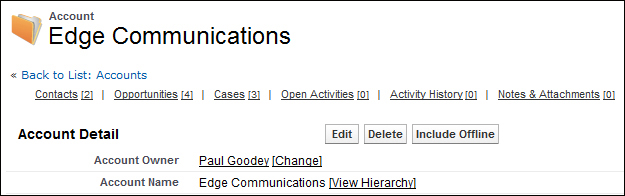
You will see that the related list sections are not yet loaded. They appear as […] while the primary record detail (for the account example) is loaded immediately, as follows:
After the primary record detail has loaded (the account page), the related lists are then loaded. You can see that the number of records for the Contacts related list is now displayed as [2].
This option does not apply to pages for which you cannot control the layout (such as user pages or Visualforce pages).
Note
The Enable Separate Loading of Related Lists option is disabled by default.
This option allows users to change field values directly within the record detail page, avoiding the need to load the record edit page first. By double-clicking on the field to be edited within the detail page, the field changes to become editable. The new value can then be entered and saved or the action can be undone using the undo button.
First, the field is highlighted by hovering over it with the mouse to reveal the pencil icon indicating that the field is editable, as follows:
Then double-clicking the field causes the field to switch from a view mode to an edit mode to allow a new value to be entered, as follows:
After a new value has been entered, the value is displayed in orange text and the user has the option to undo the change using the undo button as follows:
The changed value and the detail page can then be saved in the standard way using the Save button, as follows:
Tip
To check if inline editing is enabled for your organization and to discover which value can be edited, you can hover over a value with your mouse and note the following result:
This option is enabled by default. Certain fields cannot be changed using inline editing, such as System Fields (created by, last modified by, and so on), Calculated Fields (formula, auto number, roll-up summary, and so on), Read-Only Fields, and Special
Fields (such as owner and record type).
Note
Also, fields on detail pages for documents and forecasts are not currently editable using inline editing.
This option provides the user with the ability to view, customize, and edit list data, which is the resulting data section that is rendered from Views. When enabled along with the Enable Inline Editing setting, users can also edit records directly within the list without having to move away from the page, as shown in the following screenshot:
With enhanced lists enabled, users can:
Create a new view or edit, delete, or refresh the existing view.
Navigate through the list results by clicking the first page, previous, next, and last page links at the bottom of the list. You can jump directly to a specific results page by entering a number in the textbox in the lower-right corner. You can also change the width of a column by dragging the right side of the column heading with the mouse. Changes made to column widths apply to that specific list only and are recalled whenever that list is viewed. Please note that when columns are added or removed from a list, any column width setting for that list is discarded.
Change the order in which a column is displayed by dragging the entire column heading with your mouse to the desired position. For your users who have the permission to edit the list definition, the changes are saved for all who see the list. For your users without permission to edit the list definition, their changes are discarded after leaving the page.
If inline editing is enabled for your organization, values can be entered directly into the list by double-clicking on individual field values. Users who have been granted the Mass Edit from Lists option on their profile can edit up to 200 records at a time.
Note
The Mass Edit from Lists option only appears on the profile if inline editing is enabled.
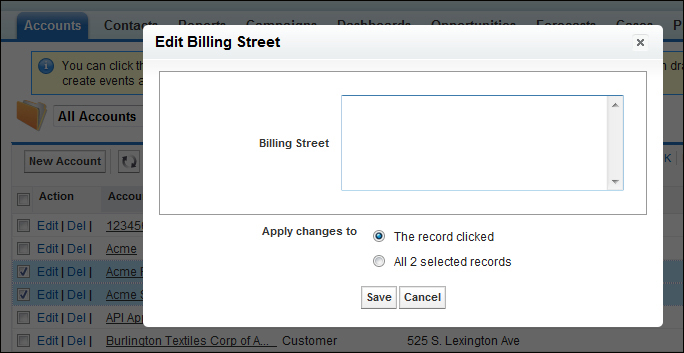
A mass edit is performed by first selecting the records to be edited using the checkboxes and then clicking on one of the fields that is to be edited.
Upon clicking on the field, a new pop-up window is displayed to prompt whether the change is to be done to just the selected record or to all the records that have been selected. In the following screenshot, we see an example where two account records have been selected, and where one of the record's billing street fields has been clicked:
Note
This feature only allows mass edit. Users cannot mass delete.
Tip
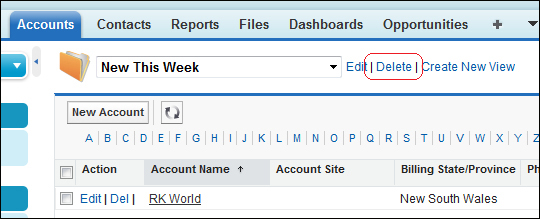
Remind users that they cannot mass delete records
As a system administrator you may need to remind users that they cannot mass delete records, as occasionally users may try to mass delete using the only visible Delete link, which is in fact the link to delete the View as shown in the following screenshot.
Communication of this fact will hopefully save you from having to recreate any views that have been deleted in error.
On Account, Contact, and Lead List views, there is an
Open Calendar link at the bottom of the page to display a weekly view of a calendar underneath the list. A record can be dragged from the list to a time slot on the calendar to create an event associated with the record.
Note
To perform inline editing on an enhanced list, Advanced Filter options must be turned off in the list view filter criteria.
Some standard fields do not support inline editing. For example, Case Status, Opportunity Stage, and several of the Task and Event fields can only be edited from the record edit page.
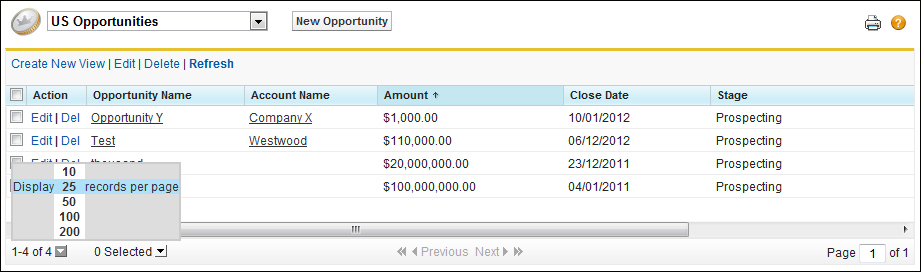
The number of records displayed can be changed per page by setting the view for 10, 25, 50, 100, or 200 records at a time. When this setting is changed, navigation is set to the first page of list results as shown in the following screenshot:
Note
If users change the number of records to be displayed per page, that setting is applied to all the lists (not just the current list).
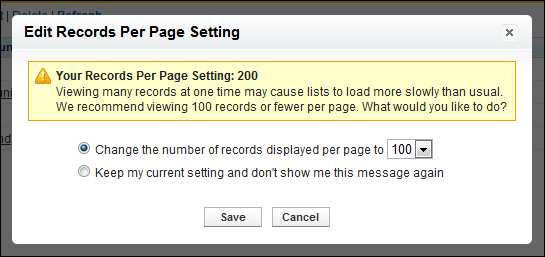
Also, if the option of displaying 200 records is selected, a warning message appears, as it can reduce performance.
Enable the New User Interface Theme
The
New User Interface Theme changes the look and feel of Salesforce from the Classic Theme to the New Theme. It also houses the links, such as Setup, Developer Console, and Logout, under the user name for users in your organization.
There are still some older browsers (such as IE 6) that cannot render the New User Interface Theme and should be avoided.
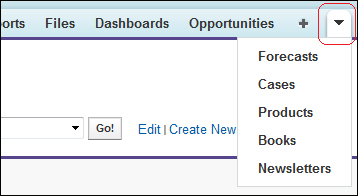
Tab Bar Organizer automatically arranges users' tabs in the tab bar to control the width of the CRM application pages and prevent horizontal scrolling. It dynamically measures how many of the application tabs can be displayed and puts tabs that extend beyond the browser's current width into a drop-down list presented on the right-hand side of the tab bar as shown in the following screenshot:
Note
This setting is only enabled when the New User Interface Theme is activated. If your organization is not using the New User Interface Theme, you can enable the feature, but the Tab Bar Organizer will not be activated for your users until the new theme is also enabled.
Enable Printable List Views
This option allows users to easily print list views.
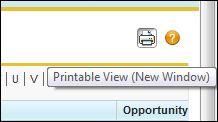
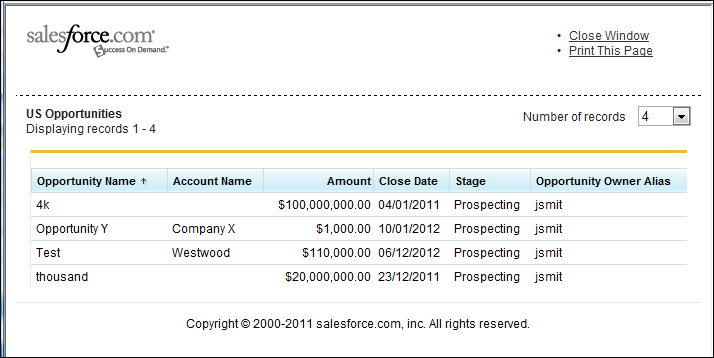
If enabled, users can click on the Printable View link (the printer logo) located in the top-right corner on any list view to open a new browser window. Within the new window, the current list view is displayed in a print-ready format, as follows:
This option allows users to click on the Printable View link from any list view, which opens a new browser window displaying the current list view in a print-ready format.
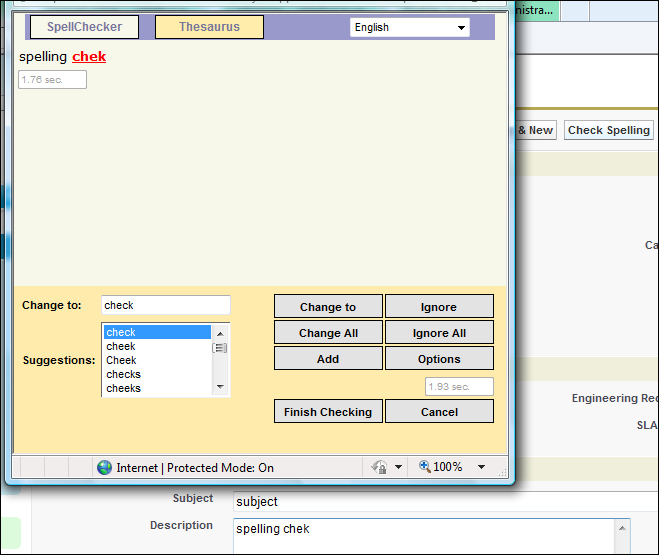
When this option is selected, the
Check Spelling button appears in certain areas of the application where text is entered, such as sending an e-mail, or when creating cases, notes, and solutions. Clicking on this button checks the spelling of your text as shown in the following screenshot:
Note
The Spell Checker option is not supported for all languages in Salesforce and does not appear where the language is for example, Thai, Russian, Japanese, Korean, or Chinese.
Enable Spell Checker on tasks and events
This option enables the appearance of the Check Spelling button when users create or edit tasks or events. Spelling is checked in the Description field on events and the Comments field on tasks.
There are administrator-specific user interface settings that can improve your experience with the application located under the Setup settings for the following:
Enable Enhanced Page Layout Editor
This option enables the
Enhanced Page Layout Editor for your organization for editing page layouts with a feature-rich WYSIWYG (What You See Is What You Get) editor.
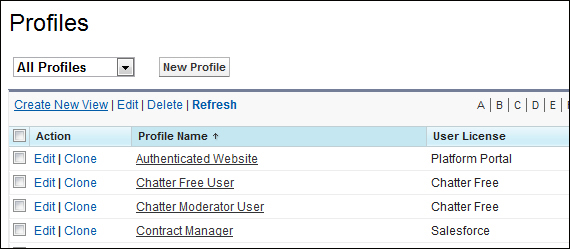
Enable Enhanced Profile List Views
This option enables the enhanced list views and inline editing on the profiles list page, which allows you to manage multiple profiles at once.
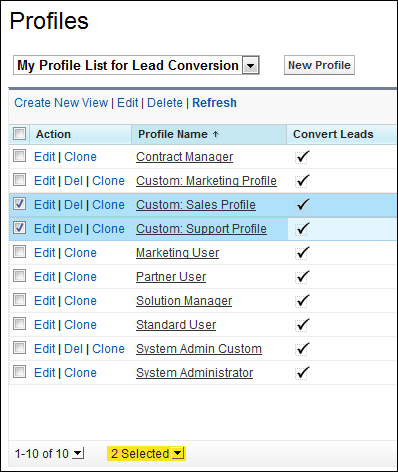
To navigate to the Profile menu, go to Your Name | Setup | Administration Setup | Manage Users | Profiles. Now select a profile and click on Create New View as shown in the following screenshot:
Following are the three steps to produce the list of profiles that allow you to modify multiple profile settings at once:
Enter View Name
Specify Filter Criteria
Select Columns to Display
Now that the profile view has been created, we can select multiple profiles to manage all at once as shown in the following screenshot:
You can display the multiple lists of profiles that can be selected and actioned as follows:
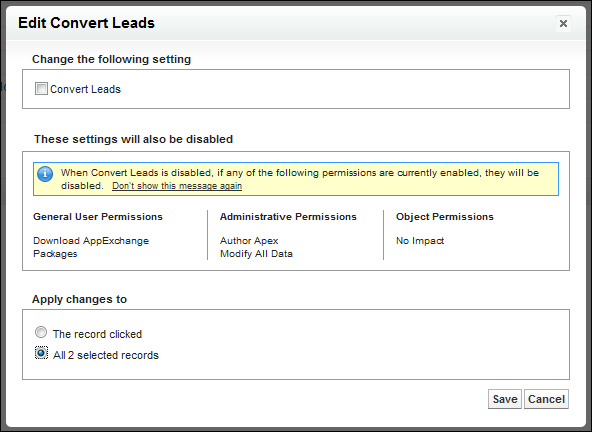
You can also modify the multiple profile selection to apply the setting to all the profiles as shown in the following screenshot:
The Advanced settings of User Interface set up the screen currently related to the
Extended
Mail Merge features.
Enable Enhanced Profile User Interface
This option allows you to enable the Enhanced Profile User Interface, which then offers the following features to help you:
Find permissions and settings. Here, you can start typing a specific permission or setting name in the Find Settings box and then choose from a list of matching results.
Edit profile properties. Here, you can change the name or description of a profile.
Find out who belongs to a profile by clicking on the Assigned Users button to see a list.
Browse permissions and settings, for both, app and system properties. Here, the app-related and system permissions and settings are grouped on individual pages where the profile overview page provides the descriptions and links.
Enable Custom Object Truncate
Select the Enable Custom Object Truncate checkbox to activate truncating custom objects, which permanently removes all of the records from a custom object while keeping the object and its metadata intact for future use.
Note
When this option is enabled, a Truncate button appears in the list of edit buttons within the custom object setup page.
Truncating custom objects is a quick way to permanently delete all of the records from a custom object, for example, if a custom object has been created and filled with test records. When testing is complete and the test data is no longer required, you can truncate the object to remove the test records, but keep the object ready to be deployed into production. This is much quicker than batch-deleting records and having to recreate the custom object.
Note
Truncating a custom object permanently removes all of its records, and you cannot recover the records from the Recycle Bin. A copy of the truncated object appears in the Deleted Objects list for 15 days, during which the object and its records continue to count towards the organization data limits. The copied object and its records are then permanently deleted after 15 days.
Advanced settings provides the activation of two features, namely the activation of Extended Mail Merge and the option to Always save Extended Mail Merge documents to the Documents tab.
Note
The Advanced settings option appears when your organization has enabled Extended Mail Merge, currently available by request to Salesforce customer support.
Activate Extended Mail Merge
This option enables the Mass Mail Merge link to be available in the
Tools area on the home pages for accounts, contacts, and leads.
When enabled, this option also sets single mail merges requested from the Activity History related list on a record to be created with the Extended Mail Merge function. The Extended Mail Merge function is activated using a wizard comprising of the following steps:
In the Tools area, click on Mass Mail Merge to start the mass mail merge wizard. Choose a list view from the View drop-down list and select the records to include in the mail merge. Selecting the checkbox in the column header will select all records currently displayed on the page.
Select the types of Word documents to generate from the multiple selections of documents, envelopes, and labels. Select the optional Log an activity... checkbox to log the creation of these mail merge documents, which adds a completed task to each record.
Select the appropriate mail merge templates. For documents, choose whether to create one Word document that includes all the outputs or a separate Word document for each record. Click on the optional Preview Template button to review the preloaded mail merge template.
Although the document preview is editable, do not edit in Word as the changes will not be saved to your current mail merge request. You have to make a new mail merge template and upload this first.
Note
With Extended Mail Merge, the mail merge operation cannot exceed 1000 records; the selected mail merge template's total size cannot be greater than 1 Mbytes, and the number of records multiplied by the combined size of the mail merge templates cannot be greater than 50 Mbytes.
Also, Extended Mail Merge is available by sending a request to Salesforce customer support.
Always save Extended Mail Merge documents to the Documents tab
This option stops the sending of the mail merge documents as e-mail attachments, and instead stores them in the user's personal documents folder on the Documents tab. Users are still sent e-mails as confirmation when their mail merge requests have completed, and these e-mails contain links to the documents in the Documents tab.
Note
These documents count against your organization's storage limits.
The Salesforce user interface includes pop-up windows, therefore, pop-up blockers must be disabled for the Salesforce domain.
A way to check that a user's browser allows pop-up windows is as follows:
Click on Your Name | Setup | My Personal Information | Reminders, and then click on Preview Reminder Alert.


 Free Chapter